Pierce Co-Immunoprecipitation (Co-IP) Kit
Pierce Co-Immunoprecipitation (Co-IP) Kit
Pierce Co-Immunoprecipitation (Co-IP) Kit

Create successful ePaper yourself
Turn your PDF publications into a flip-book with our unique Google optimized e-Paper software.
INSTRUCTIONS<br />
<strong>Pierce</strong> ® <strong>Co</strong>-<strong>Immunoprecipitation</strong><br />
(<strong>Co</strong>-<strong>IP</strong>) <strong>Kit</strong><br />
26149<br />
Number Description<br />
26149 <strong>Pierce</strong> <strong>Co</strong>-<strong>Immunoprecipitation</strong> (<strong>Co</strong>-<strong>IP</strong>) <strong>Kit</strong>, contains sufficient reagents to perform 50 reactions<br />
using 25µL of immobilized antibody support<br />
<strong>Kit</strong> <strong>Co</strong>ntents:<br />
AminoLink ® Plus <strong>Co</strong>upling Resin, 2mL of settled resin supplied as a 50% slurry (e.g., 100µL of 50%<br />
slurry is equivalent to 50µL of settled resin)<br />
<strong>Co</strong>upling Buffer (20X), 25mL, when diluted results in 0.01M sodium phosphate, 0.15M NaCl; pH 7.2<br />
Sodium Cyanoborohydride Solution (5M), 0.5mL<br />
Quenching Buffer, 50mL, 1M Tris•HCl<br />
Wash Solution, 60mL, 1M NaCl<br />
<strong>IP</strong> Lysis/Wash Buffer, 2 × 50mL, 0.025M Tris, 0.15M NaCl, 0.001M EDTA, 1% NP-40,<br />
5% glycerol; pH 7.4<br />
Modified Dulbecco’s PBS (20X), 25mL, when diluted results in 0.008M sodium phosphate,<br />
0.002M potassium phosphate, 0.14M sodium chloride and 0.01M KCl; pH 7<br />
<strong>Co</strong>nditioning Buffer (100X), 5mL, neutral pH buffer<br />
Elution Buffer, 50mL, pH 2.8, contains primary amine<br />
Lane Marker Sample Buffer, Non-reducing, (5X), 5mL, 0.3M Tris•HCl, 5% SDS, 50% glycerol,<br />
lane marker tracking dye; pH 6.8<br />
<strong>Pierce</strong> Spin <strong>Co</strong>lumns – Screw Cap, 100 each<br />
Microcentrifuge <strong>Co</strong>llection Tubes, 2mL, 100 each<br />
Microcentrifuge Sample Tubes, 1.5mL, 50 each<br />
<strong>Pierce</strong> <strong>Co</strong>ntrol Agarose Resin (crosslinked 4% beaded agarose), 2mL of settled resin supplied as a<br />
50% slurry (e.g., 100µL of 50% slurry is equivalent to 50µL of settled resin)<br />
Introduction<br />
Storage: Upon receipt store at 4°C. Product shipped at ambient temperature.<br />
The Thermo Scientific <strong>Pierce</strong> <strong>Co</strong>-<strong>Immunoprecipitation</strong> (<strong>Co</strong>-<strong>IP</strong>) <strong>Kit</strong> enables isolation of native protein complexes from a<br />
lysate or other complex mixture by directly immobilizing purified antibodies onto an agarose support. <strong>Co</strong>-<strong>IP</strong> is a common<br />
approach to study protein:protein interactions that uses an antibody to immunoprecipitate the antigen (bait protein) and coimmunoprecipitate<br />
any interacting proteins (prey proteins). Traditional co-<strong>IP</strong> methods that use Protein A or G result in coelution<br />
of the antibody heavy and light chains that may co-migrate with relevant bands, masking important results. The <strong>Pierce</strong><br />
<strong>Co</strong>-<strong>IP</strong> <strong>Kit</strong> resolves this issue by covalently coupling antibodies onto an amine-reactive resin. The kit includes optimized<br />
buffers for protein binding and recovery, reagents to perform control experiments and efficient spin columns and collection<br />
tubes, which shorten the protocol and minimize handling and mixing.<br />
<strong>Pierce</strong> Biotechnology PO Box 117 (815) 968-0747 www.thermoscientific.com/pierce<br />
3747 N. Meridian Road Rockford, lL 61105 USA (815) 968-7316 fax<br />
2181.6
Important Product Information<br />
• Perform all resin centrifugation steps for 30-60 seconds at low speed (i.e., 1000-3000 × g). Centrifuging at speeds greater<br />
than 5000 × g may cause the resin to clump and make resuspension difficult.<br />
• When centrifuging spin columns, the flow-through volume should not exceed 600µL when using a 2mL collection tube<br />
and 300µL when using a 1.5mL collection tube. Exceeding these volumes can cause back pressure in the column and<br />
incomplete washing or elution.<br />
• Primary amines (e.g., Tris, glycine) in the antibody solution will compete for coupling sites on the resin. Remove<br />
primary amines before antibody immobilization using Thermo Scientific Zeba Spin Desalting <strong>Co</strong>lumns or Slide-A-Lyzer<br />
Dialysis Cassettes.<br />
• Gelatin or carrier proteins in the antibody solution will compete for coupling sites on the resin. Remove gelatin and<br />
carrier proteins using the Thermo Scientific <strong>Pierce</strong> Antibody Clean-up <strong>Kit</strong> (Product No. 44600) or by performing Protein<br />
A/G purification (Product No. 20423) and dialysis.<br />
• To reduce nonspecific protein binding in immunoprecipitations, pre-clear the lysate using the <strong>Co</strong>ntrol Agarose Resin or<br />
add Thermo Scientific Surfact-Amps X-100 (10% Triton ® X-100, Product No. 28314) to the Modified Dulbecco’s PBS<br />
at 0.1-1%. Note: Surfact-Amps ® X-100 is not supplied with the kit.<br />
• The <strong>IP</strong> Lysis/Wash Buffer has been tested on representative cell types including but not limited to the following cell<br />
lines: HeLa, Jurkat, A431, A549, MOPC, NIH 3T3 and U2OS. Typically, 10 6 HeLa cells yield ~10 mg of cell pellet and<br />
~3µg/µL (or 300µg) when lysed with 100µL of <strong>IP</strong> Lysis/Wash Buffer.<br />
• For best results, add Thermo Scientific Halt Protease (Product No. 78430) and Phosphatase (Product No. 78428)<br />
Inhibitor <strong>Co</strong>cktails to minimize degradation and dephosphorylation of cell lysate proteins. These inhibitors are also<br />
available as a combined cocktail (Product No. 78440). See the Related Thermo Scientific Products Section for more<br />
information.<br />
• The <strong>IP</strong> Lysis/Wash Buffer and Elution Buffer are compatible with the Thermo Scientific <strong>Pierce</strong> BCA Protein Assay<br />
(Product No. 23225).<br />
• Proper controls are vital for identifying relevant interactions. The supplied <strong>Pierce</strong> <strong>Co</strong>ntrol Agarose Resin is composed of<br />
the same support material as the AminoLink Plus <strong>Co</strong>upling Resin but is not amine-reactive. This resin provides an<br />
excellent negative control.<br />
• The <strong>Pierce</strong> Spin <strong>Co</strong>lumns package includes columns, screw caps, plugs, Luer-Lok ® Adapter Caps, large frits and a large<br />
frit tool. The large frit is not needed for the standard <strong>IP</strong> protocol. When scaling-up the <strong>IP</strong> reaction (i.e., > 200µL of<br />
resin), the large frit can be inserted to facilitate washing. The Luer-Lok Caps have a flip top that may be used during<br />
wash steps. Use the screw caps for sealing the spin columns during storage. (See the Additional Information Section.)<br />
• The <strong>Pierce</strong> <strong>Co</strong>-<strong>Immunoprecipitation</strong> <strong>Kit</strong> can be scaled as needed. For optimal results, perform co-<strong>IP</strong> reactions with resin,<br />
antibody, elution and wash quantities indicated in Table 1. These conditions result in a coupling efficiency of ~95% after<br />
2 hours. <strong>Co</strong>upling efficiency can be approximated by measuring the absorbance of the antibody solution at 280nm before<br />
and after coupling.<br />
Table 1. Amounts of antibody, coupling resin, wash buffer and elution buffer to use.<br />
Additional Material Required<br />
<strong>Co</strong>upling Resin<br />
Volume (µL)<br />
Antibody<br />
Wash<br />
Amount (µg) (volume of 50% slurry) Volume (µL)<br />
250-1000 100 (200) 400 100-150<br />
75-250 50 (100) 300 75-100<br />
10-75 25 (50) 200 50-75<br />
≤ 10 10 (20) 200 50<br />
• Microcentrifuge collection tubes, 2mL<br />
<strong>Pierce</strong> Biotechnology PO Box 117 (815) 968-0747 www.thermoscientific.com/pierce<br />
3747 N. Meridian Road Rockford, lL 61105 USA (815) 968-7316 fax<br />
2<br />
Elution Buffer<br />
Volume (µL)
Procedure for <strong>Co</strong>-<strong>Immunoprecipitation</strong><br />
A. Antibody Immobilization<br />
Note: The following protocol is for coupling 10-75µg of affinity-purified antibody in a solution free of amines and<br />
carrier proteins (see the Important Product Information Section). Scale this protocol as needed; see Table 1 in the<br />
Important Product Information Section for suggested antibody and resin volumes.<br />
1. Equilibrate the AminoLink Plus <strong>Co</strong>upling Resin and reagents to room temperature.<br />
2. Prepare 2mL of 1X <strong>Co</strong>upling Buffer for each co-<strong>IP</strong> reaction by diluting the 20X <strong>Co</strong>upling Buffer with ultrapure water.<br />
3. Gently swirl the bottle of AminoLink Plus <strong>Co</strong>upling Resin to obtain an even suspension. Using a wide-bore or cut<br />
pipette tip, add 50µL of the resin slurry into a <strong>Pierce</strong> Spin <strong>Co</strong>lumn. Place column into a microcentrifuge tube and<br />
centrifuge at 1000 × g for 1 minute. Discard the flow-through.<br />
4. Wash resin twice by adding 200µL of 1X <strong>Co</strong>upling Buffer, centrifuge and discard the flow-through.<br />
5. Gently tap the bottom of the spin column on a paper towel to remove any excess liquid and insert the bottom plug.<br />
6. Prepare 10-75µg of affinity-purified antibody for coupling by adjusting the volume to 200µL, using sufficient ultrapure<br />
water and 20X <strong>Co</strong>upling Buffer to produce 1X <strong>Co</strong>upling Buffer. For example add 10µL of 20X <strong>Co</strong>upling Buffer, 180µL<br />
of ultrapure water and 10µL of antibody at 1µg/1µL. Add the ultrapure water, 20X <strong>Co</strong>upling Buffer and affinity-purified<br />
antibody directly to the resin in the spin column.<br />
7. In a fume hood, add 3µL of the Sodium Cyanoborohydride Solution for every 200µL of reaction volume.<br />
Note: Sodium cyanoborohydride is highly toxic. Wear gloves and use caution when handling.<br />
8. Attach the screw cap to the column and incubate on a rotator or mixer at room temperature for 90-120 minutes, ensuring<br />
that the slurry remains suspended during incubation.<br />
9. Remove and retain the bottom plug and loosen the screw cap. Place the spin column into a collection tube and centrifuge.<br />
Save the flow-through to verify antibody coupling.<br />
10. Remove the screw cap, add 200µL of 1X <strong>Co</strong>upling Buffer, centrifuge and discard the flow-through. Repeat this step<br />
once.<br />
11. Add 200µL of Quenching Buffer to the column, centrifuge and discard the flow-through.<br />
12. Tap the bottom of the column on a paper towel to remove excess liquid and insert the bottom plug. Add 200µL of<br />
Quenching Buffer to the resin.<br />
13. In a fume hood, add 3µL of Sodium Cyanoborohydride Solution and attach the screw cap. Incubate for 15 minutes with<br />
gentle shaking or end-over-end mixing.<br />
14. Remove plug and loosen the screw cap. Place spin column in a collection tube, centrifuge and discard the flow-through.<br />
15. Remove screw cap, wash the resin twice with 200µL of 1X <strong>Co</strong>upling Buffer, centrifuging after each wash.<br />
16. Wash the resin six times with 150µL of Wash Solution, centrifuging after each wash.<br />
17. Either proceed to cell lysis and co-<strong>IP</strong> or, if storing the resin, proceed to the next step.<br />
18. Wash the resin twice with 200µL of 1X <strong>Co</strong>upling Buffer, centrifuging after each wash.<br />
19. Tap the column on a paper towel to remove excess liquid and place plug in bottom of spin column. Add 200µL of 1X<br />
<strong>Co</strong>upling Buffer, attach the screw cap and store column at 4°C. For long-term storage, add sodium azide to a final<br />
concentration of 0.02%.<br />
B. Mammalian Cell Lysis<br />
Protocol I: Lysis of Cell Monolayer (Adherent) Cultures<br />
1. Carefully remove culture medium from cells.<br />
2. Wash the cells once with 1X Modified Dulbecco’s PBS.<br />
3. Add ice-cold <strong>IP</strong> Lysis/Wash Buffer (Table 2) to the cells. Incubate on ice for 5 minutes with periodic mixing.<br />
<strong>Pierce</strong> Biotechnology PO Box 117 (815) 968-0747 www.thermoscientific.com/pierce<br />
3747 N. Meridian Road Rockford, lL 61105 USA (815) 968-7316 fax<br />
3
Table 2. Suggested volume of <strong>IP</strong> Lysis/Wash Buffer to use for different<br />
standard culture plates.<br />
Plate Size/Surface Area Volume of <strong>IP</strong> Lysis/Wash Buffer<br />
100 × 100 mm 500-1,000µL<br />
100 × 60 mm 250-500µL<br />
6-well plate 200-400µL per well<br />
24-well plate 100-200µL per well<br />
4. Transfer the lysate to a microcentrifuge tube and centrifuge at ~ 13,000 × g for 10 minutes to pellet the cell debris.<br />
5. Transfer supernatant to a new tube for protein concentration determination and further analysis.<br />
Protocol II: Lysis of Cell Suspension Cultures<br />
1. Centrifuge the cell suspension at 1000 × g for 5 minutes to pellet the cells. Discard the supernatant.<br />
2. Wash cells once by suspending the cell pellet in PBS. Centrifuge at 1000 × g for 5 minutes to pellet cells.<br />
3. Add ice-cold <strong>IP</strong> Lysis/Wash Buffer to the cell pellet. Use 500µL of <strong>IP</strong> Lysis/Wash Buffer per 50 mg of wet cell pellet (i.e.,<br />
10:1 v/w). If using a large amount of cells, first add 10% of the final volume of <strong>IP</strong> Lysis/Wash Buffer to the cell pellet and<br />
pipette the mixture up and down to mix. Add the remaining volume of <strong>IP</strong> Lysis/Wash Buffer to the cell suspension.<br />
4. Incubate lysate on ice for 5 minutes with periodic mixing. Remove cell debris by centrifugation at ~ 13,000 × g for<br />
10 minutes. Transfer supernatant to a new tube for protein concentration determination and further analysis.<br />
C. Pre-clear lysate using the <strong>Co</strong>ntrol Agarose Resin<br />
1. For 1mg of lysate, add 80μL of the <strong>Co</strong>ntrol Agarose Resin slurry (40μL of settled resin) into a spin column.<br />
2. Centrifuge column to remove storage buffer.<br />
3. Add 100μL of 1X <strong>Co</strong>upling Buffer to the column, centrifuge and discard the flow-through.<br />
4. Add 1mg of lysate to the column containing the resin and incubate at 4ºC for 30 minutes to 1 hour with gentle end-overend<br />
mixing.<br />
5. Centrifuge column at 1000 × g for 1 minute. Discard the column containing the resin and save the flow-through, which<br />
will be added to the immobilized antibody for the co-<strong>IP</strong>.<br />
D. <strong>Co</strong>-<strong>IP</strong><br />
• Perform all co-<strong>IP</strong> steps at 4°C unless otherwise indicated.<br />
• The amount of bait:prey complex required and incubation time depends upon the system used and the affinity of the<br />
antibody, bait and prey interactions and must be optimized for each system.<br />
• The protocol uses the <strong>IP</strong> Lysis/Wash Buffer for coupling and washing the immune complex. The 20X Modified<br />
Dulbecco’s PBS is supplied in the kit as an alternative binding/wash buffer. Use this buffer for complexes that might be<br />
disrupted by detergents. For each co-<strong>IP</strong> reaction, prepare 2mL of 1X Modified Dulbecco’s PBS by diluting with<br />
ultrapure water.<br />
1. Mix the bait and prey proteins (if separate) and prepare appropriate experimental controls.<br />
2. Dilute the bait:prey protein mixture and controls in <strong>IP</strong> Lysis/Wash Buffer, or other suitable buffer. Recommended total<br />
sample volume in the spin column is 100-500µL.<br />
3. Wash the resin twice by adding 200µL of <strong>IP</strong> Lysis/Wash Buffer to the spin column containing the antibody-coupled<br />
resin, centrifuge and discard the flow-through.<br />
4. Gently tap the bottom of the spin column on a paper towel to remove excess liquid and insert the bottom plug.<br />
5. Add the bait:prey protein mixture and controls to the appropriate resin. Attach cap and incubate with gentle mixing or<br />
rocking for 1-2 hours or overnight at 4ºC.<br />
Note: It may be necessary to optimize the binding time for each application. For large sample volumes, transfer the<br />
antibody-coupled resin to a separate tube containing the protein complex. After incubation, centrifuge 0.5mL aliquots<br />
through the spin cup until the entire sample has been processed.<br />
<strong>Pierce</strong> Biotechnology PO Box 117 (815) 968-0747 www.thermoscientific.com/pierce<br />
3747 N. Meridian Road Rockford, lL 61105 USA (815) 968-7316 fax<br />
4
6. Remove the bottom plug, loosen the screw cap and place the column in a collection tube. Centrifuge the spin columns.<br />
Save the flow-through for future analysis.<br />
7. Remove the screw cap, place the column into a new tube, add 200µL of <strong>IP</strong> Lysis/Wash Buffer and centrifuge.<br />
8. Wash the sample two more times with 200µL <strong>IP</strong> Lysis/Wash Buffer and centrifuge after each wash.<br />
Note: Evaluate the washes (e.g., A280, SDS-PAGE or Thermo Scientific Micro BCA Protein Assay) to determine the<br />
optimal number of washes for the specific system. There should be no protein in the final wash fraction. Additional<br />
washes might be necessary for samples containing high protein concentrations.<br />
Optional Wash: To improve elution, perform an additional wash with 100µL of 1X <strong>Co</strong>nditioning Buffer. This buffer<br />
contains low salt and minimal buffer; therefore, test the flow-through to confirm that the bait:prey complex remained intact.<br />
E. Elution of <strong>Co</strong>-<strong>IP</strong><br />
Note: If the protein or antibody is sensitive to low pH, use a neutral pH system (i.e., Thermo Scientific Gentle Elution Buffer,<br />
Product No. 21027). For downstream enzymatic or functional assays, add 5µL of 1M Tris, pH 9.5 to the collection tube, which<br />
will neutralize the pH of the Elution Buffer upon centrifugation.<br />
1. Place the spin column into a new collection tube. Add 10µL of Elution Buffer and centrifuge.<br />
2. Keep the column in the tube and add 50µL of Elution Buffer. Incubate for 5 minutes at room temperature. The column<br />
does not need to be closed or mixed.<br />
Note: For a more concentrated eluate, use less Elution Buffer; however, overall yield may be reduced.<br />
3. Centrifuge the tube and collect the flow-through. Analyze the flow-through for protein. Perform additional elutions (i.e.,<br />
Steps E1-E3) as needed. Analyze each flow-through fraction separately to ensure that the antigen has completely eluted.<br />
4. To preserve activity of the antibody-coupled resin, immediately proceed to Section F, Resin Regeneration and Storage.<br />
F. Resin Regeneration and Storage<br />
1. Add 100µL of 1X <strong>Co</strong>upling Buffer to the spin column, centrifuge and discard the flow-through. Repeat this step once.<br />
2. Replace the bottom plug on the spin column. Add 200µL of 1X <strong>Co</strong>upling Buffer to spin column. Replace screw cap.<br />
Wrap the bottom of the tube with laboratory film to prevent resin from drying. For long-term storage (i.e., > 2 weeks)<br />
add sodium azide at a final concentration of 0.02%.<br />
G. Sample Preparation for SDS-PAGE Analysis<br />
1. Equilibrate the 5X Lane Marker Sample Buffer to room temperature. Gently mix the sample buffer by inverting 5-<br />
10 times. For a reducing gel, add 1M DTT to a final concentration of 100mM in the 5X Sample Buffer.<br />
2. Add 5X Sample Buffer to sample to make a 1X final solution (i.e., add 5µL 5X Sample Buffer to 20µL of sample).<br />
3. Heat the sample at 95-100°C for ~5 minutes. Allow the sample to cool to room temperature before applying to the gel.<br />
<strong>Pierce</strong> Biotechnology PO Box 117 (815) 968-0747 www.thermoscientific.com/pierce<br />
3747 N. Meridian Road Rockford, lL 61105 USA (815) 968-7316 fax<br />
5
Troubleshooting<br />
Problem Possible Cause Solution<br />
Antibody is detected<br />
with the eluted protein<br />
complex<br />
Proteins are detected in<br />
the negative control<br />
resin experiment<br />
Bait protein is not<br />
captured from sample<br />
Bait protein is not<br />
captured from sample<br />
Bait protein is captured<br />
but no interacting prey<br />
proteins are detected<br />
Resin leaks from the<br />
spin column<br />
Non-coupled antibody was not removed<br />
sufficiently with the Wash Solution<br />
during the coupling procedure<br />
A reducing agent was added to the<br />
antibody-coupled resin during the <strong>IP</strong> or<br />
elution steps, which eluted antibody<br />
fragments not directly linked to the resin<br />
Proteins bind nonspecifically to the<br />
coupling resin<br />
An insufficient amount of antibody is<br />
coupled to the resin causing low protein<br />
binding<br />
Antibody does not recognize native bait<br />
protein (common with antibodies made<br />
against peptides)<br />
<strong>Pierce</strong> Biotechnology PO Box 117 (815) 968-0747 www.thermoscientific.com/pierce<br />
3747 N. Meridian Road Rockford, lL 61105 USA (815) 968-7316 fax<br />
6<br />
Wash the antibody-coupled resin with Elution<br />
Buffer until no additional antibody elutes from the<br />
resin (as determined by protein assay or A280)<br />
Use buffers that do not contain reducing agents<br />
(i.e., DTT or β-mercaptoethanol)<br />
Increase the number of washes before eluting or<br />
add Triton X-100 to the co-<strong>IP</strong> buffer to decrease<br />
nonspecific binding<br />
Pre-adsorb sample to the <strong>Co</strong>ntrol Resin before<br />
performing the co-<strong>IP</strong>*<br />
Check flow-through and wash fractions to verify<br />
that antibody is coupled to the resin<br />
Perform a sample-buffer elution of the resin to<br />
evaluate antibody coupling (see the Additional<br />
Information Section)<br />
Increase antibody amount to ensure that sufficient<br />
antibody is coupled to the resin<br />
Use a more sensitive detection method<br />
Use a different antibody<br />
Antibody is sensitive to amine coupling Increase antibody amount, reduce coupling time or<br />
try a different antibody<br />
The bait protein does not elute from the<br />
antibody using acidic conditions<br />
Protein:protein interactions are weak and<br />
cannot withstand the washing protocol<br />
Antibody binds only to the noncomplexed<br />
protein because of shared<br />
binding sites or conformational changes<br />
<strong>Co</strong>-<strong>IP</strong> buffer conditions do not promote<br />
protein:protein interaction<br />
There is no protein complex involving the<br />
bait protein<br />
Frit was displaced from bottom of spin<br />
column<br />
Optimize the elution conditions (see Tech Tip #27<br />
on our website)<br />
Use a different wash buffer or a slower<br />
centrifugation speed<br />
Use a crosslinker to reinforce weak or transient<br />
interactions<br />
Use an antibody that recognizes a different epitope<br />
on the bait protein<br />
Specific ions, cofactors, etc. might be required to<br />
promote the interactions<br />
None<br />
When placing plug in the column, tap the bottom<br />
of the spin column on a paper towel to remove<br />
excess liquid − liquid present below the frit can<br />
produce back pressure and frit displacement when<br />
the bottom plug is inserted<br />
*Interacting protein might be obscured in the gel analysis by nonspecific protein bands. Incubating the sample with <strong>Co</strong>ntrol<br />
Resin to capture proteins that bind to the resin before performing the co-<strong>IP</strong> reaction can eliminate this interference.
Additional Information<br />
A. <strong>Co</strong>ntrol Experiments<br />
When the co-<strong>IP</strong> results are analyzed by SDS-PAGE, several protein bands may appear, indicating possible interacting<br />
proteins; however, these bands may also be caused by nonspecific interactions with the resin matrix. Use of proper controls is<br />
vital for identifying relevant interactions. This kit provides the necessary components to perform several types of controls.<br />
Any of the following controls may be performed along side the co-<strong>IP</strong>. When results are analyzed by SDS-PAGE, bands that<br />
appear in both the co-<strong>IP</strong> and control lanes represent nonspecific interactions and may be disregarded.<br />
• <strong>Co</strong>ntrol Resin: The supplied <strong>Co</strong>ntrol Resin is composed of the same support material as the co-<strong>IP</strong> resin, but it is not<br />
activated. This resin provides an excellent negative control when processed the same as the Antibody <strong>Co</strong>upling resin.<br />
• Quenched Antibody <strong>Co</strong>upling Resin: Create a quenched resin control by adding 200µL of Quenching Buffer to the<br />
Antibody <strong>Co</strong>upling Resin instead of the antibody and continue with the standard procedure.<br />
• Non-relevant antibody: <strong>Co</strong>uple an unrelated antibody to the Antibody <strong>Co</strong>upling Resin and continue with the standard<br />
procedure.<br />
B. Sample-buffer elution<br />
To troubleshoot if the antibody is coupled to the gel, perform an elution using the sample buffer. This elution method<br />
may also be used if you are certain that antibody fragments will not interfere with Western blot target detection.<br />
1. Prepare 50µL of 2X Non-reducing Lane Marker Sample Buffer (i.e., dilute the 5X sample buffer to 2X with ultrapure<br />
water) and add DTT to a final concentration of 20mM. Place the spin column containing the resin into a new collection<br />
tube and add the 2X reducing sample buffer.<br />
2. Keep the column unplugged and in the collection tube, and incubate at 100ºC for 5-10 minutes. Centrifuge tube to collect<br />
eluate. Allow the sample to cool to room temperature before performing the SDS-PAGE.<br />
Note: After heating the resin with SDS sample buffer, the resin cannot be reused and must be discarded.<br />
C. Additional Applications<br />
• Using prey and bait proteins from different samples: In addition to studying native protein complexes, this kit can be<br />
used for co-<strong>IP</strong> using a bait protein from one sample and a prey protein from another sample. In this case, the bait and<br />
prey proteins are co-purified after they are allowed to interact in solution, or the bait protein is coupled directly to the<br />
antibody coupling resin and then used to capture the prey protein. When the bait and prey proteins exist in separate<br />
samples a different control experiment may be used; the prey protein may be incubated with the antibody-coupled resin<br />
in the absence of bait protein. Because the prey protein should not bind in the absence of bait protein, any protein bands<br />
recovered in this control experiment can be considered a nonspecific interaction and disregarded.<br />
• Protein:protein interaction disruption: Attempts to disrupt protein:protein interactions are often performed. The<br />
ability to disrupt a complex indicates the degree of specificity to the interaction and provides some insight into the mode<br />
of interaction of the two proteins. Disrupting a protein complex is often accomplished by increasing the ionic strength of<br />
the buffer, adding a detergent to the buffer or removing a cofactor that is required for the binding interaction.<br />
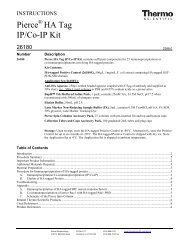
D. <strong>Pierce</strong> Spin <strong>Co</strong>lumns<br />
<strong>Pierce</strong> Spin <strong>Co</strong>lumns can hold up to 900μL. <strong>Co</strong>lumns can be placed in 1.5mL or 2mL microcentrifuge tubes or used with a<br />
Luer-lok Adapter (see Figure 1) for processing samples with a syringe. When using a syringe, sample size and wash volumes<br />
are only limited by the volume capacity of the syringe. For small volumes of resin, use columns with only the small, preinserted<br />
frit (Figure 2A). For applications requiring more than 100µL of resin, the large frit may be used at either the top or<br />
bottom (Figure 2B and 2C). Resins may be used repeatedly when the resin is in-between the small and large frit (Figure 2B).<br />
• To remove a frit from a column, use an unfolded paper clip and insert the wire through the column tip and push the frit.<br />
• To insert a frit, place the frit inside the column and use the frit tool to push the frit into position.<br />
• To remove the top frit from an already-packed column with a top and bottom frit, use an unfolded paper clip to tip the<br />
top frit up. The top frit can be then removed with tweezers.<br />
<strong>Pierce</strong> Biotechnology PO Box 117 (815) 968-0747 www.thermoscientific.com/pierce<br />
3747 N. Meridian Road Rockford, lL 61105 USA (815) 968-7316 fax<br />
7
Figure 1. Schematic of the <strong>Pierce</strong> Spin <strong>Co</strong>lumn contents. Figure 2. Three formats for frit placement.<br />
E. Information available from our website<br />
• Tech Tip #27: Optimize elution conditions for immunoaffinity purification<br />
• Tech Tip #43: Protein stability and storage<br />
• Tech Tip #40: <strong>Co</strong>nvert between times gravity (× g) and centrifuge rotor speed (RPM)<br />
Related Thermo Scientific Products<br />
78428 Halt Phosphatase Inhibitor Single-Use <strong>Co</strong>cktail (100X), 100µL × 24 microtubes<br />
78440 Halt Protease and Phosphatase Inhibitor <strong>Co</strong>cktail (100X), 1mL<br />
78430 Halt Protease Inhibitor Single-Use <strong>Co</strong>cktail (100X), 24 × 100µL<br />
69705 <strong>Pierce</strong> Spin <strong>Co</strong>lumns – Screw Cap, 25/pkg<br />
69720 <strong>Pierce</strong> Microcentrifuge Tubes, 2mL, 72/pkg<br />
69715 <strong>Pierce</strong> Microcentrifuge Tubes, 1.5mL, 72/pkg<br />
89879 <strong>Pierce</strong> Micro-Spin <strong>Co</strong>lumns, 50/pkg<br />
28314 Surfact-Amps X-100 (10% solution of Triton X-100), 6 × 10mL<br />
20291 DTT No-Weigh Format, 48 microtubes each containing 7.7mg<br />
39001 Lane Marker Sample Buffer, Non-Reducing (5X), 5mL<br />
21027 Gentle Ag/Ab Elution Buffer, pH 6.6, 500mL<br />
28374 BupH Modified Dulbecco’s Phosphate Buffered Saline Packs, 40 packs<br />
21004 IgG Elution Buffer, 1L<br />
26150 <strong>Pierce</strong> <strong>Co</strong>ntrol Agarose Resin, 10mL<br />
Triton is a trademark of Rohm & Haas.<br />
Luer-Lok is a trademark of Becton, Dickinson and <strong>Co</strong>mpany.<br />
This product (“Product”) is warranted to operate or perform substantially in conformance with published Product specifications in effect at the time of sale,<br />
as set forth in the Product documentation, specifications and/or accompanying package inserts (“Documentation”) and to be free from defects in material and<br />
workmanship. Unless otherwise expressly authorized in writing, Products are supplied for research use only. No claim of suitability for use in applications<br />
regulated by FDA is made. The warranty provided herein is valid only when used by properly trained individuals. Unless otherwise stated in the<br />
Documentation, this warranty is limited to one year from date of shipment when the Product is subjected to normal, proper and intended usage. This<br />
warranty does not extend to anyone other than the original purchaser of the Product (“Buyer”).<br />
No other warranties, express or implied, are granted, including without limitation, implied warranties of merchantability, fitness for any particular<br />
purpose, or non infringement. Buyer’s exclusive remedy for non-conforming Products during the warranty period is limited to replacement of or<br />
refund for the non-conforming Product(s).<br />
There is no obligation to replace Products as the result of (i) accident, disaster or event of force majeure, (ii) misuse, fault or negligence of or by Buyer, (iii)<br />
use of the Products in a manner for which they were not designed, or (iv) improper storage and handling of the Products.<br />
Current product instructions are available at www.thermoscientific.com/pierce. For a faxed copy, call 800-874-3723 or contact your local distributor.<br />
© 2011 Thermo Fisher Scientific Inc. All rights reserved. Unless otherwise indicated, all trademarks are property of Thermo Fisher Scientific Inc. and its<br />
subsidiaries. Printed in the USA.<br />
<strong>Pierce</strong> Biotechnology PO Box 117 (815) 968-0747 www.thermoscientific.com/pierce<br />
3747 N. Meridian Road Rockford, lL 61105 USA (815) 968-7316 fax<br />
8