Water Specialist 1.5", 2" and 2L Control Valve ... - ClackValves.Net
Water Specialist 1.5", 2" and 2L Control Valve ... - ClackValves.Net
Water Specialist 1.5", 2" and 2L Control Valve ... - ClackValves.Net

You also want an ePaper? Increase the reach of your titles
YUMPU automatically turns print PDFs into web optimized ePapers that Google loves.
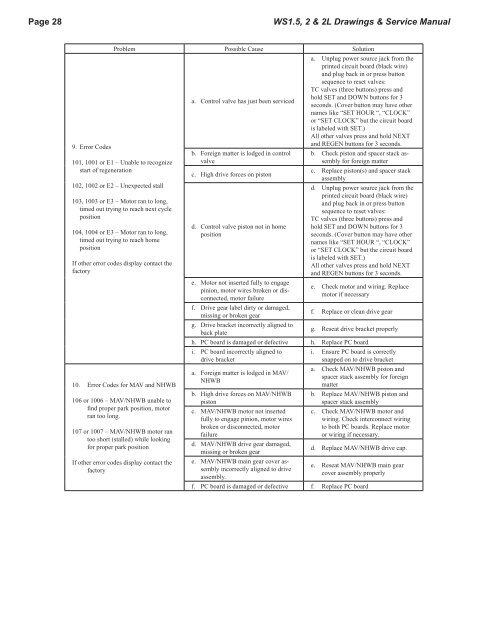
Page 28 WS1.5, 2 & <strong>2L</strong> Drawings & Service Man u al<br />
9. Error Codes<br />
Problem Possible Cause Solution<br />
101, 1001 or E1 – Unable to recognize<br />
start of regeneration<br />
102, 1002 or E2 – Unexpected stall<br />
103, 1003 or E3 – Motor ran to long,<br />
timed out trying to reach next cycle<br />
position<br />
104, 1004 or E3 – Motor ran to long,<br />
timed out trying to reach home<br />
position<br />
If other error codes display contact the<br />
factory<br />
10. Error Codes for MAV <strong>and</strong> NHWB<br />
106 or 1006 – MAV/NHWB unable to<br />
fi nd proper park position, motor<br />
ran too long.<br />
107 or 1007 – MAV/NHWB motor ran<br />
too short (stalled) while looking<br />
for proper park position<br />
If other error codes display contact the<br />
factory<br />
a. <strong>Control</strong> valve has just been serviced<br />
b. Foreign matter is lodged in control<br />
valve<br />
c. High drive forces on piston<br />
d. <strong>Control</strong> valve piston not in home<br />
position<br />
e. Motor not inserted fully to engage<br />
pinion, motor wires broken or disconnected,<br />
motor failure<br />
f. Drive gear label dirty or damaged,<br />
missing or broken gear<br />
g. Drive bracket incorrectly aligned to<br />
back plate<br />
a. Unplug power source jack from the<br />
printed circuit board (black wire)<br />
<strong>and</strong> plug back in or press button<br />
sequence to reset valves:<br />
TC valves (three buttons) press <strong>and</strong><br />
hold SET <strong>and</strong> DOWN buttons for 3<br />
seconds. (Cover button may have other<br />
names like “SET HOUR “, “CLOCK”<br />
or “SET CLOCK” but the circuit board<br />
is labeled with SET.)<br />
All other valves press <strong>and</strong> hold NEXT<br />
<strong>and</strong> REGEN buttons for 3 seconds.<br />
b. Check piston <strong>and</strong> spacer stack assembly<br />
for foreign matter<br />
c. Replace piston(s) <strong>and</strong> spacer stack<br />
assembly<br />
d. Unplug power source jack from the<br />
printed circuit board (black wire)<br />
<strong>and</strong> plug back in or press button<br />
sequence to reset valves:<br />
TC valves (three buttons) press <strong>and</strong><br />
hold SET <strong>and</strong> DOWN buttons for 3<br />
seconds. (Cover button may have other<br />
names like “SET HOUR “, “CLOCK”<br />
or “SET CLOCK” but the circuit board<br />
is labeled with SET.)<br />
All other valves press <strong>and</strong> hold NEXT<br />
<strong>and</strong> REGEN buttons for 3 seconds.<br />
e. Check motor <strong>and</strong> wiring. Replace<br />
motor if necessary<br />
f. Replace or clean drive gear<br />
g. Reseat drive bracket properly<br />
h. PC board is damaged or defective h. Replace PC board<br />
i. PC board incorrectly aligned to<br />
drive bracket<br />
a. Foreign matter is lodged in MAV/<br />
NHWB<br />
b. High drive forces on MAV/NHWB<br />
piston<br />
c. MAV/NHWB motor not inserted<br />
fully to engage pinion, motor wires<br />
broken or disconnected, motor<br />
failure<br />
d. MAV/NHWB drive gear damaged,<br />
missing or broken gear<br />
e. MAV/NHWB main gear cover assembly<br />
incorrectly aligned to drive<br />
assembly.<br />
i. Ensure PC board is correctly<br />
snapped on to drive bracket<br />
a. Check MAV/NHWB piston <strong>and</strong><br />
spacer stack assembly for foreign<br />
matter<br />
b. Replace MAV/NHWB piston <strong>and</strong><br />
spacer stack assembly<br />
c. Check MAV/NHWB motor <strong>and</strong><br />
wiring. Check interconnect wiring<br />
to both PC boards. Replace motor<br />
or wiring if necessary.<br />
d. Replace MAV/NHWB drive cap.<br />
e. Reseat MAV/NHWB main gear<br />
cover assembly properly<br />
f. PC board is damaged or defective f. Replace PC board