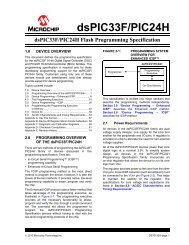
Stepper Motor Control with dsPIC DSCs - Microchip
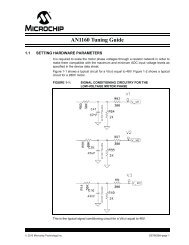
Stepper Motor Control with dsPIC DSCs - Microchip
Stepper Motor Control with dsPIC DSCs - Microchip

You also want an ePaper? Increase the reach of your titles
YUMPU automatically turns print PDFs into web optimized ePapers that Google loves.
Author: Sorin Manea<br />
<strong>Microchip</strong> Technology Inc.<br />
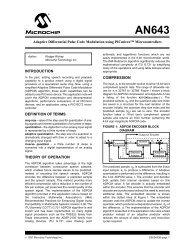
INTRODUCTION<br />
This application note describes how to drive a stepper<br />
motor <strong>with</strong> a <strong>dsPIC</strong>33F motor control family DSC.<br />
The eight PWM channels (six pins from the PWM1<br />
module and two pins from the PWM2 module) are used<br />
to control a stepper motor in all possible ways, whether<br />
it is bipolar or unipolar, using full step or microstepping,<br />
open or closed loop, <strong>with</strong>out the need for external<br />
jumpers or complicated logic circuitry.<br />
The <strong>dsPIC</strong>DEM MCSM Development Board Kit<br />
(DV330022) was used in this application note. This kit<br />
includes the <strong>dsPIC</strong>DEM MCSM Development Board,<br />
<strong>Stepper</strong> <strong>Motor</strong>, Power Supply, and Plug-in Module<br />
(PIM). The hardware topology is very simple, consisting<br />
of just the <strong>dsPIC</strong> ® DSC, the drivers and two Hbridges.<br />
Each MOSFET in the dual H-bridge is controlled<br />
by one PWM signal. The powerful PWM module<br />
of the <strong>dsPIC</strong> DSC features independent or complementary<br />
control over each of the four PWM pairs, plus an<br />
additional override function on each pin, which gives<br />
even more control over the power MOSFETs.<br />
The <strong>dsPIC</strong> DSC is used to achieve high-speed<br />
microstepping in closed loop current control. For this<br />
task, voltages higher than the motor rated voltage are<br />
needed to force the current quickly through the motor<br />
windings. These high voltages require a high PWM frequency<br />
<strong>with</strong> a synchronized ADC for fast and accurate<br />
current control. Fast timers and high processing power<br />
are also needed since one microstep can be as short<br />
as one PWM period.<br />
The <strong>dsPIC</strong>DEM MCSM Development Board was<br />
designed to work <strong>with</strong> drive voltages of up to 80V and<br />
therefore accommodate a wide range of stepper<br />
motors and driving algorithms. Since high voltages are<br />
used relative to the stepper motor rated voltage, a very<br />
fast reacting controller is needed. A PWM frequency of<br />
40 kHz was chosen to have the smallest possible reaction<br />
time. For example, having a stepper motor <strong>with</strong> 2.3<br />
ohm and 4 mH per phase driven at 80V, the current<br />
needs just 70 microseconds to reach the rated level of<br />
1.4A. This is under three PWM periods <strong>with</strong> 100% duty<br />
cycle. At 24V, 10 PWM periods (250 microseconds) are<br />
needed to reach 1.4A.<br />
FIGURE 1: <strong>dsPIC</strong>DEM MCSM DEVELOPMENT BOARD BLOCK DIAGRAM<br />
3.3V<br />
J4<br />
S1<br />
J1/J2<br />
ICD2<br />
USB<br />
POT<br />
DC_BUS<br />
<strong>Stepper</strong> <strong>Motor</strong> <strong>Control</strong> <strong>with</strong> <strong>dsPIC</strong> ® <strong>DSCs</strong><br />
<strong>dsPIC</strong>33FJXXXMCXXX<br />
PIM<br />
UART<br />
to<br />
USB<br />
Regulator<br />
3.3V<br />
24VDC<br />
PWM1H1<br />
PWM1L1<br />
PWM1H2<br />
PWM1L2<br />
PWM1H3<br />
PWM1L3<br />
PWM2H1<br />
PWM2L1<br />
FAULT<br />
J6<br />
IMOTOR1<br />
IMOTOR2<br />
Comparator<br />
Regulator<br />
15V<br />
Drivers<br />
BP1<br />
BP2<br />
Amplifier<br />
Amplifier<br />
Safe Current<br />
Level<br />
DC_BUS<br />
2009 <strong>Microchip</strong> Technology Inc. DS01307A-page 1<br />
J5<br />
J7<br />
M1<br />
M2<br />
AN1307<br />
M3<br />
M4<br />
J8<br />
M1<br />
M2<br />
M3<br />
M4<br />
M
AN1307<br />
OVERVIEW OF CONTROL<br />
TOPOLOGIES<br />
This application note discusses several operating<br />
modes for stepper motor control. The following is a<br />
summary of the control methodology used in this application<br />
note, which can be selected using simple<br />
defines in the code or in real time through DMCI:<br />
• Open Loop – Fixed Voltage<br />
• Open Loop – Fixed Current<br />
• Closed Loop Current <strong>Control</strong><br />
Each of these methods can be operated <strong>with</strong> a different<br />
granularity of voltage steps fed to the motor windings.<br />
The different granularity options available in this<br />
application note are:<br />
• Full Step Mode (1/1 Step)<br />
• Half Step Mode (1/2 Step)<br />
• Microstepping:<br />
- 1/4 Step<br />
- 1/8 Step<br />
- 1/16 Step<br />
- 1/32 Step<br />
- 1/64 Step<br />
Different decay modes are also implemented in this<br />
application note, which can also be combined <strong>with</strong> any<br />
control method and <strong>with</strong> any number of steps (full, half<br />
or microstepping). The available decay modes are:<br />
• Fixed Decay Mode, which is configurable to either<br />
slow or fast decay<br />
• Alternating Decay, which combines both slow and<br />
fast decay<br />
Decay modes are described in detail in upcoming<br />
sections of this application note.<br />
FIGURE 2: MICROSTEP GENERATION<br />
1.5<br />
1<br />
0.5<br />
0<br />
-0.5<br />
-1<br />
Quarter Step Half Step Full Step<br />
Wave Drive<br />
FULL STEP, HALF STEP AND<br />
MICROSTEP<br />
In applications where high positional accuracy and low<br />
vibrations and noise are needed, the ideal waveform<br />
for driving a stepper motor winding is a sine wave. A<br />
two-phase stepper motor is driven by two sine waves<br />
shifted 90 degrees apart driving each of the motor<br />
windings.<br />
All stepping modes are derived from the sinusoidal<br />
mode by adjusting the granularity of the driving sine<br />
wave. A full step is the largest step and it consists of<br />
90 degrees of one sine wave period. A half step represents<br />
half of that and so on. Microstepping is used<br />
to increase the rotor position resolution and to reduce<br />
vibration and noise in motor operation. With typical<br />
motors, a microstepping value of 1/32 is more than<br />
enough to achieve the best performance. Going over<br />
this point will not usually bring significant improvements<br />
to positional accuracy, although running noise<br />
may decrease. The motor inductance and drive voltage<br />
play a key role here. Lowering the motor inductance<br />
value or increasing the drive voltage will give a<br />
better resolution to smaller microsteps.<br />
A microstep table consisting of desired current or voltage<br />
levels is generated starting from a cosine, as<br />
shown in Figure 2. The x-axis is divided into evenly<br />
spaced intervals based on the desired microstep size.<br />
This application note uses a resolution of 1/64<br />
microsteps, thus resulting in a number of 256 points<br />
per period. However, in the software implementation,<br />
one cosine period is divided into 1024 points. This<br />
allows the microstep resolution to be easily increased<br />
up to 1/256 if needed. The values of the cosine at<br />
each of these time intervals is stored in a look-up<br />
table that will later be used to reconstruct the original<br />
cosine at any desired resolution. The properties of the<br />
cosine function allows us to store only the first quadrant<br />
of the function in the look-up table (256 values,<br />
one-fourth of a period), while the other three<br />
quadrants are reconstructed from this first one.<br />
-1.5<br />
1+ 1 1+<br />
1 1+ 1 1+<br />
1+<br />
¼ ½ ¼ ¼ ½ ¼ ½ ½<br />
Full Step<br />
Two-Phase ON<br />
DS01307A-page 2 2009 <strong>Microchip</strong> Technology Inc.
The values represented in the microstep table represent<br />
different things depending on the operating control<br />
mode. If the control mode is open loop voltage control,<br />
then this table represents desired voltages to be<br />
applied to each winding. If the operating mode is closed<br />
loop current control, the values in the microstep table<br />
represent current references. In both cases, the table is<br />
scaled <strong>with</strong> the maximum allowed voltage or current, as<br />
appropriate.<br />
AN1307<br />
Figure 3 shows the voltage and current waveforms for<br />
full step generation in closed loop current control. The<br />
squared line represents the voltage command. The<br />
larger signal represents the current for the commanded<br />
voltage.<br />
In Figure 4 microstepping is shown. Notice how the reference<br />
voltage has greater granularity than in Figure 3.<br />
This is because a 1/4 microstepping is used.<br />
FIGURE 3: FULL STEP MODE PHASE VOLTAGE AND PHASE CURRENT<br />
FIGURE 4: MICROSTEPPING WITH 1/4 STEP SIZE<br />
2009 <strong>Microchip</strong> Technology Inc. DS01307A-page 3
AN1307<br />
Users can change microstep granularity by changing<br />
the value of the stepSize variable. The value of this<br />
variable can range from 0 to 6, which represents the<br />
granularity detailed in Table 1.<br />
TABLE 1: STEP MODES<br />
stepSize<br />
value<br />
Step Mode<br />
Total of Steps<br />
Per Cycle<br />
0 Full Step 4<br />
1 Half Step 8<br />
2 1/4 Step 16<br />
3 1/8 Step 32<br />
4 1/16 Step 64<br />
5 1/32 Step 128<br />
6 1/64 Step 256<br />
FIGURE 5: WAVE DRIVE MODE CURRENTS<br />
FIGURE 6: TWO-PHASE ON MODE CURRENTS<br />
Note that when the value of stepSize increases, the<br />
number of microsteps also increases.<br />
When operating in Full Step mode (stepSize = 0),<br />
two options are available to drive the motor controlled<br />
by using the variable fullStepMode:<br />
• FULLSTEP_WAVE_DRIVE: With this mode, only<br />
one phase is ON at any moment in time. This<br />
mode is enabled when the variable<br />
fullStepMode is FULLSTEP_WAVE_DRIVE<br />
• FULLSTEP_TWO_PHASE_ON: With this mode,<br />
two phases are always ON, but the polarity<br />
changes every two steps. This mode is enabled<br />
when the variable fullStepMode is<br />
FULLSTEP_TWO_PHASE_ON<br />
DS01307A-page 4 2009 <strong>Microchip</strong> Technology Inc.
OPEN LOOP CONTROL METHODS<br />
There are two open loop control methods implemented<br />
in this application note. One is fixed voltage control,<br />
which is an open loop control and does not adjust PWM<br />
duty cycles according to feedback. The second control<br />
method is fixed current control. In this method, the duty<br />
cycle is corrected every four full steps (one sine wave<br />
period) in order to reach a desired current amplitude<br />
set point. Both methods are described in the following<br />
two sections.<br />
FIGURE 7: MOTOR CURRENT AND PWM<br />
Fixed Voltage <strong>Control</strong><br />
AN1307<br />
In classic voltage control, the rated motor voltage is<br />
applied to the windings. When a higher power supply is<br />
used, such as 24V, the motor rated voltage is achieved<br />
<strong>with</strong> the use of a chopper, which is implemented <strong>with</strong><br />
the Pulse Width Modulation (PWM) module.<br />
<strong>Stepper</strong> motors are designed to run reliably at the rated<br />
current, as instructed by the manufacturer. The rated<br />
motor voltage is based on that current and the winding<br />
resistance. However, the voltage across the motor can<br />
be higher than that, as long as the current is kept at all<br />
times at the rated value or lower. As shown in Figure 1,<br />
the motor is connected to two H-bridges powered at<br />
24V and driven by PWM signals. By carefully choosing<br />
the PWM duty cycle, the appropriate average voltage<br />
for driving the motor at the rated current is generated,<br />
as shown in Figure 7.<br />
2009 <strong>Microchip</strong> Technology Inc. DS01307A-page 5
AN1307<br />
This application note implements fixed voltage control<br />
by generating the desired voltage levels <strong>with</strong> the appropriate<br />
PWM duty cycles. Microstepping operation<br />
applies to open loop voltage control as well. If a particular<br />
application requires very low noise operation, open<br />
loop voltage control <strong>with</strong> microstepping would be the<br />
best choice.<br />
Figure 8 shows the practical results of open loop voltage<br />
control. As shown by the red line in the graph, the<br />
current increases depending on the voltage magnitude;<br />
however, since there is no current control, the shape is<br />
not perfect. As shown in the figure, there are 8 steps<br />
per revolution in Half Step mode.<br />
The flag, uGF.controlMode, is used for control<br />
method selection. If this flag has the value of<br />
FIXED_VOLTAGE, the control method selected is fixed<br />
voltage.<br />
Fixed Current <strong>Control</strong><br />
FIGURE 8: OPEN LOOP VOLTAGE CONTROL WITH HALF STEP<br />
Note: The voltage reference is scaled to make it visible.<br />
When using fixed voltage control, the motor is driven<br />
<strong>with</strong> the rated voltage, which allows the current to rise<br />
from zero to the rated current value in a fixed amount<br />
of time. At a certain motor speed, which depends on the<br />
motor inductance and the drive voltage, the current will<br />
not rise fast enough through the motor coil to reach the<br />
rated motor current and torque will be lost. This presents<br />
a problem when higher speeds are required by the<br />
system.<br />
As the motor speeds up, the step time is getting smaller<br />
and the current amplitude is falling more and more,<br />
until the rotor eventually stalls. To overcome this problem,<br />
the easiest solution is to increase the drive voltage<br />
as the motor speeds up in order to have a maximum<br />
current amplitude equal to the rated motor current and<br />
extend the maximum torque versus speed range.<br />
Figure 9 shows the voltage and current for fixed voltage<br />
control. The voltage level is low and the measured<br />
current is rising slowly until the voltage drops. The<br />
desired level is far away and the motor torque is low.<br />
FIGURE 9: FIXED VOLTAGE CONTROL AT 120 RPM WITH ALTERNATE DECAY<br />
Note: The voltage reference is scaled to make it visible.<br />
DS01307A-page 6 2009 <strong>Microchip</strong> Technology Inc.
Figure 10, on the other hand, shows how the current<br />
amplitude is controlled to a higher value by applying a<br />
higher voltage. Only the current amplitude is controlled<br />
in this mode, not the shape or phase.<br />
FIGURE 10: FIXED CURRENT CONTROL AT 120 RPM WITH ALTERNATE DECAY<br />
A simple control loop is used for controlling the current<br />
amplitude. The maximum amplitude of the current in<br />
both motor windings is sampled during one complete<br />
sine wave. If the maximum current amplitude is lower<br />
than the desired value, the drive voltage is increased<br />
gradually by adjusting the PWM duty cycle until the<br />
desired current amplitude is reached. If the current is<br />
too high the duty cycle is decreased, but not less than<br />
the initial value corresponding to the rated motor<br />
voltage.<br />
As long as the drive voltage is higher than the motor<br />
rated voltage, this method provides an extended speed<br />
range over the classic open loop approach. Another<br />
advantage to using this algorithm is that there is no<br />
need to retune for different motors. As long as the starting<br />
voltage produces a lower current than desired, the<br />
algorithm will increase this voltage until the desired<br />
current level amplitude is reached.<br />
This control method is selected by assigning<br />
FIXED_CURRENT to the uGF.controlMode flag.<br />
DECAY MODES<br />
Note: The voltage reference is scaled to make it visible.<br />
When a motor winding is turned OFF by the PWM,<br />
such as in a chopping circuit, the current through that<br />
winding starts to decay until it reaches zero or until the<br />
winding is energized again. The rate at which the current<br />
decays depends on the configuration of the Hbridge<br />
at that specific moment. The different current<br />
decay methods are called decay modes.<br />
There are two decay modes discussed in this<br />
application note:<br />
• Fast Decay: This mode is active when the voltage<br />
across the de-energized winding is reversed,<br />
which produces a fast current drop, hence the<br />
name Fast Decay mode<br />
• Slow Decay: This mode is active when the motor<br />
winding is shorted. Current drop is much slower,<br />
since there is no voltage applied to the winding<br />
AN1307<br />
These two modes are used in this application note in<br />
two different ways:<br />
• Fixed Decay: Users can select this option where<br />
only one of the six decay modes is used by the<br />
controller at all times. It is recommended to use<br />
one of the slow decay modes in this configuration<br />
• Alternating Decay: The controller uses two<br />
selected decay modes and switches between<br />
them at the appropriate time<br />
Fast Decay<br />
In Fast Decay mode, when the current is flowing<br />
through a motor’s winding and all MOSFETs are<br />
switched off, the voltage on that winding will be equal<br />
to the negative of the supply voltage plus the drop voltage<br />
on two freewheeling diodes, as shown in<br />
Figure 11. The decay rate can be adjusted slightly by<br />
shorting one or two diodes in the circuit <strong>with</strong> their corresponding<br />
MOSFETs. However, the reverse voltage<br />
applied to the coil will not change significantly since the<br />
voltage drop across a diode (1V) is much smaller than<br />
the supply voltage (24V). Still, the advantage of using<br />
this method is that the decaying current is flowing<br />
through the MOSFET body diodes only briefly, until the<br />
MOSFET turns ON. The MOSFET has a lower ONresistance<br />
and thus, the dissipated power will be much<br />
lower, which presents an advantage to the overall<br />
system power dissipation.<br />
Another advantage of Fast Decay mode is the simplicity<br />
of the current feedback circuit, since motor current<br />
can be read from the simple shunt resistor at all times.<br />
When the winding is driven, the current is positive.<br />
While the current is dropping during Fast Decay mode,<br />
the current will be negative since the voltage is<br />
reversed across the winding. Therefore, current is<br />
available on the shunt resistor at all times.<br />
2009 <strong>Microchip</strong> Technology Inc. DS01307A-page 7
AN1307<br />
FIGURE 11: FAST DECAY CURRENT<br />
FLOW<br />
Drive<br />
Q1A<br />
Q1B<br />
DC_BUS<br />
Q2A<br />
Q2B<br />
Decay<br />
Q1A<br />
Q1B<br />
DC_BUS<br />
Q2A<br />
Q2B<br />
FIGURE 12: FAST DECAY PWM TIMING<br />
DIAGRAM<br />
PWM1H1<br />
PWM1L1<br />
PWM1H2<br />
PWM1L2<br />
Drive Decay<br />
TABLE 2: FAST DECAY DRIVE SIGNALS<br />
Mosfet Driving Signal Value<br />
Q1A PWM1H1 PWM<br />
Q1B PWM1L1 0<br />
Q2B PWM1H2 PWM<br />
Q2A PWM1L2 0<br />
With a slight variation on the drive signals, we have<br />
something called Reverse Decay mode. Reverse<br />
Decay mode behaves like Fast Decay mode until the<br />
current reaches zero, at which point it forces the current<br />
in the opposite direction. For short decay times<br />
though, until the current reaches zero, this is not an<br />
issue. If reverse decay is continued after the current<br />
has dropped to zero, then negative current will be generated<br />
when a positive current is desired, and vice<br />
versa. Reverse decay generates the lowest possible<br />
dissipated power in the fast decay configuration.<br />
FIGURE 13: FAST DECAY (REVERSE)<br />
CURRENT FLOW<br />
FIGURE 14: FAST DECAY (REVERSE)<br />
PWM TIMING DIAGRAM<br />
TABLE 3: FAST DECAY (REVERSE)<br />
DRIVE SIGNALS<br />
Mosfet Driving Signal Value<br />
Q1A PWM1H1 PWM<br />
Q1B PWM1L1 PWM<br />
Q2B PWM1H2 PWM<br />
Q2A PWM1L2 PWM<br />
Fast decay and reverse decay modes can be set in<br />
software by changing the initialization value of variable<br />
alternateDecay to each of the following defined<br />
values shown in Table 4.<br />
Fast decay is not recommended as a base decay since<br />
the current may drop faster during Fast Decay than it is<br />
actually rising when the supply voltage is applied to the<br />
winding.<br />
TABLE 4: FAST DECAY MODES<br />
Variable Name Initialization Value Active Components During Decay<br />
baseDecay<br />
D_FAST Low Side Diode + Opposite High Side Diode<br />
alternateDecay D_REVERSE Low Side MOSFET + Opposite High Side MOSFET<br />
DS01307A-page 8 2009 <strong>Microchip</strong> Technology Inc.<br />
Drive<br />
Q1A<br />
Q1B<br />
PWM1H1<br />
PWM1L1<br />
PWM1H2<br />
PWM1L2<br />
DC_BUS<br />
Q2A<br />
Q2B<br />
Decay<br />
Q1A<br />
Q1B<br />
Drive Decay<br />
DC_BUS<br />
Q2A<br />
Q2B
Slow Decay<br />
Slow decay is entered by shorting the motor winding<br />
when it is not driven by the supply voltage. This is<br />
achieved by keeping one of the drive MOSFETs<br />
opened at all times (see the Q1A or Q2B MOSFETs in<br />
Figure 15). The current recirculates through the motor<br />
winding, drive MOSFET and the opposite MOSFET or<br />
its body diode. If two MOSFETs are ON (lower ones or<br />
upper ones) the diodes are shorted allowing less power<br />
dissipation and less current drop during slow decay.<br />
FIGURE 15: SLOW DECAY LOW SIDE<br />
MOSFET CURRENT FLOW<br />
Drive<br />
Q1A<br />
Q1B<br />
DC_BUS<br />
Q2A<br />
Q2B<br />
Decay<br />
Q1A<br />
Q1B<br />
DC_BUS<br />
Q2A<br />
Q2B<br />
AN1307<br />
FIGURE 16: SLOW DECAY LOW SIDE<br />
MOSFET PWM TIMING<br />
DIAGRAM<br />
PWM1H1<br />
PWM1L1<br />
PWM1H2<br />
PWM1L2<br />
Drive Decay<br />
TABLE 5: SLOW DECAY LOW SIDE<br />
MOSFET DRIVE SIGNALS<br />
Mosfet Driving Signal Value<br />
Q1A PWM1H1 PWM<br />
Q1B PWM1L1 PWM<br />
Q2B PWM1H2 1<br />
Q2A PWM1L2 0<br />
Depending on which MOSFET remains ON during<br />
decay, there are several slow decay modes that can be<br />
selected in the software. The recommended slow<br />
decay mode when using a bootstrap is the Low Side<br />
MOSFET Recirculation mode. Using this mode helps<br />
the bootstrap capacitors used to drive the upper<br />
MOSFETs to fully recharge. If the bootstrap capacitors<br />
discharge, the upper MOSFETs cannot be turned ON.<br />
Appendix B lists all slow decay modes including the<br />
current flow path, timing diagrams and drive signals.<br />
Table 6 summarizes all slow decay modes.<br />
TABLE 6: SLOW DECAY MODES<br />
Variable Name Initialization Value Active Components During Decay<br />
baseDecay<br />
D_SLOW_L_DIODE Low Side Diode + Opposite Low Side MOSFET<br />
alternateDecay D_SLOW_H_DIODE High Side MOSFET + Opposite High Side Diode<br />
D_SLOW_L_MOSFET Low Side MOSFET + Opposite Low Side MOSFET<br />
D_SLOW_H_MOSFET High Side MOSFET + Opposite High Side MOSFET<br />
2009 <strong>Microchip</strong> Technology Inc. DS01307A-page 9
AN1307<br />
Current measurement is not possible in slow decay<br />
modes <strong>with</strong> the shunt resistor circuit used for current<br />
sensing. This is because in slow decay modes, current<br />
is not flowing through the shunt resistor since it<br />
recirculates through the motor and MOSFETs or<br />
diodes.<br />
Figure 17 shows how the current measurement signal<br />
changes when the decay mode changes from slow (low<br />
MOSFET recirculation) to fast. This transition from slow<br />
to fast happens during the high level of the upper sig-<br />
nal. The peaks of the bottom signal represent the shunt<br />
resistor current and the peaks match <strong>with</strong> the ON time<br />
of the PWM. The shunt resistor current is positive when<br />
the winding is driven, which is during the ON phase of<br />
the PWM (Q1A and Q2B switches are ON) and negative<br />
in Fast Decay mode. The signal in the middle of the<br />
plot represents the actual motor current using a current<br />
probe. It can be observed that during slow decay (when<br />
the top signal is low) the current is zero when the<br />
winding is not driven.<br />
FIGURE 17: CURRENT SIGNALS FOR FAST AND SLOW DECAY MODES<br />
DS01307A-page 10 2009 <strong>Microchip</strong> Technology Inc.
COMBINING DECAY MODES<br />
In this application note, there are two ways that the<br />
decay modes can be used. The first one is Fixed Decay<br />
mode, where the user selects a decay mode (fast, slow,<br />
etc.) and that same decay mode will be used all of the<br />
time. The second option is alternate decay, where two<br />
decay modes are combined while driving the stepper<br />
motor. Table 7 shows which flag and which values<br />
should be used for any of the two decay operation<br />
modes.<br />
Fixed Decay<br />
As mentioned earlier, in Fixed Decay mode there is<br />
only one decay mode used during motor operation. The<br />
recommended decay mode is slow decay in the low<br />
MOSFET recirculation configuration.<br />
Alternate Decay<br />
With all of the available decay modes, the question<br />
arises of which one to use and when. Slow Decay<br />
mode provides quieter motor operation and is good at<br />
relative low speeds. As the motor speed increases and<br />
the desired current falls on a steep decline, the winding<br />
current can no longer follow this curve using Slow<br />
Decay mode. Although operation in Fast Decay mode<br />
is noisier, it allows greater control of the current<br />
descent rate.<br />
TABLE 7: DECAY MODE COMBINATIONS<br />
FIGURE 18: COMPARISON BETWEEN FIXED AND ALTERNATE DECAY<br />
AN1307<br />
The two plots in Figure 18 show the difference between<br />
Fixed Decay mode, using slow decay, and Alternate<br />
Decay mode, using fast and slow decay. In Alternate<br />
Decay mode (right plot), fast decay is only used when<br />
the current is decreasing and only for a limited time<br />
until the current reaches the desired level.<br />
The advantage of using the alternate decay mode can<br />
be seen at high speeds, where slow decay cannot provide<br />
a fast current drop rate as demanded by the<br />
switching pattern. Also, the BEMF of the motor prevents<br />
the current from decreasing fast enough. Fast<br />
decay can be used to bring the current down faster to<br />
the desired level. Where fast decay is too aggressive or<br />
needs to be used for a very short time, slow decay <strong>with</strong><br />
diode recirculation can be used for a longer period as it<br />
forces the current to decay faster than in the MOSFET<br />
recirculation mode.<br />
For each step, a different current drop is required, so a<br />
smaller or larger ratio of fast to slow decay is needed<br />
based on the step amplitude change. If fast decay is<br />
not used long enough, the current decreases too slow<br />
and does not follow the desired shape. If it is used for<br />
too long, the current drops too much and will have to<br />
rise back up. This is why the number of fast decay (or<br />
alternate decay) periods must be proportional to the<br />
current amplitude drop. Since the motor back-EMF<br />
induces current in the windings, it is recommended to<br />
keep the winding in fast decay whenever the desired<br />
current level is zero. This is an efficient and fast method<br />
of controlling the current to zero.<br />
Flag Value Description<br />
uGF.decayMode FIXED_DECAY Only one decay mode is used: baseDecay.<br />
ALTERNATE_DECAY Alternates between two decay modes: baseDecay and<br />
alternateDecay.<br />
2009 <strong>Microchip</strong> Technology Inc. DS01307A-page 11
AN1307<br />
CURRENT MEASUREMENT<br />
Current measurement in the full-bridge configuration<br />
brings up some challenges. First of all, the measuring<br />
shunt resistor is located between the ground and the<br />
low side MOSFETs, which means that no current will be<br />
visible unless there is a path opened between DC_BUS<br />
and ground. The path can either be one high-side<br />
MOSFET plus the opposite low-side MOSFET, or the<br />
body diodes of the same MOSFETs when they are<br />
turned OFF.<br />
When the motor winding is energized, the shunt current<br />
will always be positive, regardless of the current direction<br />
in the motor winding. Whenever the winding is in<br />
fast decay, the shunt current will be negative. In all slow<br />
decay modes there is no current flowing through the<br />
shunt resistor.<br />
Figure 19 shows a typical shunt resistor waveform during<br />
motor operation in full step wave drive <strong>with</strong> fast and<br />
slow decay. For simplicity we will assume first that there<br />
is no PWM driving the motor and that only DC voltages<br />
are applied to the winding.<br />
The challenge is to reconstruct the real motor current<br />
based on the available measured data from the shunt<br />
resistor. As DC voltage is replaced by PWM, the step<br />
pattern shown in Figure 19 is reproduced on a much<br />
smaller scale, a number of times inside each of those<br />
steps, as shown in Figure 20.<br />
FIGURE 19: WINDING CURRENT VERSUS SHUNT CURRENT IN DC MODE<br />
Drive<br />
Fast<br />
Decay<br />
Fast<br />
Decay<br />
Slow<br />
Decay<br />
<strong>Motor</strong> Current Shunt Resistor Current<br />
Slow<br />
Decay<br />
DS01307A-page 12 2009 <strong>Microchip</strong> Technology Inc.
In the Closed Loop <strong>Control</strong> mode, the PI controller<br />
switches from slow to fast decay often and at small time<br />
intervals, as shown in Figure 20 and Figure 21. In this<br />
scenario, PWM1H1 and PWM1H2 are driving the winding<br />
current in the positive direction. PWM1L1 and<br />
PWM1L2 are driving the winding current in the negative<br />
direction, but as long as the winding current is positive,<br />
this is identical to fast decay. The PWM1H1 and<br />
PWM1L2 signals are controlling the high MOSFETs of<br />
the H-bridge. Since the slow decay <strong>with</strong> low MOSFET<br />
recirculation mode is used, the PWM1L1 and PWM1H2<br />
signals are complementary to PWM1H1 and PWM1L2,<br />
respectively.<br />
FIGURE 20: SHUNT CURRENT IN CLOSED LOOP CURRENT CONTROL<br />
AN1307<br />
Whenever PWM1H1 is high, the entire supply DC voltage<br />
is applied to the winding and its current is increasing.<br />
The shunt resistor only sees this current when the<br />
PWM signal is high. When PWM1L2 is high, the same<br />
DC voltage is applied to the winding, but in reverse<br />
polarity. This puts the winding in Fast Decay mode and<br />
forces the shunt resistor current to negative values, but<br />
equal in amplitude <strong>with</strong> the real winding current. When<br />
both of these PWMs are low, their complementary<br />
PWM pins driving the H bridge low MOSFETs are high;<br />
therefore, the winding is in the Slow Decay MOSFET<br />
Recirculation mode and no current flows through the<br />
shunt resistor.<br />
FIGURE 21: RECONSTRUCTION OF WINDING CURRENT FROM ADC READINGS<br />
2009 <strong>Microchip</strong> Technology Inc. DS01307A-page 13
AN1307<br />
The ADC reads the shunt current twice every PWM<br />
cycle, once on the active pulse (PWMxHx is high) and<br />
once on the inactive pulse (PWMxLx is high). By properly<br />
connecting all of the high amplitude peaks, the real<br />
winding current is reconstructed in software. By monitoring<br />
in which direction the winding is driven, the<br />
reconstructed current variable is only updated at the<br />
right time. The current value is updated on the active<br />
pulse if the driving direction is positive, and on the<br />
inactive pulse when the driving direction is negative.<br />
The flag, setDir1HW, holds the driving direction for<br />
winding 1.<br />
At small duty cycles, the winding current does not have<br />
enough time to energize the shunt resistor, filter capacitors<br />
and amplification circuits, and therefore, it is not<br />
read properly by the ADC. The minimum PWM pulse<br />
width that still allows reliable ADC readings is approximately<br />
1.75 µs. At 40 khz PWM frequency, this results<br />
in a duty cycle of 7%. All duty cycles below this value<br />
are set to 7%. Current levels that normally require<br />
lower duty cycles in open loop are still achieved by the<br />
PI controller by properly controlling the decay mode.<br />
CLOSED LOOP PI CURRENT<br />
CONTROL<br />
Two Proportional Integral (PI) controllers are used to<br />
control the current, one for each of the two motor windings.<br />
For the best possible results, a theoretical<br />
approach is used that allows easy tuning for any motor<br />
configuration. As long as the motor parameters are<br />
known, such as resistance, inductance and rated current,<br />
setting up the system to run <strong>with</strong> different motors<br />
poses no real challenge in terms of tuning.<br />
PI controller<br />
<strong>Stepper</strong> motors have two windings, so two PI<br />
controllers are needed, one for each winding.<br />
EQUATION 1: MOTOR WINDING<br />
EQUATION<br />
V u R i <br />
di<br />
L<br />
dt<br />
L = <strong>Motor</strong> resistance<br />
R = <strong>Motor</strong> inductance<br />
V = DC voltage<br />
i = Instantaneous motor current<br />
u = PWM duty cycle percentage<br />
EQUATION 2: MOTOR TRANSFER<br />
FUNCTION<br />
i(<br />
s)<br />
H<br />
u(<br />
s)<br />
M<br />
V V R<br />
( s)<br />
<br />
L s R L R s 1<br />
EQUATION 3: CONTINUOUS PI<br />
CONTROLLER<br />
L/Rs + 1<br />
HPIs = K -----------------------s<br />
s = Laplace variable<br />
K = Continuous controller gain<br />
In order to compensate the motor transfer function pole<br />
and achieve a zero steady state error, a classic PI controller<br />
is chosen. By applying Tustin discretization to<br />
Equation 3, the formula shown in Equation 4 is<br />
obtained:<br />
EQUATION 4: DISCRETE PI CONTROLLER<br />
uz <br />
--------- HPIz G<br />
z p1 z p – 2<br />
= =<br />
----------------------z<br />
– 1<br />
p1 = L + R T/2<br />
p2 = L – RT/2 T = 25 µs<br />
G = K/R<br />
= Current error<br />
u = Voltage output<br />
z = z-transform variable<br />
p1 , p2 = Discrete controller parameters<br />
T = <strong>Control</strong>ler sample time<br />
G = <strong>Control</strong>ler discrete gain<br />
The closed loop transfer function of the entire system is<br />
shown in Equation 5. The step response rise time of<br />
this system, being a first order system, is approximately<br />
three times the time constant. By choosing the desired<br />
response time, the value for the continuous controller<br />
gain can be calculated. Following Equation 6, the value<br />
for the discrete controller gain is found. For the discrete<br />
gain, a multiplication factor of 4 is used in order to get<br />
more resolution from fixed point calculations by<br />
avoiding underflows.<br />
EQUATION 5: CLOSED LOOP TRANSFER<br />
FUNCTION<br />
DS01307A-page 14 2009 <strong>Microchip</strong> Technology Inc.
EQUATION 6: DISCRETE GAIN USED IN<br />
THE FIXED POINT<br />
IMPLEMENTATION<br />
R<br />
3 70s<br />
K V<br />
G0 4 <br />
FIGURE 22: CLOSED LOOP CONTROLLER BLOCK DIAGRAM<br />
In this application, a value of 70 µs was chosen as the<br />
desired rise time. The step response of the closed loop<br />
system is shown in Figure 23. Since the gain has a high<br />
value, the controller is very aggressive. The maximum<br />
voltage is limited to the available DC voltage of 24V. We<br />
can only measure the correct rise time as set by the PI<br />
parameters during the last pulse, where the voltage<br />
K<br />
R<br />
G 0 = Scaled discrete gain<br />
i ref u<br />
+<br />
–<br />
FIGURE 23: CLOSED LOOP PI CURRENT CONTROL<br />
H PI<br />
AN1307<br />
output is not limited. We can count 6 periods, which at<br />
12.5 µs for one period equals 75 µs, which is very close<br />
to the desired time. In all other cases, when the output<br />
is limited, the rise time will be longer because higher<br />
voltages than DC_BUS would be needed to achieve<br />
the set rise time.<br />
2009 <strong>Microchip</strong> Technology Inc. DS01307A-page 15<br />
H M<br />
i
AN1307<br />
Anti-Windup<br />
Limiting the controller output leads to a problem called<br />
accumulator wind-up. The output is saturated but the PI<br />
integrator accumulator keeps counting and grows until<br />
it eventually saturates. When the error is returning from<br />
the saturation area, the accumulator value is much<br />
higher than normal for that specific error value and, as<br />
a result, the system response slows. To prevent this<br />
effect, the accumulator also has to be compensated. To<br />
do this, another gain is added in Equation 8, which is<br />
called the anti-windup gain. The difference between the<br />
actual (saturated) output and the accumulator is multiplied<br />
<strong>with</strong> this gain and then subtracted in the next<br />
accumulator calculation cycle.<br />
EQUATION 8: ANTI-WINDUP PI CONTROLLER<br />
Phase Advance<br />
acc k 1<br />
G w = Anti-windup gain<br />
By changing the value of the anti-windup gain, different<br />
controller behaviors are achieved. For low speeds, it is<br />
good to have a small gain so that the current tracks the<br />
reference as precise as possible. At higher speeds,<br />
when the DC_BUS voltage is not strong enough to<br />
bring the current to the reference value and the fast<br />
decay rate is not sufficient to bring the current down in<br />
the allocated time frame for one step, the anti-windup<br />
gain helps to change the phase of the current, thereby<br />
allowing transition to higher speeds, which otherwise<br />
could not be reached. Keeping the anti-windup gain low<br />
will result in the motor eventually stalling as the speed<br />
increases.<br />
FIGURE 24: 1/4 STEP AT 840 RPM WITH A LOW ANTI-WINDUP GAIN<br />
EQUATION 7: DISCRETE PI CONTROLLER<br />
IMPLEMENTATION<br />
acck 1 =<br />
uk + 1<br />
+ =<br />
G0 P1 k+<br />
1 – G0 P2k+ acck – Gwacck – uk + G0 p1 k+<br />
1 – G0 p2k+ acck = – 24V acck + 1 24V<br />
acc = Integral accumulator<br />
u = Output voltage<br />
= Current error<br />
p1 , p2 = Discrete controller parameters<br />
acck , k = Values from previous cycle<br />
acck +1 , k + 1 = Values from present cycle<br />
Figure 24 and Figure 25 are taken <strong>with</strong> one-fourth<br />
microstep resolution at a motor speed of 840 RPM.<br />
With a low anti-windup gain, Figure 24 shows that the<br />
output voltage and the desired current are in phase.<br />
However, because of the high speed at which the motor<br />
is running, the winding current is not able to follow the<br />
reference. At some point, the current will be rising too<br />
late and brake the rotor instead of accelerating it, since<br />
the stator poles will be energized too late, after the rotor<br />
has passed them.<br />
DS01307A-page 16 2009 <strong>Microchip</strong> Technology Inc.
FIGURE 25: 1/4 STEP AT 840 RPM WITH A HIGH ANTI-WINDUP GAIN<br />
In Figure 25, The high anti-windup gain forces the controller<br />
output voltage to exit saturation sooner and<br />
therefore changes the phase of the winding current relative<br />
to the desired current. With this phase advance,<br />
the current has enough time to rise into the winding<br />
before the rotor pole reaches the energized stator pole.<br />
Further increasing the speed, the current amplitude<br />
keeps dropping until it eventually changes phase<br />
forced by the back-EMF. At this point, the current amplitude<br />
will begin to rise again and the phase advance and<br />
motor back-EMF work together to keep the motor running,<br />
as shown in Figure 26. The motor torque at 2400<br />
RPM is strong enough to operate the motor under a<br />
light load. As a comparison, the maximum speed<br />
achieved in the open loop control modes <strong>with</strong> the same<br />
motor is around 200 RPM.<br />
FIGURE 26: 1/4 STEP WITH PHASE ADVANCE<br />
AN1307<br />
The current waveform reference plays an important<br />
role here. If it is closer to a sine wave, the current will<br />
follow it better and the motor will have better torque. At<br />
high speeds, it is best to use the smallest possible<br />
microsteps, in order to obtain the best motor torque.<br />
However, at high speeds, the microstep changing rate<br />
becomes faster than the output frequency of 40 kHz.<br />
The <strong>dsPIC</strong> DSC device might also run out of time to<br />
execute all of the step changes if they are very fast. For<br />
these reasons, a value of approximately 20 µs for one<br />
microstep is implemented as the lower limit for one<br />
microstep time, regardless of the microstepping resolution<br />
used. This means the top speed is higher for low<br />
resolution modes, such as full, half or quarter step, and<br />
lower for high resolution microstepping.<br />
2009 <strong>Microchip</strong> Technology Inc. DS01307A-page 17
AN1307<br />
POSITION CONTROL<br />
Open loop position control is the main reason why stepper<br />
motors are used. In combination <strong>with</strong> the closed<br />
loop current control, open loop position control is more<br />
accurate and reliable up to considerable speeds. To<br />
reach high speeds though, the motor has to be accelerated<br />
gradually to prevent the rotor from stalling. Stopping<br />
the motor must be done in the same way, so<br />
maximum acceleration and deceleration rates for the<br />
motor speed are used.<br />
A classic Proportional (P) position controller <strong>with</strong> a variable<br />
gain and a maximum speed limit is implemented<br />
based on Equation 9. The fixed gain is chosen in such<br />
a way that the deceleration rate is slightly smaller that<br />
the maximum allowed value.<br />
When the desired position is reached, the motor should<br />
stop immediately to avoid position oscillations. Since a<br />
fixed deceleration rate is imposed to the motor, the<br />
position controller must take it into account and begin<br />
the deceleration at the right time, before it is too late. A<br />
variable gain is used to ensure that the motor starts<br />
deceleration at the right point and a fast stop is<br />
obtained. Compared <strong>with</strong> a fixed gain solution, this<br />
controller output exits saturation later.<br />
CONCLUSION<br />
This application note presented three methods to control<br />
a stepper motor: Fixed Voltage mode, Fixed Current<br />
mode and PI Closed Loop <strong>Control</strong> mode.<br />
A method of generating up to 1024 points per cycle was<br />
also implemented in this application note using<br />
microstepping. Different decay methods were also presented<br />
allowing the controller to operate the stepper in<br />
a variety of ways depending on system’s requirements.<br />
For software implementation, code is available for<br />
download from the <strong>Microchip</strong> website, which is posted<br />
on the same web page as this application note.<br />
To learn more details about the hardware tool used,<br />
refer to the “<strong>dsPIC</strong>DEM MCSM Development Board<br />
User’s Guide” (DS70610).<br />
FIGURE 27: POSITION CONTROL WITH VARIABLE GAIN – EIGHT MOTOR ROTATIONS ARE<br />
PERFORMED AT QUARTER STEP RESOLUTION<br />
EQUATION 9: PROPORTIONAL (P) POSITION CONTROLLER WITH VARIABLE GAIN AND<br />
MAXIMUM SPEED LIMIT<br />
posFixed_gain decelerationRate<br />
speedRef = posGain posErr = -------------------------------------------------------------------------------- pos<br />
speedOut<br />
Err<br />
speed Ref speed Max<br />
DS01307A-page 18 2009 <strong>Microchip</strong> Technology Inc.
APPENDIX A: SOFTWARE FLOW<br />
CHARTS<br />
FIGURE A-1: MAIN STATE MACHINE<br />
Start<br />
Peripherals<br />
Initialization<br />
State = RUN<br />
NO<br />
State = OFF<br />
NO<br />
State = INIT<br />
YES<br />
YES<br />
YES<br />
Button<br />
released<br />
Cycle through<br />
step sizes<br />
1/64<br />
step<br />
YES<br />
YES<br />
State = OFF<br />
Button<br />
released<br />
YES<br />
State = RUN<br />
NO<br />
NO<br />
Initialize <strong>Control</strong> Algorithm<br />
State = OFF<br />
Process<br />
DMCI<br />
Commands<br />
Process<br />
DMCI<br />
Commands<br />
Timer1<br />
Overflow<br />
Call Speed and Position<br />
<strong>Control</strong>lers<br />
AN1307<br />
2009 <strong>Microchip</strong> Technology Inc. DS01307A-page 19<br />
YES<br />
NO
AN1307<br />
FIGURE A-2: ADC INTERRUPT<br />
ADC interrupt<br />
NO YES<br />
State = RUN<br />
Calculate max<br />
current amplitude<br />
Process alternate<br />
decay for both<br />
windings<br />
Set PWM duty<br />
cycles<br />
PWM<br />
counting<br />
up<br />
YES<br />
Read Currents<br />
Read POT<br />
YES Current<strong>Control</strong><br />
Current<strong>Control</strong> YES<br />
Loop == OFF<br />
Loop == OFF<br />
Winding1 PI Loop<br />
Update decay mode<br />
Set ADC trigger to<br />
PWM counting down<br />
Set ADC trigger to<br />
PWM counting up<br />
DS01307A-page 20 2009 <strong>Microchip</strong> Technology Inc.<br />
NO<br />
Exit<br />
Read Currents<br />
Read POT<br />
NO NO<br />
Winding2 PI Loop<br />
Update decay mode<br />
Set PWM duty<br />
cycles
FIGURE A-3: TIMER INTERRUPTS<br />
Timer2/3<br />
Interrupt<br />
Update Timer<br />
Period<br />
Increment<br />
MicroStep Counter<br />
SineWave<br />
Period<br />
Complete<br />
NO<br />
Calculate Next Step<br />
Amplitude Reference<br />
Calculate Position<br />
Clear IRQ flag<br />
Exit<br />
YES<br />
Reset MicroStep<br />
Counter<br />
Process Fixed<br />
Current Mode<br />
Timer1<br />
Interrupt<br />
Set overflow indicator<br />
Clear IRQ flag<br />
AN1307<br />
2009 <strong>Microchip</strong> Technology Inc. DS01307A-page 21<br />
Exit
AN1307<br />
APPENDIX B: DECAY MODES<br />
FIGURE B-1: FAST DECAY<br />
Drive<br />
Q1A<br />
Q1B<br />
DC_BUS<br />
Q2A<br />
Q2B<br />
Decay<br />
Q1A<br />
Q1B<br />
DC_BUS<br />
Mosfet Driving Signal Value<br />
Q1A PWM1H1 PWM<br />
Q1B PWM1L1 0<br />
Q2B PWM1H2 PWM<br />
Q2A PWM1L2 0<br />
FIGURE B-2: SLOW DECAY LOW DIODE RECIRCULATION<br />
Drive<br />
Q1A<br />
Q1B<br />
DC_BUS<br />
Q2A<br />
Q2B<br />
Decay<br />
Q1A<br />
Q1B<br />
DC_BUS<br />
Mosfet Driving Signal Value<br />
Q1A PWM1H1 PWM<br />
Q1B PWM1L1 0<br />
Q2B PWM1H2 1<br />
Q2A PWM1L2 0<br />
Q2A<br />
Q2B<br />
Q2A<br />
Q2B<br />
PWM1H1<br />
PWM1L1<br />
PWM1H2<br />
PWM1L2<br />
PWM1H1<br />
PWM1L1<br />
PWM1H2<br />
PWM1L2<br />
Drive Decay<br />
Drive Decay<br />
DS01307A-page 22 2009 <strong>Microchip</strong> Technology Inc.
FIGURE B-3: SLOW DECAY HIGH DIODE RECIRCULATION<br />
Drive<br />
Q1A<br />
Q1B<br />
DC_BUS<br />
Q2A<br />
Q2B<br />
Decay<br />
Q1A<br />
Q1B<br />
DC_BUS<br />
FIGURE B-4: SLOW DECAY LOW MOSFET RECIRCULATION<br />
Drive<br />
Q1A<br />
Q1B<br />
Mosfet Driving Signal Value<br />
Q1A PWM1H1 1<br />
Q1B PWM1L1 0<br />
Q2B PWM1H2 PWM<br />
Q2A PWM1L2 0<br />
DC_BUS<br />
Q2A<br />
Q2B<br />
Decay<br />
Q1A<br />
Q1B<br />
DC_BUS<br />
Mosfet Driving Signal Value<br />
Q1A PWM1H1 PWM<br />
Q1B PWM1L1 PWM<br />
Q2B PWM1H2 1<br />
Q2A PWM1L2 0<br />
Q2A<br />
Q2B<br />
Q2A<br />
Q2B<br />
PWM1H1<br />
PWM1L1<br />
PWM1H2<br />
PWM1L2<br />
PWM1H1<br />
PWM1L1<br />
PWM1H2<br />
PWM1L2<br />
Drive Decay<br />
Drive Decay<br />
AN1307<br />
2009 <strong>Microchip</strong> Technology Inc. DS01307A-page 23
AN1307<br />
FIGURE B-5: SLOW DECAY HIGH MOSFET RECIRCULATION<br />
Drive<br />
Q1A<br />
Q1B<br />
DC_BUS<br />
Q2A<br />
Q2B<br />
Decay<br />
Q1A<br />
Q1B<br />
Mosfet Driving Signal Value<br />
Q1A PWM1H1 1<br />
Q1B PWM1L1 0<br />
Q2B PWM1H2 PWM<br />
Q2A PWM1L2 PWM<br />
FIGURE B-6: REVERSE DECAY<br />
Drive<br />
Q1A<br />
Q1B<br />
DC_BUS<br />
Q2A<br />
Q2B<br />
Decay<br />
Q1A<br />
Q1B<br />
DC_BUS<br />
DC_BUS<br />
Mosfet Driving Signal Value<br />
Q1A PWM1H1 PWM<br />
Q1B PWM1L1 PWM<br />
Q2B PWM1H2 PWM<br />
Q2A PWM1L2 PWM<br />
Q2A<br />
Q2B<br />
Q2A<br />
Q2B<br />
PWM1H1<br />
PWM1L1<br />
PWM1H2<br />
PWM1L2<br />
PWM1H1<br />
PWM1L1<br />
PWM1H2<br />
PWM1L2<br />
Drive Decay<br />
Drive Decay<br />
DS01307A-page 24 2009 <strong>Microchip</strong> Technology Inc.
Note the following details of the code protection feature on <strong>Microchip</strong> devices:<br />
• <strong>Microchip</strong> products meet the specification contained in their particular <strong>Microchip</strong> Data Sheet.<br />
• <strong>Microchip</strong> believes that its family of products is one of the most secure families of its kind on the market today, when used in the<br />
intended manner and under normal conditions.<br />
• There are dishonest and possibly illegal methods used to breach the code protection feature. All of these methods, to our<br />
knowledge, require using the <strong>Microchip</strong> products in a manner outside the operating specifications contained in <strong>Microchip</strong>’s Data<br />
Sheets. Most likely, the person doing so is engaged in theft of intellectual property.<br />
• <strong>Microchip</strong> is willing to work <strong>with</strong> the customer who is concerned about the integrity of their code.<br />
• Neither <strong>Microchip</strong> nor any other semiconductor manufacturer can guarantee the security of their code. Code protection does not<br />
mean that we are guaranteeing the product as “unbreakable.”<br />
Code protection is constantly evolving. We at <strong>Microchip</strong> are committed to continuously improving the code protection features of our<br />
products. Attempts to break <strong>Microchip</strong>’s code protection feature may be a violation of the Digital Millennium Copyright Act. If such acts<br />
allow unauthorized access to your software or other copyrighted work, you may have a right to sue for relief under that Act.<br />
Information contained in this publication regarding device<br />
applications and the like is provided only for your convenience<br />
and may be superseded by updates. It is your responsibility to<br />
ensure that your application meets <strong>with</strong> your specifications.<br />
MICROCHIP MAKES NO REPRESENTATIONS OR<br />
WARRANTIES OF ANY KIND WHETHER EXPRESS OR<br />
IMPLIED, WRITTEN OR ORAL, STATUTORY OR<br />
OTHERWISE, RELATED TO THE INFORMATION,<br />
INCLUDING BUT NOT LIMITED TO ITS CONDITION,<br />
QUALITY, PERFORMANCE, MERCHANTABILITY OR<br />
FITNESS FOR PURPOSE. <strong>Microchip</strong> disclaims all liability<br />
arising from this information and its use. Use of <strong>Microchip</strong><br />
devices in life support and/or safety applications is entirely at<br />
the buyer’s risk, and the buyer agrees to defend, indemnify and<br />
hold harmless <strong>Microchip</strong> from any and all damages, claims,<br />
suits, or expenses resulting from such use. No licenses are<br />
conveyed, implicitly or otherwise, under any <strong>Microchip</strong><br />
intellectual property rights.<br />
Trademarks<br />
The <strong>Microchip</strong> name and logo, the <strong>Microchip</strong> logo, <strong>dsPIC</strong>,<br />
KEELOQ, KEELOQ logo, MPLAB, PIC, PICmicro, PICSTART,<br />
rfPIC and UNI/O are registered trademarks of <strong>Microchip</strong><br />
Technology Incorporated in the U.S.A. and other countries.<br />
FilterLab, Hampshire, HI-TECH C, Linear Active Thermistor,<br />
MXDEV, MXLAB, SEEVAL and The Embedded <strong>Control</strong><br />
Solutions Company are registered trademarks of <strong>Microchip</strong><br />
Technology Incorporated in the U.S.A.<br />
Analog-for-the-Digital Age, Application Maestro, CodeGuard,<br />
<strong>dsPIC</strong>DEM, <strong>dsPIC</strong>DEM.net, <strong>dsPIC</strong>works, dsSPEAK, ECAN,<br />
ECONOMONITOR, FanSense, HI-TIDE, In-Circuit Serial<br />
Programming, ICSP, Mindi, MiWi, MPASM, MPLAB Certified<br />
logo, MPLIB, MPLINK, mTouch, Octopus, Omniscient Code<br />
Generation, PICC, PICC-18, PICDEM, PICDEM.net, PICkit,<br />
PICtail, PIC 32 logo, REAL ICE, rfLAB, Select Mode, Total<br />
Endurance, TSHARC, UniWinDriver, WiperLock and ZENA<br />
are trademarks of <strong>Microchip</strong> Technology Incorporated in the<br />
U.S.A. and other countries.<br />
SQTP is a service mark of <strong>Microchip</strong> Technology Incorporated<br />
in the U.S.A.<br />
All other trademarks mentioned herein are property of their<br />
respective companies.<br />
© 2009, <strong>Microchip</strong> Technology Incorporated, Printed in the<br />
U.S.A., All Rights Reserved.<br />
Printed on recycled paper.<br />
<strong>Microchip</strong> received ISO/TS-16949:2002 certification for its worldwide<br />
headquarters, design and wafer fabrication facilities in Chandler and<br />
Tempe, Arizona; Gresham, Oregon and design centers in California<br />
and India. The Company’s quality system processes and procedures<br />
are for its PIC ® MCUs and <strong>dsPIC</strong> ® <strong>DSCs</strong>, KEELOQ ® code hopping<br />
devices, Serial EEPROMs, microperipherals, nonvolatile memory and<br />
analog products. In addition, <strong>Microchip</strong>’s quality system for the design<br />
and manufacture of development systems is ISO 9001:2000 certified.<br />
2009 <strong>Microchip</strong> Technology Inc. DS01307A-page 25
AMERICAS<br />
Corporate Office<br />
2355 West Chandler Blvd.<br />
Chandler, AZ 85224-6199<br />
Tel: 480-792-7200<br />
Fax: 480-792-7277<br />
Technical Support:<br />
http://support.microchip.com<br />
Web Address:<br />
www.microchip.com<br />
Atlanta<br />
Duluth, GA<br />
Tel: 678-957-9614<br />
Fax: 678-957-1455<br />
Boston<br />
Westborough, MA<br />
Tel: 774-760-0087<br />
Fax: 774-760-0088<br />
Chicago<br />
Itasca, IL<br />
Tel: 630-285-0071<br />
Fax: 630-285-0075<br />
Cleveland<br />
Independence, OH<br />
Tel: 216-447-0464<br />
Fax: 216-447-0643<br />
Dallas<br />
Addison, TX<br />
Tel: 972-818-7423<br />
Fax: 972-818-2924<br />
Detroit<br />
Farmington Hills, MI<br />
Tel: 248-538-2250<br />
Fax: 248-538-2260<br />
Kokomo<br />
Kokomo, IN<br />
Tel: 765-864-8360<br />
Fax: 765-864-8387<br />
Los Angeles<br />
Mission Viejo, CA<br />
Tel: 949-462-9523<br />
Fax: 949-462-9608<br />
Santa Clara<br />
Santa Clara, CA<br />
Tel: 408-961-6444<br />
Fax: 408-961-6445<br />
Toronto<br />
Mississauga, Ontario,<br />
Canada<br />
Tel: 905-673-0699<br />
Fax: 905-673-6509<br />
Worldwide Sales and Service<br />
ASIA/PACIFIC<br />
Asia Pacific Office<br />
Suites 3707-14, 37th Floor<br />
Tower 6, The Gateway<br />
Harbour City, Kowloon<br />
Hong Kong<br />
Tel: 852-2401-1200<br />
Fax: 852-2401-3431<br />
Australia - Sydney<br />
Tel: 61-2-9868-6733<br />
Fax: 61-2-9868-6755<br />
China - Beijing<br />
Tel: 86-10-8528-2100<br />
Fax: 86-10-8528-2104<br />
China - Chengdu<br />
Tel: 86-28-8665-5511<br />
Fax: 86-28-8665-7889<br />
China - Hong Kong SAR<br />
Tel: 852-2401-1200<br />
Fax: 852-2401-3431<br />
China - Nanjing<br />
Tel: 86-25-8473-2460<br />
Fax: 86-25-8473-2470<br />
China - Qingdao<br />
Tel: 86-532-8502-7355<br />
Fax: 86-532-8502-7205<br />
China - Shanghai<br />
Tel: 86-21-5407-5533<br />
Fax: 86-21-5407-5066<br />
China - Shenyang<br />
Tel: 86-24-2334-2829<br />
Fax: 86-24-2334-2393<br />
China - Shenzhen<br />
Tel: 86-755-8203-2660<br />
Fax: 86-755-8203-1760<br />
China - Wuhan<br />
Tel: 86-27-5980-5300<br />
Fax: 86-27-5980-5118<br />
China - Xiamen<br />
Tel: 86-592-2388138<br />
Fax: 86-592-2388130<br />
China - Xian<br />
Tel: 86-29-8833-7252<br />
Fax: 86-29-8833-7256<br />
China - Zhuhai<br />
Tel: 86-756-3210040<br />
Fax: 86-756-3210049<br />
ASIA/PACIFIC<br />
India - Bangalore<br />
Tel: 91-80-3090-4444<br />
Fax: 91-80-3090-4080<br />
India - New Delhi<br />
Tel: 91-11-4160-8631<br />
Fax: 91-11-4160-8632<br />
India - Pune<br />
Tel: 91-20-2566-1512<br />
Fax: 91-20-2566-1513<br />
Japan - Yokohama<br />
Tel: 81-45-471- 6166<br />
Fax: 81-45-471-6122<br />
Korea - Daegu<br />
Tel: 82-53-744-4301<br />
Fax: 82-53-744-4302<br />
Korea - Seoul<br />
Tel: 82-2-554-7200<br />
Fax: 82-2-558-5932 or<br />
82-2-558-5934<br />
Malaysia - Kuala Lumpur<br />
Tel: 60-3-6201-9857<br />
Fax: 60-3-6201-9859<br />
Malaysia - Penang<br />
Tel: 60-4-227-8870<br />
Fax: 60-4-227-4068<br />
Philippines - Manila<br />
Tel: 63-2-634-9065<br />
Fax: 63-2-634-9069<br />
Singapore<br />
Tel: 65-6334-8870<br />
Fax: 65-6334-8850<br />
Taiwan - Hsin Chu<br />
Tel: 886-3-6578-300<br />
Fax: 886-3-6578-370<br />
Taiwan - Kaohsiung<br />
Tel: 886-7-536-4818<br />
Fax: 886-7-536-4803<br />
Taiwan - Taipei<br />
Tel: 886-2-2500-6610<br />
Fax: 886-2-2508-0102<br />
Thailand - Bangkok<br />
Tel: 66-2-694-1351<br />
Fax: 66-2-694-1350<br />
EUROPE<br />
Austria - Wels<br />
Tel: 43-7242-2244-39<br />
Fax: 43-7242-2244-393<br />
Denmark - Copenhagen<br />
Tel: 45-4450-2828<br />
Fax: 45-4485-2829<br />
France - Paris<br />
Tel: 33-1-69-53-63-20<br />
Fax: 33-1-69-30-90-79<br />
Germany - Munich<br />
Tel: 49-89-627-144-0<br />
Fax: 49-89-627-144-44<br />
Italy - Milan<br />
Tel: 39-0331-742611<br />
Fax: 39-0331-466781<br />
Netherlands - Drunen<br />
Tel: 31-416-690399<br />
Fax: 31-416-690340<br />
Spain - Madrid<br />
Tel: 34-91-708-08-90<br />
Fax: 34-91-708-08-91<br />
UK - Wokingham<br />
Tel: 44-118-921-5869<br />
Fax: 44-118-921-5820<br />
03/26/09<br />
DS01307A-page 26 2009 <strong>Microchip</strong> Technology Inc.