FLIGHT TRAINING INSTRUCTION T-45 WEAPONS/STRIKE - Cnatra
FLIGHT TRAINING INSTRUCTION T-45 WEAPONS/STRIKE - Cnatra
FLIGHT TRAINING INSTRUCTION T-45 WEAPONS/STRIKE - Cnatra

Create successful ePaper yourself
Turn your PDF publications into a flip-book with our unique Google optimized e-Paper software.
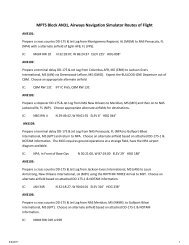
T-<strong>45</strong> <strong>WEAPONS</strong>/<strong>STRIKE</strong> CHAPTER THREE<br />
Figure 3-16 T-<strong>45</strong>C “Z” Diagram Components<br />
Release Altitude is the planned release altitude, were as the Minimum Release Altitude, or<br />
“Zmin” Altitude, is the “No Lower Than” release altitude. We will strive to release with the<br />
pipper arriving at our aimpoint as close to the planned release altitude as possible. The<br />
minimum release altitude is just that – the absolute minimum. Releasing below the Zmin altitude<br />
WILL NOT BE TOLERATED. Consistently releasing well below the planned release altitude<br />
will be reflected in your grades. You need to recognize a developing late sight picture,<br />
understand what caused it and make the appropriate adjustments on subsequent runs. Releasing<br />
below the Minimum Release Altitude is considered to be unsafe. The causes of late sight<br />
pictures will be discussed in detail in the Target Tracking Section of this text.<br />
Release Power Setting is the power setting prior to roll-in to achieve the planned release<br />
airspeed. Aim Off Distance (AOD) and Aim Off Angle are shown below the Power Setting.<br />
This is how far past the target our Velocity Vector needs to be to compensate for the trajectory<br />
drop of the weapon. All altitudes are shown in AGL. A space is allotted on the Z diagrams to<br />
add target elevation to the AGL altitudes thereby deriving the MSL altitudes flown in the<br />
aircraft. ACD stands for Attack Cone Distance which is the distance from the target where the<br />
roll-in from pattern altitude begins. This is also referred to as the Roll-In Point or “RIP”.<br />
Figure 3-17 shows the T-<strong>45</strong>C “Z” diagrams used for Mk 76 bomb deliveries.<br />
<strong>WEAPONS</strong> DELIVERY THEORY AND PRINCIPLES 3-15