

1611 Install-Toyota Tundra Front Differential by Mike ... - Teddnet.com
1611 Install-Toyota Tundra Front Differential by Mike ... - Teddnet.com
1611 Install-Toyota Tundra Front Differential by Mike ... - Teddnet.com

You also want an ePaper? Increase the reach of your titles
YUMPU automatically turns print PDFs into web optimized ePapers that Google loves.
<strong>1611</strong> <strong>Install</strong>-<strong>Toyota</strong> <strong>Tundra</strong> <strong>Front</strong> <strong>Differential</strong> <strong>by</strong> <strong>Mike</strong> Donofrio<br />
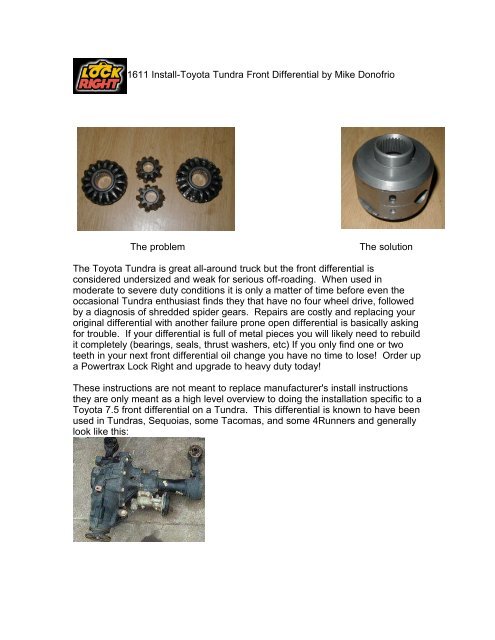
The problem The solution<br />
The <strong>Toyota</strong> <strong>Tundra</strong> is great all-around truck but the front differential is<br />
considered undersized and weak for serious off-roading. When used in<br />
moderate to severe duty conditions it is only a matter of time before even the<br />
occasional <strong>Tundra</strong> enthusiast finds they that have no four wheel drive, followed<br />
<strong>by</strong> a diagnosis of shredded spider gears. Repairs are costly and replacing your<br />
original differential with another failure prone open differential is basically asking<br />
for trouble. If your differential is full of metal pieces you will likely need to rebuild<br />
it <strong>com</strong>pletely (bearings, seals, thrust washers, etc) If you only find one or two<br />
teeth in your next front differential oil change you have no time to lose! Order up<br />
a Powertrax Lock Right and upgrade to heavy duty today!<br />
These instructions are not meant to replace manufacturer's install instructions<br />
they are only meant as a high level overview to doing the installation specific to a<br />
<strong>Toyota</strong> 7.5 front differential on a <strong>Tundra</strong>. This differential is known to have been<br />
used in <strong>Tundra</strong>s, Sequoias, some Ta<strong>com</strong>as, and some 4Runners and generally<br />
look like this:
Before beginning to do the work you will need the following:<br />
• Vise or clamp table<br />
• LocTite Red and Blue<br />
• I prefer Sierra Gear and Axle brand 100% silicone as a gasket maker<br />
• Medium grease<br />
• 1.4 quarts 75w-90 gear oil<br />
• A sharp chisel and a very small screwdriver will be very helpful<br />
• Jackstands, safety glasses, <strong>com</strong>mon sense<br />
• Good set of wrenches, sockets, etc<br />
From <strong>Toyota</strong> you will need to buy:<br />
• 1pc 90521-29002 Ring, Hole Snap<br />
• 2pc 43425-04020 Ring, Drive Shaft Snap<br />
• 5pc 41222-35030 Plate, Ring Gear<br />
Jack vehicle and secure with jackstands.<br />
Remove wheels.<br />
Remove engine undercover (skidplate).<br />
Remove front diff fill plug (upper) then remove<br />
drain plug (lower) drain gear oil into suitable<br />
container for recycling. 10mm allan wrench.<br />
Remove lower ball joint bolts-4 each side (bolt<br />
shown exposed). 14 mm<br />
Matchmark and<br />
then disconnect<br />
front driveline at<br />
front differential<br />
pinion flange (4<br />
bolts). 14 mm
Disconnect plug for Automatic <strong>Differential</strong> Disconnect (ADD) and front diff<br />
breather (Not shown).<br />
X=Do not use allan wrench to remove cushion screw<br />
On rear of<br />
differential<br />
remove two<br />
bolts on front<br />
differential rear<br />
cushion. One<br />
facing up (A)<br />
and one facing<br />
down (B).<br />
17mm<br />
Firmly grasp rotor/caliper assembly and pull<br />
entire half shaft out of differential. Be careful<br />
not to damage CV joints. Repeat on other side.<br />
Align half shafts away from differential and be<br />
sure not to tear CV boots on exposed bolts.<br />
Begin to stabilize differential with transmission jack or have a friend hold it while<br />
<strong>com</strong>pleting next step. Use caution as diff will be almost <strong>com</strong>pletely removed and<br />
may fall causing injury. It weighs close to 100 lbs.<br />
Remove front differential cushion brackets-two<br />
bolts. Pic shown is with differential drop<br />
bracket-OEM design similar.<br />
Remove differential to bench<br />
Remove differential seal bolts.
Using chisel and hammer, pry open front diffworking<br />
your way around it.<br />
Using prybar,<br />
gently pry<br />
carrier<br />
assembly<br />
away from<br />
housing,<br />
again working<br />
your way<br />
around until it<br />
<strong>com</strong>es free.<br />
Clamp carrier assembly in clamp table or vise, being careful not to mar bearings.<br />
Using a chisel,<br />
tap lock plate<br />
tabs away<br />
from ring gear<br />
bolts then<br />
pound them<br />
flat to make<br />
way for a<br />
socket.<br />
Using 17mm six-sided socket remove ring gear.
Using a chisel, separate ring gear from carrier<br />
assembly, working your way around the ring<br />
gear.<br />
Once ring gear is removed, place in oven on<br />
cookie sheet at 225 degrees until ready to<br />
reinstall.<br />
Drill out metal deformation around pinion shaft<br />
retainer pin with 1/4” drill bit.<br />
Using a suitable tool, drive out retainer pin.
Remove<br />
pinion shaft<br />
and rotate<br />
gears so that<br />
spider gears<br />
fall away.<br />
Remove side<br />
gears and<br />
thrust washers<br />
and save<br />
washers.<br />
Using the old pinion, tap out stub shaft and<br />
remove remaining side gear.<br />
***Follow manufacturer's instructions for exact installation information***<br />
Assemble Lock Right coupler with original thrust<br />
washers apply a liberal amount of heavy grease<br />
to both sides. Then place these into carrier<br />
according to manufacturer's instructions.<br />
Apply grease<br />
to spacer and<br />
place inside of<br />
driver, use<br />
plenty of<br />
grease on slide<br />
pins and spring<br />
holes to keep<br />
pins flush<br />
inside of driver<br />
then place into<br />
the carrier.
Slide shear pin into opposite hole, then place<br />
dual spring assembly into each window. Be<br />
sure springs are seated. Repeat for each shear<br />
pin/spring set. <strong>Install</strong> pinion shaft making sure<br />
that spacers are clear of pinion shaft, then<br />
slide retainer pin into retainer pin hole.<br />
Use punch to deform hole and secure retainer<br />
pin.<br />
Remove ring gear from oven and drop onto carrier assembly, align holes <strong>by</strong><br />
starting a thread or two on ring gear bolts.<br />
Place ring<br />
gear lock<br />
plates over<br />
bolt holes,<br />
apply red<br />
LocTite to<br />
ring gear<br />
bolts, torque,<br />
then tap lock<br />
plates flush<br />
to bolt heads.<br />
Using a scraper, <strong>com</strong>pletely clean differential case mating surfaces to remove all<br />
old gasket material. Then clean with solvent such as brake cleaner.<br />
Place new hole snap ring onto end of stub<br />
shaft, place stub shaft into ADD collar<br />
assembly being sure to line up splines on<br />
collar with stub shaft.
Apply generous amount of grease to bearing<br />
race and gently tap until seated.<br />
Pack as much grease as possible into bearings and then place carrier assembly<br />
onto stub shaft which is exposed from ADD side of differential case. Tap with<br />
block of wood and hammer if necessary.<br />
Apply 1/4” bead of Sierra Gear and Axle<br />
Silicone around circumference of mating<br />
surface and around each bolt hole.<br />
Reinstallation procedure: Use blue LocTite on all bolts and torque to<br />
manufacturer's specifications.<br />
Apply a drop<br />
of blue<br />
LocTite to<br />
each<br />
differential<br />
case bolt and<br />
torque to<br />
spec.<br />
1. Place differential back under vehicle, aligning rear differential mounting<br />
cushion.<br />
2. Thread rear mounting cushion-upper bolt a few turns, then thread up lower<br />
bolt a few turns. Return to upper bolt and tighten; then tighten lower bolt.<br />
3. Bolt up front differential cushions-two long bolts<br />
4. Bolt up front differential pinion flange to front driveline<br />
5. Place new snap rings onto ends of axle shafts, then place gob of grease on<br />
each shaft end/snap ring<br />
6. Grasp rotor assembly and have a friend line up axle shafts into differential
case. Use a quick push to thrust axle shaft into differential until shaft is locked<br />
into place and no appreciable gap is detected between CV joint flange and<br />
differential case.<br />
7. Repeat other side.<br />
8. Place 4 bolts into each lower ball joint, LocTite and torque to spec<br />
9. Replace engine undercover (skidplate).<br />
10.Replace wheels and torque to spec.<br />
11.Remove from jackstands.<br />
12.Wait a few hours for silicone to cure then replace drain plug fill with1.4 quarts<br />
of gear oil until oil trickles from fill hole then replace fill plug.<br />
13.Take for a test drive and learn to drive your new Lock Right front end. The<br />
truck will handle differently than it did before so be sure to read all of the Lock<br />
Right owner's manual.<br />
14.Stomp and enjoy, but always be sure to tread lightly!<br />
A special thank you to the following:<br />
Derryl, Kimberly, the Sterling Family, and Momo.