ASSEMBLY MANUAL - Hobie Cat
ASSEMBLY MANUAL - Hobie Cat
ASSEMBLY MANUAL - Hobie Cat

You also want an ePaper? Increase the reach of your titles
YUMPU automatically turns print PDFs into web optimized ePapers that Google loves.
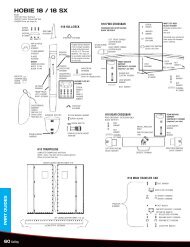
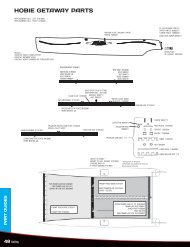
THE HULLS<br />
Lay the hulls on the ground, on their sides with bottoms to the<br />
center (graphics down), as shown above. A tarpoline or pads<br />
under the hull may be desirable if the ground surface is rough.<br />
Place the hulls about seven feet apart.<br />
CROSSBARS AND<br />
TRAMPOLINES<br />
The forward and main<br />
trampolines are rolled<br />
onto the front crossbar.<br />
Position the crossbar<br />
between the hulls near<br />
the forward cross bar<br />
sleeve in each hull.<br />
KNOTS TO USE<br />
FIGURE 8 KNOT<br />
AT END OF LINE<br />
FIGURE 8 KNOT BOWLINE KNOT HALYARD KNOT CLEATING OFF A LINE<br />
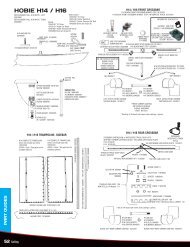
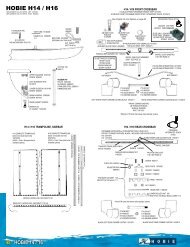
<strong>ASSEMBLY</strong> INSTRUCTIONS<br />
Note: There is one plug in the rear of each hull. These plugs<br />
are used to drain the hulls. The plugs should be in place<br />
before sailing. Remove the plugs after sailing to drain any<br />
water that may have leaked into the hulls. It is best to travel<br />
with and store the boat with the plugs removed to allow for<br />
pressure changes due to heating, cooling and altitude<br />
changes. This will prevent warping of the hull surface.<br />
Main Beam with Trampoline<br />
4<br />
Remove the bolt that is<br />
threaded into the<br />
plastic block on each<br />
end of the Bow<br />
Spreader Pole.<br />
1. 2.<br />
The rear crossbar has the main sheet traveler car and swivel<br />
cam cleat installed. Position it near the aft crossbar sleeve in<br />
each hull.<br />
The Bow Spreader Bar<br />
has slides, eye straps,<br />
bridle wires (2) and the<br />
roller furler installed.<br />
Position it near the<br />
recesses on each bow.