ASSEMBLY MANUAL - Hobie Cat
ASSEMBLY MANUAL - Hobie Cat
ASSEMBLY MANUAL - Hobie Cat

You also want an ePaper? Increase the reach of your titles
YUMPU automatically turns print PDFs into web optimized ePapers that Google loves.
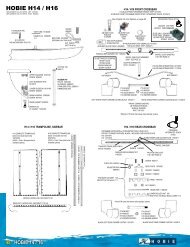
MAINSHEET SYSTEM<br />
Connect the main sheet block to the<br />
traveler car. Attach the shackle that is<br />
part of the block<br />
through the clevis pin<br />
on the traveler car.<br />
Hook the mainsheet<br />
to the "clew"<br />
grommet at the rear<br />
of the main sail.<br />
The tail end of the main sheet line<br />
is used for traveler adjustment.<br />
Pass this line end through the<br />
swivel cleat jaws (from forward<br />
towards rear of the boat) then<br />
eye. Pass the line through the<br />
traveler car. Pass the line through<br />
the stainless eye on the rear side of<br />
the cross bar. Tie a figure 8 knot in<br />
the end of the line to keep it from<br />
coming out of the eye. When sailing<br />
upwind, cleat the traveler more to<br />
the center of the boat. On a reach<br />
across the wind or when sailing<br />
downwind adjust and cleat the<br />
traveler further out the track. When<br />
sailing in strong winds you can move the car further out to help<br />
keep the boat more level and limit heeling or tipping.<br />
Keep the mainsheets loose when the boat is on the beach to<br />
prevent an accidental capsize.<br />
RIGGING THE JIB SAIL<br />
Thread the jib sheet line starting from<br />
the eye next to the starboard (right<br />
side) swivel cleat. Pass the line<br />
through the stainless eye and tie a<br />
figure 8 knot. Thread the onthe end<br />
through one of the jib clew blocks and<br />
then through the swivel cleat. Pass<br />
the line through the swivel eye and<br />
then the jaw and onto the main<br />
trampoline. Cross over to the port (left) side and repeat the<br />
process in reverse ending at the stainless eye with another<br />
figure 8 knot.<br />
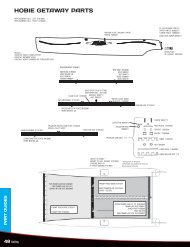
The jib is furled on the forestay and<br />
covered by a "snorkel". To remove<br />
the snorkel, simply unzip as it is pulled<br />
down.<br />
12<br />
The jib is held furled by a snap hook<br />
that is attached to the jib clew.<br />
Before releasing the snap hook, spin<br />
the jib clockwise 2 or 3 turns to start<br />
spooling the furler line onto the furler<br />
spool. Release the hook from the<br />
loop and attach the 2 jib clew blocks<br />
to the snap hook. The jib can now<br />
be unfurled by pulling on the jib clew or tightening one side of<br />
the jib sheets. This action will automatically roll the furling line<br />
onto the furler spool as the jib un-furls. (If the jib is not furled<br />
and the line is also not loaded in the drum, wrap the jib<br />
around the forestay until it is furled. Then when you<br />
unfurl, it will load the drum as desired.)<br />
To furl the jib, ease off on the<br />
mainsheet tension and release<br />
the jib sheets, pull on the jib furler<br />
line. Keep light tension on the jib<br />
sheet as the sail is being furled to<br />
get a nice tight wrap. Cleat the<br />
furler line in the furler cleat to<br />
keep the sail furled.<br />
There is a luff adjustment line that is installed at the jib top<br />
(head) and may need to be adjusted. While the mainsheet is<br />
tensioned, and the forestay is taunt, there should be just<br />
enough tension to smooth the sail and remove the horizontal<br />
wrinkles at the luff. Too much tension can damage the sail or<br />
pull the head or tack grommet out when under sailing loads.<br />
To adjust the line you must tip the boat onto it’s side or drop<br />
the mast down to access the tensioning line at the jib top.<br />
If the boat is being put away for the day the snorkel should be<br />
installed. To do so, unhook the jib clew blocks and snap the<br />
hook onto the loop sewn into the sail. This will keep the sail<br />
tightly furled while the snorkel is installed. Re-attach the<br />
zipper and slide the snorkel up the sail as it is zipped up.<br />
The main halyard can be used to pull the snorkel up over the<br />
jib, but if the sail is tightly furled, the halyard will not be<br />
required. Route the halyard under a shroud and hook to the<br />
snorkel and hoist. Tie the halyard to the halyard cleat.