ASSEMBLY MANUAL - Hobie Cat
ASSEMBLY MANUAL - Hobie Cat
ASSEMBLY MANUAL - Hobie Cat

You also want an ePaper? Increase the reach of your titles
YUMPU automatically turns print PDFs into web optimized ePapers that Google loves.
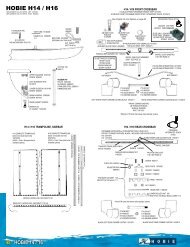
STEPPING THE MAST continued...<br />
Lean your weight<br />
against the mast to<br />
hold it in this<br />
position. The mast<br />
base/crossbar<br />
arrow alignment is<br />
no longer required.<br />
Be sure to keep the arrows at the<br />
mast base and front crossbar<br />
aligned. Face forward on the<br />
boat with a wide stance for<br />
stability. Walk forward while<br />
lifting the mast until the side<br />
shrouds go tight preventing the<br />
mast from further forward<br />
movement.<br />
Insert the forestay<br />
adjuster into the furler drum one or two holes and pin in place.<br />
Run the furling line from the drum<br />
to the cleat next to the mast.<br />
Pass the line through the cleat<br />
and tie a small figure 8 knot in the<br />
end of the line to keep it from<br />
slipping back through the cleat.<br />
At this time, pull the furling line to<br />
unwind the drum completely.<br />
The drum will be rewound when<br />
the sail is unfurled.<br />
10<br />
After stepping the mast, adjustments can be made to tension<br />
the wires and for raking the mast forward or aft. Positioning<br />
the shrouds lower in the shroud adjusters will rake (lean) the<br />
mast aft. This can help boat-handling in higher winds.<br />
There is a limit to the amount of mast rake aft that is possible.<br />
This will be seen when the main sail block on the sail clew<br />
nears or touches the block attached to the rear crossbar when<br />
fully sheeted while sailing. Too much mast rake will not allow<br />
you to sheet the sail properly. It may also be more difficult to<br />
tack the boat.<br />
At this time adjust / tension the<br />
shroud wires lower in their<br />
adjuster plates, one side at a<br />
time. Use the main halyard to<br />
hold the mast up while your crew<br />
makes the adjustments. Be very<br />
careful to tie off the halyard at<br />
the mast cleat in such a way as<br />
it will not slip during this<br />
process. You will be holding the mast with this line alone.<br />
Step aft and away from the boat on the side to be adjusted.<br />
Tension the halyard line to ease the shroud tension on that<br />
side. Lower one side a few holes then refasten the keeper pin<br />
and ring. Do the same for the opposite side. Repeat until all<br />
three mast supporting wires are taunt and the shroud wires<br />
are as nearly equally adjusted as possible. Once the proper<br />
adjustments are made, you will not have to repeat this process<br />
again. Unless you want to make adjustments to the mast rake<br />
angle.<br />
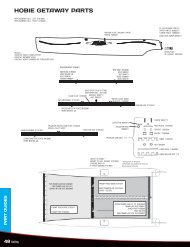
MAIN SAIL AND BATTENS.<br />
Unfurl the sail on the trampoline.<br />
Getaway sails are shipped from<br />
the factory with the battens<br />
installed. It is important that the<br />
means of securing the battens in<br />
the sail be understood.<br />
Note that the batten ends have a<br />
"V" jam cleat molded into them.<br />
These "V" jam cleats will keep the tension line from slipping in<br />
only one direction. Note the hollowed-out side of the cleats.<br />
Pull the line from the flush side toward the hollowed side when<br />
cleating.<br />
Cleat at mouth of each tip<br />
Batten pocket<br />
Start here with a<br />
bowline knot<br />
Hollowed-out<br />
side of tip