shock 1997 user manual - Neil Pryde
shock 1997 user manual - Neil Pryde
shock 1997 user manual - Neil Pryde

You also want an ePaper? Increase the reach of your titles
YUMPU automatically turns print PDFs into web optimized ePapers that Google loves.
4<br />
6<br />
2<br />
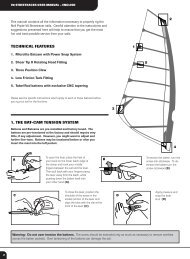
THE MINI HEAD BATTEN<br />
The Mini Head Batten can be adjusted by means of the allen key provided. The<br />
Batten is pre-tensioned at the factory and should require very little if any<br />
adjustment. Tension only until wrinkles disappear. Do Not Overtension.<br />
RIGGING<br />
ADJUSTABLE HEAD FITTING (Smaller Sails)<br />
Fit the mast cup and sail head fitting to the top of the mast . Preset<br />
the webbing so that the tack is just above the cleat when the<br />
sail has been fully downhauled. For guidance in setting the<br />
adjustment webbing, see the specifications printed near the tack of<br />
the sail. Allow at least 15-25 cm. between the tack and the cleat<br />
for downhaul tension.<br />
ATTENTION: Always be sure to secure the tail of the head<br />
adjustment webbing using the safety knot shown.<br />
LOW FRICTION<br />
TACK RING<br />
The Low Friction Tack must be<br />
rigged properly to ensure<br />
maximum downhauling<br />
efficiency. Always rig the tack<br />
ring according to the diagram.<br />
A. Set your boom and mast base to the approximate dimensions of the sail, as<br />
printed near the tack. For sails with adjustable head fittings, set the webbing<br />
to the specified dimension, adding this to the luff length to obtain the required<br />
mast length.<br />
B. Check that all the battens are fully inserted into their pockets.<br />
C. Tension the battens according to the instructions.<br />
D. Insert the mast into the luff pocket. Use the tack handle to help pull the tack<br />
fitting close to the mast base. Do not pull on the neoprene tack fairing.<br />
E. Partially tension the downhaul using the low friction tack fitting.<br />
F. Attach the booms to the mast, allowing space above them in the cut-out so<br />
that the sail can be fully downhauled later.<br />
G. Outhaul the sail, until it is quite flat.<br />
H. Downhaul the sail again to within the range of dimensions printed near the<br />
tack. Re-position the cams if needed. Re-set the mast base so that the tack<br />
fitting is within two centimeters of the cleat.<br />
I. Re-tension any battens - only as necessary until any wrinkles across the batten<br />
pockets disappear. Be sure not to over tension the battens.<br />
J. Ease the outhaul tension until the sail has the desired foil shape, and re-adjust<br />
the boom length so that the clew is within two centimeters of the boom end.<br />
K. To ensure correct tuning for your specific sail, please consult the trim instructions<br />
that follow.<br />
7<br />
3<br />
FIXED HEAD FITTING<br />
The fixed head fitting is designed to remain attached to the sail. Never<br />
attempt to remove the fitting from the webbing at the sail head. When<br />
rigging, ensure that the finger at the bottom of the plastic fitting is<br />
seated correctly in the cup at the top of the mast.<br />
5<br />
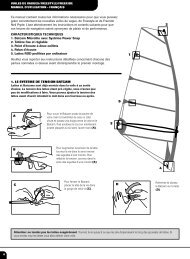
Cam Rigging Tips:<br />
THE LEECH CORD<br />
The leech cord is intended only to prevent unwanted<br />
flutter of the aft edge of the leech and head. The cord<br />
should never be tensioned more than necessary to prevent<br />
excessive flutter. An over tight leech cord will result in<br />
greatly reduced sail performance. A simple guide to<br />
setting the leech cord: with the sail fully rigged (boom<br />
attached), press down on the mast base and mast tip until<br />
the leech appears firm, but not tight. While pushing down<br />
lightly on the outboard end of the top batten, tension the<br />
cord very lightly, securing the loose end around the button<br />
provided. This exercise will ensure that leech flutter is<br />
discouraged without over tensioning the cord.<br />
Grab the cams (through the luff pocket) and work them down the<br />
mast one by one. This is easier and works better than trying to pull<br />
the luff pocket over the mast from the sail tack. For the 5.3 through<br />
7.0, keep the two cams opposite the boom cut-out close together as<br />
you work them down the mast. The boom cut-out area of the luff<br />
pocket should be compressed and wrinkled looking during this<br />
process. This method reduces cam pressure on the mast and makes<br />
rigging a lot easier. Use the tack handle to help pull the tack fitting<br />
close to the mast base. Do not pull on the neoprene tack fairing.<br />
DE-RIGGING PROCEDURES<br />
QUICK RIG<br />
CLEW<br />
PULLEY<br />
The quick rig<br />
clew pulley is<br />
easily rigged by<br />
following the<br />
Fold the neoprene tack fairing back over any mast base fittings before<br />
releasing the downhaul. To de-rig, just brace the mast tip against a solid<br />
object, and slide the cams up the mast one at a time, reversing the initial<br />
process.<br />
1. CAREFULLY EASE THE OUTHAUL until it is completely loose.<br />
2. NOW REMOVE THE BOOM COMPLETELY.<br />
3. THEN CAREFULLY EASE THE DOWNHAUL a little at a time.<br />
4. CAREFULLY remove the mast from the sail, taking care that the cams<br />
remain correctly positioned on the batten pocket ends.