shock 1997 user manual - Neil Pryde
shock 1997 user manual - Neil Pryde
shock 1997 user manual - Neil Pryde

You also want an ePaper? Increase the reach of your titles
YUMPU automatically turns print PDFs into web optimized ePapers that Google loves.
User Manual
SHOCK <strong>1997</strong><br />
USER MANUAL<br />
This <strong>manual</strong> contains all the information necessary to properly rig all<br />
of the <strong>Neil</strong> <strong>Pryde</strong> Shock Sails. Careful attention to the instructions and<br />
suggestions presented here will help to ensure that you get the most<br />
fun and best possible service from your sails.<br />
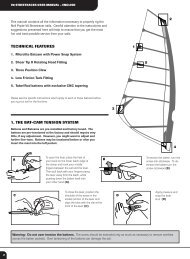
TECHNICAL FEATURES<br />
1. Bat-Cam Tensioning System<br />
2. Mini Head Batten<br />
3. Fixed Head System<br />
4. Adjustable Head Fitting (small and medium size sails)<br />
5. Quick Rig Clew Pulley<br />
6. Low Friction Tack Fitting<br />
7. Leech Cord<br />
Please see the specific instructions which apply to each of these features before you rig<br />
your sails for the first time.<br />
1. BAT-CAM INSTRUCTIONS<br />
Correct batten tension is obtained by adjusting<br />
the screw. Tension the battens before you<br />
insert the mast into the luff pocket.<br />
First, be sure that the batten is all the way into<br />
the pocket (A).<br />
Then turn the screw clockwise so that it is all<br />
the way into the tube, and close the lever (B).<br />
To close the lever, position the shoulder of the<br />
screw in the socket portion of the lever and<br />
align the tube with the clip at the front of the<br />
handle (C).<br />
Apply pressure and snap the lever shut (D).<br />
To remove any wrinkles along the batten<br />
pocket, open the Bat-Cam and turn the screw<br />
counter-clockwise, then close the Bat-Cam<br />
again as above.<br />
To open place the heel of your hand on the<br />
lower leech edge of the clamp and hook your<br />
middle fingers between the sail and the lever.<br />
Next pull back with your fingers prying the<br />
lever away from the leech, while pushing<br />
down on the batten itself with your other<br />
hand. (E).<br />
Warning: do not over tension the<br />
batten.<br />
The screw should be extended only as much<br />
as necessary to remove wrinkles across the<br />
batten pockets. Over tensioning of the batten<br />
can damage the sail.<br />
A.<br />
D.<br />
7.<br />
5.<br />
C.<br />
1.<br />
2.<br />
B.<br />
E.<br />
3.<br />
4.<br />
6.
4<br />
6<br />
2<br />
THE MINI HEAD BATTEN<br />
The Mini Head Batten can be adjusted by means of the allen key provided. The<br />
Batten is pre-tensioned at the factory and should require very little if any<br />
adjustment. Tension only until wrinkles disappear. Do Not Overtension.<br />
RIGGING<br />
ADJUSTABLE HEAD FITTING (Smaller Sails)<br />
Fit the mast cup and sail head fitting to the top of the mast . Preset<br />
the webbing so that the tack is just above the cleat when the<br />
sail has been fully downhauled. For guidance in setting the<br />
adjustment webbing, see the specifications printed near the tack of<br />
the sail. Allow at least 15-25 cm. between the tack and the cleat<br />
for downhaul tension.<br />
ATTENTION: Always be sure to secure the tail of the head<br />
adjustment webbing using the safety knot shown.<br />
LOW FRICTION<br />
TACK RING<br />
The Low Friction Tack must be<br />
rigged properly to ensure<br />
maximum downhauling<br />
efficiency. Always rig the tack<br />
ring according to the diagram.<br />
A. Set your boom and mast base to the approximate dimensions of the sail, as<br />
printed near the tack. For sails with adjustable head fittings, set the webbing<br />
to the specified dimension, adding this to the luff length to obtain the required<br />
mast length.<br />
B. Check that all the battens are fully inserted into their pockets.<br />
C. Tension the battens according to the instructions.<br />
D. Insert the mast into the luff pocket. Use the tack handle to help pull the tack<br />
fitting close to the mast base. Do not pull on the neoprene tack fairing.<br />
E. Partially tension the downhaul using the low friction tack fitting.<br />
F. Attach the booms to the mast, allowing space above them in the cut-out so<br />
that the sail can be fully downhauled later.<br />
G. Outhaul the sail, until it is quite flat.<br />
H. Downhaul the sail again to within the range of dimensions printed near the<br />
tack. Re-position the cams if needed. Re-set the mast base so that the tack<br />
fitting is within two centimeters of the cleat.<br />
I. Re-tension any battens - only as necessary until any wrinkles across the batten<br />
pockets disappear. Be sure not to over tension the battens.<br />
J. Ease the outhaul tension until the sail has the desired foil shape, and re-adjust<br />
the boom length so that the clew is within two centimeters of the boom end.<br />
K. To ensure correct tuning for your specific sail, please consult the trim instructions<br />
that follow.<br />
7<br />
3<br />
FIXED HEAD FITTING<br />
The fixed head fitting is designed to remain attached to the sail. Never<br />
attempt to remove the fitting from the webbing at the sail head. When<br />
rigging, ensure that the finger at the bottom of the plastic fitting is<br />
seated correctly in the cup at the top of the mast.<br />
5<br />
Cam Rigging Tips:<br />
THE LEECH CORD<br />
The leech cord is intended only to prevent unwanted<br />
flutter of the aft edge of the leech and head. The cord<br />
should never be tensioned more than necessary to prevent<br />
excessive flutter. An over tight leech cord will result in<br />
greatly reduced sail performance. A simple guide to<br />
setting the leech cord: with the sail fully rigged (boom<br />
attached), press down on the mast base and mast tip until<br />
the leech appears firm, but not tight. While pushing down<br />
lightly on the outboard end of the top batten, tension the<br />
cord very lightly, securing the loose end around the button<br />
provided. This exercise will ensure that leech flutter is<br />
discouraged without over tensioning the cord.<br />
Grab the cams (through the luff pocket) and work them down the<br />
mast one by one. This is easier and works better than trying to pull<br />
the luff pocket over the mast from the sail tack. For the 5.3 through<br />
7.0, keep the two cams opposite the boom cut-out close together as<br />
you work them down the mast. The boom cut-out area of the luff<br />
pocket should be compressed and wrinkled looking during this<br />
process. This method reduces cam pressure on the mast and makes<br />
rigging a lot easier. Use the tack handle to help pull the tack fitting<br />
close to the mast base. Do not pull on the neoprene tack fairing.<br />
DE-RIGGING PROCEDURES<br />
QUICK RIG<br />
CLEW<br />
PULLEY<br />
The quick rig<br />
clew pulley is<br />
easily rigged by<br />
following the<br />
Fold the neoprene tack fairing back over any mast base fittings before<br />
releasing the downhaul. To de-rig, just brace the mast tip against a solid<br />
object, and slide the cams up the mast one at a time, reversing the initial<br />
process.<br />
1. CAREFULLY EASE THE OUTHAUL until it is completely loose.<br />
2. NOW REMOVE THE BOOM COMPLETELY.<br />
3. THEN CAREFULLY EASE THE DOWNHAUL a little at a time.<br />
4. CAREFULLY remove the mast from the sail, taking care that the cams<br />
remain correctly positioned on the batten pocket ends.
SAIL MAINTENANCE<br />
Always store your sail rolled and dry in its sailbag. Try to prevent the sail<br />
from being crushed or badly creased. Washing the sail in fresh water before<br />
storage increases its life considerably. If the foot batten is not roughly<br />
parallel with the upper battens, remove it before rolling the sail. This helps<br />
to prevent wrinkles developing in the foot and window area. The leech<br />
battens should be left in their pockets.<br />
Do Not leave the sail exposed to strong or direct sunlight. Do not use any<br />
solvents or chemicals to clean it. If the sail becomes dirty, use fresh water<br />
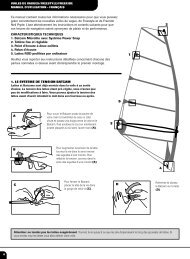
TUNING THE SHOCK SAILS<br />
When correctly rigged on the beach, the Shock sails will not look identical from one size to another. Each size requires<br />
slightly different tuning and will exhibit slightly different visual queues indicating correct trim. First set the sail to within<br />
the dimensions printed at the sail tack. Then follow the steps below to correctly fine tune each of the four Shock sails.<br />
Note: Over tensioning the downhaul can hinder rotation.<br />
Shock 4.6<br />
Downhaul until the leech is loose to the second batten.<br />
Then add outhaul - at least 2 - 4 cm of positive outhaul -<br />
beyond the point at which you begin to feel resistance.<br />
When over-powered, increase outhaul tension by 1 - 2<br />
cm. If the sail feels stiff and “pitchy”, it is probably<br />
over-downhauled. If the sail feels unstable or<br />
difficult to sheet in, it is probably underouthauled.<br />
Shock 5.3<br />
This sail has the firmest leech of any of the Shock range.<br />
Downhaul until the sail is just loose at the first batten, with<br />
perhaps just a little loosness (but not a floppy edge),<br />
between battens # 1 and 2. Then add outhaul - between<br />
2 and 4 centimeters beyond the point where you<br />
begin to feel tension. When over-powered, increase<br />
outhaul tension by 1 - 2 cm. If the sail feels stiff<br />
and “pitchy”, it is probably over-downhauled. If<br />
the sail feels unstable or difficult to sheet in, it<br />
is probably under-outhauled.<br />
1<br />
SAIL SAFE, HAVE FUN<br />
Sail carefully and thoughtfully around other sailors and beach <strong>user</strong>s.<br />
Before leaving the beach check all your equipment thoroughly for<br />
signs of wear or breakage. Always check the weather forecasts and<br />
take note of local conditions and potential hazards before sailing.<br />
Check for dangerous currents, and consider carefully where you<br />
might land in the event of an emergency.<br />
For further information on this or other NEILPRYDE sailing<br />
equipment contact your AUTHORIZED NEILPRYDE DEALER or our<br />
distributor in your country.<br />
2<br />
Shock 4.6 correctly tuned at near<br />
maximum downhaul.<br />
1<br />
3<br />
2<br />
3<br />
Shock 5.3 correctly tuned at near<br />
maximum downhaul.
Shock 6.1<br />
The 6.1 also features a relatively firm leech. Downhaul<br />
until the leech is slightly loose at the first batten and<br />
perhaps just a little soft between battens 1 and 2.<br />
Then outhaul 2 -4 cm beyond the “0” (no<br />
tension) point depending on wind<br />
conditions. When over-powered,<br />
increase outhaul tension by 1 - 2 cm.<br />
If the sail feels stiff and “pitchy”, it is<br />
probably over-downhauled. If the<br />
sail feels unstable or difficult to<br />
sheet in, it is probably underouthauled.<br />
Shock 7.0<br />
The 7.0 has the loosest leech of any of the four Shock sizes.<br />
Downhaul until the sail is loose to the second batten and a bit<br />
soft to batten # 3. As winds increase beyond the minimum<br />
required for planing, go ahead and downhaul until the sail is<br />
a bit looser between battens 2 and 3. Add outhaul<br />
between 2 and 4 cm past the “0” point --- more<br />
outhaul for improved control as wind speeds<br />
increase. When over-powered, increase outhaul<br />
tension by an extra 1 - 2 cm. If the sail feels stiff<br />
and “pitchy”, it is probably over-downhauled.<br />
If the sail feels unstable or difficult to sheet<br />
in, it is probably under-outhauled.<br />
A NOTE ON RIG DIMENSIONS<br />
The rig dimensions printed on the tack of all <strong>Neil</strong> <strong>Pryde</strong> collection sails<br />
show the following information:<br />
• Top setting (where relevant): The distance between the bottom of the<br />
mast head fitting (top of the mast) and the sail head (the intersection<br />
of luff pocket and upper leech).<br />
• Minimum luff length: The distance from the sail head to the bottom<br />
of the tack fitting at the lightest useful downhaul setting.<br />
• Maximum luff length: The distance from the sail head to the bottom<br />
of the sail tack fitting at the hardest downhaul setting.<br />
• Minimum boom: The distance from the forward edge of the mast (at<br />
the center of the boom cutout) to the sail clew at the fullest (lightest)<br />
useful outhaul setting.<br />
• Maximum boom: The distance from the forward edge of the mast (at<br />
the center of the boom cutout) to the sail clew at the flattest (hard<br />
est) useful outhaul setting.<br />
These figures are intended as a guide to proper sail trim, and,<br />
depending on the rig components you choose, may not always<br />
correspond perfectly to the settings which are best for you.<br />
1<br />
2<br />
1<br />
3<br />
CHOOSING THE RIGHT MAST<br />
Shock 6.1 correctly tuned at<br />
near maximum downhaul.<br />
2<br />
The Shock range of sails have been designed specifically around the<br />
Carbon 30/460 mast, and this spar is therefore recommended for best<br />
results. Other masts from the <strong>Neil</strong> <strong>Pryde</strong> collection can also be used, as<br />
can earlier <strong>Neil</strong> <strong>Pryde</strong> masts having the correct diameter to fit the luff<br />
pocket. Check with your <strong>Neil</strong> <strong>Pryde</strong> retailer if you are in doubt.<br />
3<br />
Shock 7.0 correctly tuned at<br />
near maximum downhaul.