Output file - United States Dressage Federation
Output file - United States Dressage Federation
Output file - United States Dressage Federation

Create successful ePaper yourself
Turn your PDF publications into a flip-book with our unique Google optimized e-Paper software.
tHe<br />
<strong>Dressage</strong> riDer’s<br />
How-to guiDe<br />
30 October 2012 • USDF ConneCtion<br />
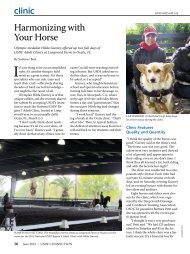
Braids? Polo wraps? We’ve got you covered.<br />
By Sharon BiggS<br />
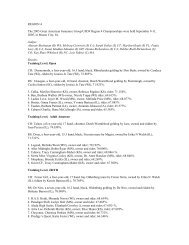
IMPECCABLE: Beautiful braids, correctly ftting tack and attire,<br />
and excellent grooming complement the bloom of health and<br />
present your horse to his best advantage. Stefen Peters presents<br />
Ravel at the 2012 Olympic Games veterinary inspection.<br />
jennifer bryant
aKDraGOOPHOtO.COM; jennifer bryant<br />
every equestrian sport has a particular way of<br />
turning out horse and rider for competition, and<br />
dressage is no diferent. to call yourself a true<br />
DQ (that’s “dressage queen” for the uninitiated),<br />
you need to master the big three: braiding, tail prep, and<br />
polo-wrap application (the latter of which will also come in<br />
handy should your horse’s legs need to be bandaged). you<br />
also need to know how to select and adjust a saddle pad for<br />
a fattering look and maximum horse comfort.<br />
in this article, a grooming expert and a tack-shop owner<br />
ofer step-by-step instructions. Bonus: a dressage judge<br />
and longtime competitor and horse owner shares her pet<br />
peeves and advice on show turnout.<br />
How to: Braid for <strong>Dressage</strong><br />
First, the rules. although the US equestrian <strong>Federation</strong><br />
rule Book states that braiding the horse’s mane for dressage<br />
is optional, the unwritten rule is always to braid, except<br />
perhaps for unrecognized competitions (schooling shows).<br />
Most dressage riders consider braiding a traditional form of<br />
showing respect for the judge and the competition, as well<br />
as a way of enhancing the look of their horses’ necks.<br />
as you may know, braiding can be a tricky craft to conquer.<br />
For guidance we turned to Charni Lewis, trainer and<br />
instructor at Flintridge riding Club in La Canada Flintridge,<br />
Ca, and the author of Braiding Manes and Tails: A Visual<br />
Guide to 30 Basic Braids (Storey, 2008).<br />
“Braiding styles have changed over the years,” says Lewis.<br />
“Style is a personal preference, but for a long time there<br />
was a school of thought that said braids should extend up<br />
along the top of the horse’s neck. But it’s difcult to get that<br />
line even. Te dressage bun [aka the button braid] is a popular<br />
style that lies close to the neck and give a nice, smooth<br />
topline. Te other beneft to the bun is that all the hair is<br />
contained, and so the braid doesn’t look fuzzy. Tey also<br />
tend to last really well and look fresh for a couple of days.<br />
Shavings are fairly easy to brush of.”<br />
What you’ll need: Spray bottle, sponge, hair clip, pullthrough,<br />
pulling comb, comb, braid aid, seam ripper, and<br />
yarn that matches your horse’s mane.<br />
Step 1: Prepare the mane by pulling it to about fve to six<br />
inches in length. Shampoo the mane a few days before you<br />
plan to braid, but omit conditioner and any products that<br />
will make the hair slippery, such as “sheen” sprays.<br />
Step 2: Cut the yarn into pieces of about ten to twelve<br />
inches in length. Tread the hank through your belt loop<br />
or through the ring in your horse’s halter—somewhere that<br />
will be easy to reach while you braid. Dampen the mane<br />
with water or with a braiding product such as Quic Braid.<br />
HUNTER BRAIDS: Can be tied so they lie fat against the neck or with<br />
little knobs at the top, as shown here<br />
DRESSAGE BUNS: An extra wrap or fold creates the dressage bun or<br />
button braid, popular in our sport<br />
Use a braid aid or comb to section of a clump of mane. if<br />
you’re using a comb, mark a space on it with black tape so all<br />
braids are the same thickness, Lewis advises: an inch to an<br />
inch and a half apart for hunter braids, and up to two inches<br />
apart for dressage buns. Use a hair clip to hold the rest of<br />
the mane away from the section you’ll be braiding.<br />
Divide the mane into three equal sections and plait<br />
down from the crest, putting pressure on the braid in a<br />
downward motion. avoid pulling the braid out and away<br />
from the crest, which will create a “Pippi Longstocking”<br />
look. halfway down the braid, fold a piece of yarn in half,<br />
incorporate it into the braid, and continue plaiting. When<br />
you reach the end of the braid, pinch the end with one hand<br />
as you loop the yarn tightly around it and make a double<br />
knot. repeat until the entire mane is braided down.<br />
Step 3 (for traditional hunter braids): insert the looped<br />
end of your pull-through into the braid near the crest until<br />
the loop pokes out from the bottom side of the braid.<br />
Tread the yarn ends through the pull-through loop. Pull<br />
the tool back up through the braid, bringing the yarn ends<br />
USDF ConneCtion • October 2012 31
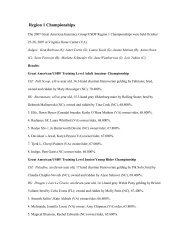
RUNNING BRAID: Traditionally long-maned horses, like this Lusitano,<br />
are braided for dressage using a French-braid variation called<br />
the running braid<br />
through the middle of the plait. tie the yarn under the braid<br />
in a square knot by crossing the strings over each other<br />
twice; tighten; then tie the ends right over left, left over<br />
right. Bring the ends around to the front and make another<br />
square knot against the crest so that a little bump is created.<br />
Cut of the excess yarn and repeat down the neck.<br />
Step 3 (for dressage buns): Tis style wraps the end of<br />
the braid around itself, securing the plait against the horse’s<br />
neck. Use the pull-through tool as described above, but pull<br />
the entire braid through the middle of the plait (the end will<br />
be above the crest). remove the yarn from the pull-through.<br />
insert the tool back up through the base of the plait, loop<br />
pointed up. Wrap the end of the braid under the plait from<br />
right to left. insert the ends of the yarn through the pullthrough<br />
loop from back to front, and pull the yarn and<br />
what’s left of the braid down through the plait. Make sure to<br />
keep the braid tight. Separate the ends of the yarn and bring<br />
them up above the crest. hold the braid with your thumb<br />
and tie a square knot as above. Te braid will lie fat. Cut the<br />
excess yarn and repeat down the neck.<br />
Use the same techniques for the forelock. if you like, you<br />
can wrap white braiding tape around the top of each mane<br />
More Braiding Tips<br />
from Charni Lewis<br />
From Charni Lewis, author of Braiding Manes<br />
and Tails:<br />
Unlike in the hunter/jumper world, in which<br />
manes are traditionally trained to lie on the right<br />
side of the horse’s neck, dressage horses can be<br />
braided to either side.<br />
The typical number of braids runs from nineteen<br />
to 22, according to Lewis; but let your horse’s neck<br />
be the guide. “Fewer braids make the neck look<br />
shorter; more braids make it look longer,” she says.<br />
32 October 2012 • USDF ConneCtion<br />
and forelock braid. Shoot for an even line down the length<br />
of the neck.<br />
(Some riders leave their horses’ forelocks unbraided.<br />
traditionally the unbraided forelock signifes a stallion.<br />
a well-known example is the Danish stallion Calecto V,<br />
owned and ridden by tina Konyot, whose hallmark is his<br />
luxuriant loose forelock.)<br />
For long-maned horses: Some breeds, such as Friesians<br />
and iberian horses, are traditionally shown with long<br />
manes. instead of creating many separate neck braids, use<br />
a French “running” braid along the crest. Section a clump<br />
of mane about one and a half inches wide. Separate into<br />
three pieces and start braiding. With the frst turn, gather<br />
a piece of mane into the braid. Work your way down the<br />
crest, gathering an even piece of mane into the braid each<br />
time. Be sure to keep the braid parallel to the neck. at the<br />
end, braid down and secure with a rubber band. Fold the<br />
braid up and secure again.<br />
“you can also fnish this braid with a bun,” says Lewis.<br />
How to: Trim a Tail<br />
although tail-braiding, as seen in the hunter/jumper world,<br />
is permitted in dressage competition, it’s more customary<br />
in our sport to trim the hair at the top of the tail instead. But<br />
there are exceptions, as Lewis explains.<br />
What you’ll need: Set of clippers or trimmers with a<br />
#10 blade, scissors. if braiding: hair gel, rubber band.<br />
For breeds shown with traditional (short) braided manes:<br />
Clipping the hair on the sides of the dock can help accentuate<br />
your horse’s haunches. Using a #10 clipper blade, lightly<br />
pass or comb the clippers, teeth facing down, from the top<br />
of the dock to the middle of the tailbone, ending in the middle<br />
of the buttocks.<br />
For breeds shown with long manes in a running braid:<br />
Leave the top of the tail natural. “French-braid the tail to the<br />
middle of the buttocks; then braid it a few turns down. Secure<br />
with a rubber band and let the excess hang down to blend in<br />
with the rest of the tail. if you prep the tail with gel, it can help<br />
hold those loose hairs in. i also put a bandage around this<br />
braid when i’m fnished to protect it,” Lewis says.<br />
<strong>Dressage</strong> horses’ tails are traditionally banged—trimmed<br />
straight across at the bottom. to bang the tail, hold the tailbone<br />
slightly away from the horse to mimic the way he carries<br />
it when he moves. “i hold the tailbone with my right<br />
hand and then run my left hand down, thumb down, to the<br />
length i prefer; the european way is to mid-cannon bone,<br />
but that’s personal preference,” Lewis says. “Let go of the tail<br />
with one hand, fip the end of the tail up with the other, and<br />
cut it straight across with a sharp pair of scissors.”<br />
jennifer bryant
jennifer bryant<br />
DRESSAGE TAIL: Tis warmblood’s tail has been banged (trimmed<br />
straight across at the bottom), and the sides of the dock have been<br />
trimmed to accentuate the hindquarters<br />
How to: Fit a <strong>Dressage</strong> Saddle Pad<br />
a saddle pad may seem an easy thing to ft, but here’s one<br />
area where correct size is more than an aesthetic concern: a<br />
poorly ftting pad can actually cause your horse discomfort.<br />
Beth haist, owner of Te horse of Course tack shop in<br />
Claremore, oK, says the most critical measurement in a<br />
traditional square dressage saddle pad is the drop, which<br />
describes the distance from midway along the pad’s spine to<br />
the bottom of the pad.<br />
“your pad shouldn’t exceed the length of the saddle fap<br />
by more than an inch or so,” says haist. “if it’s too long, it<br />
will bunch up under the girth. you should have enough<br />
length so that you can pull the pad up into the gullet of the<br />
saddle, which allows freedom for the withers.” (Better pads<br />
usually are contoured to allow for the withers, as well.)<br />
Te length of the pad from pommel to cantle is also important.<br />
if the pad is too short from front to back, the saddle<br />
will rest on the edges of the pad and create one or more<br />
pressure points, haist says. (a too-short pad also bears an<br />
unattractive resemblance to a tutu.) on the fip side, a toolong<br />
pad will swamp the horse.<br />
“it should extend an inch or two past the panel of the<br />
cantle. Some saddles have underneath panels that extend<br />
LONG AND GORGEOUS: Although some grooms pair the Iberian horse’s<br />
running braid with a braided tail, it’s equally common to see the tail left<br />
natural. Either way, it’s encouraged to be as full and lush as possible.<br />
past the panel of the cantle, so make sure the pad fts past<br />
that,” haist says.<br />
to get an idea of size, measure your saddle from the<br />
middle of the seat to the bottom of the fap and from the<br />
front of the pommel to the back of the panel. [<br />
Helmet or Hat?<br />
Current US Equestrian <strong>Federation</strong> rules state<br />
that, at USEF-licensed/USDF-recognized dressage<br />
competitions, anyone mounted on a<br />
horse must wear protective headgear except for<br />
those aged eighteen and older who are competing<br />
at Prix St. Georges and above.<br />
A rider who is competing the same horse at both<br />
national (Training-Fourth) levels and FEI (PSG-Grand<br />
Prix) levels must wear protective headgear at all<br />
times. In other words, if you are competing the<br />
same horse at Fourth Level and PSG, you must wear<br />
protective headgear, regardless of your age. If you<br />
are showing the horse only at PSG (or Intermediate<br />
or Grand Prix) and you’re eighteen or older, you may<br />
choose to ride in either a top hat or a helmet.<br />
USDF ConneCtion • October 2012 33
CORRECT PAD FIT: Tis traditional square dressage saddle pad<br />
is large enough to cover the saddle and faps but not so long that it<br />
bunches up under the girth. Te pad’s rounded edges are fattering on<br />
this shorter-backed horse.<br />
34 October 2012 • USDF ConneCtion<br />
Te pad needs to ft both your saddle and your horse. “a<br />
pony saddle pad might ft a horse that’s ffteen hands, but<br />
it won’t ft an eighteen-inch saddle. a properly ftting pad<br />
should frame the saddle a little bit,” says haist. Particularly<br />
in the case of a short-backed or delicately built horse, the<br />
trick is to fnd a pad that’s big enough to accommodate the<br />
saddle without making him look as if he’s wearing a blanket.<br />
“if you’re having problems fnding the right size, consider<br />
a custom pad,” haist says. “you can buy a nice custom<br />
pad for thirty-nine dollars. i prefer pads with a felt lining<br />
because they keep their shape, even after washing, and look<br />
smart in the show ring.”<br />
From an aesthetic standpoint, rounded edges look best<br />
on smaller horses, according to haist. Square-edged and<br />
swallowtail pads are attractive on long-backed horses because<br />
the lines visually shorten the back, she says.<br />
to keep your pad looking good, haist advises giving the<br />
outside material a liberal coating of Scotchgard. hang to dry<br />
before you ride in the pad. according to haist, a pad thus treated<br />
will remain stain-free for two years. “you can even do this<br />
with your show clothes, especially white breeches,” she says.<br />
if you use a half-pad on top of your regular saddle pad, its<br />
size is important, too. half-pads come in diferent lengths,<br />
so choose the one that suits your saddle length.<br />
jennifer bryant
arnD brOnKHOrst; aKDraGOOPHOtO.COM<br />
APPLYING POLO WRAPS: With each turn, the groom strives for even<br />
tension and equal overlap<br />
How to: Apply Polo Wraps<br />
Tere are many forms of equine leg protection, but the classic<br />
dressage look is the polo wrap. Polo wraps are feece<br />
bandages that secure with hook-and-loop strips. Unlike<br />
thin stable bandages, which are designed to be applied over<br />
cushioned wraps, polo wraps are usually applied directly to<br />
the leg, although some riders use thin cushioned pads underneath<br />
for extra protection.<br />
FINISHED PRODUCT: Applied properly, the polo wrap comes down<br />
to cover the fetlock, creating an upside-down-V appearance at the front<br />
of the leg. Te fasteners are on the outsides of the legs so the horse can’t<br />
tear them of.<br />
as with any leg bandage, ensuring a snug (not tight) ft<br />
with even pressure throughout is key. “a little bit of tension is<br />
important, but not enough to restrict the tendons,” says Lewis.<br />
“Whenever you tighten or take the slack out, do so against<br />
the front of the cannon bone and not against the tendons.” [<br />
USDF ConneCtion • October 2012 35
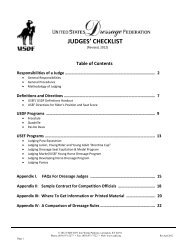
From the Judge’s Perspective<br />
You only have one chance to make a first impression<br />
on a dressage judge, so make sure it’s a<br />
good one.<br />
Proper turnout tells the judge that you care and<br />
that you pay attention to details. Above all else, make<br />
sure that you and your horse are neat and tidy, says<br />
US Equestrian <strong>Federation</strong> “S” judge Melissa Creswick,<br />
Clovis, CA, a member of the USEF <strong>Dressage</strong> Committee<br />
and a board member of the California <strong>Dressage</strong><br />
Society.<br />
“I don’t care if your tack or your show clothes are<br />
high-dollar. They should be clean, well-fitting, and appropriate<br />
for the level,” Creswick says.<br />
The most common show-turnout faux pas Creswick<br />
sees is an ill-fitting and poorly adjusted bridle. She<br />
points out that not only does it look unattractive, but<br />
it also can hinder the horse’s performance.<br />
“I see lots of issues: nosebands fitted too low; flash<br />
nosebands too tight; browbands too loose and banging<br />
on the forehead or not sitting square across the<br />
brow; or worst of all, the bit clanking on the horse’s<br />
teeth because it’s hanging too low,” Creswick says.<br />
Are you certain that your horse’s bit and bridle fit<br />
and are adjusted correctly? If not, then seek guidance<br />
from an experienced professional.<br />
Dirty tack that looks rough and dry also makes<br />
Creswick’s list of “don’ts.” It looks bad; what’s more,<br />
leather that’s not properly cared for can crack and<br />
become a safety hazard. Clean and condition leather<br />
regularly. Replace cracked or worn bridle parts, reins,<br />
stirrup leathers, and billet straps. If stitching is loose,<br />
missing, or rotting, repair or replace the item.<br />
When Creswick sits at “C,” she sees a lot of riders<br />
whose coats don’t fit well. “The biggest thing I see<br />
is coats that are too tight,” she says. “The arms look<br />
stuffed into the sleeves so the rider can barely move.<br />
I’d rather see bagginess because the rider has some<br />
freedom.”<br />
Although you wouldn’t want to ride in a coat and<br />
white breeches every day, avoid treating your show<br />
clothes and tack like formal attire kept only for special<br />
occasions, Creswick advises. They should be broken in<br />
and comfortable for you and your horse. That’s not to<br />
say your equipment should be put into the everyday<br />
lineup; but a pristine bridle with stiff reins, a saddle<br />
pad fresh out of the plastic, and riding boots that<br />
rarely come into contact with a horse will feel strange<br />
come show day.<br />
“Try out your show equipment, especially boots,<br />
because those can impede your performance,” says<br />
36 October 2012 • USDF ConneCtion<br />
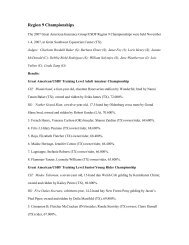
NEAT AND TIDY: Even at a schooling show, this child and<br />
pony are nicely turned out with clean and well-ftting tack<br />
and attire. Te efort shows respect for the judge.<br />
Creswick. “Make sure the saddle pad is soft and<br />
formed to the horse’s back so he isn’t uncomfortable.<br />
Give your things a test ride two weeks before<br />
the show so you’ll know what fits and what doesn’t.<br />
No one wants to make show breeches dirty, but often<br />
after they’re washed for the first time the fit changes<br />
or there’s a compromised feel. Maybe they shrank in<br />
the waist or in the rise. You don’t want to have that<br />
problem on the day.”<br />
Blingy browbands, super-fancy saddle pads, and<br />
the like may look great in the shop or in the catalog,<br />
but make sure that they flatter your horse before you<br />
take them down center line, Creswick cautions. For<br />
instance, if your horse is built “downhill,” a swallowtail<br />
saddle pad can act as an arrow pointing straight to the<br />
high croup, she says.<br />
“Be smart,” says Creswick. “Don’t draw attention<br />
to faults with your equipment. I always say to keep<br />
it simple and you will be fine. And don’t draw attention<br />
to yourself, either. The focus should always be on<br />
showing off your horse.”<br />
Last, make a pre-ride checklist and give a copy to a<br />
helper to help avoid making turnout mistakes resulting<br />
from pre-show jitters. “For instance,” says Creswick,<br />
“they don’t take the time to tighten the girth, and so<br />
they make themselves unstable.”<br />
jennifer bryant
Start by rolling the polo wrap with the fuzzy “loop” strip<br />
of the Velcro turned toward the hooks (if your wraps are<br />
brand-new, you’ll have to unroll and reroll them before use)<br />
so that on the fnal pass the strips will be in the right position<br />
for fastening.<br />
Tere’s more than one way to apply a polo wrap, but<br />
here’s how Lewis does it:<br />
“Set the tail of the wrap at the inside of the cannon bone,<br />
below the horse’s knee, with the roll fat against the leg. roll<br />
the bandage toward you [clockwise for right legs; counterclockwise<br />
for left legs] and make a turn around itself to anchor<br />
the wrap.<br />
“on the next turn, cover three-quarters of that frst<br />
wrap. Work your way down, switching hands as needed,<br />
covering each wrap three-quarters down until you reach<br />
the area where the sesamoid bones are.”<br />
at the fetlock, “Loop the wrap just below the ergot to<br />
make a little sling. Bring that up so it comes just diagonally<br />
above the pastern. go straight around the back of the ankle<br />
and over the ergot one more time to make a second sling.<br />
Make sure that no leg is showing at the back.<br />
“Work your way back up the leg, each time overlapping<br />
the wrap by half, until you get to where you started, below<br />
the knee. Te fastener should be on the outside facing back-<br />
ward so the horse can’t tear them of. With your averagelength<br />
wrap, this leaves you with one and a half revolutions<br />
at the top. if you have more than one and it doesn’t come<br />
up perfect, work the bandage back down and then up to<br />
adjust.”<br />
Veterinary experts say that it doesn’t matter which way<br />
you apply the polo bandage, clockwise or counterclockwise.<br />
however, the traditional method that Lewis describes does<br />
ensure that the fastener ends up on the outside of the leg,<br />
where it can’t be ripped loose.<br />
The Finishing Touch<br />
a great braiding job or a gorgeous tail can’t substitute for<br />
solid dressage training and veterinary care, of course. But<br />
used as fnishing touches on a well-schooled, well-cared-for<br />
horse, they can give your show-ring look that extra something<br />
special and boost your pride and confdence on the<br />
big day. ▲<br />
Sharon Biggs is a dressage instructor based in Northwest<br />
Indiana. She is the co-author of Te original horse Bible<br />
(BowTie Press), advanced english riding (BowTie Press),<br />
and in one arena: top <strong>Dressage</strong> experts Share Teir<br />
Knowledge Trough the Levels (Half Halt Press).<br />
USDF ConneCtion • October 2012 37