
You also want an ePaper? Increase the reach of your titles
YUMPU automatically turns print PDFs into web optimized ePapers that Google loves.
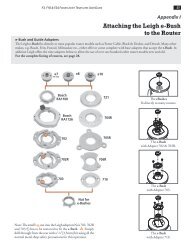
<strong>D4RKIT</strong> <strong>Upgrade</strong><br />
<strong>Leigh</strong> D4R Dovetail Jig <strong>Upgrade</strong> to New Features<br />
Your D4R Dovetail Jig can be upgraded with two great new features. The <strong>D4RKIT</strong> <strong>Upgrade</strong>, along<br />
with new or modified fingers, will allow you to rout single pass Half-blind dovetails in five depths<br />
and you can also rout two sizes of box joints, 3/8” and 3/4”, with precise adjustment for fit. The<br />
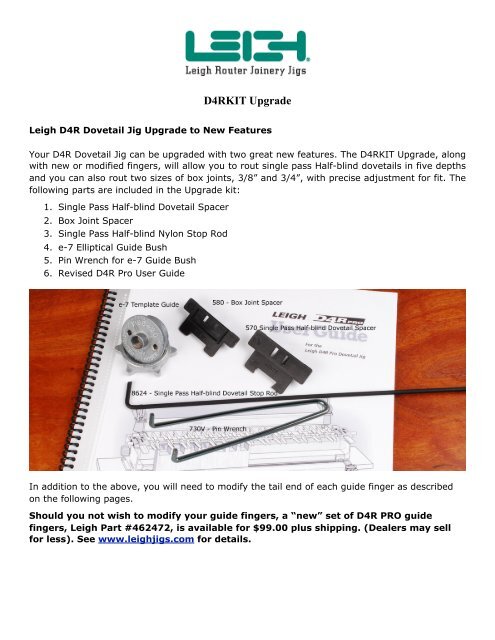
following parts are included in the <strong>Upgrade</strong> kit:<br />
1. Single Pass Half-blind Dovetail Spacer<br />
2. Box Joint Spacer<br />
3. Single Pass Half-blind Nylon Stop Rod<br />
4. e-7 Elliptical Guide Bush<br />
5. Pin Wrench for e-7 Guide Bush<br />
6. Revised D4R Pro User Guide<br />
In addition to the above, you will need to modify the tail end of each guide finger as described<br />
on the following pages.<br />
Should you not wish to modify your guide fingers, a “new” set of D4R PRO guide<br />
fingers, <strong>Leigh</strong> Part #462472, is available for $99.00 plus shipping. (Dealers may sell<br />
for less). See www.leighjigs.com for details.
D4R/D4 Finger Modification<br />
In order to produce Single Pass Half-blind dovetails on your D4R dovetail jig, a 9/64” hole must be<br />
drilled in the tail end of each finger at a specific location. Although fingers may be marked and drilled<br />
free hand, we recommend using a shop made drilling jig similar to the attached drawing, and your drill<br />
press, to ensure holes are drilled at the same location in every finger.<br />
D4R/D4 Owners<br />
1. Remove the finger assembly from the jig, remove the scales and remove all fingers from the<br />
finger bar.<br />
2. Use a flat board approximately 10” x 6” as a base.<br />
3. Mount a cross piece (A), 4” long by !” x "” approximately 2 "” from one end of the board.<br />
4. Mount the first perpendicular piece (B), 5” x !” x #” approximately centered on cross piece (A).<br />
5. Place a finger firmly against the first horizontal piece.<br />
6. Mount the second perpendicular piece (C) firmly against the finger and secure in place.<br />
7. Make a spacer block “D”, 7/32” x 1” x 7/16”.<br />
8. Using a left finger, mark layout lines on the flat surface of the tail end of the finger as indicated.<br />
i.e. 11/64” down from the screw face of the finger and 29/32” from the end of the finger.<br />
NOTE, all fingers are identified with an “L” (Left hand) or an “R” (Right hand)<br />
cast in to the tail end of the finger<br />
9. Place the left finger in the drilling jig as indicated and mount the drilling jig on the drill press<br />
table.<br />
10. Center the drill bit on the layout marks and secure the drilling jig to the table with clamps.<br />
Tighten clamps securely.<br />
11. Drill all left hand fingers.<br />
12. Before drilling the right hand fingers, place the spacer block in the drilling jig as indicated. This<br />
block is necessary to prevent the right hand fingers from bending down when drilling.<br />
13. Drill all right hand fingers.<br />
14. Replace all fingers on the finger bar and refer to your User Guide, section 1-8 and 1-9 when<br />
reattaching the scales.<br />
D4 Owners Only<br />
D4 jig owners require shop made spacers to offset the tail board for Single Pass Half-blind<br />
dovetails, and the socket board for 3/8” and 3/4” box joints. Spacers are easily made from scrap<br />
#” plywood, solid wood or pressboard.<br />
The Single Pass Half-blind dovetail offset spacer must be 5 "” long by .521” wide by #” thick.<br />
(Cut spacer to 17/32” and sand lightly to specification)<br />
The box joint offset spacer must be 5 "” long by .386” wide by #” thick. (Cut spacer to 25/64 th<br />
and sand slightly to specification)
B<br />
1/4" B<br />
[6,3mm]<br />
C<br />
C<br />
3/4"[19mm]<br />
Snug fit to finger<br />
B C<br />
A<br />
B<br />
C<br />
9/64"[3,57mm] diameter hole<br />
<br />
RIGHT FINGER<br />
LEFT FINGER<br />
B C<br />
11/64"<br />
[4,37mm]<br />
29/32"<br />
[23,0mm]<br />
D<br />
A<br />
3/4"<br />
[19mm]<br />
LEFT FINGER RIGHT FINGER<br />
A<br />
A<br />
D<br />
A<br />
<br />
7/32"<br />
[5,55]<br />
1/2"<br />
[12,7mm]