HOBIE 16 TATOO - Hobie-cat
HOBIE 16 TATOO - Hobie-cat
HOBIE 16 TATOO - Hobie-cat

You also want an ePaper? Increase the reach of your titles
YUMPU automatically turns print PDFs into web optimized ePapers that Google loves.
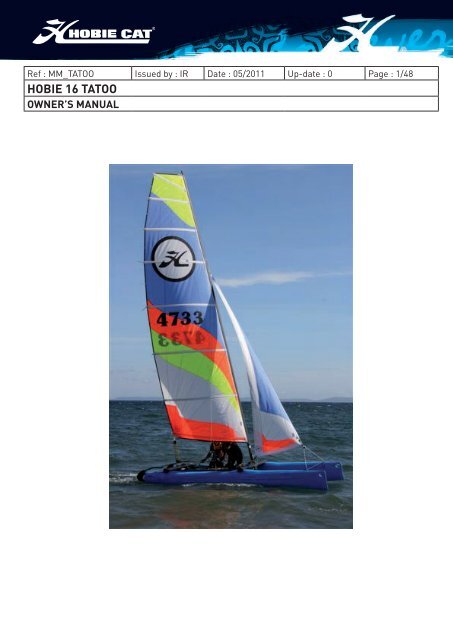
Ref : MM_<strong>TATOO</strong> Issued by : IR Date : 05/2011 Up-date : 0 Page : 1/48<br />
<strong>HOBIE</strong> <strong>16</strong> <strong>TATOO</strong><br />
OWNER’S MANUAL
Ref : MM_<strong>TATOO</strong><br />
<strong>HOBIE</strong> <strong>16</strong> <strong>TATOO</strong><br />
OWNER’S MANUAL<br />
Issued by : IR Date : 05/2011 Up-date : 0 Page : 2/48<br />
Welcome in the «<strong>Hobie</strong> Way of Life»<br />
Congratulations for the purchase of your new <strong>HOBIE</strong> CAT and welcome to the <strong>HOBIE</strong> sailing family.<br />
The <strong>Hobie</strong> Cat is a long life boat.<br />
Le <strong>Hobie</strong> <strong>16</strong> Tatoo is primarily meant for sailing schools, clubs and beach operators.<br />
We offer this manual as a guide to increased safety and enjoyment of your new boat. The purpose of<br />
this publi<strong>cat</strong>ion is to provide easy, simple and accurate instructions on how to get your <strong>Hobie</strong> ready for<br />
the water. Please read them carefully and familiarize yourself with the boat and all of the parts spread<br />
before you.<br />
Whether you are a new sailor or a veteran of many years, we recommend that you read this thoroughly<br />
before your first sail and TRY IT OUR WAY FIRST! If you are new to sailing, this manual alone is not<br />
intended to teach you how to sail. There are many excellent books, videos and courses on the safe handling<br />
of small sailboats. We suggest that you contact your local sailboat dealer, college or Coast Guard<br />
Auxiliary for recommendations.<br />
Watch for overhead wires whenever you are rigging, launching, sailing or trailering with the mast up.<br />
CONTACT OF THE MAST WITH POWER LINES COULD BE FATAL! Be certain that the rigging area and<br />
the area that you will be sailing in are free of overhead power lines. Report any such power lines to<br />
your local power authority and sail elsewhere.<br />
We take pride in presenting this <strong>Hobie</strong> Cat to you and hope that you’ll take as much pride in owning<br />
her.<br />
Fair winds and good sailing!<br />
<strong>Hobie</strong> Cat Europe<br />
Copyright HCE 2011 - www.hobie-<strong>cat</strong>.net
Ref : MM_<strong>TATOO</strong><br />
<strong>HOBIE</strong> <strong>16</strong> <strong>TATOO</strong><br />
OWNER’S MANUAL<br />
Table of content<br />
Issued by : IR Date : 05/2011 Up-date : 0 Page : /48<br />
Pages Description<br />
OWNER’S MANUAL<br />
4 Boat description<br />
5 Safety advices<br />
6 Complementary information<br />
7-8 Handling and maintenance<br />
9 Warranty conditions<br />
10 Your distributor<br />
ASSEMBLY MANUAL<br />
11 Necessary tools<br />
12-14 List of the parts<br />
15-<strong>16</strong> Hull / crossbar assembly<br />
17-18 Trampoline<br />
19 Front spreader bar<br />
20 Picture of the plateform assembled<br />
21 Bridles and shroud adjusters<br />
22-26 Preparation of the mast<br />
27-29 stepping the mast<br />
0 Trapeze<br />
1 Tensioning the rig<br />
2 Main sail<br />
Cunningham<br />
4 Mainsheet system<br />
5- 7 Jib<br />
8 righting line<br />
9 Rudder assembly<br />
40 Tiller crossbar<br />
41 Mast floating device<br />
42-47 Spinnaker kit (option)<br />
48 Contact<br />
ANNEXES:<br />
• SPARE PART ILLUSTRATED GUIDE<br />
• CONFORMITY<br />
KEEP THIS MANUAL IN A SAFE PLACE AND GIVE IT TO THE<br />
NEW OWNER IF YOU SELL YOUR BOAT<br />
Copyright HCE 2011 - www.hobie-<strong>cat</strong>.net
Ref : MM_<strong>TATOO</strong><br />
<strong>HOBIE</strong> <strong>16</strong> <strong>TATOO</strong><br />
OWNER’S MANUAL<br />
Boat description<br />
Issued by : IR Date : 05/2011 Up-date : 0 Page : 4/48<br />
made in France<br />
<strong>TATOO</strong><br />
01<br />
Copyright HCE 2011 - www.hobie-<strong>cat</strong>.net<br />
Length (m) 4,90<br />
Beam (m) 2, 0<br />
Mast height (m) 7,50<br />
Weight (kg) tbc<br />
Main sail area (m²) 1<br />
Jib area (m²)<br />
Spi area (m²) 12 (option)<br />
Maximum load (kg) 240<br />
Crew number<br />
Homologation EC N°<br />
The manufacturing of <strong>Hobie</strong> Cats conforms to the following ISO norms :<br />
Module Abis<br />
Hull construction and scantlings ISO 12215-1:2000<br />
Stability and buoyancy assessment and <strong>cat</strong>egorization ISO 12217:2000<br />
Hull identifi<strong>cat</strong>ion -- Coding system<br />
FR-HCE W0020E111<br />
Category C / 4D<br />
Hull construction Polyethylene<br />
ISO 10087:1995<br />
Builder’s plate ISO FDIS 14945<br />
Owner’s manual ISO 10240:2004<br />
Small crafts - principal data ISO FDIS 8666
Ref : MM_<strong>TATOO</strong><br />
<strong>HOBIE</strong> <strong>16</strong> <strong>TATOO</strong><br />
OWNER’S MANUAL<br />
Safety advices<br />
Issued by : IR Date : 05/2011 Up-date : 0 Page : 5/48<br />
Read carefully before sailing :<br />
•<br />
•<br />
•<br />
•<br />
•<br />
•<br />
•<br />
•<br />
•<br />
•<br />
•<br />
•<br />
Whether on land or on the water, WATCH FOR OVERHEAD POWER LINES. Contact with power lines can<br />
cause serious injury or death.<br />
DO NOT sail while under the influence of alcohol and/or drugs<br />
Only sail in conditions in which you feel comfortable and where you feel confident that you can safely sail the<br />
boat. Never go out in conditions beyond your ability.<br />
Everyone on board should wear a life jacket at all times.<br />
If you are in the water, remain in contact with the boat, even if it is capsized. A sailboat can drift away faster<br />
than a person can swim.<br />
Never sail without a righting line.<br />
Wear appropriate clothes. Wear a wet suit or dry suit in cold weather or cold water conditions.<br />
Protect yourself against heat and sun.<br />
Learn the right of way rules and when in doubt, give way to others.<br />
When not sailing, always keep the boat pointed into the wind whether in the water or on the beach.<br />
Read the instruction manual carefully.<br />
Make sure everyone on the boat reads and understands these safety instructions.<br />
ALWAYS check that the drain plugs are screwed in before launching your <strong>cat</strong>amaran. Remove the plugs after<br />
sailing to drain any water that may have leaked into the hulls.<br />
Safety equipment :<br />
All necessary safety equipment must be available on board. (Life jackets, etc.) and must correspond to the boat<br />
type, weather conditions, etc. This material is mandatory in some countries. The crew must know how to use this<br />
material and how to behave in case of emergency (men at sea, towing, etc.) ; Sailing schools and clubs regularly<br />
organise training sessions to learn how to use the safety equipment and how to behave in case of emergency.<br />
Copyright HCE 2011 - www.hobie-<strong>cat</strong>.net
Ref : MM_<strong>TATOO</strong><br />
<strong>HOBIE</strong> <strong>16</strong> <strong>TATOO</strong><br />
OWNER’S MANUAL<br />
Issued by : IR Date : 05/2011 Up-date : 0 Page : 6/48<br />
Complementary information<br />
INTERNATIONAL <strong>HOBIE</strong> CLASS ASSOCIATION (I.H.C.A.)<br />
<strong>Hobie</strong> Cat owners are organised in a world-wide class association : the IHCA (Interna-<br />
tional <strong>Hobie</strong> Class Association).<br />
For Europe, you can contact theEHCA (European <strong>Hobie</strong> Class Association).<br />
Visit their web site : http://ehca.hobieclass.com to find the name and contact details of<br />
the association of you country.<br />
Copyright HCE 2011 - www.hobie-<strong>cat</strong>.net
Ref : MM_<strong>TATOO</strong><br />
<strong>HOBIE</strong> <strong>16</strong> <strong>TATOO</strong><br />
OWNER’S MANUAL<br />
Issued by : IR Date : 05/2011 Up-date : 0 Page : 7/48<br />
Handling & maintenance<br />
Before sailing, check the following points :<br />
1/ Install the drain plugs (if any) – do not overtighten, hand tight is sufficient. Overtightening may<br />
cause the drain plug flange to distort and cause leakage.<br />
2/ Tension the rig. This can be accomplished by having your assistant hang from the trapeze or you<br />
can use mainsheet tension on one side at a time so that you can adjust the shroud position in the<br />
side stay adjusters.<br />
/ Fit the daggerboards into the daggerboards wells.<br />
4/ Check all fastenings :<br />
- Mast tang shackles and shrouds (to prevent the mast to fall down)<br />
- pins and trapeze rope locks (to prevent falling out in the water if the trapeze is not well fastened)<br />
- pins and spring rings on the forestay and shrouds (to prevent the mast to fall down)<br />
- spring rings on the rudder pins (to prevent loosing the rudder assembly in case of capsizing)<br />
Transport<br />
Afin d’éviter d’endommager les coques :<br />
In order to avoid hull damages :<br />
- Always use a dolley to transport your <strong>Hobie</strong> on the beach (even if it is sand beach) and for launching. Step into<br />
the water with the dolley and once the <strong>cat</strong>a is afloat take out the dolley.<br />
- DO NOT BEACH. Beaching, even smoothly, may damage the hulls. use your beach dolley to take the boat out of<br />
the water.<br />
- For towing, always use an homologated road trailer with cradles.<br />
Launching your <strong>Hobie</strong> Cat<br />
Launching the boat is easiest when the boat can be pointed into the wind to keep it de-powered and floated into<br />
deep enough water to lower the rudders.<br />
It is possible to launch in shallow water with the rudders partly up.<br />
Try not to steer with too much force on the rudders until you lock them in the down position.<br />
Keep the sail loose and trimmed out completely until you can power up and steer away from any obstacle.<br />
Copyright HCE 2011 - www.hobie-<strong>cat</strong>.net
Ref : MM_<strong>TATOO</strong><br />
<strong>HOBIE</strong> <strong>16</strong> <strong>TATOO</strong><br />
OWNER’S MANUAL<br />
Issued by : IR Date : 05/2011 Up-date : 0 Page : 8/48<br />
Handling & maintenance<br />
Righting your <strong>Hobie</strong> Cat<br />
Copyright HCE 2011 - www.hobie-<strong>cat</strong>.net<br />
If you tip the boat over, in order to avoid the mast from sinking under the hull,<br />
one of the crew must rapidly climb on the hull that remains on the water. In<br />
the meantime, the other crew uncleat all the lines and sheets.<br />
It is not necessary, but it is easier, to right the boat when the bow and the mast<br />
are pointed into the wind. There will be less resistance and better control in<br />
this position.<br />
Skipper and crew stand up on the hull. Using the righting line, skipper and<br />
crew pull the righting line that is against the upper hull and hold the line while<br />
slowly leaning back away from the trampoline. As the mast and sail lift out of<br />
the water, drop down to your knees then into the water. Hold on to the crossbar<br />
near the hull that you were standing on.<br />
Be well aware of the hull and crossbar coming down over your head. Holding the crossbar or righting line will<br />
also insure that you remain with the boat when it is righted. Climb abord and continue sailing.<br />
Maintenance of your <strong>Hobie</strong><br />
This manual is not an exhaustive guide for the mainteance or repair of your <strong>Hobie</strong>. In case of difficulties, take<br />
contact with the builder or his representative.<br />
Always use the service of an experienced professional for the maintenance, the mounting of accessories or the<br />
modifi<strong>cat</strong>ions to your <strong>Hobie</strong>.<br />
Modifi<strong>cat</strong>ion that may affect the safety use of the boat must be checked before processing and made by an experienced<br />
professional. The builder cannot be hold for responsible for modifi<strong>cat</strong>ion that he has not duly approved.<br />
In some countries, prior authorisations are necessary or specific regulations are in force. Check them.<br />
Always maintain your boat and take into account the deterioration that may occur with the time or following<br />
inappropriate or intensive use. Any boat (even the strongest one) may be severely dammaged if it is not used the<br />
right way. This is not compatible with a safe sailing.<br />
•<br />
•<br />
•<br />
<strong>Hobie</strong> Cat does not recommend leaving your <strong>Hobie</strong> in the water on a mooring. Accelerated wear to the boat<br />
and rigging will be experienced. Damage to the hull material is possible. Limitation of the mast rotation and<br />
tensioning of the rigging are required to lessen this wear. Inspect rigging often and tape rigging rings and<br />
shackles to prevent loosening.<br />
After sailing, it recommended to wash the hulls to remove the salt. Also remove the sails and wash them<br />
before storing them.<br />
There is one plug in the rear of each hull. These plugs are used to drain the hulls. The plugs should be in<br />
place before sailing. Remove the plugs after sailing to drain any water that may have leaked into the hulls. It<br />
is best to travel with and store the boat with the plugs removed to allow for pressure changes due to heating,<br />
cooling, and altitude changes. This will prevent warping of the hull surface.
Ref : MM_<strong>TATOO</strong><br />
<strong>HOBIE</strong> <strong>16</strong> <strong>TATOO</strong><br />
OWNER’S MANUAL<br />
Issued by : IR Date : 05/2011 Up-date : 0 Page : 9/48<br />
Limited warranty by <strong>Hobie</strong> Cat Europe<br />
This warranty applies to customers of <strong>Hobie</strong> Cat Europe.<br />
The boat is warranted to the original retail customer for one year from the date of retail purchase against defects in materials and workmanship.<br />
The spare parts are warranted for one year.<br />
The components coverage applies only to the original retail customer. The warranty is not transferable.<br />
In no case, the repairs made will extend the initial date of the warranty, except for any replacement or repaired parts.<br />
The Warranty Registration Card is required by law for use in the event of a product problem notifi<strong>cat</strong>ion.<br />
The warranty is only effective if the boat is sold by an authorised <strong>Hobie</strong> Cat dealer.<br />
What is covered?<br />
Replacement parts and labour. According to the decision of <strong>Hobie</strong> Cat Europe, the dealer will make the repairs himself or through an external contractor,<br />
after presentation of an estimate and written agreement from HCE. The dealer will be then reimbursed after presentation of the invoice. The warranty<br />
covering these repairs will no longer be at HCE’s charge but at the contractor’s charge.<br />
What is not covered?<br />
•<br />
•<br />
•<br />
•<br />
•<br />
•<br />
•<br />
•<br />
normal wear and discoloration<br />
Transport charges to or from the dealer’s shop to the client<br />
charges occurred in case of an on-the-spot repair.<br />
Damages caused by abuse or failure to perform normal maintenance (see assembly manual), by a defective or abnormal use or by a bad storage.<br />
Discoloration, blistering or grazing of gelcoat caused by boat being moored or stored in salt or fresh water.<br />
The boat is not covered under warranty if the boats are hired or placed in commercial service.<br />
<strong>Hobie</strong> Cat Europe is not responsible for boat damage as a result of adding additional blocks to the original manufacturer’s sheeting arrangement.<br />
Any other expenses: CONSEQUENTIAL DAMAGES, INCIDENTAL DAMAGES, OR INCIDENTAL EXPENSES, INCLUDING DAMAGE TO PROPERTY.<br />
How to obtain warranty performance within 0 days of discovering the defect:<br />
Bring your boat to the nearest authorised <strong>Hobie</strong> Cat Europe dealer (a list of the dealers is available at HCE). Be sure to take proof of date of retail purchase<br />
(invoice). All payments for in-warranty expenses shall be made by <strong>Hobie</strong> Cat Europe to the <strong>Hobie</strong> Cat Europe dealer and not to the customer.<br />
Implied warranties:<br />
IMPLIED WARRANTIES, INCLUDING THE IMPLIED WARRANTIES OF MERCHANTABILITY AND FITNESS FOR A PARTICULAR PURPOSE, SHALL BE NO<br />
LONGER THAN THE DURATION OF THIS EXPRESS WARRANTY.<br />
<strong>Hobie</strong> Cat Europe makes no express warranties in addition to this limited warranty. <strong>Hobie</strong> Cat Europe’s dealers have no authority to make any warranties<br />
on behalf of <strong>Hobie</strong> Cat Europe in addition to or inconsistent with those stated herein.<br />
To the extent any provision of this warranty is prohibited by federal, state, or municipal law and cannot be pre-empted, it shall not be applicable.<br />
HOW IT WORKS?<br />
It is essential that for each sold boat, the warranty card be completely filled in, signed by the dealer and the customer, and that the copy for <strong>Hobie</strong> Cat<br />
Europe be returned to the factory within 8 days of boat delivery.<br />
For all claims the warranty department must be contacted. The final decision regarding warranty claims lies with this service.<br />
SPECIAL NOTES:<br />
All warranty transactions will be handled through the claiming dealership and not directly with the customer.<br />
<strong>Hobie</strong> Cat dealers are responsible for proper diagnosis and completion of all warranty claims.<br />
If in doubts about warranty coverage of a particular problem, contact the Warranty department first.<br />
Warranty work may be carried out by an authorised dealer other than the original seller of the boat, however for all warranty requests it is<br />
mandatory to fax or mail a copy of the completely filled out warranty card which must have been registered immediately following delivery to the customer.<br />
As warranty work is registered following the information of the warranty card, it is mandatory that the card be filled out in detail in all the<br />
boxes. Failure to cite a hull, sail, or serial numbers on the warranty will make claims impossible to process.<br />
Copyright HCE 2011 - www.hobie-<strong>cat</strong>.net
Ref : MM_<strong>TATOO</strong><br />
<strong>HOBIE</strong> <strong>16</strong> <strong>TATOO</strong><br />
OWNER’S MANUAL<br />
Your distributor<br />
Issued by : IR Date : 05/2011 Up-date : 0 Page : 10/48<br />
Distributor’s stamp<br />
Your dealer is our representative and will bring you all necessary assistance<br />
in order to solve problems you may encounter.<br />
As soon as you become owner, please date and sign this receipt (below)<br />
and give it to your dealer to be covered by our warranty.<br />
Copyright HCE 2011 - www.hobie-<strong>cat</strong>.net<br />
Please carefully read the warranty conditions<br />
written in this manual.<br />
Please carefully and thoughroughly read this<br />
manual. Keep it in a safe place<br />
Give it to the new owner if you resell your <strong>Hobie</strong>.
Ref : MM_<strong>TATOO</strong> Issued by : IR Date : 05/2011 Up-date : 0 Page : 11/48<br />
<strong>HOBIE</strong> <strong>16</strong> <strong>TATOO</strong><br />
ASSEMBLY MANUAL<br />
Necessary tools<br />
N° Illustration Description<br />
1 Lubricant<br />
2 Universal pliers<br />
Copyright HCE 2011 - www.hobie-<strong>cat</strong>.net<br />
Poignée d’étarquage<br />
4 Mètre ruban<br />
5 wrench #14<br />
6 adhesive tape<br />
7 screw driver
Ref : MM_<strong>TATOO</strong> Issued by : IR Date : 05/2011 Up-date : 0 Page : 12/48<br />
<strong>HOBIE</strong> <strong>16</strong> <strong>TATOO</strong><br />
ASSEMBLY MANUAL<br />
List of the parts<br />
Your <strong>Hobie</strong> is delivered in 5 parcels (6 parcels if you have the spinnaker option) See detail below :<br />
Illustration N° Description Reference<br />
Copyright HCE 2011 - www.hobie-<strong>cat</strong>.net<br />
1<br />
2<br />
4-5<br />
Front crossbar <strong>16</strong>662500<br />
Rear crossbar <strong>16</strong>662600<br />
Rudder assembly left and right x2 1 662115<br />
Tiller crossbar <strong>16</strong>562200<br />
Wire bag without jib furler <strong>16</strong>660500<br />
Wire bag with jib furler (option) <strong>16</strong>660510<br />
Rig bag + ropes <strong>16</strong>680 10<br />
Spinnaker kit (option) <strong>16</strong>670 85<br />
Aluminium tiller extension <strong>16</strong>062 05<br />
Mainsail (coloured) <strong>16</strong>6 0050<br />
Mainsail battens <strong>16</strong>6 4000<br />
Jib (coloured) <strong>16</strong>6 0065<br />
Spinnaker (Option) ref pending sail colour<br />
Spi trumpet soft (Option) 99267760<br />
Spi bag (Option) 99267529<br />
Trampoline <strong>16</strong>625800<br />
Mast <strong>16</strong>642700<br />
Right hull <strong>16</strong>656060<br />
Left hull <strong>16</strong>656050<br />
6 Spinnaker pole (option) <strong>16</strong>662640
Ref : MM_<strong>TATOO</strong> Issued by : IR Date : 05/2011 Up-date : 0 Page : 1 /48<br />
<strong>HOBIE</strong> <strong>16</strong> <strong>TATOO</strong><br />
ASSEMBLY MANUAL<br />
List of the parts<br />
Illustration Qty Description Reference<br />
WIRE SET WITHOUT JIB FURLER <strong>16</strong>660500<br />
Copyright HCE 2011 - www.hobie-<strong>cat</strong>.net<br />
1 TRAPEZE SHOCK CORD 2 BUCKLES 1 680500<br />
1 PULLEY HALYARD JIB SMALL MODEL RF186 <strong>16</strong>080515<br />
1 PULLEY HALYARD JIB BIG MODEL RF188 <strong>16</strong>0805<strong>16</strong><br />
1 JIB HALYARD ROPE <strong>16</strong>/15/15CLUB/<strong>TATOO</strong> <strong>16</strong>080540<br />
2 TRAPEZE WIRE <strong>16</strong> <strong>16</strong>080557<br />
2 TRAPEZE LINE GREEN D6 1ML >TI < <strong>16</strong>080558<br />
1 FORESTAY + PIGTAIL <strong>TATOO</strong> <strong>16</strong>660525<br />
2 SHROUD <strong>TATOO</strong> <strong>16</strong>680500<br />
2 BRIDLE WIRE <strong>TATOO</strong> <strong>16</strong>680570<br />
2 TRAPEZE ROPE LOCK 18060 01<br />
1 SPLIT RING DIAM 14MM FIL 1.2 992200 1<br />
1 STAY ADJUSTER 992200<br />
1 CLEVIS PIN 6X<strong>16</strong>-2.5 A4 992200 4<br />
1 SHACKLE D6 REF 6 5 992200 5<br />
2 SHACKLE D4 REF 6 4 992200 6<br />
1 SHACKLE D8 RF6 6 99220058<br />
2 J&H TRAPEZE HANDLE BLACK 99500020<br />
WIRE SET WITH JIB FURLER (OPTION) <strong>16</strong>660510<br />
1 TRAPEZE SHOCK CORD 2 BUCKLES 1 680500<br />
2 TRAPEZE WIRE <strong>16</strong> <strong>16</strong>080557<br />
2 TRAPEZE LINE GREEN D6 1ML >TI < <strong>16</strong>080558<br />
1 PIGTAIL+SWIVEL <strong>TATOO</strong> <strong>16</strong>6605 0<br />
1 FORESTAY WIRE FOR JIB FURLER <strong>TATOO</strong> <strong>16</strong>6605 5<br />
2 SHROUD <strong>TATOO</strong> <strong>16</strong>680500<br />
2 BRIDLE WIRE <strong>TATOO</strong> <strong>16</strong>680570<br />
2 TRAPEZE ROPE LOCK 18060 01<br />
1 JIB FURLER 17/18/FA/21 21060150<br />
4 SPLIT RING DIAM 14MM FIL 1.2 992200 1<br />
1 SHACKLE D4 REF 6 4 992200 6<br />
1 SHACKLE D8 RF6 6 99220058<br />
4,5 BLACK LINE D4 REGATTA 99 00610<br />
2 J&H TRAPEZE HANDLE BLACK 99500020<br />
1 SINGLE BLOCK HSB286 99500474<br />
1 SINGLE BLOCK MICRO H404 99500478
Ref : MM_<strong>TATOO</strong> Issued by : IR Date : 05/2011 Up-date : 0 Page : 14/48<br />
<strong>HOBIE</strong> <strong>16</strong> <strong>TATOO</strong><br />
ASSEMBLY MANUAL<br />
List of the parts<br />
Illustration Qty Description Reference<br />
RIG BAG <strong>16</strong>680310<br />
Copyright HCE 2011 - www.hobie-<strong>cat</strong>.net<br />
1 MAINSHEET 15/15CLUB/TWIX/<strong>16</strong>E-<strong>16</strong>CLUB/GTW 15570420<br />
2 JIB SHEET BLOCK <strong>16</strong>/18 RM410 <strong>16</strong>080 51<br />
1 DOUBLE PULLEY H226 17070<strong>16</strong>0<br />
4 SPLIT RING DIAM 14MM FIL 1.2 992200 1<br />
2 STAY ADJUSTER 992200<br />
4 CLEVIS PIN 6X<strong>16</strong>-2.5 A4 992200 4<br />
1 SHACKLE D6 REF 6 5 992200 5<br />
1 STOP BALL HPN 070A (HA122) 9950010<br />
1 MAINSAIL/CUNI HOOK 6MM R8440 99500210<br />
1 MAINSAIL HOOK 8MM R8450 99500260<br />
1 SAFETY HOOK D6 R8490 99500270<br />
1 TILLER BAR CONNECTION KIT TCM 99500 80<br />
1 THREEFOLD BOOM BLOCK 57 MM 08 HT990 0 99500990<br />
1 THREEFOLD WINCH BLOCK 08 HT9908 99500995<br />
2 EYE-BOLT 99220490<br />
2 WASHER<br />
ROPE BAG <strong>16</strong>670400<br />
1 MAIN CUNNINGHAM (A)<br />
1 TRAMPOLINE LACING LINE (B)<br />
1 MAIN HALYARD (C)<br />
1 JIB SHEET (D)<br />
1 RIGHTING LINE (E)
Ref : MM_<strong>TATOO</strong> Issued by : IR Date : 05/2011 Up-date : 0 Page : 15/48<br />
<strong>HOBIE</strong> <strong>16</strong> <strong>TATOO</strong><br />
ASSEMBLY MANUAL<br />
Hull assembly : crossbar fixation<br />
Illustration Steps Description<br />
faire photo<br />
Copyright HCE 2011 - www.hobie-<strong>cat</strong>.net<br />
1<br />
2<br />
4<br />
5<br />
Unscrew the bolts from the two crossbars.<br />
For the mounting we will use the #14 wrench.<br />
NB : DO NOT USE any ratchet key on the screw<br />
WHILE MAINTAINING the nut in a fixed position<br />
with another wrench. This would cause over heating<br />
and could weld the nut on the screw. Use the<br />
ratchet key ONLY on the nut.<br />
Position the hulls in parallel with the inner sides<br />
facing the ground.Lift the right hull. One person<br />
straddles the hull tohold it in place. The other<br />
person applies the silicone sealant (for waterproofing)<br />
around the screw holes.<br />
Front crossbar :<br />
Unfold the trampoline. Insert the front edge of the<br />
trampoline into the track at the left, rear side of<br />
the front crossbar. Continue feeding the trampoline<br />
into the track and position it in the center. line up<br />
the grommet in the center of the trampoline with<br />
the dolphin striker post to ensure it is centered.<br />
Position the front crossbar on its hull supports so<br />
that the trampoline track faces the rear of the boat.<br />
The pins on the hull are facing the holes in the<br />
crossbar. Insert the crossbar on the pins.<br />
Insert the screws and washers as indi<strong>cat</strong>ed on the<br />
photo: aluminium washer, then nylon washer and<br />
through the hull. Pass your hand through the inspection<br />
port to position the nylon washer, then the<br />
aluminium washer and lastly the nut. Do the same<br />
thing on the other side. Tighten loosely.
Ref : MM_<strong>TATOO</strong> Issued by : IR Date : 05/2011 Up-date : 0 Page : <strong>16</strong>/48<br />
<strong>HOBIE</strong> <strong>16</strong> <strong>TATOO</strong><br />
ASSEMBLY MANUAL<br />
Hull assembly : crossbar fixation<br />
Illustration Steps Description<br />
Copyright HCE 2011 - www.hobie-<strong>cat</strong>.net<br />
6<br />
Rear crossbar :<br />
Apply silicone sealant around the crew holes. Position<br />
the crossbar on the pins and insert the screws,<br />
washers and nuts in the same way as for the front<br />
crossbar.<br />
NB : Caution ! the trampoline lacing post must face<br />
towards the rear of the boat.<br />
Lastly, fully tighten the 4 bolts of the front crossbar<br />
and the 4 bolts of the rear crossbar.<br />
NB : Regularly check the fastening of the crossbar nuts and the dolphin striker rod.
Ref : MM_<strong>TATOO</strong> Issued by : IR Date : 05/2011 Up-date : 0 Page : 17/48<br />
<strong>HOBIE</strong> <strong>16</strong> <strong>TATOO</strong><br />
ASSEMBLY MANUAL<br />
Trampoline assembly<br />
Illustration Steps Description<br />
Copyright HCE 2011 - www.hobie-<strong>cat</strong>.net<br />
1<br />
2<br />
4<br />
Front crossbar<br />
Check that the trampoline is well centered on the<br />
front crossbar.<br />
Take one of the side tensioning lines and pass the<br />
line through the pad-eye that is fixed to the front<br />
crossbar. Then tie with a bowline knot the line onto<br />
the grommet of, the trampoline near where the<br />
rope exits the trampoline.<br />
Repeat this step at the opposite side front corner.<br />
Rear crossbar<br />
Move to the rear of the trampoline. Tie a loop very<br />
closely to where the side tensioning line exits the<br />
rear of the trampoline. ensure you pull the side<br />
tensioning line firmly as to tie the loop as closely<br />
to the trampoline where the rope exits as possible.<br />
Tie a bowline or a similar loop in the line which will<br />
be used for a 4:1 purchase of the side tensioning<br />
lines. Repeat this step for the opposite side<br />
rear corner.<br />
Now take the tale of the side tensioning line and<br />
pass the rope through the pad-eye mounted on the<br />
rear cross beam closest to where the line exits<br />
the trampoline. Then pass the line back through<br />
the loop tied in step .<br />
Again go through the pad-eye on the beam and<br />
back through the loop. This will provide a 4:1 purchase.<br />
Pull the line slightly as to take some tension<br />
for the sides but do not completely tension at this<br />
stage. Repeat this step for the opposite side rear<br />
corner. Ensure that the trampoline is still centered.
Ref : MM_<strong>TATOO</strong> Issued by : IR Date : 05/2011 Up-date : 0 Page : 18/48<br />
<strong>HOBIE</strong> <strong>16</strong> <strong>TATOO</strong><br />
ASSEMBLY MANUAL<br />
Trampoline assembly<br />
Illustration Steps Description<br />
Copyright HCE 2011 - www.hobie-<strong>cat</strong>.net<br />
5<br />
6<br />
7<br />
8<br />
Find the trampoline rod and insert it into the rear<br />
stripe of the trampoline.<br />
Commence lacing the rear of the trampoline. The<br />
lacing line starts at the left, rear lacing button on<br />
the rear crossbar. Lace the rear of the trampoline<br />
as tightly as possible as per the photographs and<br />
diagrams supplied. Continue across the rear<br />
crossbar and tie off securely when finished.<br />
Again, take the side tensioning line and very<br />
firmly pull the line. Once as tight as possible tie<br />
off the line with an adequate knot. Repeat this<br />
for the opposite side rear corner.<br />
Go back to the left side and using the long tail, pass<br />
it back through the grommet at the rear corner of<br />
the trampoline near where the side tensioning line<br />
exits the trampoline. Then pass the line through<br />
the pad-eye on the rear crossbar. Again pass the<br />
tail through the grommet on the trampoline and<br />
pull the line firmly. Once the sides of the trampoline<br />
have been further tightened, tie off the line<br />
and stow the rest of the line under the trampoline.<br />
Repeat this step at the opposite side rear corner.<br />
NB : the trampoline must always be strongly tighten.<br />
Check the tension on a regular basis.
Ref : MM_<strong>TATOO</strong> Issued by : IR Date : 05/2011 Up-date : 0 Page : 19/48<br />
<strong>HOBIE</strong> <strong>16</strong> <strong>TATOO</strong><br />
ASSEMBLY MANUAL<br />
Front spreader bar<br />
Illustration Steps Description<br />
Copyright HCE 2011 - www.hobie-<strong>cat</strong>.net<br />
1<br />
2<br />
4<br />
5<br />
Take in the rig bag the two eye-bolts with their<br />
washers.<br />
Place the washers on the holes at the bow of the<br />
hulls and put some lubricant in the insert.<br />
2 persons straddle the hulls to maintain them.<br />
A third person insert the eye-bolt and screw it MA-<br />
NUALLY up. When it becomes hard, do a last turn<br />
inserting a small bar in the eye to make it easier.<br />
NB : Never use the forward spreader<br />
bar to carry the boat. Use the 4 handles<br />
(2 at the front, 2 at the rear of the boat) to carry<br />
the boat.
Ref : MM_<strong>TATOO</strong> Issued by : IR Date : 05/2011 Up-date : 0 Page : 20/48<br />
<strong>HOBIE</strong> <strong>16</strong> <strong>TATOO</strong><br />
ASSEMBLY MANUAL<br />
Photo of the plateform assembled<br />
Copyright HCE 2011 - www.hobie-<strong>cat</strong>.net
Ref : MM_<strong>TATOO</strong> Issued by : IR Date : 05/2011 Up-date : 0 Page : 21/48<br />
<strong>HOBIE</strong> <strong>16</strong> <strong>TATOO</strong><br />
ASSEMBLY MANUAL<br />
Bridles and shroud adjusters<br />
Illustration Steps Description<br />
Copyright HCE 2011 - www.hobie-<strong>cat</strong>.net<br />
1<br />
2<br />
4<br />
Bridle fixation<br />
Take the bridles in the wire bag.<br />
take off the pin and the split ring from the forket tip<br />
of the bridle, insert insert it in the eye bolt on the<br />
spreader bar and fix it securly with the pin and the<br />
split ring.<br />
Do the same thing on the other side.<br />
Shroud adjusters<br />
Take the shroud adjusters in the rig bag.<br />
fix them on the eye bolts that are lo<strong>cat</strong>ed on the<br />
hull decks between the two crossbars.
Ref : MM_<strong>TATOO</strong> Issued by : IR Date : 05/2011 Up-date : 0 Page : 22/48<br />
<strong>HOBIE</strong> <strong>16</strong> <strong>TATOO</strong><br />
ASSEMBLY MANUAL<br />
Mast set-up : Main halyard<br />
Illustration Steps Description<br />
faire photo<br />
faire photo<br />
Copyright HCE 2011 - www.hobie-<strong>cat</strong>.net<br />
1<br />
2<br />
Put the mast horizontally on two supports in order<br />
to easily fix the wires to it.<br />
Take the main halyard rope in the rope bag.<br />
Attach the main halyard rope to the main<br />
halyard wire (falling from the mast head) with a<br />
bowline knot. Set the halyard wire and rope alongside<br />
the mast.<br />
(insert the ... that are on the halyard wire into the<br />
mast opening)<br />
faire photo Turn the end of the halyard rope around the black<br />
cleat at the bottom of the mast, then pass it<br />
through the shackle of the halyard wire and come<br />
back to the black cleat to fix it temporarily.
Ref : MM_<strong>TATOO</strong> Issued by : IR Date : 05/2011 Up-date : 0 Page : 2 /48<br />
<strong>HOBIE</strong> <strong>16</strong> <strong>TATOO</strong><br />
ASSEMBLY MANUAL<br />
Mast set-up : wires (model without jib furler)<br />
Illustration Steps Description<br />
1<br />
2 (option)<br />
3<br />
Copyright HCE 2011 - www.hobie-<strong>cat</strong>.net<br />
4<br />
3<br />
1<br />
2 (option)<br />
1<br />
2<br />
If you have the model with jib furler, go directly to<br />
page 26.<br />
Take in the wire bag :<br />
1 : trapeze wires for the skipper<br />
2 : trapeze wires for the crew (option)<br />
: shroud wires<br />
4 : forestay + pigtail<br />
5 :Jib halyard rope<br />
Take in the rig bag the 8 mm shackle and attach<br />
the wires to it as shown on the drawing.<br />
Attach the shackle with the wires on the mast tang.<br />
In the wire bag, take the two jib halyard blocks.
Ref : MM_<strong>TATOO</strong> Issued by : IR Date : 05/2011 Up-date : 0 Page : 24/48<br />
<strong>HOBIE</strong> <strong>16</strong> <strong>TATOO</strong><br />
ASSEMBLY MANUAL<br />
Mast set-up : wires (model without jib furler)<br />
Illustration Steps Description<br />
Copyright HCE 2011 - www.hobie-<strong>cat</strong>.net<br />
1<br />
4<br />
3<br />
2<br />
5<br />
refaire Photo ?<br />
4<br />
5<br />
Fix the big pulley to the pigtail using the shackle<br />
(1).<br />
Using a bowline knot, attach the halyard to the top<br />
of the small pulley (2), lead it through the lower<br />
sheave in the big pulley ( ), come back to the<br />
sheave of the small pulley (4), then in the upper<br />
sheave of the big pulley (5)<br />
See drawing.<br />
Take the small pulley and attach it with the other<br />
end of the halyard to the white cleat at the bottom<br />
of the mast. Block the halyard at the cleat, after having<br />
inserted it in the shackle of the small pulley.
Ref : MM_<strong>TATOO</strong> Issued by : IR Date : 05/2011 Up-date : 0 Page : 25/48<br />
<strong>HOBIE</strong> <strong>16</strong> <strong>TATOO</strong><br />
ASSEMBLY MANUAL<br />
Mast set-up : wires (model without jib furler)<br />
Illustration Steps Description<br />
Copyright HCE 2011 - www.hobie-<strong>cat</strong>.net<br />
6<br />
Take the adjuster that was together with the jib<br />
halyard blocks and fix it to the bridles using a 6<br />
mm shackle.
Ref : MM_<strong>TATOO</strong> Issued by : IR Date : 05/2011 Up-date : 0 Page : 26/48<br />
<strong>HOBIE</strong> <strong>16</strong> <strong>TATOO</strong><br />
ASSEMBLY MANUAL<br />
Mast set-up : wires (model with jib furler)<br />
Illustration Steps Description<br />
1<br />
2 (option) 2 (option)<br />
3<br />
4<br />
Copyright HCE 2011 - www.hobie-<strong>cat</strong>.net<br />
If you do not have the jib furler, go directly to the next page<br />
3<br />
1<br />
1<br />
2<br />
4<br />
In the rig bag, take the 8 mm shackle and insert<br />
the wires in the same order as indi<strong>cat</strong>ed on the<br />
drawing :<br />
1 : Trapeze wires for the skipper<br />
2 : Trapeze wires for the crew (option)<br />
: shroud wires<br />
4 : pigtail + swivel<br />
Attach the shackle with the wires on the mast tang.<br />
Insert the jib halyard rope in the small block at the<br />
end of the black jib halyard, make a buckle and<br />
stop with a figur 8 knot. Attach the two loose ends<br />
at the bottom of the mast.<br />
Take the jib furler in the wire bag and connect it to<br />
the two bridle wires using the clevis pins and split<br />
rings.<br />
NB : Caution ! Ensure that the exit hole in the furler<br />
is pointing at the furler cleat on the front crossbar.<br />
Check that the screw on the underside of the furler<br />
is tight. This prevents the outer cover from rotating.<br />
Wind the furler up in a clockwise direction. Leave<br />
enough furler line to reach the furler cleat on the<br />
front crossbar.
Ref : MM_<strong>TATOO</strong> Issued by : IR Date : 05/2011 Up-date : 0 Page : 27/48<br />
<strong>HOBIE</strong> <strong>16</strong> <strong>TATOO</strong><br />
ASSEMBLY MANUAL<br />
Stepping the mast<br />
Illustration Steps Description<br />
faire photo<br />
Copyright HCE 2011 - www.hobie-<strong>cat</strong>.net<br />
CAUTION DANGER : ALUMINIUM MAST<br />
STAY AWAY FROM ELECTRICAL WIRES<br />
CONTACT WITH ELECTRICAL WIRES MAY CAUSE DEATH<br />
1<br />
2<br />
With the base of the mast facing towards the front<br />
of the boat, lay the mast on top of the boat. (place<br />
some padding under the mast to prevent scratching).<br />
Put the wires on each side of the boat.<br />
Connect the shrouds to the stay adjuster on the<br />
hull, using the clevis pins and the split rings.<br />
At this stage, attach them in the upper hole. The<br />
position may be changed afterwards.<br />
The position in the stay adjuster determines the<br />
mast rake.<br />
You can pull the cover partially over the stay adjusters<br />
at this time. The assembly of the trapeze<br />
wires can wait until after you have raised the mast.<br />
faire photo Spinnaker Option:<br />
Insert the spi halyard into the small block at the top<br />
of the mast (see the drawing for the mounting of<br />
the spinnaker at the end of this manual).
Ref : MM_<strong>TATOO</strong> Issued by : IR Date : 05/2011 Up-date : 0 Page : 28/48<br />
<strong>HOBIE</strong> <strong>16</strong> <strong>TATOO</strong><br />
ASSEMBLY MANUAL<br />
Stepping the mast<br />
Illustration Steps Description<br />
faire photo<br />
Copyright HCE 2011 - www.hobie-<strong>cat</strong>.net<br />
CAUTION DANGER : ALUMINIUM MAST<br />
STAY AWAY FROM ELECTRICAL WIRES<br />
CONTACT WITH ELECTRICAL WIRES MAY CAUSE DEATH<br />
4<br />
5<br />
6<br />
Now, ensure that the forestay wire is not twisted<br />
around any other wires and you are ready for raising<br />
the mast.<br />
Raising the mast requires two people for ease<br />
and safety. One person lifts the top of the mast to<br />
shoulder height from behind the boat. The other<br />
person removes the securing bolt from the mast<br />
base and positions the mast base on the mast ball<br />
which is lo<strong>cat</strong>ed at the center of the front crossbar.<br />
Now replace the mast base securing bolt to ensure<br />
that the mast does not pop off of the mast ball.<br />
Now step on the trampoline, and support the<br />
mast, while the other person walk towards the<br />
boat. While raising the mast, make sure that the<br />
shrouds and trapeze wires are not being twisted.
Ref : MM_<strong>TATOO</strong> Issued by : IR Date : 05/2011 Up-date : 0 Page : 29/48<br />
<strong>HOBIE</strong> <strong>16</strong> <strong>TATOO</strong><br />
ASSEMBLY MANUAL<br />
Stepping the mast<br />
Illustration Steps Description<br />
refaire photo<br />
Copyright HCE 2011 - www.hobie-<strong>cat</strong>.net<br />
CAUTION DANGER : ALUMINIUM MAST<br />
STAY AWAY FROM ELECTRICAL WIRES<br />
CONTACT WITH ELECTRICAL WIRES MAY CAUSE DEATH<br />
refaire photo<br />
7<br />
7<br />
8<br />
Connect the forestay to the bridles<br />
With the person on the trampoline supporting<br />
the mast, the other person connects the forestay<br />
to the upper hole of the stay adjuster that was<br />
already attached to the bridles. Use the clevis pin<br />
and split ring.<br />
Connect the forestay to the jib furler (option)<br />
With the person on the trampoline supporting<br />
the mast, the other person takes the forestay and<br />
connects it to the stay adjuster fixed to the jib furler.<br />
Pin the forestay towards the top of the adjuster.<br />
Now, provided all the clevis pins have the split<br />
rings fitted, the mast is supported by the shrouds<br />
and forestay.<br />
Once the forestay is attached and the mast is standing,<br />
remove the mast base securing bolt. This<br />
bolt is only used for raising and lowering the mast
Ref : MM_<strong>TATOO</strong> Issued by : IR Date : 05/2011 Up-date : 0 Page : 0/48<br />
<strong>HOBIE</strong> <strong>16</strong> <strong>TATOO</strong><br />
ASSEMBLY MANUAL<br />
Trapeze assembly<br />
Illustration Etapes Description<br />
refaire photo<br />
Copyright HCE 2011 - www.hobie-<strong>cat</strong>.net<br />
1 take the trapeze line and handles in the wire bag.<br />
2<br />
4<br />
Assembling the J&H handles<br />
Tie a knot firmly at the end of the 6 mm line. Fix<br />
the knotted rope firmly to the handle as on the<br />
drawing, ensuring that the rope cannot move from<br />
the top center of the handle. Lead the other end<br />
into the thimble of the trapeze wire (under the<br />
black handle).<br />
Then, attach the rope-lock as shown on the picture.<br />
The height of trapezing can be adjusted by changing<br />
the position of the rope lock.<br />
Take the two trapeze shock cords. Each of them<br />
must be lead under the trampoline to connect the<br />
right trapeze to the left one, raising through the<br />
trampoline grommets.<br />
Use a bowline knot to secure the trapeze lines to<br />
the trapeze shock cord as shown on the picture.
Ref : MM_<strong>TATOO</strong> Issued by : IR Date : 05/2011 Up-date : 0 Page : 1/48<br />
<strong>HOBIE</strong> <strong>16</strong> <strong>TATOO</strong><br />
ASSEMBLY MANUAL<br />
Tensionning the rig<br />
Illustration Steps Description<br />
refaire photo<br />
Copyright HCE 2011 - www.hobie-<strong>cat</strong>.net<br />
1<br />
Now the rig can be tensioned. One person can pull<br />
down on a trapeze handle whilst the other person<br />
repositions the clevis pin in the stay adjuster.<br />
Ensure that the two shrouds are pinned at the<br />
same height in both adjusters. If too much tension<br />
is applied it may become difficult for the mast to<br />
rotate freely.<br />
Check this before proceeding with raising the sail.
Ref : MM_<strong>TATOO</strong> Issued by : IR Date : 05/2011 Up-date : 0 Page : 2/48<br />
<strong>HOBIE</strong> <strong>16</strong> <strong>TATOO</strong><br />
ASSEMBLY MANUAL<br />
Main Sail<br />
NB : Always point your <strong>Hobie</strong> directly into the wind before you raise the mainsail<br />
Illustration Steps Description<br />
faire photo<br />
Copyright HCE 2011 - www.hobie-<strong>cat</strong>.net<br />
1<br />
2<br />
Unfold the mainsail onto the trampoline and insert<br />
each batten into its respective pocket in the<br />
sail. The smallest goes at the top of the sail and<br />
the longest at the bottom of the sail. Insert the<br />
battens into their pockets and secure them using<br />
the webbing straps and plastic clips. Apply enough<br />
tension to remove the wrinkles from the pocket.<br />
Attach the main halyard shackle to the sail headboard.<br />
Feed the bolt rope of the sail into the slit in<br />
the sail track. Proceed to pull down on the main<br />
halyard whilst your assistant feeds the bolt rope<br />
into the slit. Raise the main sail fully.<br />
faire photo Feed the bottom part of the bolt rope (the part that<br />
remains at the bottom once the sail is fully raised)<br />
into the sail track below the slit.<br />
faire photo<br />
4<br />
Secure the halyard in the cleat at the bottom of<br />
the mast. Stow the excess line in the trampoline<br />
pocket.
Ref : MM_<strong>TATOO</strong> Issued by : IR Date : 05/2011 Up-date : 0 Page : /48<br />
<strong>HOBIE</strong> <strong>16</strong> <strong>TATOO</strong><br />
ASSEMBLY MANUAL<br />
Cunningham<br />
Illustration Steps Description<br />
Copyright HCE 2011 - www.hobie-<strong>cat</strong>.net<br />
1 Take the cunningham line in the rope bag.<br />
2 Take the hook with the double block in the rig bag.<br />
4<br />
Thread the cunningham line :<br />
1. Insert one end in the pad-eye, make a buckle<br />
and stop with a bowline knot.<br />
2. Lead the other end up into the sheave of the<br />
double block<br />
. then down to the cheek block<br />
4. than up into the second sheave of the double<br />
block.<br />
5. Sheet in and secure the line in the black cleat at<br />
the bottom of the mast.
Ref : MM_<strong>TATOO</strong> Issued by : IR Date : 05/2011 Up-date : 0 Page : 4/48<br />
<strong>HOBIE</strong> <strong>16</strong> <strong>TATOO</strong><br />
ASSEMBLY MANUAL<br />
Mainsheet system<br />
Illustration Steps Description<br />
faire photo<br />
Copyright HCE 2011 - www.hobie-<strong>cat</strong>.net<br />
1 Take the mainsheet system in the rig bag.<br />
2<br />
Fasten the mainsheet ratchet block onto the top of<br />
the main traveller.<br />
faire photo The mainsheet system is now ready to be headed<br />
to the clew of the mainsail.<br />
faire photo<br />
4<br />
NB : It is best to leave the top block unhooked until<br />
the boat is in the water.<br />
Thread the tail of the mainsheet line through the<br />
traveller cleat and fairlead of the traveller car and<br />
then secure with a figure 8 knot at the eyestrap on<br />
the aft edge of the rear crossbar.
Ref : MM_<strong>TATOO</strong> Issued by : IR Date : 05/2011 Up-date : 0 Page : 5/48<br />
<strong>HOBIE</strong> <strong>16</strong> <strong>TATOO</strong><br />
ASSEMBLY MANUAL<br />
Jib sail (without jib furler)<br />
Illustration Steps Description<br />
faire photo<br />
faire photo<br />
faire photo<br />
Copyright HCE 2011 - www.hobie-<strong>cat</strong>.net<br />
1<br />
2<br />
4<br />
Take the jib block at the bottom of the mast and fix<br />
it to the head of the jib.<br />
Shackle the jib tack point to the 4th or 5th hole<br />
of the forestay adjuster (depending on the sailing<br />
conditions).<br />
Clip the jib luff (the front edge of the sail) onto the<br />
forestay wire. To do this turn the clips at 90° then<br />
push and twist onto the forestay.<br />
Hoist the jib. Secure the jib halyard on the cleat at<br />
the bottom of the mast and stow the excess line on<br />
the trampoline pocket.
Ref : MM_<strong>TATOO</strong> Issued by : IR Date : 05/2011 Up-date : 0 Page : 6/48<br />
<strong>HOBIE</strong> <strong>16</strong> <strong>TATOO</strong><br />
ASSEMBLY MANUAL<br />
Jib sail (with jib furler - option)<br />
Illustration Steps Description<br />
faire photo 1<br />
Copyright HCE 2011 - www.hobie-<strong>cat</strong>.net<br />
2<br />
4<br />
Unfold the jib and attach the jib halyard to the head<br />
of the jib using the shackle supplied. Pull on the<br />
halyard to hoist the jib<br />
Clip the jib luff (the front edge of the sail) onto the<br />
forestay wire. To do this turn the clips at 90° then<br />
push and twist onto the forestay.<br />
shackle the tack point of the jib to the stay adjuster<br />
on the top of the furler. Fasten as low as possible.<br />
Use the jib luff tensioner line to replace the jib<br />
halyard. The tensioner line can be fastened to the<br />
tack shackle, fed up through the small block and<br />
then cleated off at the cleat on the sail. Ensure<br />
that the line is tight and cleated securely. Enough<br />
tension should be applied to remove the wrinkles<br />
from the luff of the sail. The jib halyard line can be<br />
stored in the trampoline pocket.
Ref : MM_<strong>TATOO</strong> Issued by : IR Date : 05/2011 Up-date : 0 Page : 7/48<br />
<strong>HOBIE</strong> <strong>16</strong> <strong>TATOO</strong><br />
ASSEMBLY MANUAL<br />
Jib sheet line<br />
Illustration Steps Description<br />
faire photo<br />
faire photo<br />
faire photo<br />
Copyright HCE 2011 - www.hobie-<strong>cat</strong>.net<br />
1<br />
2<br />
4<br />
Take the jib sheet in the rope bag and the jib<br />
blocks in the rig bag.<br />
Attach the blocks at the clew point of the jib using<br />
the safety hook.<br />
Attach one end of the jib sheet on the fixed point<br />
of the left jib block on the front crossbar, lead it<br />
through the left pulley on the jib, then down into<br />
the block on the crossbar and out through the<br />
cleat. Take it to the opposite side of the boat and<br />
do the same thing in reverse, first the cleat, then<br />
up to the jib, then down to the block and fix the end<br />
to the fixed point of the block.<br />
The jib sail can now be furled. Ensure that the jib<br />
sheet is not cleated and pull down the furler line.<br />
When the sail is fully furled, secure the furler line<br />
in the ‘V’’ jam cleat on the rear of the crossbar.
Ref : MM_<strong>TATOO</strong> Issued by : IR Date : 05/2011 Up-date : 0 Page : 8/48<br />
<strong>HOBIE</strong> <strong>16</strong> <strong>TATOO</strong><br />
ASSEMBLY MANUAL<br />
Righting line<br />
Illustration Steps Description<br />
faire photo<br />
Copyright HCE 2011 - www.hobie-<strong>cat</strong>.net<br />
1<br />
2<br />
Righting line<br />
Take the righting line in the rope bag.<br />
Tie a knot about 5 cm from the end of the line and<br />
pass the short end down through the grommet at<br />
the contre front of the trampoline.<br />
Then pass the line through the eyestrap mounted<br />
underneath the mast step and tie a figure 8 knot in<br />
the end.<br />
Now, stow the rest of the righting line in the trampoline<br />
pocket.<br />
A knot in the righting line just above the grommet<br />
will prevent the righting line from slipping down<br />
and dragging in the water.
Ref : MM_<strong>TATOO</strong> Issued by : IR Date : 05/2011 Up-date : 0 Page : 9/48<br />
<strong>HOBIE</strong> <strong>16</strong> <strong>TATOO</strong><br />
ASSEMBLY MANUAL<br />
Easy Lock Rudder Assembly<br />
Illustration Steps Description<br />
Copyright HCE 2011 - www.hobie-<strong>cat</strong>.net<br />
photo à changer<br />
1<br />
2<br />
4<br />
Place the rudder assembly on the boat pintle.<br />
Note : the Housing may only be installed or removed<br />
from the boat pintles when the rudder blade<br />
is in-between the upper and lower positions. This is<br />
an additional safety feature to keep the rudder on<br />
the boat in case of capsize.<br />
Secure the housing to the pintles by placing the<br />
keeper over the upper pintle. Make sure that it is<br />
completely engaged in the slot.<br />
This new design has a simplified and more intuitive<br />
function. To raise the rudder, raise the tiller ; to<br />
lower the rudder, lower the tiller. The rudder<br />
automatically locks into either position and is held<br />
by spring-loaded detents. The rudder will kick-up if<br />
beached or if an obstruction is hit.<br />
Locking pin<br />
Attached to the side of each rudder is a locking<br />
pin. This pin is designed to keep your rudder in the<br />
up position during transportation. Bumpy launch<br />
ramps or steep angled beaches could cause the<br />
rudders to drop down, causing the blade to dig into<br />
the ground. To install the pin, put the rudder in the<br />
up position and simply remove the pin that is snapped<br />
to the casting and insert it through the hole in<br />
the side of the rudder. When you want to put the<br />
rudder back down, remove the pin and snap it back<br />
into the side of the casting.<br />
Up-keep and precautions<br />
When in use, make sure that the rudder is locked in the down position. You will know if your rudder is not down all the<br />
way if steering feels heavy.<br />
If used in saltwater, it is always a good idea to rinse rudder assembly with fresh water.<br />
If boat is stored outdoors for extended periods of time, without being used, remove rudder assembly and store indoors.<br />
Avoid storing rudder assembly in extremely hot lo<strong>cat</strong>ions such as in direct sunglight in a vehicle with windows closed.
Ref : MM_<strong>TATOO</strong> Issued by : IR Date : 05/2011 Up-date : 0 Page : 40/48<br />
<strong>HOBIE</strong> <strong>16</strong> <strong>TATOO</strong><br />
ASSEMBLY MANUAL<br />
Barre d’accouplement et stick<br />
Illustration steps Description<br />
Copyright HCE 2011 - www.hobie-<strong>cat</strong>.net<br />
1<br />
2<br />
4<br />
5<br />
Tiller crossbar<br />
Take the connection kit TCM from the rig bag.<br />
Attach the tiller crossbar (1) to the tiller arm (2).<br />
Pay attention to the left and right side. Insert the<br />
screw as shown on the drawing.<br />
Repeat the same operation on the other side.<br />
It is advisable to have the rudder blades parallel<br />
or lightly toed-in ( -4 mm). The length of the tiller<br />
crossbar can be adjusted to achieve this. Loosen<br />
the screw on the underside of the tiller crossbar<br />
and you will be able to slide the adjuster in or out.<br />
When you have aligned the rudders correctly, ensure<br />
that you re-tighten the adjuster screw firmly.<br />
Tiller extension :<br />
Attach the stick by slipping the pin through the<br />
violin screw in the middle of the tiller crossbar.
Ref : MM_<strong>TATOO</strong> Issued by : IR Date : 05/2011 Up-date : 0 Page : 41/48<br />
<strong>HOBIE</strong> <strong>16</strong> <strong>TATOO</strong><br />
ASSEMBLY MANUAL<br />
Safety equipment<br />
Illustration Steps Description<br />
Mast floating device (option)<br />
This device prevents the mast from sinking in case of capsize thus allows easy righting.<br />
As serial or optional equipment, the mast float devise is already mounted. You just need to fit it on your mast head (see<br />
step ). If it is not mounted, follow steps 1 to below.<br />
Copyright HCE 2011 - www.hobie-<strong>cat</strong>.net<br />
1 Unscrew the four screws that are on the device.<br />
2<br />
4<br />
Adjust the alu plate so that the<br />
holes fit the four holes on the<br />
device and fix it with the screws.<br />
Fix the device on the mast head using the bolt and<br />
the two washers as shown on the photo.<br />
Safety line<br />
While sailing, the safety cord on the trampoline<br />
(blue line on the photo, that may be of a different<br />
colour) prevents the crew from falling off of the <strong>cat</strong>,<br />
and allows easy righting in case of capsizing.
Ref : MM_<strong>TATOO</strong> Issued by : IR Date : 05/2011 Up-date : 0 Page : 42/48<br />
<strong>HOBIE</strong> <strong>16</strong> <strong>TATOO</strong><br />
ASSEMBLY MANUAL<br />
Spinnaker kit (option)<br />
Illustration steps Description<br />
Copyright HCE 2011 - www.hobie-<strong>cat</strong>.net<br />
1<br />
2<br />
Attach the spinnaker pole on its fixation on the<br />
front crossbar.<br />
Attach the spi pole bridles on the eye-bolts at the<br />
bow of each hull using the 4 mm shakle supplied.<br />
Attach the black spi pole bending rope as shown<br />
on the picture.<br />
4 Fix the spi bag on the trumpet.
Ref : MM_<strong>TATOO</strong> Issued by : IR Date : 05/2011 Up-date : 0 Page : 4 /48<br />
<strong>HOBIE</strong> <strong>16</strong> <strong>TATOO</strong><br />
ASSEMBLY MANUAL<br />
Spinnaker kit (option)<br />
Illustration steps Description<br />
Copyright HCE 2011 - www.hobie-<strong>cat</strong>.net<br />
5<br />
6<br />
Attach the rear of the bag on the front crossbar<br />
using the two small white lines : one on the nylon<br />
pad-eye on the crossbar, the other to the spi pole<br />
fixation.<br />
Position the trumpet on the spinnaker pole in such<br />
manner that the bag is well stretched. Fix the<br />
trumpet using the two screws supplied.<br />
7 Fix the velcro stripes around the spinnaker pole.<br />
8<br />
Take the spinnaker halyard falling from the block<br />
at the mast head and make a buckle around the<br />
spinnaker head and stop it with a bowline knot.
Ref : MM_<strong>TATOO</strong> Issued by : IR Date : 05/2011 Up-date : 0 Page : 44/48<br />
<strong>HOBIE</strong> <strong>16</strong> <strong>TATOO</strong><br />
ASSEMBLY MANUAL<br />
Spinnaker kit (option)<br />
Illustration steps Description<br />
Copyright HCE 2011 - www.hobie-<strong>cat</strong>.net<br />
9<br />
Take the other loose end of the halyard and thread<br />
it in the block that is facing the mast on the spi<br />
pole.<br />
10 insert it in one of the sister blocks.<br />
11<br />
12<br />
Then thread is through the cam cleat block on the<br />
front crossbar.<br />
Take the block that is attached at the end of the<br />
shock cord, and fix this assembly to the trampoline<br />
rod (see the photo). Thread the spi halyard through<br />
this block.
Ref : MM_<strong>TATOO</strong> Issued by : IR Date : 05/2011 Up-date : 0 Page : 45/48<br />
<strong>HOBIE</strong> <strong>16</strong> <strong>TATOO</strong><br />
ASSEMBLY MANUAL<br />
Spinnaker kit (option)<br />
Illustration steps Description<br />
Copyright HCE 2011 - www.hobie-<strong>cat</strong>.net<br />
1<br />
Then, lead it through the sheave on the front crossbar,<br />
14 then, through the grommet of the spi bag stripe<br />
15<br />
<strong>16</strong><br />
use a batten as bodkin to insert the halyard all<br />
through the bag and have it coming out of the<br />
trumpet mouth.<br />
Then insert the halyard in the first and in the second<br />
ring of the two first patches of the spinnaker.
Ref : MM_<strong>TATOO</strong> Issued by : IR Date : 05/2011 Up-date : 0 Page : 46/48<br />
<strong>HOBIE</strong> <strong>16</strong> <strong>TATOO</strong><br />
ASSEMBLY MANUAL<br />
Spinnaker kit (option)<br />
Illustration steps Description<br />
Copyright HCE 2011 - www.hobie-<strong>cat</strong>.net<br />
17 Make a knot in the third patch.<br />
18<br />
19<br />
20<br />
Take the tack line and fix it at the tacking point<br />
of the spinnaker, then in the block that is at the<br />
end of the spinnaker pole, then lead it through the<br />
second sister pulley, that kit back through the pole<br />
block and stop it by a knot.<br />
Install the winch blocks at each end of the front<br />
crossbar.<br />
Insert the spi sheet in the 1st block, then in the<br />
2nd block - check the way you do it.<br />
Take the two ends through the spi clew point and<br />
stop each end by a figure 8 knot as shown on the<br />
picture.
Ref : MM_<strong>TATOO</strong> Issued by : IR Date : 05/2011 Up-date : 0 Page : 47/48<br />
<strong>HOBIE</strong> <strong>16</strong> <strong>TATOO</strong><br />
ASSEMBLY MANUAL<br />
Spinnaker kit (option) - line circuit<br />
Spinnaker tack line<br />
Spinnaker sheet line<br />
Copyright HCE 2011 - www.hobie-<strong>cat</strong>.net<br />
Spinnaker halyard
Ref : MM_<strong>TATOO</strong> Issued by : IR Date : 05/2011 Up-date : 0 Page : 48/48<br />
<strong>HOBIE</strong> <strong>16</strong> <strong>TATOO</strong><br />
OWNER’S MANUAL<br />
<strong>HOBIE</strong> CAT EUROPE<br />
ZI Toulon Est, BP 250, 8 078 Toulon cedex 9, France<br />
Tel + (0)494 08 78 78 - Fax + (0)494 08 1 99<br />
E-mail : info@hobie-<strong>cat</strong>.net - site web www.hobie-<strong>cat</strong>.net<br />
Copyright HCE 2011