102mm Wide View Manual - Celestron
102mm Wide View Manual - Celestron
102mm Wide View Manual - Celestron

Create successful ePaper yourself
Turn your PDF publications into a flip-book with our unique Google optimized e-Paper software.
80mm <strong>Wide</strong> <strong>View</strong> Spotting Scope (#52260)<br />
<strong>102mm</strong> <strong>Wide</strong> <strong>View</strong> Spotting Scope (#52270)<br />
INSTRUCTION MANUAL
INTRODUCTION<br />
A spotting scope is nothing more than a telescope that is designed to look around the Earth.<br />
Unlike astronomical telescopes, which produce inverted or reverted images, spotting scopes<br />
produce correctly oriented images. <strong>Celestron</strong> offers several different models, each of which uses<br />
the highest quality optics to produce the best possible images.<br />
How to Use this <strong>Manual</strong><br />
This manual explains the proper use of your <strong>Celestron</strong> spotting scope —from initial set up to ongoing<br />
use. This manual is broken down into several sections. The first covers attaching your<br />
spotting scope to a stable platform, like a photographic tripod, so that the standard accessories can<br />
be attached. The second section is on using your spotting scope. Topics include how to attach the<br />
standard accessories, how to locate objects, etc. The last sections deal with general information.<br />
Topics include visual and photographic observing hints, astronomical uses for your spotting<br />
scope, and maintenance information. Before you attempt to use your spotting scope, read this<br />
manual carefully.<br />
A Word of Caution!<br />
Your <strong>Celestron</strong> spotting scope is designed to give you hours of fun and rewarding observations.<br />
There are, however, a few things to consider before using your spotting scope that will ensure<br />
your safety and protect your equipment.<br />
• Never look directly at the Sun with the naked eye or with your spotting scope. Permanent and<br />
irreversible eye damage may result.<br />
• Never use your spotting scope to project an image of the Sun onto any surface. Internal heat<br />
build-up can damage your spotting scope and/or any accessories attached to it.<br />
• Never use an eyepiece solar filter or a Herschel wedge. Internal heat build-up inside your<br />
spotting scope can cause these devices to crack or break, allowing unfiltered sunlight to pass<br />
through to the eye.<br />
• Never leave your spotting scope unsupervised, either when children are present or adults who<br />
may not be familiar with the correct operating procedures of your spotting scope.<br />
• Never point your spotting scope at the Sun unless you have the proper solar filter. When<br />
using your spotting scope with the proper solar filter, ALWAYS cover the finderscope.<br />
Although small in aperture, this instrument has enough light gathering power to possibly<br />
cause permanent and irreversible eye damage. In addition, the image projected by the finder<br />
is hot enough to burn skin and clothing.<br />
2
GETTING STARTED<br />
The high magnification of your spotting scope makes it very difficult to handhold and, as a result,<br />
it must be attached to a stable platform. The <strong>102mm</strong> <strong>Wide</strong> <strong>View</strong> has a tripod adapter block,<br />
which is located on the bottom of the spotting scope tube. Remove your spotting scope from the<br />
box and attach it to any of the mounts described below.<br />
Photographic Tripod<br />
For best results, attach your <strong>Celestron</strong> spotting scope to a photographic tripod like the <strong>Celestron</strong><br />
Photographic Tripod (#93596) or any fairly rigid photographic tripod. To attach your spotting<br />
scope to the tripod:<br />
1. Remove the instrument platform from the tripod. To do this, rotate the platform lock<br />
clockwise. Pull the back of the instrument platform out first, then pivot the front out. Since<br />
the platform lock is spring-loaded, hold the clamp in position and pull the platform up, off of<br />
the tripod head.<br />
2. Place the tripod adapter block (on the instrument) over the 1/4x20 screw on the tripod head.<br />
Keep in mind that the platform is not on the tripod at this time. Tighten the screw (located on<br />
the under side of the platform) until tight. Just in front of the 1 /4x20 screw is a small peg<br />
used to secure video cameras to the tripod. If you are not using a video camera, this peg,<br />
which is spring-loaded, will push down into the tripod head.<br />
3. Rotate the platform lock clockwise. Slide the front of the platform in first, then pivot the back<br />
in.<br />
4. Push the platform lock counterclockwise until it touches the under side of the tripod head.<br />
This will hold the platform in place.<br />
Once mounted on the tripod, you are ready to attach the standard accessories.<br />
Slow Motion Control<br />
The Photographic Tripod Slow Motion Control (#93804-DX) is not a mount, but a fine pointing<br />
tool that fits between your spotting scope and a photographic tripod head. Unlike the rough<br />
adjustment handles found on photographic tripods, the Photographic Tripod Slow Motion Control<br />
uses fine adjustment knobs to allow for precision pointing.<br />
What next?<br />
With your spotting scope firmly attached to a stable platform, you are ready to attach the standard<br />
accessories and begin using your spotting scope.<br />
3
The <strong>Wide</strong> <strong>View</strong> Spotting Scope<br />
This section covers the correct set up and operating procedures for your <strong>Celestron</strong> 80mm or<br />
<strong>102mm</strong> <strong>Wide</strong> <strong>View</strong> spotting scope and includes information on visual and photographic<br />
observations. The <strong>Wide</strong> <strong>View</strong> spotting scope uses a classical refractor optical design with a twoelement<br />
(achromatic) lens made of crown and flint glass. Unlike other spotting scopes which have<br />
built-in correcting prisms, the <strong>Wide</strong> <strong>View</strong> uses a diagonal to produce a correctly oriented image.<br />
This allows you to use your spotting scope like a conventional telephoto when a camera is<br />
attached. The basic <strong>Celestron</strong> <strong>Wide</strong> <strong>View</strong> comes standard with the following accessories:<br />
80mm <strong>Wide</strong> <strong>View</strong> <strong>102mm</strong> <strong>Wide</strong> <strong>View</strong><br />
20mm Plossl Eyepiece 1 1 /4” (20x) 25mm Plossl Eyepiece 1 1 /4” (20x)<br />
10mm Plossl Eyepiece 1 1 /4” (40x) 10mm Plossl Eyepiece 1 1 /4” (50x)<br />
45° Erect Image Diagonal – 1 1 /4” 45° Erect Image Diagonal – 1 1 /4”<br />
8x20 Erect Image Finderscope 8x20 Erect Image Finderscope<br />
Lens Caps Lens Caps<br />
1/4 x20 Mounting Adapter 1/4 x 20 Mounting Adapter<br />
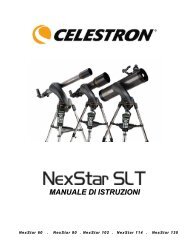
Take a few minutes to study the diagram on the following page to help familiarize yourself with<br />
the various parts of your spotting scope for set up and ongoing use.<br />
Eyepiece<br />
45º Erect Image<br />
Diagonal<br />
Focuser<br />
Knob<br />
Finderscope<br />
Mounting<br />
Bracket<br />
Figure 1 – <strong>Wide</strong> <strong>View</strong> spotting scope shown on optional tripod<br />
4<br />
Photographic<br />
Tripod<br />
(Optional)<br />
Objective<br />
Lens
Removing the Lens Cover<br />
To protect your spotting scope, the objective lens, focuser, and accessories are fitted with<br />
protective covers. All are tension-fitted and easily removed by pulling off. The covers should be<br />
removed as each piece is installed. Once removed, place the covers in the box to ensure they<br />
won’t get lost.<br />
Attaching the Standard Accessories<br />
With your spotting scope attached to a sturdy mount, as described earlier in this manual, you are<br />
ready to attach the standard accessories. To do this:<br />
1. Remove the protective cover from the focuser of the spotting scope, the 45º Erect Image<br />
Diagonal, and the eyepiece.<br />
2. Loosen the thumbscrew on the focuser of the spotting scope so that the opening (i.e., inner<br />
diameter) is unobstructed.<br />
3. Slide the chrome barrel of the 45º Erect Image Diagonal into the focuser barrel.<br />
4. Tighten the thumbscrew on the focuser to hold it in place.<br />
5. Loosen the thumbscrew on the eyepiece holder of the 45º Erect Image Diagonal. Make sure<br />
that it does not block the inner diameter of the eyepiece holder.<br />
6. Insert the chrome barrel of the eyepiece into the 45º Erect Image Diagonal.<br />
7. Tighten the thumbscrew on the 45° Erect Image Diagonal to hold the eyepiece in place.<br />
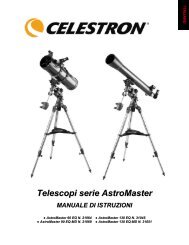
Attaching The Finderscope<br />
Figure 2<br />
Your spotting scope comes with a 8x20 erect image finderscope to help you locate distant objects<br />
that might be difficult to find in the narrow field of view of the main spotting scope.<br />
1. Attach the finderscope and bracket by sliding the rubber O-ring over the objective lens<br />
(narrow) end of the finderscope and roll it 1/3 of the way up the finderscope body. Then<br />
insert the object lens end of the finder through the rings in the bracket until the O-ring<br />
5
presses tightly between the finderscope and the inside of the bracket. Tighten the three<br />
adjustment screws until they make contact with the finderscope body. See figure 3a.<br />
2. Slide the finder bracket (attached to the finderscope) into the mounting bracket on the<br />
spotting scope. Tighten the thumb screw on the mounting bracket to hold the finderscope<br />
in place. See figure 3b.<br />
Aligning the Finderscope<br />
To align the finderscope:<br />
Figure 3a Figure 3a<br />
Figure 3b<br />
1. Choose a target in excess of one mile away. This will eliminate any possible parallax<br />
effect.<br />
2. Point the spotting scope at your target and center it in the eyepiece of the spotting scope.<br />
3. Adjust the screws on the finder bracket until the cross hairs in the finder are centered on<br />
the target.<br />
4. Tighten each screw a quarter turn so the finder does not come loose.<br />
Using Your <strong>Wide</strong> <strong>View</strong> Spotting Scope Visually<br />
With the standard accessories attached, you are ready for your first look.<br />
1. Point the front end of the spotting scope at a distant object.<br />
2. Locate the object in the finderscope.<br />
Finderscope<br />
Adjustment<br />
Screws<br />
3. Look through the spotting scope and turn the focus knobs until objects come to a sharp<br />
focus.<br />
4. Center your target using the slow motion controls of the tripod.<br />
Repeat this process for each object you observe.<br />
6
Focusing<br />
For objects closer than the one you are currently observing, turn the focus knobs towards the<br />
eyepiece and for objects further away, turn the focus knobs away from the eyepiece.<br />
Changing Eyepieces<br />
You can vary the power of your spotting scope simply by changing eyepieces. To change<br />
eyepieces:<br />
1. Loosen the thumbscrew on the 45° Erect Image Diagonal.<br />
2. Remove the eyepiece currently in the spotting scope.<br />
3. Insert a new eyepiece into the 45° Erect Image Diagonal.<br />
4. Tighten the thumbscrew on the 45° Erect Image Diagonal to hold the eyepiece in place<br />
With the new eyepiece in place you will need to refocus your spotting scope (unless the eyepieces<br />
have the same focus point, something known as being parfocal). Once again, turn the focusing<br />
ring until the image is sharp.<br />
<strong>Celestron</strong> offers a wide variety of eyepieces as optional accessories. To determine the<br />
magnification of each eyepiece used with your spotting scope, see the section “Calculating<br />
Magnification” at the end of this manual.<br />
In addition to eyepieces, you may also use a Barlow lens to increase magnification. A Barlow<br />
lens is a negative lens that increases the focal length of a spotting scope. Used with an eyepiece it<br />
increases the magnification. The amount of the increase depends on the lens itself and its position<br />
in the optical system. <strong>Celestron</strong> offers Barlow lenses for 1-1/4” eyepieces (#93506 & #93507).<br />
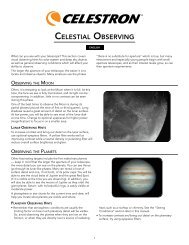
Using Your <strong>Wide</strong> <strong>View</strong> Spotting Scope Photographically<br />
Your Spotting Scope can be used photographically as well as visually. To turn your spotting scope into a<br />
telephoto lens all you need is a T-Ring for your particular camera make (i.e., Nikon, Minolta, Pentax, etc.).<br />
The T-Ring replaces the 35mm SLR camera’s normal lens.<br />
Built-in T-Adapter<br />
Threads<br />
2” Focuser<br />
Barrel<br />
1 ¼” Accessory<br />
Adapter (for <strong>102mm</strong><br />
WV)<br />
7<br />
Figure 4<br />
Focuser Tension<br />
Screw<br />
Focuser Knob
Attaching a Camera<br />
To attach a camera to your <strong>Wide</strong> <strong>View</strong> Spotter:<br />
1. Remove all visual accessories.<br />
2. Thread the proper T-Ring onto the built-in T-Adapter threads at the end of the eyepiece<br />
holder.<br />
3. Mount your camera body onto the T-Ring the same as you would any other lens.<br />
Focusing The Camera<br />
The focusing mechanism is the same photographically and visually. However, due to the high<br />
magnification, the micro prism focuser in your camera may "black out." If this is the case, you<br />
will have to use the ground glass portion of your focusing screen, which itself may be dark. For<br />
the best results, take your time. Look at your subject carefully to make sure that you have the<br />
sharpest possible focus. To achieve a very sharp focus, consider using a focusing magnifier.<br />
These devices are readily available from your local camera store.<br />
If you can not get a sharp focus, check to see if your subject is closer than the near focus distance<br />
listed in the "Technical Specification" section.<br />
Storing Your <strong>Wide</strong> <strong>View</strong> Spotting Scope<br />
To minimize the need to clean your spotting scope, replace all lens covers after use. The spotting<br />
scope can be left on a tripod for display purposes or returned to its shipping carton. Since the rear<br />
cell of your <strong>Wide</strong> <strong>View</strong> spotting scope is not sealed, the eyepiece or protective cover MUST be<br />
placed over the opening in the rear cell when not in use. This will prevent contaminants from<br />
entering the optical system.<br />
Technical Specifications<br />
Below is pertinent technical information on your <strong>Wide</strong> <strong>View</strong> spotting scope that<br />
you may find useful.<br />
80mm <strong>Wide</strong> <strong>View</strong> <strong>102mm</strong> <strong>Wide</strong> <strong>View</strong><br />
Optical System Refractor Refractor<br />
Aperture: 80mm (3.15") <strong>102mm</strong> (4")<br />
Focal Length: 400mm (16") 500mm (20")<br />
Near Focus: with low power eyepiece ~13' ~17<br />
Useful Power Range: 12x to 189x 15x to 240x<br />
Linear Field of <strong>View</strong>: 131' with 20mm Eyepiece 131' with 25mm Eyepiece<br />
(53' with 10mm Eyepiece) (53' with 10mm Eyepiece)<br />
Angular Field of <strong>View</strong>: 2.5° with 20mm Eyepiece 2.5° with 25mm Eyepiece<br />
(1.0° with 10mm Eyepiece) (1.0° with 10mm Eyepiece)<br />
F/ratio: f/5 f/5<br />
Length: 15.5" 21"<br />
Weight: 4 lbs. 11 oz 5 lbs.<br />
Note: All specifications are stated for the <strong>Wide</strong> <strong>View</strong> spotting scopes using the standard<br />
accessories. These specifications are approximate and may change without notice.<br />
8
VISUAL OBSERVING INFORMATION<br />
Focusing<br />
When working with any optical instrument, there are several focusing hints that will ensure that<br />
you get the sharpest possible image. The hints listed here are for visual observing and<br />
photography.<br />
S Never look through glass. Glass found in household windows is optically imperfect and<br />
may vary in thickness from one location to the next. This inconsistency can and will<br />
affect the ability to focus your spotting scope. In most cases, you will not be able to<br />
achieve a truly sharp focus. In some cases, you may actually see a double image.<br />
S Avoid looking across or over objects that are producing heat waves. This includes<br />
asphalt parking lots on hot summer days or building rooftops. The turbulent air caused<br />
by these conditions makes it impossible to get a truly sharp focus.<br />
S Avoid hazy skies, fog, and mist, all of which can make it difficult to focus, thus greatly<br />
reducing the amount of detail seen. Remember that no matter how good the optics of your<br />
instrument are, they can NOT perform to their fullest under adverse conditions.<br />
Calculating Magnification (Power)<br />
You can change the magnification of your spotting scope simply by changing the eyepiece (also<br />
called an ocular). To determine the magnification with your spotting scope, simply divide the<br />
focal length of your spotting scope by the focal length of the eyepiece. In equation format, the<br />
formula looks like this:<br />
Focal Length of Spotting Scope (mm)<br />
Magnification = ___________________________________________________<br />
Focal Length of Eyepiece (mm)<br />
For example, to determine the magnification of the <strong>102mm</strong> <strong>Wide</strong> <strong>View</strong> with a 25mm eyepiece,<br />
divide the focal length of the <strong>102mm</strong> <strong>Wide</strong> <strong>View</strong> (500mm) by the focal length of the eyepiece<br />
(25mm). 500 divided by 25 yields 20 power.<br />
Although the power is variable, each instrument has a limit to the highest useful magnification.<br />
The general rule is that 60 power can be used for every inch of aperture. For example, in a 4”<br />
diameter spotting scope, such as the <strong>102mm</strong> <strong>Wide</strong> <strong>View</strong>, the maximum useful magnification is<br />
240 power. This is derived from multiplying 60 times 4”. Although this is the maximum useful<br />
magnification, most observing is done in the range of 20 to 35 power for every inch of aperture<br />
which for the <strong>102mm</strong> <strong>Wide</strong> <strong>View</strong> is 80 to 140.<br />
9
Field of <strong>View</strong><br />
Determining the field of view is important if you want to get an idea of the size of the object you<br />
are observing. To calculate the actual field of view, divide the apparent field of the eyepiece<br />
(supplied by the eyepiece manufacturer) by the magnification. In equation format, the formula<br />
looks like this:<br />
True Field (in degrees) =<br />
Apparent Field of Eyepiece<br />
Magnification<br />
Using the example we started with in the previous section, we can determine the field of view<br />
using the same 25mm eyepiece. The 25mm eyepiece has an apparent field of view of 50°. Divide<br />
the 50° by the magnification, which is 20 power. This yields an actual field of 2.5°, or two and a<br />
half degrees. To convert this to feet at one thousand yards, multiply the actual field of 2.5° by<br />
52.5. This gives us a field width of 131 feet at one thousand yards.<br />
PHOTOGRAPHY HINTS<br />
Metering<br />
<strong>Celestron</strong> spotting scopes have fixed apertures and, as a result, fixed f/ratios. To properly expose<br />
your subjects photographically, you need to set your shutter speed accordingly. Most 35mm SLR<br />
cameras offer through-the-lens metering which lets you know if your picture is under or<br />
overexposed. Adjustments for proper exposures are made by changing the shutter speed. Consult<br />
your camera manual for specific information on metering and changing shutter speeds.<br />
Reducing Vibration<br />
Releasing the shutter manually can cause<br />
vibrations, producing blurred photos. To reduce<br />
vibration when tripping the shutter, use a cable<br />
release. A cable release keeps your hands clear of<br />
the camera and lens, thus eliminating the possibility<br />
of introducing vibration. Mechanical shutter<br />
releases can be used, though air-type releases are<br />
best.<br />
Blurry pictures can also result from shutter speeds<br />
that are too slow. To prevent this, use films that produce shutter speeds greater than 1/250 of a<br />
second when hand-holding the lens. If the lens is mounted on a tripod, the exposure length is<br />
virtually unlimited.<br />
Another way to reduce vibration is with the Vibration Suppression Pads (#93503). These pads<br />
rest between the ground and tripod feet. They reduce the vibration amplitude and vibration time.<br />
10
ASTRONOMY WITH YOUR SPOTTING SCOPE<br />
A spotting scope is nothing more than a telescope that produces correctly oriented images. That is<br />
why all <strong>Celestron</strong> spotting scopes are so well-suited for looking around the Earth. But this in no<br />
way limits the spotting scope to terrestrial use. On the contrary, the <strong>102mm</strong> <strong>Wide</strong> <strong>View</strong> spotting<br />
scopes work well as an astronomical telescope for observing the sky.<br />
Observing the Sun<br />
Although overlooked by many amateur astronomers, solar observation is both rewarding and fun.<br />
However, because the Sun is so bright, special precautions must be taken when observing our star<br />
so as not to damage your eyes or your spotting scope. Never project an image of the Sun through<br />
the telescope. Tremendous heat build-up inside the optical tube can damage the spotting scope<br />
and/or any accessories attached to the spotting scope. To observe the Sun in complete safety, use<br />
a proper <strong>Celestron</strong> solar filter (#94138 for <strong>102mm</strong> WV and #94135 for 80mmWV).<br />
These filters reduce the intensity of the Sun’s light, making it safe to view. With these filters you<br />
can see sunspots as they move across the solar disk as the Sun rotates. In addition, you can see<br />
tiny grain shaped structures called granules, which are convection cells on the Sun. Be sure to<br />
cover the lens of the finderscope when observing the Sun. This will ensure that the<br />
finderscope itself is not damaged and that no one looks through it accidentally.<br />
Observing the Moon<br />
In the night sky, the Moon is a prime target for your first look because it is extremely bright and<br />
easy to find. Often, it is tempting to look at the Moon when it is full. At this time, the face we see<br />
is fully illuminated and its light is overpowering. In addition, little or no contrast can be seen at<br />
this time.<br />
One of the best times to observe the Moon is during its partial phases (around the time of first or<br />
third quarter). Long shadows reveal a wealth of detail on the lunar surface. At low power you can<br />
see the entire lunar disk at one time. Change to higher power (magnification) to focus in on a<br />
smaller area.<br />
Keep in mind that since you are not using a clock drive, the Earth’s rotation causes the Moon to<br />
drift out of your field of view. This effect is more noticeable at high power. You must manually<br />
adjust your tripod to keep the Moon centered. Consult your local newspaper or a current<br />
astronomy magazine to find out when the Moon is visible.<br />
Observing the Planets<br />
This same method used to observe the Moon applies to viewing the planets. You can see Venus<br />
go through its lunar-like phases. Mars reveals a host of surface detail and one, if not both, of its<br />
polar caps. You will be able to see the cloud belts of Jupiter and the great Red Spot (if it is visible<br />
at the time you are observing). In addition, you will also be able to see the moons of Jupiter as<br />
they orbit this gas giant. Saturn, with its beautiful ring system, is easily visible at moderate power.<br />
All you need to know is when and where to look. Most astronomy publications tell where the<br />
planets can be found in the sky each month.<br />
11
Observing Deep Sky Objects<br />
Deep sky objects are simply those objects outside the boundaries of our solar system. They<br />
include star clusters, planetary nebulae, diffuse nebulae, double stars, and other galaxies outside<br />
our own Milky Way. Because your spotting scope is not set up for serious astronomical<br />
observing, you will need to know where to look in the sky for these objects. The <strong>Celestron</strong> Sky<br />
Maps (#93722) will help you locate the brightest deep sky objects.<br />
Once you start observing deep sky objects, there are a few things to remember. First, most deep<br />
sky objects have a large angular size. Therefore, low to moderate power is all you need to see<br />
them. Second, visually they are too faint to reveal any color that is common to photographs.<br />
Instead, they have a black and white appearance. And lastly, because of their low surface<br />
brightness, they should be observed from a dark sky location. Light pollution around large urban<br />
areas washes out most nebulae making them difficult, if not impossible, to see. An LPR (Light<br />
Pollution Reduction) Filter (#94126A) is available for use with 1 1 /4” eyepieces to allow urban<br />
use of the <strong>102mm</strong> <strong>Wide</strong> <strong>View</strong> for looking at nebulae.<br />
Photographing the Moon<br />
After looking at the night sky for awhile you may want to try photographing it. If you do, start<br />
with a nice, bright object like the Moon. To photograph the Moon:<br />
1. Attach your spotting scope to a stable platform like the <strong>Celestron</strong> Photographic Tripod<br />
(#93596).<br />
2. Load your camera with film that has a moderate-to-fast speed (i.e., high ISO rating). Faster<br />
films are more desirable when the Moon is a crescent. When the Moon is full, and at its<br />
brightest, slower films are more desirable. If photographing during the full phase, use a<br />
yellow filter to reduce the light intensity and to increase contrast.<br />
3. Center the Moon in the field of your spotting scope.<br />
4. Set the shutter speed to the appropriate setting (see below).<br />
5. Trip the shutter using a cable release so as not to shake the camera and spotting scope.<br />
Lunar Phase ISO 50 ISO ISO ISO 400<br />
100 200<br />
Crescent 1/8 1/15 1/60 1/125<br />
Quarter 1/30 1/125 1/250 1/500<br />
Full 1/125 1/500 1/1000 1/2000<br />
The exposure times listed here should be used as a starting point. Always make exposures that are<br />
longer and shorter than the recommended time. Also, try bracketing your exposures, taking a few<br />
photos at each shutter speed. This will ensure that you will get a good photo. Keep accurate<br />
records of your exposures. This information will be useful if you want to repeat your results or if<br />
you want to submit some of your photos to various magazines for possible publication!<br />
12
CARE AND CLEANING OF THE OPTICS<br />
Occasionally, dust and/or moisture may build up on the lens of your spotting scope. Special care<br />
should be taken when cleaning any optical instrument so as not to damage the optics.<br />
If dust has built up on the lens, remove the dust with a camel’s hair brush or a can of pressurized<br />
air. Spray at an angle to the lens for approximately 2 to 4 seconds. Then use an optical cleaning<br />
solution (available at most optical suppliers) and white tissue paper to remove any remaining<br />
debris. Strokes should go from the center of the lens to the outer edge. Do not rub in circles.<br />
You can use commercially-made lens cleaner or mix your own. A good cleaning solution is<br />
isopropyl alcohol mixed with distilled water. The solution should be 60% isopropyl alcohol and<br />
40% distilled water. Or liquid dish soap diluted with water (a couple of drops per one quart of<br />
water) can be used.<br />
Internal adjustments and cleaning should be done only by the <strong>Celestron</strong> repair department. If your<br />
spotting scope is in need of internal cleaning, please contact the factory for service.<br />
More...<br />
<strong>Celestron</strong> offers an extensive array of spotting scope accessories. Consult the <strong>Celestron</strong><br />
Accessory Catalog (#93685) for details.<br />
13
CELESTRON TWO YEAR WARRANTY<br />
A. <strong>Celestron</strong> warrants this telescope to be free from defects in materials and workmanship for two years. <strong>Celestron</strong> will repair or<br />
replace such product or part thereof which, upon inspection by <strong>Celestron</strong>, is found to be defective in materials or workmanship.<br />
As a condition to the obligation of <strong>Celestron</strong> to repair or replace such product, the product must be returned to <strong>Celestron</strong><br />
together with proof-of-purchase satisfactory to <strong>Celestron</strong>.<br />
B. The Proper Return Authorization Number must be obtained from <strong>Celestron</strong> in advance of return. Call <strong>Celestron</strong> at (310) 328-<br />
9560 to receive the number to be displayed on the outside of your shipping container.<br />
All returns must be accompanied by a written statement setting forth the name, address, and daytime telephone number of the<br />
owner, together with a brief description of any claimed defects. Parts or product for which replacement is made shall become<br />
the property of <strong>Celestron</strong>.<br />
The customer shall be responsible for all costs of transportation and insurance, both to and from the factory of<br />
<strong>Celestron</strong>, and shall be required to prepay such costs.<br />
<strong>Celestron</strong> shall use reasonable efforts to repair or replace any telescope covered by this warranty within thirty days of receipt. In<br />
the event repair or replacement shall require more than thirty days, <strong>Celestron</strong> shall notify the customer accordingly. <strong>Celestron</strong><br />
reserves the right to replace any product which has been discontinued from its product line with a new product of comparable<br />
value and function.<br />
This warranty shall be void and of no force of effect in the event a covered product has been modified in design or<br />
function, or subjected to abuse, misuse, mishandling or unauthorized repair. Further, product malfunction or<br />
deterioration due to normal wear is not covered by this warranty.<br />
CELESTRON DISCLAIMS ANY WARRANTIES, EXPRESS OR IMPLIED, WHETHER OF MERCHANTABILITY OF<br />
FITNESS FOR A PARTICULAR USE, EXCEPT AS EXPRESSLY SET FORTH HEREIN.<br />
THE SOLE OBLIGATION OF CELESTRON UNDER THIS LIMITED WARRANTY SHALL BE TO REPAIR OR<br />
REPLACE THE COVERED PRODUCT, IN ACCORDANCE WITH THE TERMS SET FORTH HEREIN. CELESTRON<br />
EXPRESSLY DISCLAIMS ANY LOST PROFITS, GENERAL, SPECIAL, INDIRECT OR CONSEQUENTIAL DAMAGES<br />
WHICH MAY RESULT FROM BREACH OF ANY WARRANTY, OR ARISING OUT OF THE USE OR INABILITY TO<br />
USE ANY CELESTRON PRODUCT. ANY WARRANTIES WHICH ARE IMPLIED AND WHICH CANNOT BE<br />
DISCLAIMED SHALL BE LIMITED IN DURATION TO A TERM OF TWO YEARS FROM THE DATE OF ORIGINAL<br />
RETAIL PURCHASE.<br />
Some states do not allow the exclusion or limitation of incidental or consequential damages or limitation on how long an implied<br />
warranty lasts, so the above limitations and exclusions may not apply to you.<br />
This warranty gives you specific legal rights, and you may also have other rights which vary from state to state.<br />
<strong>Celestron</strong> reserves the right to modify or discontinue, without prior notice to you, any model or style telescope.<br />
If warranty problems arise, or if you need assistance in using your telescope contact:<br />
This warranty supersedes all other product warranties.<br />
<strong>Celestron</strong><br />
Customer Service Department<br />
2835 Columbia Street<br />
Torrance, CA 90503<br />
Tel. (310) 328-9560<br />
Fax. (310) 212-5835<br />
Monday-Friday 8AM-4PM PST<br />
NOTE: This warranty is valid to U.S.A. and Canadian customers who have purchased this product from an Authorized<br />
<strong>Celestron</strong> Dealer in the U.S.A. or Canada. Warranty outside the U.S.A. and Canada is valid only to customers who purchased<br />
from a <strong>Celestron</strong> Distributor or Authorized <strong>Celestron</strong> Dealer in the specific country and please contact them for any<br />
warranty service.<br />
14
2835 Columbia Street<br />
Torrance, CA 90503<br />
(310)328-9560<br />
(310) 212-5835 (FAX)<br />
Web site: http:\\www.celestron.com<br />
Copyright 2002 <strong>Celestron</strong><br />
All rights reserved.<br />
Products or instructions may change without notice or obligation.<br />
Printed in China 10-02
![Guía para realizar un ensablaje rápido [continuación] - Celestron](https://img.yumpu.com/14596837/1/190x245/guia-para-realizar-un-ensablaje-rapido-continuacion-celestron.jpg?quality=85)