

Benzil from Benzoin
Benzil from Benzoin
Benzil from Benzoin

You also want an ePaper? Increase the reach of your titles
YUMPU automatically turns print PDFs into web optimized ePapers that Google loves.
Background: You may wish to review the basics of recrystallization, <strong>from</strong> Organic I<br />
lab.<br />
A compound which has two ketone groups immediately adjacent to one another is<br />
referred to an α-diketone. (In organic nomenclature, when two groups are referred to as<br />
“α” [alpha] that means that are right next to each other on adjacent carbons; when two<br />
groups are called “β” [beta] that means they are separated by one carbon, “γ” [gamma]<br />
means they are separated by two carbons, etc.).<br />
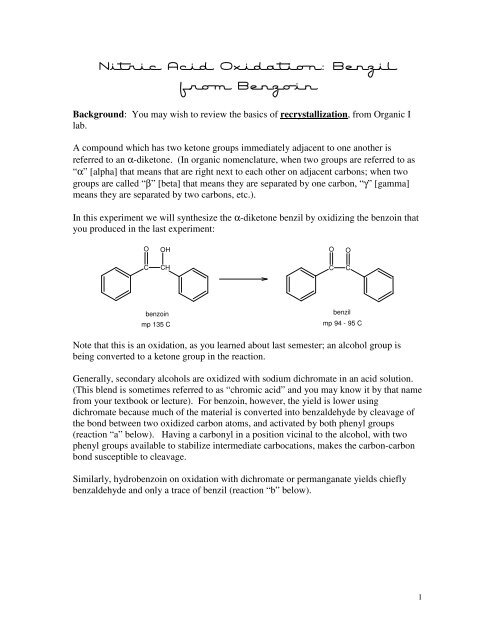
In this experiment we will synthesize the α-diketone benzil by oxidizing the benzoin that<br />
you produced in the last experiment:<br />
O<br />
C<br />
OH<br />
CH<br />
benzoin<br />
mp 135 C<br />
benzil<br />
mp 94 - 95 C<br />
Note that this is an oxidation, as you learned about last semester; an alcohol group is<br />
being converted to a ketone group in the reaction.<br />
Generally, secondary alcohols are oxidized with sodium dichromate in an acid solution.<br />
(This blend is sometimes referred to as “chromic acid” and you may know it by that name<br />
<strong>from</strong> your textbook or lecture). For benzoin, however, the yield is lower using<br />
dichromate because much of the material is converted into benzaldehyde by cleavage of<br />
the bond between two oxidized carbon atoms, and activated by both phenyl groups<br />
(reaction “a” below). Having a carbonyl in a position vicinal to the alcohol, with two<br />
phenyl groups available to stabilize intermediate carbocations, makes the carbon-carbon<br />
bond susceptible to cleavage.<br />
Similarly, hydrobenzoin on oxidation with dichromate or permanganate yields chiefly<br />
benzaldehyde and only a trace of benzil (reaction “b” below).<br />
O<br />
C<br />
O<br />
C<br />
1
(a)<br />
(b)<br />
O<br />
C<br />
OH<br />
CH<br />
OH<br />
CH<br />
benzoin<br />
OH<br />
CH<br />
hydrobenzoin<br />
"chromic<br />
acid"<br />
2-<br />
Cr2O7 H2SO4 oxid.<br />
2<br />
benzaldehyde<br />
<strong>Benzoin</strong> can be oxidized to the α-diketone, benzil, very efficiently by nitric acid or by<br />
copper (II) sulfate in pyridine. To avoid cleavage of the molecule, the milder oxidizing<br />
agent nitric acid works well:<br />
O<br />
C<br />
OH<br />
CH<br />
HNO 3<br />
----------------------------------------------------------------------------------------------------<br />
Procedure: Nitric Acid Oxidation of <strong>Benzoin</strong><br />
Caution: <strong>Benzoin</strong> is an irritant to skin and mucus membranes!<br />
Caution: Concentrated nitric acid is corrosive! It causes severe burns to the skin!<br />
*note: the benzoin that you use in this experiment is your product <strong>from</strong> last week’s lab. You will<br />
need to complete the procedure <strong>from</strong> “The <strong>Benzoin</strong> Condensation” before beginning this<br />
experiment.<br />
Set up a hot plate and begin a hot water bath (in a 400 or 600 mL beaker) IN THE HOOD.<br />
O<br />
C<br />
O<br />
C<br />
O<br />
2
If you have not already done so (last week), weigh the benzoin crystals <strong>from</strong> last week’s<br />
experiment. Record the mass in your notebook. Fill a capillary melting point tube with a few<br />
crystals of benzoin so you can determine the melting point later in today’s procedure.<br />
Caution!!!!: this reaction will create extremely corrosive nitric acid fumes, and toxic<br />
nitrogen oxide fumes! Nitrogen oxide is also a SEVERE irritant to the eyes, nose and<br />
mucus membranes. Carry out this reaction in a hood! Under no circumstances should<br />
you remove the flask <strong>from</strong> the hood while the reaction is going on! DO NOT remove the<br />
reaction mixture <strong>from</strong> the hood until the instructions indicate that you should do so.<br />
Although nitrogen oxide is not absorbed through the skin, it will stain your skin<br />
yellow or brown -- you should wear gloves during this procedure.<br />
In this reaction you will use about 4 grams of benzoin -- you should have plenty <strong>from</strong> last<br />
lab, but REMEMBER NOT TO USE UP ALL THAT YOU HAVE -- you will need a<br />
small amount to measure melting point, if required, and also a small scoop for the test at<br />
the end of this experiment.<br />
Weigh about 4 grams of the benzoin <strong>from</strong> last week’s experiment into a 125 mL<br />
Erlenmeyer flask. (If your yield <strong>from</strong> last week is less than 4 grams, your instructor can<br />
give you some extra for this procedure). IN THE HOOD, slowly add 14 mL of<br />
concentrated nitric acid. DO NOT ADD THE HNO3 ALL AT ONCE - the mixture may<br />
get hot and boil over; add the nitric acid in small portions until the entire 14 mL has been<br />
added. Place the flask in a boiling water bath for 10 minutes -- this also must be<br />
performed in the hood. It is best to perform this reaction in a 125 mL Erlenmeyer flask,<br />
to minimize the possibility of splattering.<br />
The mixture will begin as a slurry mixture of solid and liquid; as it heats up to the<br />
temperature of the hot water, it should liquefy. You will also see the formation of dark<br />
orange or brown NO fumes as the reaction proceeds.<br />
After the 10 minute heating period, slowly add 75 mL of water to the reaction mixture,<br />
cool to room temperature, and swirl for a minute or two to coagulate the precipitated<br />
product; make sure that there are no nitrogen oxide fumes remaining in the flask. After<br />
this the reaction mixture may be removed <strong>from</strong> the hood. You can do the rest of the lab<br />
at your desk.<br />
Note: At this point you may notice one or more globules of an oily substance in<br />
your flask. This is your product, but it probably will not solidify in acid solution.<br />
SLOWLY add 25 mL of 6 M NaOH. (Don’t confuse this up with the 10% NaOH that<br />
you will use in the later step! - make sure you use the 6 M in this part!). Use litmus or<br />
pH paper to determine if the mixture is basic; if it is still acidic, keep adding NaOH,<br />
about 4 - 5 mL at a time, until the pH is basic. (Depending on the exact concentrations of<br />
the NaOH and HNO3, this may take up to 40 or 50 mL of NaOH total). The product<br />
should crystallize as you make the pH basic. Once the solution is basic, cool the mixture<br />
in an ice bath for a few minutes. Collect the yellow solid on a Büchner funnel and wash<br />
3
with water. Press the solid well on the filter to squeeze out the water. At this point you<br />
should check with your instructor to determine if the product needs to be recrystallized.<br />
If you are going to perform the recrystallization - The crude product need not be<br />
dried or weighed but can be re-crystallized at once <strong>from</strong> ethanol.<br />
If you are NOT going to perform the recrystallization - Remove the product <strong>from</strong><br />
the filter paper and dry it in the oven for about 10 minutes. Weigh the crystals and<br />
proceed to the “Test for the Presence of Unoxidized <strong>Benzoin</strong>.”<br />
Recrystallization<br />
Optional - ask your instructor if this step is required! If not, skip to the next section<br />
“Test for the Presence of Unoxidized <strong>Benzoin</strong>.” Heat about 10 - 15 mL of ethanol in a<br />
small Erlenmeyer flask on a hot plate (this can be done at your desk). Dissolve the<br />
product <strong>from</strong> the reaction above in a minimum amount of hot ethanol; remember that the<br />
mixture should be kept hot (on the hot plate) until all of the solid has dissolved. One the<br />
solid is completely dissolved, add water dropwise until the solution becomes cloudy, and<br />
set aside to crystallize. You should place the mixture in an ice bath after crystals begin to<br />
form. <strong>Benzil</strong> is a fairly bright yellow solid; it looks similar to the benzoin but a brighter<br />
color.<br />
Collect the benzil crystals by vacuum filtration. You may rinse the crystals and the<br />
container with distilled water if necessary. Allow the crystals to dry in the Büchner<br />
funnel, with air passing over them, for at least five minutes. Then transfer the crystals to<br />
a pre-weighed beaker or watch glass, and dry them in the oven for about 10 minutes.<br />
Test for the Presence of Unoxidized <strong>Benzoin</strong><br />
This is a simple test to determine if your reaction is complete, and if your product is pure.<br />
This is a qualitative test, so it isn’t necessary to measure the quantities exactly; they can<br />
be approximated. In a test tube, dissolve about 0.5 mg (a small scoop, enough to cover<br />
the end of a spatula) of the benzil product in 0.5 mL of 95% ethanol or methanol and add<br />
one drop of 6 M sodium hydroxide. If unreacted benzoin is present, the solution soon<br />
acquires a dark brown or black color owing a complex of benzil with a product of<br />
auto-oxidation of benzoin. This reaction may also produce a muddy-looking precipitate.<br />
If no dark color develops in 1-3 minutes, and the sample remains a yellow or amber<br />
color, this indicates that the sample is free <strong>from</strong> benzoin (in other words, the oxidation of<br />
benzoin was complete).<br />
Sometimes students are confused as to the results of this test because you have never seen<br />
what a “positive” result looks like. You can observe a “positive” result if you add a small<br />
amount of benzoin; observe the color that develops. You can add a few more drops of<br />
NaOH and/or heat the mixture to speed up this appearance of the dark brown color after<br />
adding benzoin.<br />
Cleaning Up<br />
The aqueous filtrate is non-toxic, and should be neutral or slightly basic. Flush the waste<br />
down the drain, with plenty of water.<br />
4
Report<br />
Record the yield, color and melting point of the purified benzil. Depending on the<br />
procedure that you followed last week, you may need to measure the melting point of last<br />
week’s product, also. Check with your instructor to see if this is required.<br />
Post-Lab<br />
Report the yield and % yield of benzil; be certain to show your calculations for both<br />
theoretical yield and % yield.<br />
5
Data / Observations Page <strong>Benzil</strong> <strong>from</strong> <strong>Benzoin</strong><br />
Name ____________________________________________________________<br />
Starting materials:<br />
Mass of Erlenmeyer Flask: _____________________ grams<br />
Mass of Erlenmeyer Flask + <strong>Benzoin</strong>: _____________________ grams<br />
Mass of <strong>Benzoin</strong>: _____________________ grams<br />
Product:<br />
Mass of container: _____________________ grams<br />
Mass of container + <strong>Benzil</strong>: _____________________ grams<br />
Mass of <strong>Benzil</strong> (product): _____________________ grams<br />
melting point of product: _____________________ °C<br />
Summarize your observations <strong>from</strong> the “Test for the presence of unoxidized benzoin”:<br />
6
Pre-Lab Questions <strong>Benzil</strong> <strong>from</strong> <strong>Benzoin</strong><br />
Name ____________________________________________________________<br />
1. Calculate the theoretical yield of benzil, starting with 4.00 grams of benzoin. Show<br />
your work!<br />
7


