
Create successful ePaper yourself
Turn your PDF publications into a flip-book with our unique Google optimized e-Paper software.
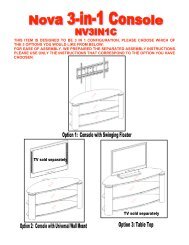
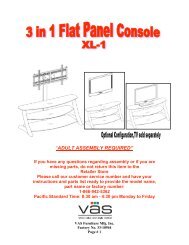
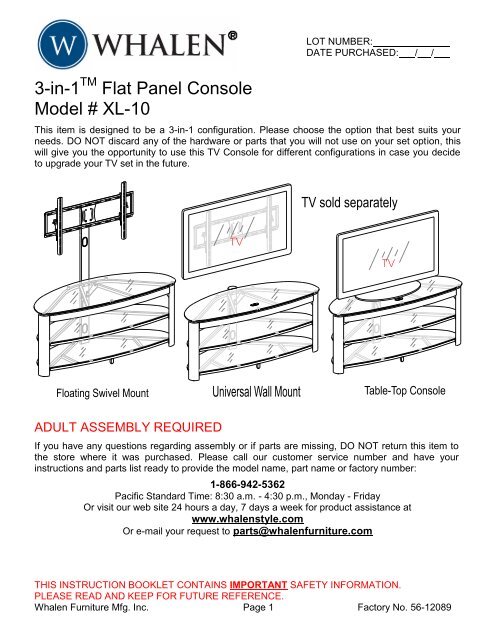
3-in-1 TM Flat Panel Console<br />
Model # <strong>XL</strong>-<strong>10</strong><br />
This item is designed to be a 3-in-1 configuration. Please choose the option that best suits your<br />
needs. DO NOT discard any of the hardware or parts that you will not use on your set option, this<br />
will give you the opportunity to use this TV Console for different configurations in case you decide<br />
to upgrade your TV set in the future.<br />
ADULT ASSEMBLY REQUIRED<br />
LOT NUMBER:<br />
DATE PURCHASED: / /<br />
If you have any questions regarding assembly or if parts are missing, DO NOT return this item to<br />
the store where it was purchased. Please call our customer service number and have your<br />
instructions and parts list ready to provide the model name, part name or factory number:<br />
1-866-942-5362<br />
Pacific Standard Time: 8:30 a.m. - 4:30 p.m., Monday - Friday<br />
Or visit our web site 24 hours a day, 7 days a week for product assistance at<br />
www.whalenstyle.com<br />
Or e-mail your request to parts@whalenfurniture.com<br />
THIS INSTRUCTION BOOKLET CONTAINS IMPORTANT SAFETY INFORMATION.<br />
PLEASE READ AND KEEP FOR FUTURE REFERENCE.<br />
<strong>Whalen</strong> Furniture Mfg. Inc. Page 1 Factory No. 56-12089
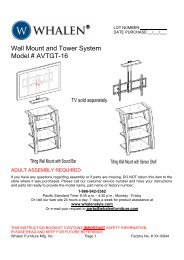
M AX I M U M R E C O M M E N D E D W E I G H T L O AD S<br />
MANUFACTURER: <strong>Whalen</strong> Furniture<br />
CATALOG: 3-in-1 TM Flat Panel Console (<strong>XL</strong>-<strong>10</strong>)<br />
DATE OF MANUFACTURE: June 2012<br />
MADE IN CHINA<br />
FITS UP TO MOST 56” FLAT PANEL TVs<br />
MAXIMUM LOAD 135 lb. (61.2 kg)<br />
FITS UP TO MOST 56” FLAT PANEL TVs<br />
WITHOUT SWIVELING BRACKET<br />
MAXIMUM LOAD 135 lb. (61.2 kg)<br />
PLACE TV BEHIND STOPPER<br />
MAXIMUM LOAD 50 lb. (22.7 kg)<br />
G E N E R AL I N F O R M ATI O N , TI P S a n d TR I C K S<br />
1. Please read the Assembly <strong>Instruc</strong>tions prior to assembling this product.<br />
2. Remove all hardware from box and sort by size.<br />
3. Check to see that all hardware and parts are present BEFORE assembling.<br />
4. Ask a friend to assist you with the assembly of this furniture.<br />
5. To avoid damage, assemble the product on a sturdy, level and protective surface.<br />
6. Please wait until all steps are completed before tightening bolts.<br />
7. Make sure all bolts are tightly fastened before the unit is used.<br />
Model # <strong>XL</strong>-<strong>10</strong><br />
THIS UNIT IS NOT INTENDED FOR USE WITH CRT TVS. USE ONLY<br />
WITH FLAT PANEL TVS AND AUDIO/VIDEO EQUIPMENT MEETING RECOMMENDED SIZE<br />
AND WEIGHT LIMITS. NEVER USE WITH LARGER/HEAVIER THAN RECOMMENDED FLAT<br />
PANEL TVS OR EQUIPMENT. TO AVOID INSTABILITY, PLACE FLAT PANEL TV IN CENTRE<br />
OF UNIT; CRT TVS, IMPROPERLY POSITIONED FLAT PANEL TVS, OR FLAT PANEL TVS<br />
OR OTHER EQUIPMENT THAT EXCEED RECOMMENDED SIZE AND WEIGHT LIMITS<br />
COULD FALL OFF OR BREAK THE UNIT, CAUSING POSSIBLE SERIOUS INJURY.<br />
This product is sold with Tip Restraint Hardware kit. You must install the Tipping Restraint<br />
Hardware between the wall and the TV stand to prevent any accidents or damages. When<br />
properly installed, this restraint can provide protection against the unexpected tipping of the<br />
unit due to small tremors, bumps or climbing. The restraint is only a deterrent and is not a<br />
substitute for proper adult supervision. Use of tip-over restraints may only reduce, but not<br />
eliminate, the risk of tip-over.<br />
<strong>Whalen</strong> Furniture Mfg. Inc. Page 2 Factory No. 56-12089
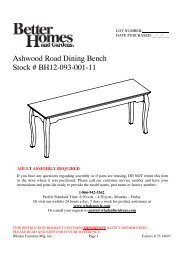
Parts and Hardware List<br />
Model # <strong>XL</strong>-<strong>10</strong><br />
Please read completely through the instructions and verify that all parts listed are<br />
present before beginning assembly.<br />
A- TOP SHELF FRAME (1) B- MIDDLE SHELF FRAME (1)<br />
C- BOTTOM SHELF FRAME (1) D- LONG SPINE (1) D1- SHORT SPINE (1)<br />
E- LEFT LEG (1) F- RIGHT LEG (1) G- TOP GLASS (1)<br />
H- GLASS SHELF (2) I- FRONT LEFT SUPPORT (1) J- FRONT RIGHT SUPPORT (1)<br />
K- BACK LEFT SUPPORT (1) L- BACK RIGHT SUPPORT (1) M- SWIVELING BRACKET (1)<br />
OR<br />
N- XYZ MOUNTING FRAME (1) O- MONITOR BRACKET (L/R) (2) P- CABLE CONTROL (2)<br />
<strong>Whalen</strong> Furniture Mfg. Inc. Page 3 Factory No. 56-12089<br />
OL
Parts and Hardware Master List<br />
Model # <strong>XL</strong>-<strong>10</strong><br />
(1) SUCTION CUP (2) 3/4” BOLT (3) 1-1/4” BOLT (4) HEX NUT<br />
(12+1 extra) (44+2 extra) (9+1 extra) (4+1 extra)<br />
(5) LOCK WASHER (6) FLAT WASHER (7) LAG BOLT WASHER (8) 2-1/2” LAG BOLT<br />
(49+2 extra) (53+2 extra) (6) (6)<br />
(9) CONCRETE ANCHOR (<strong>10</strong>) ACRYLIC STOPPER (11) FLOOR LEVELER TOUCH-UP PEN<br />
(6) (1) (1) (1)<br />
OPEN WRENCH M4 ALLEN WRENCH 3/16” ALLEN WRENCH TIPPING RESTRAINT HARDWARE KIT (1)<br />
(1) (2) (1) (Inside Plastic Bag)<br />
TV Mounting Kit<br />
M4 x 12 BOLT (4) M4 x 30 BOLT (4) M5 x 12 BOLT (4) M5 x 30 BOLT (4)<br />
M6 x 12 BOLT (4) M6 x 35 BOLT (4) M8 x 16 BOLT (4) M8 x 40 BOLT (4)<br />
M4 LOCK WASHER (4) M5 LOCK WASHER (4) M6 LOCK WASHER (4) M8 LOCK WASHER (4)<br />
LARGE SPACER (4) SMALL SPACER (4) M4/M5 FLAT WASHER (8) M6/M8 FLAT WASHER (4)<br />
Tools required: Allen Wrench, Open Wrench (provided) and Phillips screwdriver (not provided).<br />
<strong>Whalen</strong> Furniture Mfg. Inc. Page 4 Factory No. 56-12089
D1<br />
11<br />
1-1/4” BOLT<br />
(6 used in this step)<br />
③<br />
UP<br />
C<br />
Assembly <strong>Instruc</strong>tions<br />
LOCK WASHER<br />
(6 used in this step)<br />
⑤<br />
D/D1<br />
Model # <strong>XL</strong>-<strong>10</strong><br />
<strong>Whalen</strong> Furniture Mfg. Inc. Page 5 Factory No. 56-12089<br />
3<br />
5<br />
A/B/C<br />
Note: Please do not fully tighten all bolts until you finish assembling all parts. Once assembled,<br />
go back and fully tighten all bolts. This will make it easier during assembly of unit.<br />
1. Unpack the unit and confirm that you have all the hardware and parts required.<br />
2. Choose the option suits your needs. Locate LONG SPINE (D) or SHORT SPINE (D1) and<br />
set back face down on a scratch free surface as shown above.<br />
3. Align and attach three SHELF FRAMES (A, B and C) to the SPINE using 1-1/4” BOLTS (3)<br />
with LOCK WASHERS (5) and FLAT WASHERS (6) through the pre-drilled holes on back<br />
rail into the threaded inserts included in the SPINE. Ensure the end bracket is positioned<br />
with two holes facing the floor.<br />
4. Screw FLOOR LEVELER (11) to the center support of the BOTTOM SHELF FRAME (C) by<br />
rotating clockwise.<br />
UP<br />
FLAT WASHER<br />
(6 used in this step)<br />
⑥<br />
D<br />
FLOOR LEVELER<br />
(1 used in this step)<br />
⑪
F<br />
5. Stand the unit upright.<br />
D<br />
3/4” BOLT<br />
(18 used in this step)<br />
②<br />
Assembly <strong>Instruc</strong>tions<br />
F<br />
Model # <strong>XL</strong>-<strong>10</strong><br />
6. Align and attach LEFT LEG (E) to three SHELF FRAMES (A, B and C) by inserting the 3/4”<br />
BOLTS (2) with WASHERS (5 and 6) through the end bracket holes of SHELF FRAMES<br />
into the threaded inserts on the LEFT LEG. Make sure the top surface is flush with TOP<br />
SHELF FRAME (A). DO NOT tighten the bolts.<br />
7. Repeat last step with RIGHT LEG (F). Make sure the gaps and offsets between the wooden<br />
front rail of TOP SHELF FRAME (A) and the LEGS (E and F) are equal. Loosen the bolts on<br />
the end brackets and wooden front rail and adjust if necessary.<br />
<strong>Whalen</strong> Furniture Mfg. Inc. Page 6 Factory No. 56-12089<br />
E<br />
LOCK WASHER<br />
(18 used in this step)<br />
⑤<br />
E/F<br />
D1<br />
2<br />
6<br />
FLAT WASHER<br />
(18 used in this step)<br />
⑥<br />
E
F<br />
J<br />
F<br />
L<br />
3/4” BOLT<br />
(12 used in this step)<br />
②<br />
J<br />
Assembly <strong>Instruc</strong>tions<br />
D1<br />
I<br />
E<br />
L<br />
LOCK WASHER<br />
(12 used in this step)<br />
FLAT WASHER<br />
(12 used in this step)<br />
Model # <strong>XL</strong>-<strong>10</strong><br />
8. For a stable structure, align and attach FRONT LEFT SUPPORT (I) and FRONT RIGHT<br />
SUPPORT (J) in place to connect the TOP SHELF FRAME (A) with LEFT and RIGHT<br />
LEGS (E and F) using 3/4” BOLTS (2) with WASHERS (5 and 6) through the end bracket<br />
holes, as shown above.<br />
9. Align and attach BACK LEFT SUPPORT (K) and BACK RIGHT SUPPORT (L) to the TOP<br />
SHELF FRAME (A) and SPINE using the 3/4” BOLTS (2) and WASHERS (5 and 6).<br />
<strong>Whalen</strong> Furniture Mfg. Inc. Page 7 Factory No. 56-12089<br />
⑤<br />
D<br />
I<br />
E<br />
A<br />
I<br />
6 5<br />
5<br />
E<br />
D/D1<br />
A<br />
2<br />
K L<br />
⑥<br />
6
E<br />
C/E/F<br />
Assembly <strong>Instruc</strong>tions<br />
<strong>10</strong>. Go back and tighten all BOLTS with the ALLEN WRENCH provided.<br />
Model # <strong>XL</strong>-<strong>10</strong><br />
11. In case of uneven floor, FLOOR LEVELERS are provided at the bottom of both LEGS (E<br />
and F) and the SUPPORT LEG on BOTTOM SHELF FRAME (C). Simply tilt the unit back<br />
and raise or lower FLOOR LEVELER by hand to correct tilting as shown above.<br />
If you choose Table-top configuration,<br />
continue to STEP 12.<br />
If mounting TV with the Swinging Floater,<br />
skip ahead to PAGE 13.<br />
<strong>Whalen</strong> Furniture Mfg. Inc. Page 8 Factory No. 56-12089<br />
E<br />
F<br />
F
Assembly <strong>Instruc</strong>tions for Table-top Console<br />
F<br />
D1<br />
Model # <strong>XL</strong>-<strong>10</strong><br />
<strong>Whalen</strong> Furniture Mfg. Inc. Page 9 Factory No. 56-12089<br />
P<br />
2<br />
D1<br />
3/4” BOLT<br />
(4 used in this step)<br />
②<br />
12. Attach 2 CABLE CONTROLS (P) onto the backside of SHORT SPINE (D1) with the 3/4”<br />
BOLTS (2). Tighten the BOLTS with the ALLEN WRENCH provided.<br />
13. The CABLE CONTROLS (P) enable you to shorten, separate and route cables and cords.<br />
Using the CABLE CONTROLS you can create a system for routing cables through channels,<br />
between components and to power sources without tangled mess or annoying signal<br />
interference.<br />
E
A<br />
H<br />
H<br />
5<br />
3<br />
SUCTION CUP<br />
(12 used in this step)<br />
Assembly <strong>Instruc</strong>tions for Table-top Console<br />
①<br />
G<br />
E<br />
1-1/4” BOLT<br />
(3 used in this step)<br />
③<br />
Model # <strong>XL</strong>-<strong>10</strong><br />
B/C<br />
14. Put the SUCTION CUPS (1) firmly into top holes of the MIDDLE SHELF FRAME (B) and<br />
BOTTOM SHELF FRAME (C) as shown.<br />
Tip: If a SUCTION CUP resists insertion, try pressing down on the middle of the cup with<br />
the ALLEN WRENCH while twisting it clockwise into the hole.<br />
15. Place GLASS SHELVES (H) in place starting from the BOTTOM GLASS SHELF as shown<br />
above. Make sure the glass is properly centered. Push each GLASS all the way back<br />
against the SPINE. Also, be sure to press down evenly and firmly each GLASS onto the<br />
SUCTION CUPS to make sure they securely rest onto the SUCTION CUPS.<br />
16. Set the TOP GLASS (G) onto place so that the bottom glass risers overlap the pre-drilled<br />
holes on the TOP SHELF FRAME (A) properly. Insert three 1-1/4” BOLTS (3) with<br />
WASHERS (5 and 6) through the pre-drilled holes on TOP SHELF FRAME (A) and screw<br />
into the glass risers.<br />
<strong>Whalen</strong> Furniture Mfg. Inc. Page <strong>10</strong> Factory No. 56-12089<br />
G<br />
C<br />
B<br />
A<br />
LOCK WASHER<br />
(3 used in this step)<br />
⑤<br />
H<br />
1<br />
FLAT WASHER<br />
(3 used in this step)<br />
⑥
Assembly <strong>Instruc</strong>tions for Table-top Console<br />
G<br />
ACRYLIC STOPPER<br />
(1 used in this step)<br />
⑩<br />
Model # <strong>XL</strong>-<strong>10</strong><br />
NOTE: You must install the Acrylic TV Stopper to prevent TV from tipping when placing your<br />
flat panel television directly on the table-top console.<br />
17. Remove the tape of ACRYLIC STOPPER (<strong>10</strong>) and place it on the cut-out of the warning<br />
label on the front of TOP GLASS (G). Make sure it is aligned before applying pressure.<br />
18. Remove the warning label for ACRYLIC STOPPER carefully.<br />
<strong>Whalen</strong> Furniture Mfg. Inc. Page 11 Factory No. 56-12089<br />
G
Assembly <strong>Instruc</strong>tions for Table-top<br />
Model # <strong>XL</strong>-<strong>10</strong><br />
Tools required: Allen Wrench (provided), Phillips Screwdriver, Mallet, Power Drill, and 3/8” Drill Bit.<br />
19. Position the assembled Table-top in your desired location against a wall. Now follow the<br />
instructions printed on the plastic bag containing the TIPPING RESTRAINT HARDWARE to<br />
mount the tipping restraint to the SPINE and the wall.<br />
NOTE: YOU MUST USE THIS TIPPING RESTRAINT TO ATTACH THIS UNIT TO THE<br />
WALL, TO PREVENT ACCIDENTS AND/OR INJURIES.<br />
20. The Table-top is ready for use now. Be sure to position your Flat Panel TV in center of the<br />
console.<br />
NOTE: For Tilting Wall Mount, proceed to PAGE #20.<br />
<strong>Whalen</strong> Furniture Mfg. Inc. Page 12 Factory No. 56-12089
D<br />
M<br />
3/4” BOLT<br />
(6 used in this step)<br />
As s e m b l y I n s t r uctions for Option :<br />
F l o a t i n g Sw i ve l M o u nt<br />
②<br />
F<br />
M<br />
D<br />
Model # <strong>XL</strong>-<strong>10</strong><br />
<strong>Whalen</strong> Furniture Mfg. Inc. Page 13 Factory No. 56-12089<br />
UP<br />
6<br />
LOCK WASHER<br />
(6 used in this step)<br />
⑤<br />
21. Align and attach the SWIVELING BRACKET (M) to the top of LONG SPINE (D) with six 3/4”<br />
BOLTS (2) and WASHERS (5 and 6). Make sure the pivoting bolt head is up. Tighten the<br />
bolts with enclosed M4 Allen Wrench.<br />
NOTE: The LONG SPINE can provide four height options for your TV set. Refer to your TV<br />
size, adjust the Swiveling Bracket at your desired height to offer optimum viewing.<br />
5<br />
C<br />
M<br />
D<br />
FLAT WASHER<br />
(6 used in this step)<br />
⑥<br />
E
E<br />
3/4” BOLT<br />
(4 used in this step)<br />
Assembly <strong>Instruc</strong>tions for Floating Swivel Mount<br />
②<br />
D<br />
M<br />
C<br />
N<br />
HEX NUT<br />
(4 used in this step)<br />
④<br />
Model # <strong>XL</strong>-<strong>10</strong><br />
22. Hold the flat side of XYZ MOUNTING FRAME (N) onto the SWIVELING BRACKET (M)<br />
ensuring the recessed 2 holes on the MOUNTING FRAME bottom. Align and attach by<br />
threading four 3/4” BOLTS (2) with FLAT WASHERS (6) through the metal plate on XYZ<br />
MOUNTING FRAME and the SWIVELING BRACKET, at the other side of SWIVELING<br />
BRACKET fit the other FLAT WASHERS (6) and LOCK WASHERS (5) onto the BOLTS,<br />
and then secure with HEX NUTS (4). Securely tighten with OPEN WRENCH and ALLEN<br />
WRENCH provided.<br />
<strong>Whalen</strong> Furniture Mfg. Inc. Page 14 Factory No. 56-12089<br />
F<br />
5<br />
5<br />
6<br />
M<br />
LOCK WASHER<br />
(4 used in this step)<br />
⑤<br />
N<br />
FLAT WASHER<br />
(8 used in this step)<br />
⑥
Mounting Monitor Brackets to a Television with a Flat Back<br />
Model # <strong>XL</strong>-<strong>10</strong><br />
NOTE: For televisions with a curved back or recessed back proceed directly to next page.<br />
23. Determine the correct diameter of the bolt your TV requires by hand threading them into the<br />
threaded insert on the back of the TV. If you encounter any resistance, stop immediately. If<br />
you are unable to find the correct bolt consult a local hardware store.<br />
24. Follow the appropriate diagram above to attach MONITOR BRACKETS (OL/OR) to the back<br />
of your TV with selected fasteners. Make sure the MONITOR BRACKETS are centered and<br />
level with each other. Secure the bolts with a PHILLIPS SCREWDRIVER. DO NOT over<br />
tighten the bolts.<br />
NOTE: Lean the TV up against a wall or other solid surface when attaching with the Monitor<br />
Brackets. DO NOT place the TV face down on the glass this may cause permanent damage.<br />
<strong>Whalen</strong> Furniture Mfg. Inc. Page 15 Factory No. 56-12089
Model # <strong>XL</strong>-<strong>10</strong><br />
Mounting Monitor Brackets to a Television with a Curved/Recess Back<br />
25. Determine the correct diameter of the bolt your TV requires by hand threading them into the<br />
threaded insert on the back of the TV. If you encounter any resistance, stop immediately. If<br />
you are unable to find the correct bolt consult a local hardware store.<br />
26. Follow the appropriate diagram above to attach MONITOR BRACKETS (OL/OR) to the back<br />
of your TV with selected fasteners. Make sure the MONITOR BRACKETS are vertically<br />
centered and level with each other. Secure the bolts with a PHILLIPS SCREWDRIVER. DO<br />
NOT over tighten the bolts.<br />
<strong>Whalen</strong> Furniture Mfg. Inc. Page 16 Factory No. 56-12089
Assembly <strong>Instruc</strong>tions for Floating Swivel Mount<br />
N<br />
N<br />
F<br />
OR<br />
Model # <strong>XL</strong>-<strong>10</strong><br />
<strong>Whalen</strong> Furniture Mfg. Inc. Page 17 Factory No. 56-12089<br />
C<br />
MAKE SURE ALL BOLTS ARE TIGHT AND SPINE IS AT A 90 DEGREE ANGLE AND<br />
USING A QUALITY LEVEL TO VERIFY THE MOUNTING FRAME IS LEVEL PRIOR TO<br />
INSTALLATION OF TV.<br />
27. Once the MONITOR BRACKETS (OL/OR) are attached onto the back of television, ask for<br />
assistance to lift the television up to hang the MONITOR BRACKETS onto the XYZ<br />
MOUNTING FRAME (N). Set the hooks on MONITOR BRACKETS over the MOUNTING<br />
FRAME then lower them onto the bars of MOUNTING FRAME.<br />
NOTE: Loosen the LOCK BOLT pre-attached on the MONITOR BRACKETS to ensure an<br />
easy fit at the bottom hooks.<br />
28. Center the television and tighten both LOCK BOLTS with a long PHILLIPS SCREWDRIVER<br />
until they hit underside of XYZ MOUNTING FRAME (N) to secure it in place.<br />
N<br />
OL<br />
D<br />
E<br />
N
Assembly <strong>Instruc</strong>tions for Floating Swivel Mount<br />
Model # <strong>XL</strong>-<strong>10</strong><br />
29. The MONITOR BRACKETS (OL/OR) can tilt up to 11˚ downward and 5˚ upward, depending<br />
on your optimum viewing position. Have your assistant hold the TV steady before you start<br />
to adjust the tilt. Simply reach behind the TV and turn the both Tilt Adjustment Knobs with<br />
enclosed 3/16” ALLEN WRENCH to adjust your TV to provide optimum viewing and<br />
minimize glare. When the TV is in its intended position, tighten both lock bolts to secure it in<br />
place.<br />
Note: If you need to remove the TV, make sure both Lock Bolts are disengaged fully.<br />
<strong>Whalen</strong> Furniture Mfg. Inc. Page 18 Factory No. 56-12089
Assembly <strong>Instruc</strong>tions<br />
Model # <strong>XL</strong>-<strong>10</strong><br />
Tools required: Allen Wrench (provided), Phillips Screwdriver, Mallet, Power Drill, and 3/8” Drill Bit.<br />
30. Repeat the same process to attach the CABLE CONTROLS (P) and install the TOP<br />
GLASS (G) and GLASS SHELVES (H) in place.<br />
31. Carefully move the console and position in your desired location against a wall. Now follow<br />
the instructions printed on the plastic bag containing TIPPING RESTRAINT HARDWARE<br />
KIT to mount the tipping restraint to the SPINE and the wall.<br />
NOTE: You must install the Tipping Restraint Hardware with the unit in use to prevent any<br />
accidents or damage to the unit.<br />
32. You can enjoy your home entertainment center now. Swivel left-or-right for optimum viewing<br />
control.<br />
<strong>Whalen</strong> Furniture Mfg. Inc. Page 19 Factory No. 56-12089
Model # <strong>XL</strong>-<strong>10</strong><br />
The following steps are only for those who wish to mount their<br />
TV directly to the wall. If you have already mounted your TV to<br />
the Swinging Floater or plan to display your TV on the top<br />
surface of the stand, disregard the following steps.<br />
Assembly <strong>Instruc</strong>tions for Universal Wall Mount<br />
Installing XYZ Mounting Frame onto WOODEN STUD WALL<br />
2.50" (63 mm)<br />
NOTE: If you are mounting your TV onto brick, solid concrete or concrete block, skip this<br />
section. This assembly requires an electric drill, level and stud finder (not included).<br />
33. Using a stud finder, locate the edges of the wood studs. Find the center line of each stud<br />
and draw a vertical reference line on the wall over each one. Place the XYZ MOUNTING<br />
FRAME (N) level against the wall where you intend to mount the TV. Using the MOUNTING<br />
FRAME (N) as a template, mark 4 drill points (2 on top, 2 on bottom) with a pencil on the<br />
vertical reference lines you just drew.<br />
34. With an electric drill (not included) drill 3/16 inch diameter holes to at least 2½ inch deep on<br />
the four drill points. While holding the Bracket Plate in place, loosely screw in the Lag Bolts (8).<br />
35. Secure the XYZ MOUNTING FRAME (N) to wall with LAG BOLTS (8) and WASHERS (7) at<br />
the drill points. Tighten bolts firmly, but be careful not to over-tighten.<br />
Do not over-tighten the Lag Bolts. Tighten Lag Bolts only until the Lag<br />
Bolt Washer is pulled firmly against the metal plate of Mounting Frame. If there is a layer<br />
of drywall or other material, this drywall or other material may not exceed 5/8 inch in<br />
thickness. Failure to heed this caution may result property damage and/or personal injury.<br />
<strong>Whalen</strong> Furniture Mfg. Inc. Page 20 Factory No. 56-12089<br />
? 0.20" (5 mm)
Model # <strong>XL</strong>-<strong>10</strong><br />
Assembly <strong>Instruc</strong>tion for installing XYZ Mounting Frame onto BRICK,<br />
SOLID CONCRETE OR CONCRETE BLOCK<br />
Maximum weight 135 lb. (61.2 kg)<br />
Concrete Anchors should only be used for masonry mounting.<br />
NEVER use the wall anchors to mount the unit to drywall.<br />
NOTE: If you are mounting your TV to a wall with wooden studs, skip this section. This<br />
assembly requires an electric drill and level (not included).<br />
36. Begin by placing the XYZ MOUNTING FRAME (N) level against the wall where you intend to<br />
mount the TV. Using the MOUNTING FRAME as a template, mark 6 drill points with a pencil.<br />
37. With an electric drill (not included) on its low setting, drill 7/16 inch diameter holes to at least<br />
2½ inch deep. Insert CONCRETE ANCHORS (9) into pre-drilled holes so that they are flush<br />
with the wall.<br />
38. Place the XYZ MOUNTING FRAME (N) level in the desired position against the wall. Secure<br />
the MOUNTING FRAME (N) to wall with six LAG BOLTS (8) and WASHERS (7) at the drill<br />
points. Tighten bolts firmly, but be careful not to over-tighten.<br />
<strong>Whalen</strong> Furniture Mfg. Inc. Page 21 Factory No. 56-12089
Assembly <strong>Instruc</strong>tions<br />
Model # <strong>XL</strong>-<strong>10</strong><br />
39. Once the MONITOR BRACKETS (OL/OR) are attached onto the back of television, ask for<br />
assistance to lift the television up to attach the Monitor Brackets onto the XYZ MOUNTING<br />
FRAME (N). Set the hooks on Monitor Brackets over the Mounting Frame then lower them<br />
onto the bars of Mounting Frame. Loosen the Lock Bolt pre-attached on the Monitor<br />
Brackets to ensure an easy fit at the bottom hooks. Proceed to center the television.<br />
40. If you want to adjust the tilt, ask for help from your friends to hold the TV steady before you<br />
start to adjust. Simply turn the both Tilt Adjustment Knobs on Monitor Brackets (OL/OR) with<br />
3/16” Allen Wrench to adjust your TV to provide optimum viewing and minimize glare. When<br />
the TV is in its intended position, tighten both Lock bolts with a long Phillips Screwdriver until<br />
they hit underside of XYZ Mounting Frame (N) to ensure your TV is safe and secure on the wall.<br />
41. Place assembled console under your TV set. Finally, connect the A/V and power cables to<br />
your TV. You are now ready to enjoy your wall-mounted Flat Panel TV.<br />
<strong>Whalen</strong> Furniture Mfg. Inc. Page 22 Factory No. 56-12089
Care and Maintenance<br />
Model # <strong>XL</strong>-<strong>10</strong><br />
Use a soft, clean cloth that will not scratch the surface when dusting.<br />
Use of furniture polish is not necessary. Should you choose to use polish, test first in an<br />
inconspicuous area.<br />
Using solvents of any kind on your furniture may damage the finish.<br />
Never use water to clean your furniture as it may cause damage to the finish.<br />
Always use coasters under beverage glasses and flowerpots.<br />
Liquid spills should be removed immediately. Using a soft clean cloth, blot the spill gently.<br />
Avoid rubbing.<br />
Always use protective pads under hot dishes and plates. Heat can cause chemical changes<br />
that may create spotting within the furniture finish.<br />
Stains or marks from crayons or ink markers will be difficult to remove.<br />
In the event that your furniture is stained or otherwise damaged during use, we recommend<br />
that you call a professional to repair your furniture.<br />
Check bolts/screws periodically and tighten them if necessary.<br />
Further advice about furniture care<br />
It is best to keep your furniture in a climate-controlled environment. Extreme temperature and<br />
humidity changes can cause fading, warping, shrinking and splitting of wood. It is advised to keep<br />
furniture away from direct sunlight as sun may damage the finish.<br />
Proper care and cleaning at home will extend the life of your purchase. Following these important<br />
and helpful tips will enhance your furniture as it ages.<br />
A Touch-up Pen has been provided to repair any small nicks or scratches that may occur<br />
during assembly or shipping.<br />
We hope you enjoy your purchase for many years.<br />
Thank you for choosing <strong>Whalen</strong> Furniture!<br />
QUALITY GUARANTEE<br />
We are confident that you will be delighted with your <strong>Whalen</strong> Furniture purchase.<br />
Should this product be defective in workmanship or materials or fail under normal use, we<br />
will repair or replace it for up to one (1) year from date of purchase. Every <strong>Whalen</strong><br />
Furniture product is designed to meet your highest expectations. We guarantee that you<br />
will immediately see the value of our fine furniture.<br />
This warranty gives you specific legal rights and you may also have other rights which<br />
vary from State to State.<br />
Customer Service: 1-866-942-5362<br />
8:30 a.m. - 4:30 p.m., PST, Monday to Friday<br />
www.whalenstyle.com<br />
<strong>Whalen</strong> Furniture Mfg. Inc. Page 23 Factory No. 56-12089
*<strong>XL</strong><strong>10</strong>19TAK *<strong>XL</strong>-<strong>10</strong>-19-TAK Manivela M i l de d ajuste j t de d Inclinación I li ió *<strong>XL</strong><strong>10</strong>CH *<strong>XL</strong>-<strong>10</strong>-CH Herraje Completo C<br />
*<strong>XL</strong>-<strong>10</strong>-20-LMB Soporte de Monitor Izquierdo<br />
*<strong>XL</strong>-<strong>10</strong>-14-BLS Soporte Posterior Izquierdo *<strong>XL</strong>-<strong>10</strong>-34-OW Llave Española<br />
*<strong>XL</strong>-<strong>10</strong>-15-BRS Soporte Posterior Derecho *<strong>XL</strong>-<strong>10</strong>-35-TUP Plumón<br />
*<strong>XL</strong>-<strong>10</strong>-16-SB Soporte Giratorio *<strong>XL</strong>-<strong>10</strong>-36-M4AW M4 Llave Allen<br />
*<strong>XL</strong>-<strong>10</strong>-17-MF Marco de Montaje XYZ *<strong>XL</strong>-<strong>10</strong>-37-3/16AW 3/16" Llave Allen<br />
*<strong>XL</strong>-<strong>10</strong>-18-LB Tornillo Candado *<strong>XL</strong>-<strong>10</strong>-TVMK Juego de Montaje TV<br />
*<strong>XL</strong>-<strong>10</strong>-12-FLS Soporte Frontal Izquierdo *<strong>XL</strong>-<strong>10</strong>-32-CA Taquete<br />
*<strong>XL</strong>-<strong>10</strong>-13-FRS Soporte Frontal Derecho *<strong>XL</strong>-<strong>10</strong>-33-FL Nivelador<br />
*<strong>XL</strong>-<strong>10</strong>-<strong>10</strong>-LL Pata Izquierda *<strong>XL</strong>-<strong>10</strong>-30-LBW Arandela Grande<br />
*<strong>XL</strong>-<strong>10</strong>-11-RL Pata Derecha *<strong>XL</strong>-<strong>10</strong>-31-2 1/2LB Tornillo de 2-1/2”<br />
*<strong>XL</strong>-<strong>10</strong>-8-TG Vidrio Superior *<strong>XL</strong>-<strong>10</strong>-28-LW Arandela de Presión<br />
*<strong>XL</strong>-<strong>10</strong>-9-GS Entrepaño de Vidrio *<strong>XL</strong>-<strong>10</strong>-29-FW Arandela Plana<br />
*<strong>XL</strong>-<strong>10</strong>-7-CC Guía para Cable *<strong>XL</strong>-<strong>10</strong>-27-HN Tuerca<br />
*<strong>XL</strong>-<strong>10</strong>-5-MSF Repisa Intermedia *<strong>XL</strong>-<strong>10</strong>-25-3/4B Tornillo de 3/4”<br />
*<strong>XL</strong>-<strong>10</strong>-6-BSF Repisa Inferior *<strong>XL</strong>-<strong>10</strong>-26-1 1/4B Tornillo de 1-1/4”<br />
*<strong>XL</strong>-<strong>10</strong>-3-TSF Repisa Superior *<strong>XL</strong>-<strong>10</strong>-23-TRHK Juego Sujetador<br />
*<strong>XL</strong>-<strong>10</strong>-4-WFR Riel Frontal de Madera *<strong>XL</strong>-<strong>10</strong>-24-SC Ventosa<br />
*<strong>XL</strong>-<strong>10</strong>-1-LS Poste Largo *<strong>XL</strong>-<strong>10</strong>-21-RMB Soporte de Monitor Derecho<br />
*<strong>XL</strong>-<strong>10</strong>-2-SS Poste Corto *<strong>XL</strong>-<strong>10</strong>-22-OPG Ojal Ovalado<br />
35 36 37<br />
9<br />
<strong>10</strong><br />
6<br />
33 34<br />
9<br />
11<br />
5<br />
31<br />
32<br />
22<br />
4<br />
15<br />
16<br />
3<br />
28 29 30<br />
18<br />
8<br />
12<br />
13 14<br />
26 27<br />
21<br />
19<br />
23<br />
24<br />
25<br />
2<br />
7<br />
20<br />
17<br />
Consola para Televisión 3 en 1 TM (<strong>XL</strong>-<strong>10</strong>)<br />
SI REQUIERE ORDENAR PARTES UTILIZAR LA LISTA INFERIOR