Antique Range Product Manual - Elmira Stove Works
Antique Range Product Manual - Elmira Stove Works
Antique Range Product Manual - Elmira Stove Works

Create successful ePaper yourself
Turn your PDF publications into a flip-book with our unique Google optimized e-Paper software.
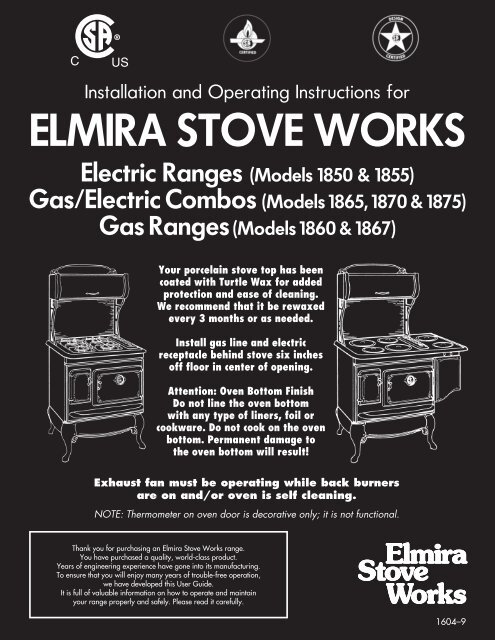
Installation and Operating Instructions for<br />
elmira stove works<br />
electric ranges (models 1850 & 1855)<br />
Gas/electric Combos (models 1865, 1870 & 1875)<br />
Gas ranges (models 1860 & 1867)<br />
Your porcelain stove top has been<br />
coated with Turtle Wax for added<br />
protection and ease of cleaning.<br />
We recommend that it be rewaxed<br />
every 3 months or as needed.<br />
Install gas line and electric<br />
receptacle behind stove six inches<br />
off floor in center of opening.<br />
Attention: Oven Bottom Finish<br />
Do not line the oven bottom<br />
with any type of liners, foil or<br />
cookware. Do not cook on the oven<br />
bottom. Permanent damage to<br />
the oven bottom will result!<br />
Exhaust fan must be operating while back burners<br />
are on and/or oven is self cleaning.<br />
Note: thermometer on oven door is decorative only; it is not functional.<br />
Thank you for purchasing an <strong>Elmira</strong> <strong>Stove</strong> <strong>Works</strong> range.<br />
You have purchased a quality, world-class product.<br />
Years of engineering experience have gone into its manufacturing.<br />
To ensure that you will enjoy many years of trouble-free operation,<br />
we have developed this User Guide.<br />
It is full of valuable information on how to operate and maintain<br />
your range properly and safely. Please read it carefully.<br />
1<br />
1604–9
gas range warning<br />
warning: if the information in this<br />
manual is not followed exactly, a fire or<br />
explosion may result causing property<br />
damage, personal injury or death.<br />
– Do not store or use gasoline or other flammable<br />
vapors and liquids in the vicinity of this or any other<br />
appliance.<br />
– what to Do if you smell gas.<br />
Safety InStructIonS – All Models ........................... 4<br />
amperage requIrementS – BTU’s ......................... 5<br />
Safety InStructIonS – Gas ...................................... 6<br />
InStallIng your range .......................................... 7<br />
InStallatIon of range Into cabInetS ............. 7<br />
InStallIng your exhauSt hood .......................... 8<br />
Smooth top electrIc cooktop .......................... 9<br />
SelectIon of potS & panS<br />
for electrIc top ................................................ 10<br />
grIddle – Optional ..................................................... 10<br />
gaS cooktop............................................................. 13<br />
gaS burner cleanIng ........................................... 13<br />
oven vent - gaS ....................................................... 14<br />
gaS Supply SyStem ................................................. 14<br />
gaS range converSIon to lp ............................ 15<br />
gaS adjuStIng for proper flame .................... 16<br />
electronIc oven control .................................. 18<br />
Important Oven Control Information ........................ 18<br />
Setting the Clock ....................................................... 19<br />
Using the Minute Timer ............................................ 19<br />
Conversion from Fahrenheit to Celsius ..................... 19<br />
Oven Control Recalibration ....................................... 19<br />
Non Timed Bake ........................................................ 19<br />
Automatic Timed Bake .................................................. 20<br />
Delayed Bake ............................................................. 20<br />
Broil and Vari-Broil................................................... 20<br />
Self Cleaning Oven .................................................... 20<br />
Safety Features .......................................................... 21<br />
Control Panel Lock .................................................... 21<br />
Cabinet Light Switch ................................................. 21<br />
Exhaust Fan Switch ................................................... 21<br />
Stay Hot Food Warmer .............................................. 21<br />
3<br />
• Do not try to light any appliance.<br />
• Do not touch any electrical switch; do not use any<br />
phone in your building.<br />
• Immediately call your gas supplier from a<br />
neighbour’s phone. follow the gas supplier’s<br />
instructions.<br />
• If you cannot reach your gas supplier, call the fire<br />
department.<br />
– installation and service must be performed by a<br />
qualified installer, service agency or the gas supplier.<br />
Before using your range reaD this Book carefully<br />
if you received a damaged range:<br />
Immediately contact the dealer that sold you the range.<br />
Before you request service:<br />
Check Troubleshooting. It lists causes of minor operating problems that you may be able to correct yourself.<br />
taBle of contents<br />
cookIng tIpS ............................................................. 24<br />
Convection Cooking Tips .......................................... 24<br />
Broiling ...................................................................... 20<br />
Convection Broiling .................................................. 27<br />
General Broiling Tips ................................................ 27<br />
Convection Roasting Rack ........................................ 27<br />
Air Circulation ........................................................... 27<br />
Oven Rack Positions .................................................. 28<br />
For Proper Cooking,<br />
Follow These Guidelines ........................................... 28<br />
Rack Placement for Specific Foods ........................... 28<br />
Using Aluminum Foil in the Oven ............................ 28<br />
oven Self-cleanIng cycle ................................ 21<br />
How the Self-Cleaning Cycle <strong>Works</strong> ........................ 21<br />
Before You Start ........................................................ 22<br />
For Best Cleaning Results ......................................... 22<br />
Automatic Door Lock ................................................ 22<br />
maIntenance & mInor repaIrS ......................... 22<br />
Removing Oven Door ................................................ 22<br />
Lubrication & Minor Service .................................... 23<br />
ServIce ........................................................................ 23<br />
gaS troubleShootIng ........................................... 24<br />
roaStIng chart ....................................................... 25<br />
bakIng chart ........................................................... 26<br />
broIlIng chart........................................................ 26<br />
convectIon cookIng ............................................. 29<br />
WIrIng dIagram ...................................................... 33<br />
cleanIng guIde ........................................................ 34<br />
troubleShootIng .................................................... 35<br />
partS of your range ................................... 36 & 37<br />
Warranty .................................................................. 40
safety instructions<br />
(all models)<br />
Important! Save these instructions for the local<br />
inspector’s use.<br />
WarnIng! Prior to installing this appliance, read<br />
the Safety Instructions as they relate to Installation on<br />
pages 3 through 7 of this manual. Failure to follow these<br />
instructions could result in serious electric hazard, risk of<br />
fire, and/or personal injury.<br />
models 1850, 1855, 1865, 1870 & 1875 are equipped<br />
with a 240 volt, standard range power cord & plug.<br />
see page 4 for amp ratings of each model.<br />
models 1860 & 1867 come with a 120 volt, 5 amp power<br />
cord & plug.<br />
Use this appliance for its intended use, as described in this<br />
manual.<br />
Never use your appliance for warming or heating the<br />
room.<br />
Do not assume that you know how to operate all parts of<br />
the range. Some features may work differently from those<br />
of your previous range.<br />
Do not climb, stand or hang on the door or range top.<br />
This can damage the range or tip it over, causing severe<br />
personal injury.<br />
children<br />
Do not leave children alone in the area where your range<br />
is in use. They should never be allowed to stand or sit on<br />
any part of this appliance.<br />
Instruct your small children that the range is not a toy and<br />
could hurt them. As your children grow up, teach them the<br />
proper and safe use of the range.<br />
Children must be taught not to use the oven door as a<br />
stepping stool to reach the cabinet above, as it may result<br />
in an injury.<br />
caution<br />
Do not store items of interest to children on cabinet<br />
above the range or on the back of the cooking surface.<br />
children climbing to reach items could be seriously<br />
injured.<br />
When cleaning cycle is on, the oven door and cooking<br />
surface will be hot. Keep children away from the range as<br />
a safety precaution.<br />
storage<br />
Do not store gasoline, flammable vapors or materials, etc.,<br />
in the oven, under or around the appliance area.<br />
hot surface<br />
Exercise caution. Surfaces may be hot enough to burn.<br />
Electric elements may be hot even when they appear dark<br />
in color.<br />
Do not operate surface burners without utensils in place.<br />
4<br />
Allow elements and burner surfaces to cool before cleaning.<br />
If a wet sponge or cloth is used to wipe spills on a hot<br />
cooking area, be careful to avoid steam burn. Some cleaners<br />
can produce noxious fumes if applied to a hot surface.<br />
Loose clothing of flammable material (pot holders) could<br />
ignite if brought in contact with hot burners and may<br />
cause severe burns.<br />
Moist or damp pot holders on hot surfaces may result in<br />
burns from steam. Do not let pot holders touch hot heating<br />
elements. Do not use towels or other bulky cloths as pot<br />
holders.<br />
Cooktop temperatures increase with the number of<br />
elements on. With three or four elements turned on,<br />
surface temperatures are high. Exercise care when<br />
touching the cooktop.<br />
fire<br />
Keep the hood and grease filters clean to maintain good<br />
venting and to avoid grease fires.<br />
Do not let cooking grease or other flammable materials<br />
accumulate in or near the range.<br />
grease<br />
Grease is flammable and should be handled carefully.<br />
Avoid letting grease deposits collect around the range in<br />
vent fans. Don’t leave cans of drippings sit around the<br />
range; refrigerate or dispose of promptly. Let quantities<br />
of hot fat (a pan of deep fat for example) cool before<br />
attempting to move or handle it. Grease fires can often<br />
be extinguished by quickly putting on the pan lid or by<br />
covering with baking soda. Do not attempt to extinguish<br />
with water because this will spread the fire.<br />
never pick up a flaming pan.<br />
oven<br />
Stand away from range when opening the oven door. Hot<br />
air or steam which escapes can cause burns.<br />
Do not heat unopened food containers in the oven.<br />
Pressure could build up and the container could burst,<br />
causing injury or damage to the range.<br />
Keep oven vent ducts unobstructed.<br />
Keep oven free from grease build up.<br />
Place oven rack in desired position while oven is cool.<br />
If rack must be handled when hot, do not let pot holder<br />
touch heating elements in the oven.<br />
Pull out oven rack to the rack stop to reduce chance of<br />
burns from touching hot surfaces of the door and oven.<br />
When using cooking or roasting bags in oven, follow the<br />
manufacturer’s directions.<br />
Do not use your oven to dry newspapers.<br />
aluminum foil<br />
Do not use aluminum foil near the broil element. This<br />
could cause damage to the elements.
Plastics<br />
All plastics are vulnerable to heat, although some will<br />
withstand higher temperatures than others. Keep all<br />
plastics away from parts of the range which may become<br />
slightly more than warm when the range is in operation.<br />
self-cleaning oven<br />
The door gasket is essential for a good seal. Care should<br />
be taken not to rub, damage or move the gasket.<br />
Do not use oven cleaners on your oven prior to selfcleaning.<br />
Damage may occur to oven finish at high<br />
temperatures. Remove aluminum or plastic utensils, food or<br />
combustible materials from oven and cooktop before selfcleaning.<br />
(See Self-Cleaning – Page 17)<br />
NOTE: Oven cleaner will not harm porcelain oven but<br />
should not be used in conjunction with self-cleaning.<br />
surface cooking<br />
Use proper pan size. Select pans large enough to cover the<br />
element. The use of undersized pans will expose a portion<br />
of the element which may result in burns, ignition of<br />
clothing or spillovers directly on element.<br />
Never leave surface units unattended at high heat setting.<br />
Boil over or boil dry conditions could result in a fire.<br />
Do not use glass or glazed ceramic cookware on the<br />
surface burners, as sudden change in temperature may<br />
break them.<br />
Always turn off surface unit, before removing pots or<br />
pans.<br />
Turn handle of the pan toward the center of the cooktop,<br />
without extending over nearby elements. This will reduce<br />
the possibility of accidentally overturning the pan.<br />
Let hot pans cool in a safe place, out of the reach of young<br />
children. Never set hot pots on a combustible surface.<br />
Do not use decorative metal covers on electric surface<br />
elements. A covered element, when turned on, could result<br />
in a burn or damage to the element.<br />
frying<br />
Use as little oil as possible. Filling the pan too full of oil<br />
can cause spillovers when food is added.<br />
Foods for frying should be as dry as possible. Frost on<br />
frozen foods or moisture on fresh foods can cause hot oil<br />
to bubble up. Spillovers, fire and burns from splatters could<br />
occur.<br />
Use a deep fat thermometer whenever possible to prevent<br />
overheating oil beyond smoking point.<br />
Deep fryer<br />
Use extreme caution when moving a hot grease kettle or<br />
disposing of hot grease.<br />
Ventilating hoods<br />
Clean ventilation hood frequently — grease should not be<br />
allowed to accumulate on hood or filter. When flaming<br />
foods under the hood, turn the fan off. The fan, when<br />
operating, may spread flame.<br />
5<br />
service<br />
Do not repair or service any part of the range unless<br />
specifically recommended in this manual. All other<br />
servicing should be referred to a qualified technician.<br />
Disconnect the range from wall receptacle (or fuse) before<br />
performing service.<br />
safety<br />
Your range, like many other household items, is heavy<br />
and can settle into soft floor coverings such as cushion<br />
vinyl or carpeting. When moving the range on this type of<br />
flooring use care.<br />
If your range must stand beside a refrigerator, allow at<br />
least 2” between the two appliances for air circulation.<br />
The heat from the range may affect refrigerator<br />
performance.<br />
Make sure that all the packing materials, including tape<br />
on elements and packing material above and below oven<br />
elements, have been removed and that all controls are in<br />
the off position before plugging in the power cord.<br />
electrical connection<br />
maximum amp. requirements Btu’s nat Btu’s lP<br />
Model 1850- 35 Amps, 240 Volts — —<br />
1855- 50 Amps, 240 Volts — —<br />
1860- 5 Amps, 120 Volts 59,000 53,100<br />
1865- 30 Amps, 240 Volts 43,000 38,700<br />
1867- 6 Amps, 120 Volts 79,000 71,100<br />
1870- 30 Amps, 240 Volts 43,000 38,700<br />
1875- 30 Amps, 240 Volts 63,000 56,700<br />
All ranges come with standard range cord attached. This<br />
cord must be plugged into a standard range receptacle<br />
provided by your electrician.<br />
installation<br />
Be sure your appliance is properly installed and grounded<br />
by a qualified technician in accordance with the installation<br />
instructions and local building codes.<br />
Power cord installation<br />
The new U.S. revised electrical code states that all new<br />
construction must use a FOUR WIRE range power cord.<br />
Existing construction may use a three wire range power<br />
cord. NOTE: The difference is, a four wire cord has a<br />
separate ground. A three wire cord is grounded through<br />
the neutral.<br />
to change from 3 wire to 4 wire cord:<br />
• Make sure all power is shut off.<br />
• Remove the back panel of the range so the power block<br />
is visible.<br />
• Unscrew terminal nuts and remove the range cord wires<br />
from the power block.<br />
• Undo ground screw attaching the white ground wire to the<br />
range body and remove wire.<br />
• Undo the bushing holding cord to stove body and remove<br />
cord from appliance.<br />
Reassemble the new range cord kit to the range making sure<br />
the white wire goes to the center of the terminal block, the<br />
red to the right and the black wire to the left.
• Attach the ringed terminal of the green or bare copper wire<br />
to the range body with the green ground screw.<br />
• Check power with multimeter. You must have 110 volts between<br />
white and black. You must have 110 volts between white and<br />
red. You must have 220 volts between red and black. If range<br />
receptacle is wired wrong, clock transformer will be severely<br />
damaged and will not be covered by manufacturer’s warranty.<br />
Replace back panel of range. Plug the power cord in and<br />
turn power on.<br />
leveling your range<br />
The range must be level in<br />
order to assure uniform<br />
cooking and baking. Shim<br />
legs if required.<br />
safety instructions – gas<br />
important instructions<br />
Do not use range as a heater. never use the range as a<br />
kitchen heater. Prolonged use of the range without adequate<br />
ventilation can be hazardous. Oven controls and top burners<br />
are not designed for home heating and component failures<br />
that may result from such abuse are definitely not covered by<br />
the warranty.<br />
warning<br />
This product must be installed by a licensed plumber or<br />
gas fitter, when installed within the Commonwealth of<br />
Massachusetts. Massachusetts approval code # G1-1202-18.<br />
#1 This installation must conform with local codes and<br />
ordinances. In the absence of local codes, installations must<br />
conform with American National Standard, National Fuel<br />
Gas Code ANSI Z223.1–latest edition (**) or CAN/CGA-<br />
B149–latest edition (***) installation codes.<br />
#2 Input ratings shown on the serial/rating plate are for<br />
elevations up to 2,000 feet (609.6 m). For elevations above<br />
2,000 feet (609.6 m), ratings are reduced at a rate of 4% for<br />
each 1,000 feet (304.8 cm) above sea level.<br />
mobile home installation<br />
The installation of this range must conform to the<br />
Manufactured Home Construction and Safety Standards,<br />
Title 24 CFR. Part 3280 (formerly the Federal Standard for<br />
Mobile Home Construction and Safety, Title 24, HUD, Part<br />
280); or when such standard is not applicable, the Standard<br />
for Manufactured Homes Installations 1982 (Manufactured<br />
Home Sites, Communities and Setups), ANSI A225.1q/<br />
NFPA 501A* or with local codes.<br />
in canada<br />
The installation of this range must conform with the<br />
current standards CAN/CSA-Z240–latest edition*** or<br />
with local codes. When this range is installed in a mobile<br />
home, it must be secured to the floor during transit. Any<br />
method of securing the range is adequate as long as it<br />
conforms to the standards listed above.<br />
6<br />
Note: The metal chassis of the range MUST be earthgrounded<br />
in order for the control panel and burner spark<br />
ignition to work. Check with a qualified electrician if you<br />
are in doubt as to whether the metal chassis of range is<br />
earth-grounded.<br />
Copies of the standards listed may be obtained from:<br />
* National Fire Protection Association<br />
Batterymarch Park<br />
Quincy, Massachusetts 02269<br />
** American Gas Association<br />
1515 Wilson Boulevard<br />
Arlington, Virginia 22209<br />
*** Canadian Standard Association<br />
178 Rexdale Boulevard<br />
Rexdale (Toronto), Ontario M9W 1R3<br />
floor covering<br />
Never install a range over inferior kitchen carpeting, vinyl<br />
tile or linoleum. These should be able to withstand at least<br />
175°F without shrinking, warping or discoloring.<br />
curtains<br />
If your range is near a window, use an appropriate window<br />
treatment. Do not use long curtains which could blow over<br />
the top burners and create a fire hazard.<br />
if you smell gas<br />
If this is a new range installation, your installer has not<br />
done a proper job of checking for leaks. Connections can<br />
loosen in transportation. If the range connections are not<br />
perfectly tight, you can have a small leak and therefore a<br />
faint gas smell.<br />
finDing a gas leak is usually not a<br />
“Do it yourself” ProceDure.<br />
Some leaks can only be found with the controls in the<br />
“on” position exposing the user to serious burns. Never<br />
use a match or flame to locate a leak. turn off the gas to<br />
the range and call a qualified serviceman.<br />
flame size: Top burner flame size should be adjusted so<br />
it does not extend beyond the edge of the cooking utensil.<br />
Excessive flame is hazardous.<br />
use of high flame: When using a high flame, never<br />
leave any pans unattended on this heat setting for long<br />
periods. Hot oil is particularly hazardous since it can<br />
become hot enough to ignite.<br />
Do not obstruct the flow of combustion and ventilation air<br />
to the range.<br />
Any openings in the wall, behind the range or the floor<br />
under the range must be sealed.<br />
Venting<br />
Never block the vents (air openings of the range). They<br />
provide the air inlet and outlet which is necessary for the<br />
range to operate properly with correct combustion. The<br />
oven vent is located at the rear of the main top.
type of gas<br />
Natural and LP Gas (propane). <strong>Range</strong>s are factory<br />
assembled for natural gas unless otherwise specified and<br />
cannot be used with LP Gas without some adjustments.<br />
Be sure your range is correctly adjusted by a qualified<br />
serviceman or installer for the type of gas on which it is to<br />
be used. (See Conversion, page 14).<br />
note: In this manual, propane is referred to as LP<br />
(liquid petroleum).<br />
installing your range<br />
Installation, adjustment and service of this range must<br />
be performed only by a qualified gas range installer or<br />
electrical serviceman. This is necessary to insure proper<br />
operation of the range and to avoid the possibility of<br />
damage to the range or injury to the users.<br />
clearances<br />
Observe all the instructions on the rating plate for<br />
minimum clearances to any adjacent vertical combustible<br />
surface. (See figure #1).<br />
WarnIng: Be careful when reaching into storage cabinets<br />
above range while it is in operation. One might accidentally<br />
contact a hot burner when using a hand for support or have<br />
one’s clothing come in contact with top burner flame.<br />
location<br />
If possible, the range should be located to avoid the main<br />
“traffic path” through the kitchen or where an open door<br />
might block a passageway or create an awkward working<br />
situation. If possible, it should be so located where cabinet<br />
working space is available on either side. Drafty locations<br />
should be avoided to prevent gas burner outage and poor<br />
air circulation.<br />
temperatures<br />
To cook, you must have heat. Some parts of the range are<br />
therefore going to get warm or even hot. Consider this in<br />
choosing a range location. Do not leave children alone or<br />
unattended near the range when it is in use. Let burner<br />
grids and other surfaces cool before touching them or<br />
leaving them where children can reach them.<br />
clearances<br />
This range may be installed with adjacent surfaces<br />
touching the base cabinets and the back flush with the back<br />
wall. Models 1860, 1865, 1867, 1870 & 1875 gas ranges<br />
require a CGA/AGA approved stainless steel gas flex line<br />
or a flexible copper coil 1/2” in diameter and at least three<br />
feet long so the range can be moved for service.<br />
To eliminate the risk of burns or fire by reaching over<br />
heated surface burners, cabinet storage above the range<br />
should be avoided. If overhead storage is unavoidable,<br />
clearances between the cooking surface and unprotected<br />
wood or metal overhead cabinets must be no less than<br />
32” (gas models only). The clearances on electric models<br />
between the cooktop and unprotected overhead cupboards<br />
is 30”. This distance may be reduced to 24” when the<br />
7<br />
bottom wood or metal cabinets are protected by not<br />
less than 1/4” thick flame retarding millboard covered<br />
with not less than No. 28MSG sheet steel, 0.015” thick<br />
stainless steel, 0.024” thick aluminum or 0.020” thick<br />
copper.<br />
note: Clearances specified to combustible construction<br />
(walls and materials) are based on a temperature rise of<br />
wood resulting from appliance operation. These clearances<br />
are suitable for walls of studding, lath and plaster or other<br />
types of combustible material which have a density of<br />
20 lbs. per cu. ft. or more. No evaluation of clearances<br />
has been made for low density cellulose, fibre board and<br />
similar materials which have a density of less than 20 lbs.<br />
per cu. ft., nor to plastic tiles or sheeting.<br />
The maximum depth of upper cabinets installed above the<br />
range is 13”.<br />
See the minimum clearances chart for electric and gas<br />
models below.<br />
minimum clearances to combustibles<br />
See figure 1 – page 6<br />
all electric combo all gas<br />
models (1850, 1855) models (1865, 1870, 1875) models (1860, 1867)<br />
A= 0” 3” 3”<br />
B= 0” 3” 3”<br />
C= 30” 32” 32”<br />
D= 0” 0” 0”<br />
E= 0” 0” 0”<br />
F= 13” Max 13” Max 13” Max<br />
1= End of section of overhead cabinet.<br />
2= Overhead center cabinet<br />
3= End wall or divider<br />
It is the responsibility of the installer to comply with the<br />
installation clearances specified in this manual.<br />
installation of range into caBinets<br />
The 4 burner range will fit into a 30 1/4” cabinet opening.<br />
Ideal - 31”. The 6 burner range will fit into a 43 1/2”<br />
cabinet opening. Ideal - 44 1/2”.<br />
If you are installing a range with the short leg option,<br />
you will need the following minimum opening size.<br />
30” range - 31”. 44” range - 44 3/4”.
Duct<br />
Duct<br />
Nickel<br />
Rail<br />
H<br />
30 1/2"<br />
Nickel Rail<br />
B<br />
29 1/2"<br />
G<br />
44 1/4"<br />
Nickel Rail<br />
C<br />
15 3/8"<br />
BACK VIEW<br />
OF RANGE<br />
C<br />
15 3/8"<br />
BACK VIEW<br />
OF RANGE<br />
D<br />
62 1/4"<br />
E<br />
36 3/8"<br />
F<br />
37 3/8"<br />
M<br />
64 1/4"<br />
N<br />
68 1/4"<br />
D<br />
62 1/4"<br />
M<br />
64 1/4"<br />
N<br />
68 1/4"<br />
M<br />
64 1/4"<br />
N<br />
68 1/4"<br />
I<br />
28 1/2"<br />
A<br />
30 1/8"<br />
Figure 3<br />
L<br />
29 1/2"<br />
exhaust hood Duct location<br />
Figure 3 shows exact center of duct for both four & six burner<br />
ranges. Cut drywall opening 10 1/4” x 3 3/8”.<br />
Height from floor to center of duct on all installations should<br />
be 62 1/4”=D.<br />
Note: Electrical receptacle & gas piping should be located in<br />
center of opening 6” off floor.<br />
Important: If you have purchased the short leg option, D<br />
dimension will be 60 1/4”.<br />
8<br />
installing your exhaust hooD<br />
Your elmira range is equipped with a 350 CFM exhaust<br />
fan located in the warming cabinet. This fan can be vented<br />
directly to the outside or, with the use of the #1442 Charcoal<br />
Filter (included) can recirculate purified exhaust air into the<br />
room.<br />
Charcoal filter should be changed every six months.<br />
See page 20 for Filter Cleaning and Replacement.<br />
Ventless installation<br />
Remove the charcoal filter from the broiler pan and<br />
remove plastic wrap. Remove the two screws holding<br />
the mesh filter in place with a #2 phillips or red square<br />
screw driver. Insert the charcoal filter into mesh filter and<br />
replace the assembly. See figure 4<br />
Figure 4<br />
To increase efficiency of the charcoal filter system, fan air<br />
should blow against the 45 degree vent deflector at rear of<br />
stove.<br />
Vented installation<br />
• Remove vent deflector on rear of stove if venting to the<br />
outside and seal screw holes.<br />
• If the exhaust hood is to be vented, the duct location<br />
must be installed in accordance with figure 3, page 7.<br />
Exhaust air must not be vented into a wall, ceiling, attic<br />
or a concealed space of a building.<br />
note: Installation must be in accordance with local<br />
and national building codes. Use only materials which<br />
conform to codes in effect. Disconnect power before<br />
doing any electrical work. Use only metal ducting, do<br />
not use plastic. Assemble securely so that in the event of<br />
a grease fire, the fire will be contained within the metal<br />
ductwork.<br />
Never vent exhaust air into a wall, attic, ceiling or any<br />
concealed space of a building, as an accumulation of<br />
grease could pose a fire hazard. Dampers on vented hoods<br />
must open freely and no obstruction should block the<br />
discharge opening.<br />
Important: If you have purchased the optional in-line<br />
blower, see installation instructions with blower.
tools and materials required<br />
• Hammer, Pliers, Tape measure<br />
• Sabre saw or keyhole saw<br />
• #8 x 1/2” sheet metal screws to secure duct<br />
• 3-1/4” x 10” duct, length according to your installation<br />
• 3-1/4” x 10” elbows and adapter, per your installation<br />
• Roof cap or wall venthood<br />
• Caulking or silicone to seal installation<br />
• Slot screwdriver, Electric drill, 3/32 drill bit<br />
The above parts are standard and are available from a<br />
hardware store or heating contractor.<br />
installation of Ducting horizontally<br />
through an outside wall<br />
Standard 3-1/4” x 10” ducting, elbows, and adapters for<br />
mounting the duct to the range can be purchased at most<br />
plumbing or heating supply dealers.<br />
If you can’t find an adapter elbow that will attach to the<br />
exhaust outlet of the range, you can easily make one by<br />
bending the one inch flanges of a standard elbow out<br />
ninety degrees. Put a bead of silicone seal on the flanges<br />
and attach the adapter to the back of the range with four<br />
1/2” x #8 sheet metal screws.<br />
Cut a 3-3/8” x 10-1/4” hole through the wall directly<br />
behind the warming cabinet outlet, ensuring that no studs<br />
are cut in the process. See figure 3. Push the range into<br />
position. From the outside of the house, measure the<br />
distance from the outside of the siding to the cabinet range<br />
outlet. Cut duct pipe to that length.<br />
Attach the vent hood to the duct pipe. Caulk the back<br />
of the vent hood and around the pipe where it will be<br />
pushed into the wall. Insert the vent assembly through the<br />
wall and into the range adapter so that the caulking seals<br />
completely against the siding.<br />
Install the mesh filter into the warming cabinet. Do not<br />
install charcoal filter.<br />
installation of Ducting through an attic or<br />
Basement space to an outside wall<br />
The range may be positioned flush with the back wall<br />
if the vent elbow and pipe are embedded in the wall. If<br />
ducting through the ceiling, continue the vent through<br />
the ceiling into the attic. Terminate the vent either on an<br />
outside wall, below the soffit using a vent hood or through<br />
the roof with a roof cap. If ducting through the basement,<br />
continue the vent through the floor to a point at least 36”<br />
above the grade level. Terminate the vent through the<br />
outside wall using a vent hood. Install the mesh filter into<br />
the warming cabinet. Do not install charcoal filter. If you<br />
are venting more than 10 feet or have more than one 90°<br />
elbow, we strongly recommend the 1518 inline blower.<br />
note to Installer: Leave these instructions with<br />
the appliance<br />
note to Consumer: Retain these instructions for<br />
future reference.<br />
9<br />
smooth toP electric cooktoP<br />
surface elements<br />
controls<br />
control knobs must be<br />
pushed in before turning<br />
them to a setting. They can<br />
be set anywhere between<br />
MAX and MIN.<br />
The controls for the surface<br />
elements provide infinite<br />
heat settings. The numbers<br />
on the dial serve as a reference. The control can be turned<br />
to any setting to provide the exact heat required.<br />
Before using your glass cooktop for the first time: turn<br />
the elements on max without a pan for 5 to 8 minutes<br />
or until smoking stops. this smoking is normal and<br />
non toxic.<br />
setting recommended use<br />
max • To start foods cooking<br />
• To bring liquids to a boil.<br />
8 - 7 • To hold a rapid boil<br />
6 - 5 • To fry foods<br />
4 • For gravy, pudding and icing<br />
• To cook large amounts of vegetables<br />
3 - 2 • To keep food cooking after starting<br />
it on a higher setting<br />
1 • To keep foods warm until ready<br />
to serve<br />
high speed radiant - electric top Burners<br />
Consists of a set of special RADIANT HEATER coils<br />
embedded in thermal insulation. The element is designed<br />
for fast heat response. You can see it light up almost<br />
immediately.<br />
Each element is fitted with a thermal limiter to ensure<br />
the ceramic glass does not exceed the maximum SAFE<br />
operating temperature. You may notice the element going<br />
on and off a number of times during use. This is a normal<br />
occurrence.<br />
To maximize the efficiency of this type of element we<br />
suggest you use it similarly to your previous burner. Turn to<br />
maximum until the desired temperature is reached, then turn<br />
it down to the setting that best maintains the desired heat.<br />
model ste – smoothtop control<br />
turning burners on<br />
• Touch ON. If highest heat is wanted, touch arrow up.<br />
• If a lower heat setting is required touch arrow down until<br />
the correct setting is achieved.<br />
• If you initially require a low heat setting when turning on<br />
the burner, touch ON then the arrow down. Scroll up to the<br />
desired setting.
turning burners off<br />
• Touch OFF<br />
• hot lights are provided in the glass of all smooth top<br />
ranges. Light glows when a burner becomes hot and shuts<br />
off when the burner has cooled.<br />
• H or 9 – To start foods cooking and to bring foods<br />
to a boil.<br />
• 8-7 – To hold a rapid boil.<br />
• 6-5 – To fry foods.<br />
• 4 – To cook large amounts of vegetables<br />
• 3-2 – To keep food cooking after starting it<br />
on a lower setting.<br />
• L – To keep foods warm until ready to serve.<br />
controls<br />
The radiant heating elements are controlled by a commonly<br />
used Infinite Heat Switch that works on the principle of<br />
percent on, percent off. For example, when the switch is<br />
turned to the medium setting, the element will be on only<br />
50% of the time. Because of the fast heat-up with these types<br />
of elements, you will notice the units switching on and off.<br />
cookware<br />
The best cooking results and the most economical use of<br />
electricity will be achieved by using smooth, flat-bottom<br />
pans. Pans should be at least the same size or slightly<br />
larger than the cooking area. Ceramic cookware suitable<br />
for stovetop cooking may be used. If pans smaller than the<br />
size of the heating element are used, care should be taken<br />
as the handles may get hot.<br />
Built into each element, is a safety device which protects the<br />
element from overheating. If using pans which are not ideal,<br />
for example concave or convex bottom pans with shiny<br />
bases, or those with ridged or grooved bottoms, the thermal<br />
limiter can cause the element to switch off and on during<br />
cooking, which means that food will take longer to cook.<br />
Very thin, badly dented, and distorted pans with uneven<br />
bottoms should not be used.<br />
Never place utensils with a skirt (e.g. a wok) on the<br />
heated area.<br />
Pans should not have rough bottoms. Do not slide pots on<br />
the ceramic glass cooking surface, as this may mark or<br />
scratch the cooktop.<br />
If pans with aluminum bottoms are slid across the cooking<br />
surface, metal marks could result. Such marks are easily<br />
cleaned with any non-abrasive stainless steel cleaner,<br />
provided they are removed immediately and not allowed<br />
to bake onto the surface.<br />
Any guidelines or recommendations given by the<br />
saucepan or cooking utensil manufacturer should be<br />
followed.<br />
things not to Do on a ceramic cooktop<br />
• Do not leave pots unattended or elements ON for<br />
extended periods of time. If an element is mistakenly left<br />
on for an extended period of time the built in thermal<br />
limiter will ensure that the heat build-up is insufficient<br />
to cause any adverse effects.<br />
10<br />
• Do not cook directly on the ceramic cooktop. The<br />
surface of the cooktop can be damaged, and will be more<br />
difficult to clean.<br />
• Do not use wire trivets mats or aluminum foil. They<br />
offer no cooking advantages and can damage the ceramic<br />
glass surface. Never place plastic or any other material<br />
which might melt on any part of the cooktop.<br />
• Do not use the cooktop as a chopping board or cutting<br />
surface. This type of use can scratch the surface.<br />
• Do not leave heavy spills during cooking. Turn heat<br />
off and allow surface to cool down. Remove the spills<br />
with a clean, damp cloth (no detergent), taking care to<br />
avoid burning fingers. If there is detergent in the cloth,<br />
you may leave a layer of soil-laden film on the cooktop<br />
surface, which can result in discolouration next time the<br />
element is switched “on”. If a detergent film builds up,<br />
use a ceramic glass cleaner-conditioner.<br />
care and cleaning<br />
To keep the exterior nickel and porcelain trim in spotless<br />
condition, wipe with a warm soapy cloth. Do not clean<br />
ceramic surface with a soapy cloth while cook surface<br />
is hot.<br />
See page 31 for complete cleaning guide.<br />
caution - <strong>Product</strong> Damage hazard<br />
Before using any cleaners, ensure that it is suitable for<br />
application on polished surfaces or trim, e.g. nickel,<br />
anodized aluminum, stainless steel, vitreous enamel,<br />
ceramic glass. Certain cleaners may have an adverse<br />
effect.<br />
Make sure that the glass ceramic surface has cooled down<br />
before applying any cleaning materials.<br />
1. saving on cleaning time<br />
• Make sure the bottom of pots and pans and cooking area<br />
are clean and dry.<br />
Select correct heat settings and use saucepans large<br />
enough to accommodate food and liquid to eliminate<br />
boilovers and splattering.<br />
• Wipe up food spills and splatters from adjacent heating<br />
areas before cooking.<br />
• Do not drag or slide pots along the surface.<br />
2. Daily care<br />
• Use a ceramic glass cleaner-conditioner, available<br />
at supermarkets and major department stores. As the<br />
cleaner-conditioner cleans, it leaves a protective coating<br />
of silicone on the smooth surface, which helps prevent<br />
scratches and abrasions in which food particles can<br />
collect. It also helps prevent the build-up of mineral<br />
deposits, and will make future cleaning easier.<br />
• Apply a dab of cleaner-conditioner in the center of each<br />
heated area to be cleaned.<br />
• For normal cleaning start with about 1 ml (1/8 tsp) of<br />
cleaner-conditioner, and apply more if needed.
• Clean unit with a damp clean paper towel. To remove<br />
more stubborn spots, use a slightly dampened nonimpregnated<br />
plastic or nylon pad specially made for<br />
non-stick utensils.<br />
• Use liquid cleansers to remove any discoloration,<br />
especially in hard water areas. A non-impregnated plastic<br />
or nylon pad specially made for non-stick utensils may<br />
also be used with these cleaners. Do not apply excessive<br />
pressure while rubbing. This could cause scratches over<br />
time.<br />
• Apply cleaner-conditioner and polish with paper towel<br />
or a soft dry cloth.<br />
• Any smearing or hazing on the surface may be removed<br />
with a lightly dampened paper towel, and polished with<br />
a soft dry cloth.<br />
• Do not use a sponge or a dishcloth. They may leave a<br />
film of soil-laden detergent on the heating area which<br />
may turn brown and resemble a discolouration the next<br />
time the area is heated. If that should happen, cleanerconditioner<br />
will remove it.<br />
warning<br />
Personal injury hazard<br />
• note: If a wet paper towel is used to remove spillovers<br />
from warm cooking area, be careful to avoid steam burns.<br />
• Never mix different household cleaning products.<br />
Chemical mixtures may interact, with objectionable or<br />
even hazardous results.<br />
Do use<br />
Ceramic glass cleaner-conditioner should be used<br />
regularly to clean and protect glass-smooth top cooking<br />
surface. If you run out, you may temporarily use baking<br />
soda as a cleaning powder.<br />
Do not use<br />
1. Household detergents and bleaches.<br />
2. Impregnated plastic or nylon pads.<br />
3. Soap pads; these will scratch and mark.<br />
4. Household abrasive powders except where specified;<br />
these may scratch depending on the pressure applied in<br />
use.<br />
5. Chemical oven cleaners, e.g. aerosols and oven pads.<br />
These are caustic cleaners, and may etch the surface.<br />
6. Rust stain or bath and sink stain removers, as these will<br />
mark and etch the surface.<br />
7. Metal scrubbers.<br />
how to Deal with Burned-on spots<br />
1. Make sure area to be cleaned is warm to the touch.<br />
2. The careful use of a stainless steel razor blade held at<br />
approximately 30 degrees to the surface can be used to<br />
remove stubborn burned-on spots from the surface.<br />
11<br />
3. Use cleaner-conditioner, and finally wipe the cooktop<br />
clean with a paper towel or damp cloth.<br />
If after the use of recommended materials there are some<br />
persistent stains or marks on the cooktop, the unit should<br />
be cleaned using a liquid cleanser. This will remove any<br />
accumulated residue of cleaner-conditioner, and if applied<br />
with a non-impregnated plastic or nylon pad for non-stick<br />
pans, for at least three to four minutes, it will also take<br />
off the film caused by salts and minerals before it has an<br />
opportunity to discolor or develop into a problems. Finish<br />
off with a touch of cleaner-conditioner, polish to a high<br />
lustre.<br />
Any smearing or streaking on the surface may be removed<br />
with lightly dampened paper towel and polished with a<br />
soft dry cloth.<br />
metal marks<br />
Certain metal pots, especially those with aluminum<br />
bottoms may leave marks on the surface, especially if the<br />
pan is allowed to slide. Use the cleaner-conditioner before<br />
the unit is used again to prevent the mark from baking on<br />
the surface.<br />
caution<br />
<strong>Product</strong> Damage hazard<br />
Ceramic glass cleaner-conditioner should be applied<br />
regularly after use of other cleaners, otherwise over<br />
a period of time the surface of the ceramic glass may<br />
roughen, and cleaning will become progressively more<br />
difficult. Staining may also occur.<br />
important notes<br />
1. In the event of the cooktop being scratched, soil will<br />
collect and appear as fine lines. These are not fully<br />
removable, but can be minimized by the daily use<br />
of cleaner-conditioner. These scratches do not<br />
affect cooking performance.<br />
2. Soil from sugar solutions must be removed from the<br />
cooktop before the syrup has set, otherwise it can<br />
permanently bond to the ceramic surface.<br />
electric surface elements<br />
solid cast elements<br />
Before using your solid elements for the first time:<br />
Heat the elements at<br />
max without a pan for<br />
3 to 5 minutes or until<br />
smoking stops. The<br />
smoking is normal and<br />
non toxic.<br />
Solid elements are<br />
sealed with a lacquer coating that prevents corrosion. This<br />
coating must be burned into the elements to be effective in<br />
protecting against rust. The coating will be transferred to<br />
the bottom of pans if this procedure is not done.<br />
Because solid elements are different from coil elements,<br />
you can expect to see differences in cooking performance,<br />
cleaning and safety.
Solid elements take longer than coil elements to reach the<br />
set temperature but they retain heat for longer periods of<br />
time after being turned off.<br />
Solid elements are easier to clean up, because the cooking<br />
surface is sealed against spills. There are no drip bowls or<br />
a burner box to clean.<br />
Solid elements should not glow red even at max setting.<br />
The red lettering will fade with use.<br />
Solid elements have built-in temperature protectors that<br />
automatically reduce heat if a pan boils dry.<br />
You will notice that a cast burner stove top gets hot,<br />
especially when the burners are on for long periods of<br />
time. This is normal for any range with solid elements.<br />
this condition is safe. To minimize heat build up, reduce<br />
burner heat setting to #3 after pot has come to a boil.<br />
selection & use of Pots & Pans<br />
flat Bottoms<br />
Thick, flat bottoms absorb and distribute the heat from<br />
the element more evenly. Thin, uneven bottoms waste<br />
energy and create hot spots that may burn the food onto<br />
cookware.<br />
Glass cooktops require heavy gauge flat bottom pans for<br />
best cooking results.<br />
Check flatness with a ruler or straight edge. See figure 7.<br />
Figure 7<br />
Pot Diameter<br />
Select element to match pan diameter. The pot should<br />
be slightly larger than the element to obtain best energy<br />
usage, and avoid spillovers flowing directly onto element.<br />
Do not use pans extending more than one inch beyond<br />
element, except while canning. See figure 8.<br />
Figure 8<br />
Small diameter pans waste energy and spillage can flow<br />
onto element. This increases chance of fire and burns.<br />
for smooth top & cast Burner ranges<br />
Use non-stick coated cookware, for easier clean up.<br />
Glass or pyroceram pans should be used only as the<br />
manufacturer describes.<br />
Pressure cookers, deep fat fryers, canners, etc. must be of<br />
the correct size and have flat bottoms to work properly.<br />
12<br />
energy tips<br />
Use cookware with tight-fitting lids, and flat bottoms<br />
which completely cover the heated portion of the element.<br />
Watch foods when bringing them to cooking temperatures<br />
at high heat. When food reaches cooking temperature,<br />
reduce heat to lowest setting that will keep it cooking.<br />
Use residual heat with surface cooking. For example,<br />
when cooking eggs in the shell, bring water to a boil,<br />
then turn element off, and allow heat in water to complete<br />
cooking.<br />
When boiling water for tea or coffee, heat only the amount<br />
needed. Do not use a wire trivet or any other kind of heat<br />
retarding pad between the pan and the element.<br />
griDDle oPtion<br />
OPTIONAL<br />
GRIDDLE<br />
griddle for electric ranges<br />
To use griddle over the back/front burner combination on<br />
left side of stove. Turn both burners on high for at least five<br />
minutes to allow griddle to heat up to frying temperature.<br />
Temperatures may be adjusted as required.<br />
griddle for gas ranges<br />
Set griddle on the left over the back/front burner<br />
combination. Lock the notches of the griddle onto the<br />
back & front grate fingers. First make sure that grates are<br />
positioned on burners correctly. Turn both front & back<br />
burners on to correct frying temperature.<br />
warning: Do not use two griddles on a range as warping<br />
of the top can occur.<br />
canning<br />
For best results, use a flat bottom, heavy gauge canner.<br />
Canners with rippled bottoms will not work on electric<br />
burners because the bottom does not make enough contact<br />
with the element. This wastes energy and takes a long time<br />
to boil water.<br />
gas cooktoP<br />
Gas cooktops are more forgiving than electric cooktops.<br />
Most cookware will work, although tight fitting lids are<br />
recommended for efficient cooking on both. Always<br />
adjust the burner controls so that flames do not extend<br />
past the edges of pots or pans.
top Burners<br />
Your gas range is equipped with “state of the art” “Sealed<br />
Gas Burners” and an “Auto-Reignition System”. The<br />
sealed gas burners spread the heat evenly across the<br />
bottom of the cooking utensil and provide infinite heat<br />
control. The auto-reignition system senses when a burner<br />
flame has gone out and will automatically reignite that<br />
burner. There are no standing pilots to light or adjust.<br />
See “Gas Burner Cleaning” for maintenance of top<br />
burners.<br />
Figure 10<br />
TO LITE<br />
HI<br />
9<br />
8<br />
7<br />
6<br />
5<br />
4 3 2 LO<br />
operating range During a Power failure<br />
To light a top burner during a power failure, hold a lit<br />
match to the desired burner head. Turn the corresponding<br />
control knob to any numbered position. After burner<br />
lights, adjust flame to desired setting.<br />
note: The “Push to Turn Safety Control Knobs” on<br />
the range are designed for child safety and to prevent<br />
accidental operation.<br />
the oven requires electricity to operate.<br />
manual Burner adjustment on low<br />
The burners have been pre-adjusted at the factory for best<br />
performance. You may manually adjust the low settings<br />
up or down by removing the control knob while the burner<br />
is lit and in the low position. While holding the valve stem<br />
so it doesn’t turn, insert a small flat blade screwdriver into<br />
the stem and turn the small brass screw slightly in either<br />
direction until desired flame height is obtained. Valve<br />
must be adjusted so low flame licks around burner cap no<br />
less than 1/8”. See figure 11.<br />
1/8"<br />
Figure 11 Figure 12<br />
13<br />
note: Low adjustment will not effect flame heights at<br />
other settings. If a top burner flame has been adjusted too<br />
low, the electronic ignitor may start to spark while burner<br />
is on. Readjust flame until ignitor stops sparking.<br />
flame appearance<br />
The burners have been pre-adjusted at the factory to a clean<br />
blue flame. On LP gas, a slight orange tip may be visible.<br />
If flame is not as above, your gas servicemen can check<br />
the regulator for proper setting with a water manometer<br />
(U-gauge). The stove pressure should be within + or - 10%<br />
of the pressure setting shown in this manual.<br />
gas Burner cleaning<br />
• the burner caps should be routinely removed and<br />
cleaned. Always clean burner caps after a spillover.<br />
Keeping the burner caps clean aids in proper ignition and<br />
an even flame.<br />
• for proper flow of gas and ignition of the burner, DO<br />
NOT ALLOW SPILLS, FOOD, CLEANING AGENTS<br />
OR ANY OTHER MATERIAL TO ENTER THE GAS<br />
ORIFICE OPENING.<br />
• gas must flow freely through the small hole in the brass<br />
orifice for the burner to light properly. This area must<br />
be free of any soil and be kept protected from boilovers<br />
or spillovers. ALWAYS keep the burner caps in place<br />
whenever a surface burner is in use.<br />
occasionally check the burner flames for proper size and<br />
shape as shown. A good flame is blue in color. If flames lift<br />
off ports they are yellow and usually noisy. You may need<br />
to clean the burners. See figure 12.<br />
if ignitors continue to click<br />
If your ignitors continue to click after lighting, the<br />
probable cause is dirt or moisture around the burner,<br />
or between the burner and ignitor. Clean these areas<br />
thoroughly with household cleaner or soap and water.<br />
Dry thoroughly or sparking may still occur. (You may<br />
have to use a hair dryer to completely dry the area.) If<br />
the condition persists, but on low setting only, you may<br />
need to increase the burner flame (see “<strong>Manual</strong> Burner<br />
Adjustment” – this page). If the condition persists, check<br />
for damaged ignitors. Very rarely, the spark module may<br />
need to be replaced. Ignitors and spark modules, with<br />
installation instructions, can be ordered from <strong>Elmira</strong> <strong>Stove</strong><br />
<strong>Works</strong>, and must be serviced from under the cook top.<br />
to clean Burners:<br />
1. lift the burner cap straight up from the burner base.<br />
2. clean burner cap with warm, soapy water and a sponge.<br />
You can also clean with a nonabrasive scrubbing pad or<br />
cleanser. Do not clean burner cap in dishwasher.<br />
3. if the gas orifice opening has become soiled or clogged,<br />
use a cotton swab or a soft cloth to clean the area.
4. if ports are clogged, clean with a straight pin. Do not<br />
enlarge or distort port. Do not leave anything stuck<br />
in the ports when replacing black porcelain burner<br />
base.<br />
5. after cleaning the orifice opening and ports, replace the<br />
burner cap. make sure cap is set straight on burner and<br />
that the tabs on cap fit into the grooves of burner base.<br />
6. check the burner for proper lighting after cleaning.<br />
note: If a gas burner burns with an uneven orange<br />
flame, reposition the burner cap so it sits flat on the<br />
burner housing. If burner lights slowly, have your gas<br />
service person check the gas pressure to the appliance.<br />
If a top burner flame has been adjusted too low, the<br />
electronic ignitor may start to spark. Readjust flame until<br />
ignitor stops sparking.<br />
When cleaning around the surface burner, use care. If<br />
cleaning cloth should catch the ignitor, it could damage it,<br />
preventing ignition.<br />
If surface burner does not light, check if ignitor is broken,<br />
soiled or wet. If clogged, clean the small port beneath the<br />
ignitor using a straight pin.<br />
Wipe acid or sugar spills as soon as the cooktop has cooled<br />
as these spills will discolor the porcelain.<br />
See Cleaning Guide – Page 31.<br />
oVen Venting - gas toP moDels<br />
the oven Vent<br />
Hot air and moisture escape from the oven through a vent<br />
in the center rear of the cooktop. Do not block the vent.<br />
Poor baking/roasting and bad combustion can result.<br />
The oven bottom must be in place for burner to bake<br />
properly on models 1860 and 1867.<br />
To remove, pull oven bottom forward. Note how tabs on<br />
the oven bottom sit into the oven pan beneath.<br />
gas suPPly system<br />
gas and electrical supplies<br />
Before connecting to the supply systems, be sure that<br />
the installation conforms with the local codes or, in the<br />
absence of local codes, with the National Fuel Code,<br />
%<br />
14<br />
ANSI Z223.1 latest edition or in Canada, CAN/CGA B149<br />
installation codes. See page 4 for electrical requirements.<br />
gas Piping to range<br />
The gas supply piping to the range should be 3/4” pipe<br />
which is then reduced to 1/2” at the regulator. With<br />
“LP” gas, the size of the piping to the range should be<br />
determined by your gas fitter.<br />
When connecting pipe to the die cast regulator, use two<br />
wrenches. Excess pressure or tightening the pipe too tight<br />
can cause the regulator to crack, resulting in a gas leak or<br />
a possible fire or explosion.<br />
Make sure that if flexible connectors are used in<br />
connecting the appliance to the gas supply, they are AGA<br />
and/or CGA approved. Poorly designed connectors can<br />
be a source of gas leaks. Even if AGA/CGA approved<br />
flexible connectors are used, the customer should be<br />
cautioned against kinking or damaging the connection<br />
when moving or cleaning the range. This could cause a<br />
gas leak.<br />
manual shutoff<br />
Install a manual shutoff valve in the gas line, in an<br />
accessible location, near the unit. Know where the gas<br />
valve is so you can shut off the gas to the range quickly.<br />
Suitable pipe thread sealant must be used which is<br />
approved for use with “LP”/Natural gas. Be sure to use<br />
this thread sealant on all pipe connections.<br />
Pressure testing<br />
The appliance, and its individual shutoff valve must be<br />
disconnected from the gas supply piping system during<br />
any pressure testing of that system at test pressures in<br />
excess of 1/3 psig (3.5kPa).<br />
The appliance must be isolated from the gas supply piping<br />
system by closing its individual manual shutoff valve<br />
during any pressure testing of the gas supply system at<br />
test pressures equal to or less than 1/2 psig (3.5kPa).<br />
The gas supply pressure for checking the regulator setting<br />
shall be at least one inch w.c. above manufacturer’s<br />
specified manifold pressure.<br />
gas leak testing<br />
After the final gas connection has been made, all the<br />
top burner valves should be closed and the gas supply<br />
and manual shutoff turned on. All connections in the<br />
gas supply line and in the range should be tested with<br />
soap suds or electronic sniffer for leaks. If a leak is<br />
present, bubbles will appear. The leak should be stopped<br />
by tightening the joint, or unscrewing completely and<br />
applying additional pipe dope and re-tightened. Any<br />
factory connections which may have been disturbed<br />
should be retested.
a match should never be used when testing for leaks.<br />
all fittings have been tightened and tested at the<br />
factory. if a leak is detected, tighten the fitting. Don’t<br />
use pipe dope on factory fittings.<br />
range conVersion to “lP”<br />
models 1865, 1870 & 1875<br />
(gas top models)<br />
All our ranges are factory set to burn natural gas unless<br />
“LP” is specified. To use the range on “LP” gas, please do<br />
the following:<br />
order an “lP” kit from the factory. $35 UPS included.<br />
Burner large medium small<br />
Nat. Gas #50 (1.75 mm) #55 (1.32 mm) #57 (1.09 mm)<br />
LP/Propane #64 (.91 mm) #65 (.89 mm) #70 (.71 mm)<br />
Store natural gas spuds so they are available for future<br />
conversions.<br />
installation of “lP” spuds<br />
Apply masking tape at the end of a 7 mm nut driver to<br />
help hold the gas orifice spud in the nut driver while<br />
changing it. Press nut driver down onto the gas orifice<br />
spud and remove by turning it counterclockwise and<br />
lifting out, set gas orifice spud aside.<br />
Gas orifice spuds are stamped with a number on the side.<br />
Replace the LP gas orifice spud with the correct Natural<br />
gas orifice spud.<br />
Refer to the following chart for the correct Natural gas<br />
orifice spud placement.<br />
15<br />
conversion of regulator to “lP”<br />
on models 1865, 1870 & 1875<br />
Disconnect Power the range<br />
• Open oven door and remove it, see removal instructions<br />
on page 16.<br />
• With a Philips driver, undo the 2 screws holding the top<br />
down.<br />
• Pull top forward about 2” then lift front. Raise the<br />
service stay on each side to hold the top up.<br />
• On the back right of the range unscrew the nut on top of<br />
the regulator.<br />
• Reverse the white insert pin by pulling it out of the cap,<br />
reverse it, then snap it back into the cap. Replace cap<br />
into body of regulator and tighten, making sure not to<br />
disturb the regulator spring.<br />
Figure 13 Nat. Gas LP Gas<br />
a. Pressure regulator:<br />
The pressure regulator is located behind the base skirt<br />
at the back of the range. For best access to the regulator<br />
after range has been moved into place, remove base skirt.<br />
Unscrew the metal nut on regulator behind the plastic cap<br />
with a wrench or vicegrip. Reinstall the plastic cap onto<br />
the threaded end of the metal nut marked LP.<br />
Rethread the nut into regulator making sure nut does not<br />
crossthread. Do not over tighten.
B. replacing rangetop orifices:<br />
Tools required to replace orifices.<br />
Small adjustable wrench.<br />
1. Remove the lift off burner cap.<br />
2. With the small adjustable wrench, unscrew the brass<br />
venturi and remove.<br />
3. Unscrew the natural gas orifices in each of the top<br />
burners using the 7 mm nut driver included with orifice<br />
kit. Replace with “LP” orifices listed below.<br />
nat. gas lP/Propane<br />
Front left superburner takes 1.75 mm (#50) .91 mm (#64)<br />
Other front burners take 1.32 mm (#55) .89 mm (#65)<br />
All rear burners use 1.09 mm (#57) .71 mm (#70)<br />
Note: example. Orifices are stamped metric sizes. (00) is<br />
the number drill equivalent.<br />
4. Reinstall the brass<br />
venturi.<br />
Store nat. gas orifices<br />
and nut driver so they<br />
are available for future<br />
conversions.<br />
When replacing the<br />
black caps, make sure<br />
that the tabs in the cap<br />
fit into the grooves of<br />
the burner base.<br />
warning<br />
– fire hazard<br />
• Located gas supply shut off<br />
valve on the press regulator.<br />
• Shut off gas supply before<br />
converting to LP gas.<br />
• Make all conversions before<br />
turning gas supply valve back on.<br />
Failure to follow these instructions could result in fire,<br />
explosion or other personal injury.<br />
16<br />
A. PlAstic cover<br />
B. GAs Pressure reGulAtor cAP with solid end<br />
fAcinG out<br />
c. GAs Pressure reGulAtor cAP with hollow<br />
end fAcinG out<br />
d. wAsher<br />
e. GAs Pressure reGulAtor cAP<br />
conversion of regulator to “lP”<br />
on models 1860 & 1867 (gas oven)<br />
• Locate the regulator at the rear of range (under back legs).<br />
• Remove the plastic cover from the regulator cap.<br />
• With your fingers, turn the nut counter clockwise.<br />
• Do not remove the spring beneath the cap.<br />
• Turn the cap over so LP faces up and reinstall into<br />
regulator.<br />
• Replace plastic cover over regulator cap.
oVen conVersion moDels 1860 & 1867<br />
to convert oven Bake Burner<br />
1. Access from left side as you are facing back of range.<br />
2. Use a 1/2” combination wrench to turn the orifice<br />
hood down snug onto pipe (about 2 to 2-1/2 turns).<br />
IMPORTANT: Do not overtighten.<br />
A. orifice hood<br />
B. Pin<br />
c. nAturAl GAs: increAse GAs – increAse flAme size (Preset<br />
At fActory for nAturAl GAs)<br />
d. lP GAs: decreAse GAs, decreAse flAme size.<br />
to convert oven Broiler Burner<br />
1. Remove oven racks.<br />
2. Use a 1/2” combination wrench to turn the orifice<br />
hood down snug onto the shoulder (about 2 to 2-1/2<br />
turns).<br />
IMPORTANT: Do not overtighten.<br />
The oven broil burner flame cannot be properly adjusted<br />
if this conversion is not made. See “Adjust Oven Broil<br />
Burner Flame” section.<br />
3. Complete installation. See “Make Gas Connection”<br />
and “Electronic Ignition System” sections.<br />
17<br />
check operation of oven Broil Burner<br />
1. Close the oven door.<br />
2. Touch “Broil” and “Start”.<br />
The oven burner should light within 8 seconds, under<br />
certain conditions it may take the burner up to 50 to 60<br />
seconds to light.<br />
adjust oven Broil Burner flame (if needed)<br />
Look through oven window to check broil burner for<br />
proper flame. This flame should have a 1/2” (1.3 cm) long<br />
inner cone of bluish-green, with an outer mantle of dark<br />
blue, and should be clean and soft in character. No yellow<br />
tips, blowing or lifting of flame should occur.<br />
if flame needs to be adjusted:<br />
1. Loosen the lock screw on the air shutter located at the<br />
rear of the broil burner.<br />
2. Adjust the air shutter as need.<br />
3. Tighten lock screw.
aDjusting for ProPer flame<br />
a. cooktop burners:<br />
See page 12 – manual burner adjustment on low.<br />
hiDDen Bake<br />
Your electric oven features a hidden bake element.<br />
There is no visible element inside the oven; it is located<br />
underneath oven floor. Hidden bake provides even heat<br />
and easier clean-ups.<br />
electronic oVen control<br />
imPortant information<br />
1 Clock must be set before any other operation of the<br />
oven control is possible.<br />
2 Time of day is always displayed in hours:minutes.<br />
3 The maximum programmable time for BAKE, BROIL,<br />
CONVECTION BAKE, CONVECTION BROIL,<br />
TENDERCOOK, COOK TIME AND STOP TIME is<br />
11 hours 59 minutes.<br />
4 When the appliance is connected to a power supply or<br />
after a power interruption of longer than 2 seconds, the<br />
clock and all indicators flash.<br />
5 If more than 10 seconds elapse between selections, the<br />
program will cancel.<br />
6 Functions are identified on the key pad. When a<br />
function such as BAKE, BROIL, CONVECTION<br />
BAKE, CONVECTION BROIL, CONVECTION,<br />
COOK TIME, SELF CLEAN, TIMER or STOP TIME<br />
is touched, setup begins. The function indicator flashes.<br />
When START is touched, the function indicator glows.<br />
The indicator will shut off when STOP is touched or at<br />
the end of the oven function.<br />
18<br />
7 Functions are activated by the touch of a finger. The<br />
electronic control generates a beep to confirm that your<br />
message has been received.<br />
8 If the control will not function and there is a glowing<br />
indicator light beside the STOP/LOCK function , the<br />
control is locked. Touch and hold STOP/LOCK for 3<br />
seconds to remove the lock. See safety measures.<br />
9 If there has been a power interruption or failure, the<br />
electronic control could either be:<br />
A) “Locked up” (meaning no buttons will function).<br />
Reset the main power breaker to the range.<br />
B) Flashing “88:88”. Reset the clock.
oVen control caliBration<br />
oPeration<br />
The oven control may be recalibrated up to 30 degrees<br />
hotter or cooler. To recalibrate oven,<br />
1. Press and hold bake key for 5 seconds until the oven<br />
display shows the current calibration. Screen should<br />
show “CAL” “00”.<br />
2. Press the TEMP “up” or “down” arrow to increase or<br />
decrease the temperature in 10 degree F increments.<br />
The adjustment can be set between plus or minus 30<br />
degrees F.<br />
3. Press START.<br />
Calibration will have to be re-set if you have a power<br />
failure.<br />
the clock<br />
oPeration<br />
1 Touch CLOCK. The colon between hours and minutes<br />
stop flashing. The clock indicator begins to flash.<br />
Within 5 seconds go to next operation.<br />
2 Touch INCREASE or DECREASE to set the clock.<br />
Fast scroll of time begins after holding for 3 seconds.<br />
Once you have reached the desired time, press start.<br />
3 The colon will flash and the CLOCK indicator will shut off.<br />
CLOCK setup is finished and clock is now working.<br />
4 Touch CLOCK twice to display international (0-24 hours)<br />
time of day instead of the 0-12 hours clock. To return to<br />
the 0-12 hour system, touch CLOCK one more time.<br />
Time of day can only be changed when oven is not in use.<br />
the minute timer<br />
The timer is used strictly for counting down a length of<br />
time. It can be set while the oven is operating, as it does<br />
not control any of the oven functions.<br />
setting the timer<br />
1 Touch TIMER. Timer indicator flashes and clock shows<br />
00:00.<br />
2 Touch INCREASE or DECREASE until desired length<br />
of time is displayed.<br />
3 Touch START. The timer count down starts immediately<br />
and timer indicator stops flashing and glows.<br />
4 Touch STOP when a continuous beep indicates that the<br />
programmed length of time has elapsed.<br />
19<br />
5 To cancel the timer before the end of the set time, touch<br />
TIMER then touch STOP. The indicator light will shut off.<br />
The maximum length that the timer may be set is 19 hours<br />
59 minutes.<br />
conVersion<br />
from fahrenheit to celsius<br />
Temperature can be displayed in Fahrenheit (°F) or in<br />
Celsius (°C). To switch from one scale to the other: touch<br />
a function key (BAKE, BROIL, CONVECTION BAKE,<br />
CONVECTION BROIL OR CONVECTION) then touch<br />
the key F/C.<br />
changing oVen temPerature<br />
To increase or decrease oven temperature, first touch oven<br />
function indicator. (Bake, Boil, etc.) Then touch the arrow<br />
up or down.<br />
Bake/Broil/cook settings<br />
non timeD Bake, conVection<br />
Bake, or conVection<br />
1 Touch BAKE, CONVECTION BAKE or CONVECTION.<br />
A temperature of 350°F (175°C) for bake or 325°F<br />
(160°C) for convection is displayed. Bake, convection<br />
bake or convection indicator keeps flashing.<br />
2 Touch oven function then touch INCREASE or<br />
DECREASE to change the actual temperature setting.<br />
The temperature may be set between a minimum of<br />
100°F and a maximum of 500°F (40°C to 260°C).<br />
3 Touch START. Oven begins bake function. Oven<br />
function indicator keeps glowing. 5 seconds later, the<br />
actual time and real oven temperature are displayed.<br />
4 The real oven temperature display increases in<br />
increments of 5°. When the programmed temperature<br />
is reached, the control beeps twice and the temperature<br />
becomes constant.<br />
5 Touch STOP if you wish to stop oven operation. The<br />
oven function indicator and the temperature display will<br />
shut off, and only the time of day will be displayed.<br />
6 To verify the oven temperature setting while the oven<br />
is heating up, touch oven function. The temperature<br />
setting is displayed for 5 seconds.
automatic timeD Bake,<br />
conVection Bake or conVection<br />
1 Touch BAKE, CONVECTION BAKE or CONVECTION.<br />
A temperature of 350°F (175°C) for bake or 325°F (160°C)<br />
for convection is displayed. The function indicator flashes<br />
and the degree indicator glows.<br />
2 Touch oven function then INCREASE or DECREASE<br />
to change the actual temperature setting. The<br />
temperature may be set between a minimum of 100°F<br />
and a maximum of 500°F (40°C to 260°C).<br />
3 Touch COOK TIME. The length of time displayed is<br />
00:00. Cook time indicator flashes.<br />
4 Touch INCREASE or Decrease until desired cook time<br />
is displayed. Fast scroll of time begins after holding for<br />
3 seconds.<br />
5 Touch START. Oven function begins and the indicator<br />
glows. After 5 seconds, the real time and real oven<br />
temperature are displayed. The real oven temperature<br />
increases in increments of 5 degrees. When the<br />
programmed temperature is reached, the control beeps<br />
twice and the temperature becomes constant. When<br />
cook time is completed, an audible signal (3 beeps) is<br />
emitted. The oven stops and display shows the time of<br />
day. The indicator and the temperature display shut off.<br />
6 Touch STOP if you wish to stop oven operation before<br />
programmed cook time has elapsed. The oven stops and<br />
the display shows the time of day. The indicator and the<br />
temperature display shut off.<br />
To recall remaining cook time or the oven temperature<br />
setting while the oven is heating up, touch the oven<br />
function or COOK TIME. The remaining cook time and<br />
temperature setting is displayed for 5 seconds.<br />
DelayeD Bake, conVection Bake<br />
or conVection<br />
1 Touch BAKE, CONVECTION BAKE or CONVECTION.<br />
Temperature of 350°F (175°C) for bake or 325°F (160°C)<br />
for convection is displayed. The oven function indicator<br />
flashes and the degree indicator glows.<br />
2 Touch oven function then INCREASE or DECREASE<br />
to change the actual temperature setting. The<br />
temperature may be set between a minimum of 100°F<br />
and a maximum of 500°F (40°C to 260°C).<br />
3 Touch COOK TIME. The length of time displayed is<br />
00:00. Cook time indicator flashes.<br />
4 Touch INCREASE until desired cook time is displayed.<br />
Fast scroll of time begins after holding for 3 seconds.<br />
5 Touch STOP TIME. Stop time indicator flashes and<br />
the display shows the time at which the oven would<br />
normally stop if its operation were not delayed.<br />
20<br />
6 Touch INCREASE or DECREASE until desired stop<br />
time is displayed.<br />
The longest delay time which may be set is 11 hours 59<br />
minutes.<br />
7 Touch START. The display shows the time of day.<br />
Oven temperature is displayed and the oven function<br />
indicator glows when the cooking cycle starts.<br />
When the oven stops, 3 beeps sound. The function<br />
indicators shut off and the time of day is displayed.<br />
8 Touch STOP if you wish to stop oven operation before<br />
programmed cook time has elapsed or to cancel the<br />
program. The function indicators shut off and the time<br />
of day is displayed.<br />
To recall cook time, remaining cook time, stop time, or the<br />
oven temperature setting, touch the appropriate button;<br />
the information is displayed for 5 seconds.<br />
Vari-Broil or conVection Broil<br />
1 Touch BROIL, temperature of 500°F (260°C) is displayed<br />
or CONVECTION BROIL is 450°F. Indicator<br />
begins to flash.<br />
2 Touch oven function then DECREASE to reduce<br />
the preset broiling temperature if desired. Touch<br />
DECREASE or INCREASE to correct temperature.<br />
3 Touch START, indicator glows. The real time and set<br />
temperature are displayed.<br />
4 Touch STOP when you wish to end the broiling cycle.<br />
The function indicator shuts off and the time of day is<br />
displayed.<br />
oVen self-cleaning<br />
WARNING: Remove racks from the oven. Racks will become<br />
dull and blue-gray if left in the oven during a self-clean<br />
cycle. Wipe up any excess oven spills. See page 22 before<br />
self-cleaning.<br />
self-cleaning to start<br />
immeDiately<br />
1 Touch SELF-CLEAN. A countdown timer setting<br />
of “3:00” is displayed to indicate that the length of<br />
cleaning cycle is 3 hours. Self-clean indicator glows<br />
and cook time indicator begins to flash.<br />
2 Touch INCREASE or DECREASE to change the set<br />
time. The clean cycle can be set from 2 to 4 hours. Four<br />
hours may be required if oven is very dirty.<br />
3 Touch START. Self-clean and cook time indicators glow<br />
and the oven door automatically locks (takes approx. 5<br />
seconds). “SC” will be displayed
4 Touch STOP to cancel the self-clean program. The selfclean<br />
indicator shuts off. The “SC “ will go off when<br />
the oven temperature falls below 550°F (290°C), at this<br />
time the oven door will unlock. The clock will display<br />
the time of day.<br />
5 After self-clean cycle is over, the self-clean indicator<br />
shuts off. The “SC” will go off when the oven<br />
temperature falls below 550°F (290°C) and the oven<br />
door unlocks. The clock will display the time of day.<br />
DelayeD oVen self-cleaning<br />
1 Touch SELF-CLEAN. A countdown timer setting<br />
of “03:00” is displayed to indicate that the length of<br />
cleaning cycle is 3 hours. Self-clean indicator glows<br />
and cook time indicator begins to flash.<br />
2 Touch INCREASE or DECREASE to change the set<br />
time. The clean cycle can be set from 2 to 4 hours. Four<br />
hours may be required if oven is very dirty.<br />
3 Touch STOP TIME if you wish to delay the start of the<br />
clean cycle. Set the stop time by touching INCREASE<br />
or DECREASE.<br />
4 Touch START. The self-clean indicator glows.<br />
5 Immediately the oven door automatically locks (takes<br />
approx. 5 seconds). “SC” glows in the temperature<br />
display and self-clean begins.<br />
6 Touch STOP to cancel the programming or clean cycle.<br />
The clean indicator shuts off. The “SC” will go off<br />
after the oven temperature falls below 550°F (290°C).<br />
The oven door unlocks. The clock will display the<br />
time of day.<br />
After self-clean cycle is over, the self-clean indicator shuts<br />
off. The “SC” will go off after the oven temperature falls<br />
below 550°F (290°C). The oven door unlocks. The clock<br />
will display the time of day.<br />
Touch SELF-CLEAN to verify the time remaining in the<br />
clean cycle.<br />
Touch STOP TIME to verify the stop time of the<br />
clean cycle.<br />
safety measures<br />
For safety reasons, the oven control will automatically<br />
shut off the oven if it has been operating continuously for<br />
12 hours.<br />
21<br />
control Panel lock<br />
The oven control can be locked to prevent children from<br />
switching the oven on in your absence. This feature can<br />
also be useful when cleaning the glass control panel.<br />
to lock the control, proceed as follows:<br />
1 Touch and hold STOP/LOCK for 3 seconds. A series of<br />
three beeps will sound and the lock indicator will glow.<br />
The control panel is now locked.<br />
to unlock the control:<br />
2 Touch and hold STOP/LOCK for 3 seconds. A series of<br />
three beeps will sound and the lock indicator will shut<br />
off. The control unlocks.<br />
stay hot fooD warmer<br />
Stay Hot Food Warmer is located in the reservoir of all<br />
45” <strong>Range</strong>s. This warmer is great for keeping casserole<br />
dishes and dinner plates warm. By flipping the switch on<br />
the side of the reservoir, the stainless steel hot plate in the<br />
reservoir warms to an optimum 200°F.<br />
miscellaneous features<br />
caBinet light<br />
Touch LIGHT. The lights will turn on. Touch LIGHT<br />
again, the lights will shut off.<br />
exhaust fan<br />
Touch FAN. The fan indicator glows and the exhaust fan<br />
is on high. Touch FAN again, the fan will shut off.<br />
in line exhaust Blower (optional)<br />
Touch FAN and the exhaust fan is on. Touch FAN again<br />
and it’s off.<br />
oVen self-cleaning cycle<br />
how the self-cleaning cycle works<br />
The self-cleaning cycle uses very high heat to burn<br />
away soil and grease. During the cycle, the oven gets<br />
much hotter than it does for normal baking or broiling<br />
– approximately 875°F (468°C). This high heat breaks up<br />
the soil or grease and burns it away.<br />
Your oven is preset for a 3 hour self-cleaning cycle.<br />
However, the cycle time can be adjusted to the amount of<br />
soil in your oven.
Before you start<br />
Before you start the self-cleaning cycle, make sure you:<br />
• hand-clean the areas shown. They do not get hot<br />
enough during the cleaning cycle for soil to burn away,<br />
and could get baked on during cleaning. Use hot water<br />
and detergent or a soapy steel-wool pad for cleaning.<br />
Oven cleaners may be used in oven but must be<br />
completely removed before self-cleaning cycle begins.<br />
note: Do not clean, move or bend the gasket. Poor<br />
cleaning, baking and roasting may result.<br />
• wipe out any loose soil or grease. This will help reduce<br />
smoke during the cleaning cycle.<br />
• remove the broiler pan grid and anything else being<br />
stored in the oven.<br />
note: If oven racks are cleaned in the self-cleaning<br />
cycle, they will become discoloured and more difficult to<br />
slide.<br />
If you clean racks in the self-cleaning cycle, place them on<br />
the 2nd, 3rd and 4th rack guides.<br />
for Best cleaning results<br />
• clean the oven before it gets heavily soiled. Cleaning a<br />
very soiled oven takes longer and results in more smoke<br />
than usual.<br />
• after the oven is cool, wipe up any residue or ash with<br />
a damp cloth or sponge. If any spots remain, clean with<br />
a mild abrasive cleanser or mildly abrasive pad.<br />
• if the self-cleaning cycle does not get the oven as<br />
clean as you expected, the cycle may not have been<br />
set long enough or you may not have prepared the oven<br />
properly. Set the self-cleaning cycle longer the next time<br />
and hand-clean areas noted above.<br />
By turning exhaust fan on while self-cleaning most<br />
smoke and odor in kitchen will be eliminated.<br />
22<br />
Porcelain enamel<br />
Porcelain enamel is glass fused on metal and may crack<br />
or chip with misuse. It is acid resistant, not acid proof.<br />
All spillovers, especially acid, milk, tomato or sugar<br />
spillovers, should be wiped up immediately with a dry<br />
cloth. When cool, wash with soapy water, rinse and dry.<br />
Never use oven cleaners on exterior finish of range.<br />
automatic Door lock<br />
As soon as you program the oven for the self-cleaning<br />
function, the door will automatically lock within approx. 5<br />
seconds. It will remain locked throughout the entire cycle.<br />
The door will automatically unlock when the temperature<br />
lowers to a safe level.<br />
maintenance & minor rePair<br />
removable oven Door<br />
The oven door is removable to allow easier cleaning inside the<br />
oven if desired.<br />
removing the oven Door:<br />
Completely open oven door. In both back corners of the<br />
door you will see door latches in the locked position.<br />
Rotate both latches forward to the unlocked position.<br />
Grasp outside edges of door with both hands.<br />
• Begin closing door, at the moment the door stops<br />
closing, lift and pull door toward you.<br />
• Set door aside on a protective surface.
ePlacing lights<br />
to replace oven light on model 1860 and<br />
1867:<br />
1. Unplug appliance or disconnect at the mail power<br />
supply.<br />
2. Replace the oven lights with a #4452166 15W<br />
appliance bulb. These bulbs are available from a<br />
Whirlpool/KitchenAid dealer or from <strong>Elmira</strong> <strong>Stove</strong><br />
<strong>Works</strong>.<br />
3. All cabinet lights are the rectangular 12 volt 5 watt<br />
variety as shown below.<br />
to replace oven lights on all models but<br />
1860 and 1867:<br />
All lights on the range are 12-volt, 5-watt (maximum)<br />
halogen bulbs.<br />
Before replacing, make sure the oven is off and cool.<br />
1. Disconnect power.<br />
2. Remove glass light cover by grasping the front edge<br />
and pulling away from oven.<br />
3. Remove bulb from socket.<br />
4. Replace bulb, replace bulb cover by snapping back<br />
into wall.<br />
5. Reconnect power.<br />
resetting Breakers<br />
In case of a malfunction, try resetting a breaker, at the<br />
main breaker panel.<br />
clock malfunction<br />
If you have experienced a power surge or loss of power<br />
recently, your clock may have “locked up”. Turn power<br />
off to your range for about 5 minutes then reconnect. This<br />
should reset clock/control and it should now function<br />
normally.<br />
23<br />
lubrication<br />
Lubricate the following with white lubricant:<br />
* Cabinet door hinge & spring (if they squeak).<br />
* Oven door hinges (if they squeak).<br />
If burner control knobs stick, remove knobs and lubricate<br />
around switch shaft with a small amount of white lube.<br />
Replace knobs on switches.<br />
exterior surfaces<br />
The exterior surfaces of your elmira range have been<br />
coated with long-lasting, non-fading textured enamel. This<br />
treatment is far more durable than paint and less fragile<br />
than porcelain.<br />
• Remove all spills immediately to prevent staining. Wipe<br />
the surface with soapy water, rinse thoroughly with<br />
clear water and dry with a soft cloth.<br />
• Do not use abrasive cleansers on enameled surfaces as<br />
they will scratch the finish. VIM, Flitz or Soft Scrub<br />
work well to remove stubborn stains. Follow directions<br />
on the container.<br />
• Should the surface of your range be accidentally<br />
chipped, matching touch-up paint is available from the<br />
factory at a cost of $9.00 plus shipping.<br />
filter cleaning & replacement<br />
Shut power off to range. Remove and clean the mesh filter<br />
as required. If a charcoal filter is being used (ventless<br />
installation), it should be replaced every six months.<br />
To remove filter, remove the two screws holding the mesh<br />
filter in place with a #2 phillips or red square screw driver.<br />
Wash the mesh filter with soapy water. Rinse and dry.<br />
Insert a new charcoal filter into mesh filter and replace the<br />
assembly.<br />
Three charcoal filters are available for $28.00 (plus<br />
shipping) from address on back cover.<br />
Do your switch knobs turn But not<br />
activate Burners?<br />
All top burners use “Push to Turn Switches”. If switch<br />
knobs are not pushed in before turned, they can break. A<br />
set of six replacement knobs is available from the address<br />
on back cover for $20.00 (plus shipping). Please include<br />
model and serial number of range.<br />
serVice<br />
service must be performed by a knowledgeable service<br />
person.<br />
if in doubt about how to handle service, call the factory<br />
for help at: 1-800-295-8498.
imPortant<br />
Proper grounding and polarity are necessary for<br />
correct operation of the electric ignition system<br />
on models 1860 and 1867 (all gas ranges). If the<br />
wall receptacle does not provide correct polarity,<br />
the ignitor will become grounded and click<br />
occasionally, even after the burner has ignited. A<br />
qualified electrician should check the wall receptacle<br />
for correct polarity and grounding. This sparking<br />
condition will also occur if there is a breeze across<br />
the burners.<br />
warning: Do not touch ignitor when it is sparking.<br />
24<br />
conVection cooking tiPs<br />
(For Convection Models)<br />
To learn how to use your convection oven to the best<br />
advantage, refer to Convection Cooking on page 26.<br />
1. The fan-forced hot air movement permits baking and<br />
roasting on as many as 3 levels at once.<br />
2. The Delay feature should not be used when using<br />
Convection for baked items e.g.…pies, cakes, cookies.<br />
3. There should be a minimum of 1” (2.5 cm) between<br />
the walls and the pans used.<br />
4. Position food in oven to allow free flow of air around<br />
the convection fan.<br />
5. Uniform spacing of baking dishes will produce the<br />
most even results.<br />
6. Place bread pans lengthwise facing the oven door.<br />
7. Do not use aluminum foil for convection baking. It<br />
may block airflow.<br />
8. True convection cooking is used for baking breads,<br />
cakes and other foods which require gentle heating.<br />
This setting is also recommended when baking large<br />
quantities of food on more than one rack.<br />
Note: During convection cooking, the oven door must<br />
remain closed. The fan will operate only when the<br />
door is closed.<br />
Convection cooking creates more moisture in the<br />
kitchen than normal, usually because more food is<br />
being cooked at one time.<br />
9. For convection roasting, do not use a roasting pan<br />
with high sides, as it cuts down the free flow of air<br />
circulating around the food. Use the convection<br />
roasting rack on the broiler pan.<br />
10. Convection cooking of frozen convenience foods:<br />
• Preheating the oven is not necessary.<br />
• Cooking times will be similar to package<br />
recommendations. Follow suggestions for oven<br />
temperatures and use of cookie sheets and foil<br />
coverings.<br />
• Most foods are best placed in the middle of the oven.<br />
• If more than one item is being cooked, stagger foods<br />
on multiple racks for proper air circulation.<br />
closed Door Broiling<br />
2. use the broiler pan and grid for broiling. They are<br />
designed to drain excess liquid and fat away from<br />
the cooking surface to help prevent spatter, smoke<br />
and fire.<br />
3. Turn food only once during broiling. Using tongs to<br />
turn meats prevents loss of juices. Use Minute Timer<br />
for timing each side.<br />
roasting tips<br />
• roast meats fat-side up in a shallow pan using a roasting<br />
rack.
stanDarD oVen meat roasting chart<br />
- roast at oven temperature of 325 ° F.*<br />
*for chicken, set the oven temperature to 350 ° f.<br />
Preheating is not needed.<br />
- Place roasting pan on rack position 1 or 2. See page 25 for rack positions.<br />
aPProximate meat<br />
aPProximate minutes thermometer<br />
meat weight Per PounD temPerature<br />
Beef<br />
rolled rib 3-5 lbs<br />
• rare 25-29 140 ° F<br />
• medium 35-37 160 ° F<br />
• well-done 45-47 170 ° F<br />
standing rib 6-7 lbs<br />
• rare 23-25 140 ° F<br />
• medium 30-32 160 ° F<br />
• well-done 35-40 170 ° F<br />
rump roast 4-6 lbs<br />
• medium 25-30 160 ° F<br />
• well-done 35-37 170 ° F<br />
lamb<br />
leg 6-7 lbs<br />
• rare 18-29 140 ° F<br />
• medium 21-24 150-155 ° F<br />
• well-done 30-32 180 ° F<br />
Pork<br />
loin 3-4 lbs 45-48 170 ° F<br />
5-6 lbs 40-44 185 ° F<br />
shoulder 4-5 lbs 40-44 185 ° F<br />
ham, fully cooked 3-5 lbs 17-18 130 ° F<br />
8-10 lbs 13-14 130 ° F<br />
Poultry<br />
chicken* 3-4 lbs 28-30 185 ° F**<br />
turkey, unstuffed 10-16 lbs 14-19 170-180 ° F<br />
18-25 lbs 11-15 170-180 ° F<br />
Veal<br />
loin 3-4 lbs 35-38 170 ° F<br />
shoulder 5-6 lbs 43-45 170 ° F<br />
25
stanDarD oVen Baking chart<br />
approximate<br />
food oven cooking time<br />
temperature (minutes)<br />
Breads, yeast<br />
• loaf 375 ° F 30-40<br />
• rolls, pan 400 ° F 12-15<br />
Breads, quick<br />
• biscuits 450 ° F 10-15<br />
• muffins 400 ° F 20-25<br />
• popovers 450 ° F 20-25<br />
• corn bread 425 ° F 25-30<br />
• nut bread 350 ° F 60-75<br />
• gingerbread 350 ° F 25-30<br />
cakes<br />
• angel food 375 ° F 30-40<br />
• layer cake 350-375 ° F 20-30<br />
• loaf cake 350 ° F 35-45<br />
• sponge cake 350 ° F 35-45<br />
• pound cake 350 ° F 34-45<br />
• fruit cake 300 ° F 2-21/2 hrs<br />
• sheet cake 300 ° F 25-35<br />
cookies<br />
• drop 375 ° F 10-15<br />
• rolled and refrigerated 375 ° F 8-12<br />
• chocolate 375 ° F 10-15<br />
• fruit and molasses 375 ° F 10-15<br />
• brownies 350 ° F 20-30<br />
• macaroons 350 ° F 12-15<br />
Broiling chart:<br />
The recommended rack position is numbered lowest (1) to highest (5). Preheat broiler for five minutes before placing food in oven.<br />
aPProximate<br />
rack time (minutes)<br />
meat Position temPerature siDe 1 siDe 2<br />
steak, 1” thick 4 500 ° F<br />
• rare 4 4<br />
• medium 6 6<br />
• well-done<br />
steak, 1 1/2” thick 4 500<br />
8 8<br />
° F<br />
• rare 8 8<br />
• medium 10 10<br />
hamburger patties or steaks, 1/2” thick or less<br />
• medium 4 500 ° F 6 4<br />
lamb chops, 1” thick 4 400 ° F 9 9<br />
ham slice, 1/2” thick 4 500 ° F 5 5<br />
precooked 1” thick 4 500 ° F 10 10<br />
Pork chops, 1” thick 4 450 ° F 12 12<br />
frankfurters 4 500 ° F 4 4<br />
chicken pieces 3 500 ° F 16 16<br />
fish, 1” thick 3 350 ° F 10 10<br />
Beef liver, 1/2” thick 4 350 ° F 5 5<br />
temperatures and times are guidelines only and may need to be adjusted to individual tastes.<br />
26<br />
approximate<br />
food oven cooking time<br />
temperature (minutes)<br />
miscellaneous<br />
• apples, baked 375 ° F 50-60<br />
• beans, baked 300 ° F 5-6 hrs<br />
• custard, cup 325 ° F 35-40<br />
• potatoes, baked 400 ° F 75<br />
• pudding<br />
bread 350 ° F 45-60<br />
cottage 375 ° F 30-40<br />
rice 325 ° F 40-60<br />
• scalloped dishes 350 ° F 60-90<br />
• soufflé 350 ° F 50-60<br />
Pastries<br />
• cream puffs 400 ° F 35-40<br />
• custard and pumpkin pie 350 ° F 30-40<br />
• pastry shell 450 ° F 10-12<br />
• two crust fruit pie<br />
cooked filling 400 ° F 25-30<br />
uncooked filling 400 ° F 40-50<br />
• meringue topping 350 ° F 10-15<br />
temperatures and times are guidelines only and may<br />
need to be adjusted to individual tastes.
• use a roasting pan that fits the size of the food to be<br />
roasted. Meat juices may overflow the sides of a pan that<br />
is too small. Too large of a pan will result in increased<br />
over spatter.<br />
• spatter can be reduced by lining the bottom of the<br />
roasting pan with lightly crushed aluminum foil.<br />
• a foil tent will slow down surface browning for longterm<br />
roasting, as when roasting a turkey. Place tentshaped<br />
foil loosely over meat to allow for air circulation.<br />
Do not seal foil or meat will be steamed.<br />
• use an accurate meat thermometer to determine when<br />
meat has reached desired degree of doneness. Insert the<br />
thermometer into the center of the thickest portion of the<br />
meat or inner thigh or breast of poultry. For an accurate<br />
reading, the tip of the thermometer should not touch fat,<br />
bone or gristle.<br />
• after reading the thermometer once, push it further<br />
into the meat 1/2 inch or more and read again. If the<br />
temperature drops, return the meat to the oven for more<br />
cooking.<br />
• check pork and poultry with a thermometer in 2-3<br />
places to ensure adequate doneness.<br />
• Poultry and roasts will be easier to carve if loosely<br />
covered with foil and allowed to stand 10-15 minutes<br />
after removal from the oven.<br />
convection Broiling<br />
(On Convection Models)<br />
1. keep the oven door closed.<br />
2. use the convection roasting rack and broiler<br />
pan for convection broiling. Convection broiling<br />
is essentially high-temperature convection cooking,<br />
combining fan-circulated hot air with the direct heat of<br />
the broiler element.<br />
3. Do not cover the roasting rack with tin foil as this will<br />
block air flow and extend cooking time.<br />
4. The circulating air creates a seal on all sides of the<br />
food so that turning of foods is often not necessary.<br />
general Broiling tips<br />
1. The surface of the food should be at least 3” (7.4 cm)<br />
away from the broil element.<br />
2. For steaks and chops, slash fat evenly, at 2” (5 cm)<br />
intervals, around the outside edges of meat to prevent<br />
curling.<br />
3. Meats and poultry can be marinated before broiling.<br />
Brush foods with barbecue sauce only during the last 5<br />
to 10 minutes of broiling.<br />
27<br />
4. Place food on a cold pan to prevent sticking. If the rack<br />
is hot, grease it or grease the food.<br />
convection roasting rack<br />
(On Convection Models)<br />
The Convection Roasting Rack is a specially designed<br />
rack, ideal for use when roasting and broiling meats using<br />
the Convection Bake and Convection Broil functions.<br />
Place it in the broiler pan instead of the regular grid. It<br />
raises the meat for better airflow to all sides for more even<br />
roasting and broiling.<br />
air circulation<br />
The hot air must circulate around the pans in the oven for<br />
even heat to reach all parts of the oven. This results in<br />
better baking.<br />
for best air circulation:<br />
• Place the pans so that one is not directly over the other.<br />
• For best results, allow 1-1/2” to 2” (3.7-5 cm) of space<br />
around each pan and between pans and oven walls.<br />
There must be a minimum space of 1” (2.6 cm).<br />
• When baking with one pan, place pan in the center of<br />
the oven rack.<br />
• When baking with two pans, place pans in opposite<br />
corners of the oven rack.<br />
note: Opening the oven door may cause heat loss,<br />
longer cooking times and unsatisfactory baking or<br />
roasting results. Rely on your timer.
oven rack Positions<br />
Your oven has five rack positions. Rack position 1 is the<br />
lowest position, or closest to the bottom of the oven. Rack<br />
position 5 is the highest position, or farthest from the<br />
bottom of the oven.<br />
There are three straight racks. Be sure to position the oven<br />
rack(s) before putting food into the oven or turning the<br />
oven on.<br />
to remove oven racks:<br />
Lift rack at front and pull out.<br />
to replace oven racks:<br />
1. Place rear of rack on rack guides.<br />
2. While lifting front of rack, push in all the way. Lower<br />
front.<br />
for Proper cooking,<br />
follow these guidelines:<br />
• when using one rack, place the rack so the top of the<br />
food will be centered in the oven.<br />
• when using two racks, place racks in positions 3 and 1<br />
(the closest to the oven bottom).<br />
• use only one cookie sheet in the oven at a time when<br />
using the regular Bake setting.<br />
rack Placement for specific foods:<br />
(For rack positions, see “Rack Positions” at the top of this<br />
page.)<br />
28<br />
rack<br />
fooD Position<br />
Frozen Pies 1 or 2<br />
Angel and bundt cakes, 2<br />
most quick breads, yeast breads,<br />
casseroles, meats<br />
Cookies, biscuits, 2 or 3<br />
muffins, cakes,<br />
non frozen pies<br />
using aluminum foil in the oven<br />
Do not use aluminum foil for convection cooking.<br />
aluminum foil may block airflow.<br />
Do not cover the broiler grid with foil. Poor drainage<br />
of grease may result in a fire.<br />
When using aluminum foil for non-convection cooking<br />
to catch spillovers from pies or casseroles, follow these<br />
instructions.<br />
• Place the foil on the oven rack below the rack with<br />
the food. Turn foil edges up and make sure foil is about<br />
1 inch (2.5 cm) larger all around than the dish holding<br />
the food.<br />
• Do not cover the entire rack with aluminum foil.<br />
It will reduce air circulation and cause poor cooking<br />
results.<br />
• Do not line oven bottom or entire oven rack with foil<br />
or other liners. Poor baking will result.
introDuction to conVection cooking<br />
welcome to convection cooking, the ultimate culinary<br />
technique that uses fan-circulated hot air to efficiently<br />
create delicious meals with appetite appeal.<br />
air flow<br />
The secret to convection cooking lies in maintaining a<br />
consistent temperature throughout the oven during the<br />
cooking process. The fan circulates hot air in your convection<br />
oven continually to distribute heat more evenly than the<br />
natural movement of air. This fundamental difference means<br />
food is cooked on all sides, sealing in natural flavour and<br />
moisture. Avoid blocking the air circulation fan at the rear<br />
of the oven with a large dish, as this will interrupt free flow<br />
of air throughout the oven. It is important not to cover foods<br />
with foil, so that surface areas remain exposed to the moving<br />
air. The effective use of circulating air also means that many<br />
of your convection creations require shorter cooking times at<br />
lower oven temperatures, so you enjoy the added benefits of<br />
less time spent in the kitchen, and greater energy savings.<br />
conVection meat roasting chart<br />
29<br />
Preheating<br />
When preheating the oven is specified in a recipe, normal<br />
time is approximately 10 minutes.<br />
BROIL ELEMENT<br />
multi-level convection cooking<br />
An immediate practical benefit of the convection cooking<br />
CONVECTION ELEMENT<br />
3<br />
method is that hot air movement allows you to 2load<br />
the oven<br />
racks to capacity. For instance, you can bake 1four<br />
loaves of<br />
bread as quickly BAKE as ELEMENT you might finish two, with outstanding,<br />
uniform results. You may choose to cook your main course<br />
and side dishes or dessert, at the same time. For greatest<br />
success with multi-level cooking, stagger dishes on opposite<br />
corners of the oven racks to the ones above and below. Be<br />
sure to leave at least one inch (2.5 cm) of space between the<br />
individual pans, and the diagram shown here indicates which<br />
convection feature and rack position you should be using for<br />
that particular recipe. At the Convection setting, the center<br />
element surrounding the fan at the rear of the oven is on. At<br />
the Convection/Broil setting, the top element in the oven will<br />
Set Cooking Selections to: ConveCtion/Bake<br />
R - Rare M - Medium WD - Well Done<br />
aPProximate<br />
internal<br />
temPerature<br />
cooking time rack oVen of meat<br />
fooD Per lB. (500g) Position temPerature when cookeD<br />
Beef<br />
Standing Prime Rib R - 20-25 min 140°F/60°C<br />
M - 25-30 min 2 300°F/145°C 160°F/70°C<br />
WD - 30-35 min 170°F/75°C<br />
Rolled Rib R - 22-25 min 140°F/60°C<br />
M - 27-30 min 2 300°F/145°C 160°F/70°C<br />
WD - 32-35 min 170°F/75°C<br />
Rump, Sirloin Tip R - 20-25 min 140°F/60°C<br />
M - 25-30 min 2 300°F/145°C 160°F/70°C<br />
WD - 30-35 min 170°F/75°C<br />
Pot Roast (braised) 35-40 min 2 300°F/145°C 170°F/75°C<br />
Meatloaf<br />
Veal<br />
20-25 min 2 325°F/160°C 170°F/75°C<br />
Leg, Loin, Rib M - 25-35 min 2 325°F/160°C 160°F/70°C<br />
Shoulder, Blade<br />
Pork<br />
WD - 30-40 min 2 300°F/145°C 170°F/75°C<br />
Loin 30-40 min 2 325°F/160°C 170°F/75°C<br />
Shoulder 35-40 min 2 325°F/160°C 170°F/75°C<br />
Tenderloin<br />
ham<br />
25-30 min 2 325°F/160°C 170°F/75°C<br />
Fresh (uncooked) 25-35 min 2 300°F/145°C 170°F/75°C<br />
Pre-cooked<br />
lamb<br />
15-20 min 2 300°F/145°C 140°F/60°C<br />
Leg, Shoulder M - 25-30 min 2 300°F/145°C 160°F/70°C<br />
WD - 30-35 min 2 170°F/75°C<br />
Rib, Rack, Loin M - 20-25 min 2 300°F/145°C 160°F/70°C<br />
WD - 25-30 min 2 170°F/75°C<br />
5<br />
4
heat up. At the Convection/Bake setting, the lower element<br />
will be in use. Rack positions number from 1 at the bottom<br />
to 5 at the top.<br />
convection Baking and roasting<br />
Your convection oven utilizes precise, consistent<br />
temperature control to ensure absolutely even baking and<br />
roasting results. In particular, foods that require browning<br />
are greatly enhanced by the hot air convection cooking<br />
method. Depending on the quantities you wish to prepare,<br />
convection cooked foods can be positioned on single or<br />
multiple racks. When roasting whole poultry or large cuts of<br />
meat, you can effectively lower oven temperature settings,<br />
and substantially reduce cooking times. You will notice the<br />
remarkable difference in convection cooked foods.<br />
memorable meats<br />
Convection cooking techniques contribute special appeal<br />
to your meat dishes by locking in flavour and retaining<br />
moisture. The result is meat that is evenly browned outside<br />
and tender and naturally juicy inside.<br />
Before roasting or broiling, brush the entire surface of lean<br />
meats with butter or oil. This will increase moisture retention<br />
and enhance browning. Position cuts of meat, uncovered,<br />
on the raised convection roasting rack, so that heat freely<br />
reaches all sides.<br />
Convection oven methods can conveniently reduce the<br />
length of time required to roast meats, in comparison to<br />
conventional roasting. Therefore, meat should be checked<br />
shortly before the end of recommended cooking times, to<br />
avoid over-cooking.<br />
Insert an accurate meat thermometer into the thickest part of<br />
the meat, taking care to avoid any bone, fat or gristle. Once<br />
the desired internal temperature is reached, remove the meat<br />
from the oven and let stand for a few minutes. This allows<br />
the juices to settle for easier carving.<br />
convection Broiling<br />
Convection broiling is essentially high-temperature<br />
convection cooking, combining fan-circulated hot air with<br />
the direct heat of the broiler element. We recommend<br />
preheating your oven first to maintain an even temperature<br />
during cooking. Convection broiling times will depend<br />
upon the variable temperature selected and the rack position<br />
used. Do not cover the broiling rack with tin foil as this will<br />
block air flow and extend cooking time. The oven door must<br />
remain closed while convection broiling. Circulating air<br />
creates a seal on all sides of the food so that turning foods is<br />
often not necessary.<br />
30<br />
Bakeware selection<br />
Bakeware with lower sides allows for constant air circulation<br />
around all surface areas of food, for more even cooking. Highsided<br />
casserole dishes and bread pans should be positioned<br />
on the lower racks in the oven where they will benefit from<br />
optimal heat distribution. For the most appetizing browning<br />
results, use matte or dull finish metal pans as they conduct heat<br />
more efficiently. Dark finishes on bakeware will absorb more<br />
heat than reflective surfaces, resulting in darker, crispy bottom<br />
crusts more suitable for pies and breads. Shiny muffin tins,<br />
cake pans and cookie sheets tend to reflect heat, producing<br />
light, tender crusts. Glass, ceramic, and stainless steel dishes<br />
may not transmit heat as evenly as metal bakeware.<br />
Perfect Poultry<br />
Preheating your oven to cook poultry is often not necessary,<br />
but we do suggest that you consult your individual recipes<br />
first. As you will notice in the Convection Poultry Roasting<br />
Chart, convection roasting temperatures are generally 25°F<br />
(15°C) lower than those used in conventional ovens.<br />
Poultry is completely cooked when an accurate meat<br />
thermometer, inserted at the thickest part of the breast or<br />
inner thigh, registers 185°F (85°C). The juices will run clear<br />
and the meat should pull easily away from the bone.<br />
Glazes or sauces may be brushed onto poultry during the last<br />
half of cooking time, for the perfect finishing touch.<br />
Delicate fish & seafood<br />
A limitless variety of fish and seafood can be elegantly<br />
prepared using different convection cooking methods.<br />
Variable Convection/Broil temperature settings offer you<br />
greater diversity compared to conventional broiling.<br />
Before Convection/Broiling we recommend that you baste<br />
all surface areas of your fish and seafood with oil or butter.<br />
Reduce your oven temperature for broiling thin fillets, and<br />
use a higher setting for broiling thicker fish steaks. Lower<br />
temperatures may require longer cooking times, but thorough<br />
hot air circulation eliminates the need to handle or turn<br />
fragile fish during convection cooking.<br />
Testing fish and seafood during the last few minutes of<br />
recommended cooking time will ensure flawless results<br />
without over-cooking. When the fish is opaque and flakes<br />
easily, remove from the oven and serve.<br />
savory Vegetables & side Dishes<br />
Oven-baking your vegetables is no longer limited<br />
to potatoes! Take full advantage of multi-level cooking<br />
and simultaneously prepare appetizing, piping hot<br />
accompaniments to your main meal with no cross-over<br />
flavors. Continuous heat distribution throughout your<br />
convection oven offers you the opportunity to efficiently<br />
prepare a variety of side dishes and vegetables.<br />
As you prepare your own favorites, remember that more<br />
dense rice and pasta casseroles may require longer cooking<br />
times. To allow for thoroughly cooked centers without overbrowned<br />
outside edges, lower oven temperatures at least<br />
25°F (15°C), but not lower than 300°F (145°C).
conVection Poultry roasting chart<br />
Set Cooking Selections to: tRue ConveCtion<br />
aPProximate oVen<br />
internal<br />
temPerature<br />
aPProximate cooking time rack temPerature of Poultry<br />
fooD weight Per lB. (500g) Position not PreheateD when cookeD<br />
Chicken, Whole 3 - 5 lb.<br />
(1.5 - 2.2 kg)<br />
20-25 min 2 325°F/160°C 185°F/85°C<br />
Parts, Quarters 3 lb.<br />
(1.5 kg)<br />
18-25 min 2 or 3 325°F/160°C 185°F/85°C<br />
Turkey, Unstuffed 13 lb. and under<br />
(5.85 kg)<br />
10-15 min 2 300°F/145°C 185°F/85°C<br />
over 13 lb.<br />
(5.85 kg)<br />
10-12 min 1 or 2 300°F/145°C 185°F/85°C<br />
Capon, Unstuffed 4 - 7 lb.<br />
(1.8 - 3.1 kg)<br />
15-20 min 2 325°F/160°C 185°F/85°C<br />
Domestic Duck 3 - 5 lb. 25-30 min 2 325°F/160°C 185°F/85°C<br />
(1.5 - 2.2 kg) then 15 min 400°F/205°C 185°F/85°C<br />
Domestic Goose 4 - 8 lb.<br />
(1.8 - 3.6 kg)<br />
30-35 min 2 300°F/145°C 185°F/85°C<br />
Cornish Hen 1 - 1.5 lb.<br />
(0.5 - 0.7 kg)<br />
50-60 min 2 or 3 325°F/160°C 185°F/85°C<br />
Stuffed poultry may require additional cooking time.<br />
incredible egg & cheese Dishes<br />
You’ll be delighted with the significant difference convection<br />
cooking makes, particularly to the preparation of dishes that<br />
are sensitive to fluctuations in oven temperature.<br />
With a consistently maintained temperature throughout the<br />
oven, a fabulous soufflé, with a light-textured interior and<br />
an exquisitely golden crust, will no longer elude you. You’ll<br />
enjoy complete success creating ham and swiss cheese<br />
soufflé as egg whites rise evenly while the wonderful flavour<br />
of cheese is gently blending in.<br />
Most egg and cheese dishes bake higher and lighter using<br />
the constantly moving air in a convection oven. Positioning<br />
dishes in the center of the oven makes efficient use of evenly<br />
distributed heat, guaranteeing perfect results with your egg<br />
and cheese dishes.<br />
conVection yeast BreaD Baking chart<br />
31<br />
effortless Quick Breads<br />
Whether your family’s preference leans toward delicious<br />
snack muffins or a hearty fruit and nut loaf, your convection<br />
range makes baking their favourites easy and rewarding!<br />
Using a preheated oven will ensure quick breads are<br />
completely cooked in the center and delicately browned<br />
outside.<br />
Enhanced heat distribution during convection baking may<br />
finish smaller items, such as biscuits and muffins, sooner than<br />
you might anticipate. Check for the desired level of doneness<br />
shortly before the end of recommended cooking times.<br />
The moisture content and density of quick breads require<br />
convection oven temperatures within the same range as<br />
conventional baking temperatures.<br />
Set Cooking Selections to: tRue ConveCtion<br />
PreheateD aPProximate<br />
size of rack oVen cooking<br />
fooD<br />
yeast Breads<br />
Baking Dish Position temPerature time<br />
Loaves Bread Pans<br />
9” x 5” (23 cm x 13 cm) 2 350°F/175°C 30-35 min<br />
Dinner Rolls Single Pan 3 350°F/175°C 10-15 min<br />
homemade Pizza<br />
Multiple Pans 1, 3 350°F/175°C 12-15 min<br />
Single 3 400°F/205°C 15 min<br />
Multiple 2, 4 400°F/205°C 15-20 min
conVection Quick BreaDs Baking chart<br />
Set Cooking Selections to: tRue ConveCtion<br />
PreheateD aPProximate<br />
size of rack oVen cooking<br />
fooD<br />
yeast Breads<br />
Baking Dish Position temPerature time<br />
Muffins Single Pan 3 375°F/190°C 18-25 min<br />
Multiple Pans 1, 3, 5 18-25 min<br />
Biscuits Single Sheet 3 425°F/220°C 8 min<br />
Multiple Sheets 1, 3, 5 10 min<br />
Fruit & Nut Loaf Pan<br />
Loaves 8” x 4” (21 cm x 12 cm) 2 325°F/160°C 45-60 min<br />
conVection Dessert Baking chart<br />
Set Cooking Selections to: tRue ConveCtion<br />
PreheateD aPProximate<br />
size of rack oVen cooking<br />
fooD<br />
cookies<br />
Baking Dish Position temPerature time<br />
Dropped Single Sheet 3 350°F/175°C 8-10 min<br />
Multiple Sheets 1, 3, 5 350°F/175°C 10-12 min<br />
Rolled Single Sheet 3 375°F/190°C 8-10 min<br />
Multiple Sheets 1, 3, 5 375°F/190°C 10-12 min<br />
Brownies Square Pan<br />
Loaves 8” - 9” (20 cm - 23 cm) 2 325°F/160°C 35 min<br />
conVection Dessert Baking chart<br />
Set Cooking Selections to: tRue ConveCtion<br />
PreheateD aPProximate<br />
size of rack oVen cooking<br />
fooD Baking Dish Position temPerature time<br />
cakes<br />
Round or Square Pan<br />
8” - 9” (20 cm - 23 cm)<br />
Single Pan 2 325°F/160°C 30-35 min<br />
Multiple Pans<br />
Rectangular Pan<br />
2, 4 325°F/160°C 30-35 min<br />
9” x 13” (23 cm x 33 cm)<br />
Bundt Pan<br />
2 325°F/160°C 30-35 min<br />
10” (25 cm) 2 325°F/160°C 40-45 min<br />
Cupcakes<br />
Loaf Pan<br />
2 325°F/160°C 20-25 min<br />
9” x 5” (23 cm x 13 cm)<br />
Angel Food or<br />
2 325°F/160°C 50-60 min<br />
Spring Form Pan 2 325°F/160°C 35-40 min<br />
Pies<br />
With Filling Single 9” (23 cm) 3 375°F/190°C 50-55 min<br />
Multiple 9” (23 cm) 1, 3, 5 375°F/190°C 55-60 min<br />
Without Filling Single 9” (23 cm) 3 375°F/190°C 8-10 min<br />
Multiple 9” (23 cm) 1, 3, 5 375°F/190°C 8-10 min<br />
32
GAS SURFACE UNITS<br />
NEUTRAL - N<br />
wiring Diagram<br />
oxford<br />
SPARK<br />
IGNITOR<br />
- L<br />
- G<br />
- 1 (L.R.)<br />
LINE 120 VAC<br />
ELECTRIC SURFACE UNITS<br />
EARTH<br />
GROUND<br />
- 2 (L.F.)<br />
OVEN CIRCUIT<br />
- 3 (R.F.)<br />
- 4 (R.R.)<br />
BLACK<br />
# 4 GREEN<br />
(RF)<br />
3 (RR)<br />
4<br />
(LR)<br />
1 (LF)<br />
2<br />
LINE 1 NEUTRAL<br />
L1<br />
# 2 WHITE<br />
# 3 BLACK<br />
oVen control<br />
P10<br />
P11 P8<br />
P1 1<br />
P5<br />
P12<br />
1<br />
1<br />
RL2<br />
RL1<br />
20 BLACK<br />
LINE 1<br />
LINE 1<br />
8 RED<br />
16 BLACK 27 BLACK<br />
6 BLUE<br />
P3<br />
33<br />
1<br />
21 BLACK<br />
#15 BLACK #28 BLACK<br />
P4<br />
1<br />
#31 BLACK<br />
BLACK 10C<br />
29 BLACK<br />
19 RED<br />
17 RED<br />
EXHAUST<br />
FAN<br />
RED 13 RED 25<br />
26<br />
14 RED RED<br />
RL4<br />
RL3<br />
P2<br />
P7<br />
P6<br />
P9<br />
M<br />
lock sensor sw.<br />
LIGHT POWER SUPPLY<br />
BK<br />
W<br />
#5 BLACK<br />
#7 RED<br />
#34 RED<br />
11C<br />
BLACK<br />
18 RED<br />
M<br />
23 BLACK<br />
Fan<br />
#33 WHITE<br />
BK BK<br />
TOD<br />
#22 BLACK<br />
TOD - RESETABLE<br />
CONV.<br />
BROIL<br />
#32 BLACK<br />
M<br />
Light<br />
BLOWER<br />
M<br />
CONV. FAN<br />
9 WHITE<br />
W<br />
HALOGEN<br />
5W/BULB<br />
W BK W<br />
#33 RED<br />
33 WHITE<br />
#30 WHITE<br />
12 WHITE<br />
1A BROWN<br />
NEUTRAL<br />
ELECTRICAL<br />
SHOCK<br />
HAZARD<br />
WARNING<br />
LINE 1<br />
LINE 1<br />
NEUTRAL<br />
#1 WHITE<br />
DISCONNECT FROM ELECTRICAL SUPPLY BEFORE<br />
SERVICING. FAILURE TO DO SO MAY RESULT IN<br />
ELECTRICAL SHOCK OR OTHER PERSONAL INJURY.<br />
ELECTRICAL<br />
SHOCK<br />
HAZARD<br />
WARNING<br />
LINE 2<br />
NEUTRAL
cleaning guiDe<br />
Part what to use how to clean<br />
control knobs<br />
glass control Panel<br />
in cabinet<br />
exterior surfaces<br />
glass cook top<br />
(electric models)<br />
country motif<br />
(optional Painting)<br />
Porcelain-enamel<br />
cook top & gas grates<br />
also see page 23<br />
front Door Vent<br />
Broiler Pan & grid<br />
(Clean after each use)<br />
oven racks<br />
nickel trim<br />
Brass or copper trim<br />
(optional)<br />
how can i clean stains<br />
off enamel or nickel?<br />
Pancake griddle<br />
(Option)<br />
exhaust fan<br />
mesh filter<br />
charcoal filter<br />
• Soft sponge<br />
• Warm, soapy water<br />
• Soft sponge OR<br />
• Soft Cloth<br />
• Warm, soapy water<br />
• Spray glass cleaner<br />
• Soft sponge<br />
• Warm, soapy water<br />
• VIM, Flitz or Soft Scrub<br />
cleaners<br />
• Soft cloth with warm, soapy<br />
water<br />
• Vim or Glass <strong>Stove</strong> Top Cleaner<br />
• Corning Cleaner-Conditioner<br />
• Dry Baking Soda<br />
• Mild soap and warm water only<br />
• Don’t use cleaners with<br />
ammonia like windex<br />
• Non-abrasive, plastic scrubbing pad<br />
• Warm, soapy water<br />
• Wax with Turtle Wax monthly<br />
permanent staIns to Cooktop, nICkel, brass or Copper trIm:<br />
acid (tomato, cherries, rhubarb, citrus, milk and vinegar) will permanently stain cooktop and trim if not wiped<br />
up immediately.<br />
34<br />
• Turn knobs to OFF and pull straight off control panel.<br />
• Wash, rinse and dry thoroughly. Do not soak.<br />
• Replace knobs. Make sure all knobs point to OFF.<br />
Do not use steel wool or abrasive cleaners. They will<br />
damage the finish.<br />
• Wash, rinse and dry thoroughly.<br />
Do not use steel wool or abrasive cleaners. They will<br />
damage the finish.<br />
note: Lock control when cleaning panel.<br />
See page 18 for details.<br />
• Wash, rinse and dry thoroughly.<br />
• Use non-abrasive, plastic scrubbing pad on heavily soiled<br />
areas.<br />
• Follow directions on the container.<br />
• Do not use abrasive or harsh cleaners.<br />
• Follow directions on container.<br />
• Do not use abrasive or harsh cleaners.<br />
• Apply to soiled areas dry with soft cloth.<br />
• Wipe off excess spills.<br />
• Wash, rinse and dry thoroughly.<br />
• Abrasive cleaner • Use abrasive cleaner to remove stains, if required.<br />
• Steel-wool pad<br />
• Warm, soapy water OR<br />
• Self-cleaning cycle<br />
• Steel-wool pad<br />
• Warm, soapy water OR<br />
• Self-cleaning cycle<br />
• Maas cleaner, follow directions on tube<br />
• Tarnite metal polish (follow<br />
directions on can)<br />
• Mild soap and warm water<br />
or Windex – no abrasives<br />
• No brass/copper cleaners<br />
• Soft sponge<br />
• Warm, soapy water OR<br />
• Windex<br />
• Maas Cleaner (available at<br />
most hardware stores)<br />
• Plastic scouring pad with<br />
soap & water<br />
• Wash, rinse and dry thoroughly.<br />
• Wash, rinse and dry thorough OR<br />
• Leave in oven during self-cleaning cycle.<br />
• Wash, rinse and dry thoroughly<br />
• Remove from oven during self-cleaning cycle.<br />
note: Racks will discolor and become harder to slide if left<br />
in oven during self cleaning cycle. Apply a small amount of<br />
vegetable oil to the side rungs to aid sliding.<br />
• Wash, rinse and dry thoroughly.<br />
• Wash, rinse and dry thoroughly.<br />
• Follow directions on the container.<br />
• Soak then wash in hot soapy water.<br />
• Soak in hot soapy water • Wash in hot soapy water and rinse.<br />
• Replace every six months.
ange trouBleshooting<br />
This section is designed to help you save the cost of a service call. However, you may still need assistance or service. When calling<br />
for service, you will need to provide a complete description of the problem, your appliance’s complete model and serial numbers<br />
and the purchase or installation date (see Warranty). This information is needed to properly identify parts needed.<br />
Before calling for service…Phone our helP line at: 1-800-295-8498<br />
If your range should fail to operate, review the following list before calling for service.<br />
Note: Most electrical clock malfunctions can be corrected by turning the power off to the range for about 5 minutes.<br />
(Clock and Control will reset itself).<br />
Problem check… what to Do<br />
Nothing will operate<br />
The oven will not operate<br />
The electric surface elements<br />
will not operate<br />
Cooktop control knobs will not turn<br />
The self-cleaning cycle<br />
will not operate<br />
The display will show “88.88”<br />
Control is “locked up” (meaning no<br />
buttons will function)<br />
“F1” or “F2” appears in the time display<br />
Cooking results are not what<br />
you expected<br />
see page 19 for instructions on how to<br />
recalibrate oven temperature<br />
• Is the power cord plugged into a live<br />
circuit with proper voltage?<br />
• Has a household fuse blown or a circuit<br />
breaker tripped?<br />
• Has the clock been set?<br />
• Have the electronic controls been set<br />
correctly?<br />
• Has a delayed start time been<br />
programmed?<br />
• Has a household fuse blown or a circuit<br />
breaker tripped?<br />
• Are the control knobs set correctly?<br />
• Is a control knob sticking or broken?<br />
• Are you pushing in before turning?<br />
• See LUBRICATION page 23.<br />
• Does the range clock show the correct<br />
time of day?<br />
• Has a delayed start time been<br />
programmed?<br />
35<br />
• Plug the power cord into a live circuit<br />
with proper voltage.<br />
• Replace household fuse or reset circuit<br />
breaker.<br />
• Refer to instructions for setting the<br />
electronic controls starting on page 18.<br />
• Wait for the start time<br />
to be reached.<br />
• Replace household fuse or reset circuit<br />
breaker.<br />
• Push control knobs in before turning to<br />
a setting.<br />
• See LUBRICATION on page 20.<br />
• Push control knobs in before turning to<br />
a setting. Call factory for help.<br />
• Reset clock to show the correct time of<br />
day (see page 19).<br />
• Wait for the start time to be reached or<br />
reset for immediate start.<br />
• Has there been a power failure? • Reset the clock (see page 19).<br />
• There has been a power interruption. • Reset the main power breaker to the<br />
range. Turn off for 1 minute.<br />
• Temperature sensor in oven? • Press CANCEL and wait for 1 minute.<br />
Shut power off at breaker for 15 seconds.<br />
If problem persists, call factory for service.<br />
• Is the range level?<br />
• Is the oven preheated before baking?<br />
• Has the recipe been tested or is it from a<br />
reliable source?<br />
• Is the pan used the type or size<br />
recommended in a reliable cookbook?<br />
• Is there proper air circulation around the<br />
pan when baking?<br />
• Does cooking utensil fit the surface<br />
burner being used?<br />
• Level range (see Leveling Your <strong>Range</strong><br />
page 6).<br />
• Preheat oven when called for in recipe.<br />
• Use only tested recipes from a reliable<br />
source.<br />
• Refer to a reliable cookbook for<br />
recommended pan type and size.<br />
• Allow 1” to 2” (3.5-5 cm) of air space on<br />
all sides of pan.<br />
• Pan should be the same size or slightly<br />
larger than surface element being used.<br />
gas trouBleshooting<br />
Problem check… what to Do<br />
Ignitor doesn’t spark when knobs are Dirt on ignitor, or defective spark module or Clean ignitors and area between ignitor and<br />
turned to light. valve switch. burner. Replace module or valve switch.<br />
Burners spark but one does not light. Check burner, cap, ignitor and orifice for dirt. Clean dirt from burner, cap or orifice.<br />
Spark occurs at ignitor when all control Module. Replace module.<br />
knobs are off. Water has been spilled on control panel. Unplug range and let control panel dry overnight.<br />
caution: Do not run burners without pots in place. excessive heat could damage clock/control above burners.
Parts of your range<br />
1. Exhaust Blower ........................................................... #1540<br />
2. Cabinet Door Spring .................................................... #1591<br />
4A. Clock Control Power Board - 120 V ........................... #1489<br />
5. Cabinet Front (Nickelled) ............................................ #1077<br />
9. Charcoal Filter for Exhaust Hood (3 per pkg.) ........... #1442<br />
10. Mesh Filter for Exhaust Hood ..................................... #1441<br />
11. Electric Element for Glass Top – 1500W .................. #1477<br />
11. Electric Element – Cast – Small ................................. #1479<br />
11C. Glass Top with Frame & Elements – ST or STE ........ #1467<br />
11D. Glass Top with Frame & Elements – ST or STE ........ #1468<br />
12. Electric Element for Glass Top – 2000W ................... #1478<br />
12. Electric Element – Cast – Large .................................. #1480<br />
*12A. Burner Cap (Small) ..................................................... #1564<br />
*12A. Burner Cap (Medium) ................................................. #1565<br />
*12A. Burner Cap (Large) ..................................................... #1566<br />
13A. Switch Knob (Electric) ................................................ #1578<br />
13B. Switch for Large Burner (2000W) .............................. #1359<br />
13C. Switch for Small Burner (1500W) .............................. #1358<br />
*13F. Gas Valves for Top Burners ........................................ #1581<br />
*13G. Switches for Gas Valves ............................................. #1583<br />
*13H. Knob for (13F) Gas Valve ........................................... #1573<br />
14. Pilot Light (Element Indicators)<br />
Orange – 110 Volt ....................................................... #1511<br />
Red – 220 Volt ............................................................ #1512<br />
15. Casting, Reservoir Door .............................................. #1055<br />
17. Oven Light Assembly .................................................. #1354<br />
18. Oven Rack, Electric & Gas Ovens .............................. #1340<br />
20. Broiler Pan & Grill ...................................................... #1338<br />
20B. Convection Roasting Rack .......................................... #1380<br />
21. Oven Door Handle ...................................................... #1515<br />
22. Oven Side Panel (Right or Left) .................................. #1043<br />
23. Hidden Bake Element (Under Oven Floor) ................. #1366<br />
*23B. Bottom Bake Burner (Gas) .......................................... #1254<br />
*23C. Ignitor for Bottom and Top Gas Oven Burner ............ #1258<br />
24. Top Broil/TBake Element (Electric) ........................... #1367<br />
*24A. Top Broil Burner (Gas) ............................................... #1260<br />
25. Door Hinge (Right) ...................................................#1336R<br />
25A. Door Hinge (Left) ......................................................#1336L<br />
26. Self Clean Latch – Motorized ..................................... #1334<br />
28. Casting, Fire Door ....................................................... #1049<br />
29. Casting, Oven Door ..................................................... #1047<br />
30. Ash Catch .................................................................... #1037<br />
31. Splashback ................................................................... #1093<br />
32. Oven Thermometer (Decorative only) ........................ #1445<br />
33. Handle, Cabinet Door .................................................. #1553<br />
34. Cabinet Door & Hinge ................................................ #1087<br />
35. Cabinet Cresting .......................................................... #1051<br />
36<br />
36. Cabinet Brackets – Right ............................................. #1079<br />
Cabinet Brackets – Left ............................................... #1080<br />
37. Casting, Side Skirt (Right or Left) .............................. #1057<br />
38. Leg ............................................................................... #1036<br />
39. Casting, Front Skirt ..................................................... #1053<br />
40. Handles for Fire & Oven Door (Nickelled) ................ #1576<br />
41. Oven Door Gasket ....................................................... #1325<br />
42. Porcelain Oven Door Liner ......................................... #1387<br />
43. Power Block (Bakelite) – 110V & 240V .................... #1381<br />
*44. Spark Module, 4 Burners – Reignition ........................ #1579<br />
*44A. Spark Module, 6 Burners – Reignition ........................ #1580<br />
*45. Gas Regulator, (Models 1865, 1870, 1875) ................ #1497<br />
*45A. Gas Regulator (Models 1860, 1867) ........................... #1270<br />
*46. Cast Grate .................................................................... #1568<br />
*47. Burner Bezel – Porcelained,<br />
(Holds Small Burner) ...............................................#1074-8<br />
*47A. Burner Bezel – Porcelained,<br />
(Holds Medium Burner) ..........................................#1074-12<br />
*47B. Burner Bezel – Porcelained,<br />
(Holds Large Burner) ..............................................#1074-15<br />
48. Convection Fan (110 Volts) ........................................ #1377<br />
48A. Convection Element (Round) ...................................... #1365<br />
48B. Convection Baffle ....................................................... #1318<br />
*48C. Gas Deflector, Oven Bottom ....................................... #1262<br />
49. Oven Sensor ................................................................ #1351<br />
50. Glass Control Panel - Self Clean ................................. #1485<br />
50A. Glass Control Panel - Convection ............................... #1486<br />
52. Installation & Operating <strong>Manual</strong>-All Models ..........#1604-8<br />
53. Pancake Griddle For Gas ............................................. #4240<br />
53A. Pancake Griddle, Fits All Electric ............................... #6050<br />
*54. Oven Vent Cap – Fits Gas Top Models ..................... #1246<br />
55. Oven Thermodisk ...................................................... #1507<br />
56. Cooling Fan Thermodisk ........................................... #1509<br />
gas parts on this list are indicated with *.<br />
Please specify color or plating when ordering parts .<br />
when ordering please give model and serial number<br />
of range.<br />
Parts are available directly from elmira stove<br />
works at 1-800-295-8498.<br />
where can i find the model and<br />
serial number?<br />
Both gas and electric certification plates are located on the<br />
underside of the ash catch (this is the piece that attaches<br />
with three screws to the bottom of the oven door).
Parts of your range (2004 & later)<br />
37
notes:<br />
38
our factory helP line numBer is:<br />
1-800-295-8498<br />
warranty<br />
Your range is warranted by elmira stove works to be free from defects in material and<br />
workmanship for a period of one year from the date of purchase. Elements, burners and<br />
smooth tops are warranted for five years.<br />
elmira stove works warrants to replace any parts free of charge which become defective<br />
during the period of this warranty. It also warrants to provide fair service labor rates to install<br />
the warranted parts during the first year. Glass, light bulbs, enamel, porcelain coatings and<br />
nickel plating are not covered by the warranty. Warranty is subject to the terms outlined<br />
below.<br />
terms and conditions<br />
This warranty applies only for residential use in the country of purchase. The range must be<br />
properly installed according to this manual and to local building and safety codes. Abuse,<br />
accident, alteration or misuse will void this warranty.<br />
Neither elmira stove works nor the dealer is liable for any damages or claims resulting<br />
from failure of the range or from service delays beyond their control.<br />
Parts repaired or replaced through this warranty are warranted for the balance of the original<br />
warranty period.<br />
This warranty does not cover any cost of making the appliance readily available for service,<br />
and does not cover labor performed at overtime or premium rates.<br />
Purchase Date: ____________________ Store: ______________________<br />
Store Address: __________________________________________________<br />
range model __________________________________<br />
serial number _________________________________<br />
elmira stove works<br />
285 Union Street, <strong>Elmira</strong>, ON Canada N3B 3P1<br />
Tel: 519 669-1281 Fax: 519 669-1774<br />
E-mail: info@elmirastoveworks.com<br />
www.elmirastoveworks.com<br />
40