Luxaflex Duette and Plissé Shades - Merit Blinds
Luxaflex Duette and Plissé Shades - Merit Blinds
Luxaflex Duette and Plissé Shades - Merit Blinds

Create successful ePaper yourself
Turn your PDF publications into a flip-book with our unique Google optimized e-Paper software.
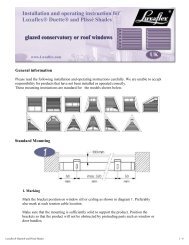
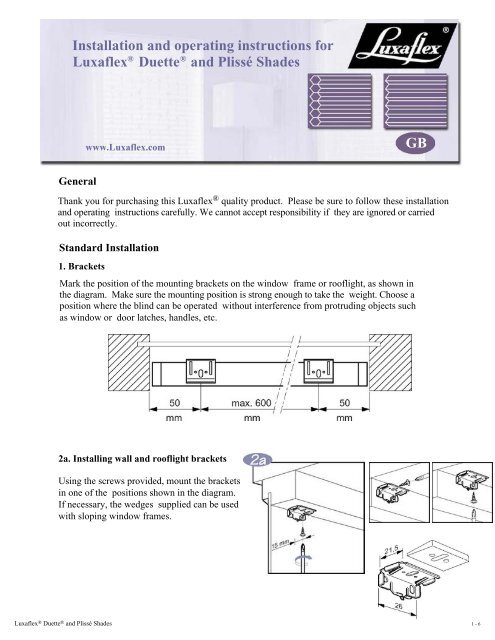
Installation <strong>and</strong> operating instructions for<br />
® ®<br />
<strong>Luxaflex</strong> <strong>Duette</strong> <strong>and</strong> <strong>Plissé</strong> <strong>Shades</strong><br />
General<br />
www.<strong>Luxaflex</strong>.com<br />
GB<br />
Thank you for purchasing this <strong>Luxaflex</strong> ® quality product. Please be sure to follow these installation<br />
<strong>and</strong> operating instructions carefully. We cannot accept responsibility if they are ignored or carried<br />
out incorrectly.<br />
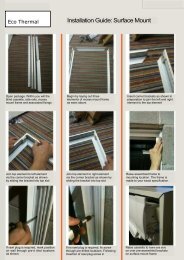
St<strong>and</strong>ard Installation<br />
1. Brackets<br />
Mark the position of the mounting brackets on the window frame or rooflight, as shown in<br />
the diagram. Make sure the mounting position is strong enough to take the weight. Choose a<br />
position where the blind can be operated without interference from protruding objects such<br />
as window or door latches, h<strong>and</strong>les, etc.<br />
2a. Installing wall <strong>and</strong> rooflight brackets<br />
Using the screws provided, mount the brackets<br />
in one of the positions shown in the diagram.<br />
If necessary, the wedges supplied can be used<br />
with sloping window frames.<br />
<strong>Luxaflex</strong> ® <strong>Duette</strong> ® <strong>and</strong> <strong>Plissé</strong> <strong>Shades</strong><br />
1 - 6
Installation <strong>and</strong> operating instructions<br />
2b. Mounting to plastic or aluminium window frames<br />
The clamp mount shown is available for use with<br />
plastic or aluminium side-hung or tilting windows.<br />
Use an Allen key to fix the clamp to the plastic<br />
or aluminium frame.<br />
3. Mounting the headrail<br />
Slip the headrail over the front edge of the clip,<br />
then press the rail upwards until it clicks into place.<br />
Operation<br />
The blind can be operated in several ways, depending on your chosen configuration:<br />
4. Cord <strong>and</strong> cord lock<br />
Pull the cord towards the centre of the blind to release<br />
the cord lock. Pull the cord back towards the side to<br />
lock the cord.<br />
Important:<br />
You should pull the cord to the right or left, NOT to the front.<br />
<strong>Luxaflex</strong> ® <strong>Duette</strong> ® <strong>and</strong> <strong>Plissé</strong> <strong>Shades</strong><br />
2 - 6
Installation <strong>and</strong> operating instructions<br />
5a. Using the h<strong>and</strong>le<br />
You can use the catch on the h<strong>and</strong>le to adjust the blind.<br />
5b. Using the crank rod (optional)<br />
Place the end of the rod over the h<strong>and</strong>le.<br />
Turn to the left to lock in position.<br />
6. Using the endless cord<br />
Pull on this cord to operate the blind.<br />
Electric operation (not shown)<br />
Use the switch to raise or lower the blind.<br />
<strong>Luxaflex</strong> ® <strong>Duette</strong> ® <strong>and</strong> <strong>Plissé</strong> <strong>Shades</strong><br />
3 - 6
Installation <strong>and</strong> operating instructions<br />
INSTALLATION OPTIONS<br />
There are a number of installation options, depending on your application.<br />
7. "In-frame" side guide with footplate<br />
The guide wire must be located vertically under the headrail.<br />
The length of the guide wire is set when the blind is ordered.<br />
8. "On-frame" side guide with footplate<br />
The guide wire must be located vertically under the<br />
headrail. Mount the bracket so it holds the guide<br />
wire taught.<br />
9a. "In-frame" side guide with tensioning rail<br />
Install the bottom rail using the same method as<br />
for the headrail (see point 2a "St<strong>and</strong>ard installation").<br />
<strong>Luxaflex</strong> ® <strong>Duette</strong> ® <strong>and</strong> <strong>Plissé</strong> <strong>Shades</strong><br />
4 - 6
Installation <strong>and</strong> operating instructions<br />
9b. Adjusting the tension<br />
It is easy to adjust the tension using the red plastic<br />
accessory supplied. Place it over the tensioner in the<br />
bottom rail, <strong>and</strong> slide it to the left or right until the desired<br />
tension is achieved. Remove the plastic accessory <strong>and</strong> keep<br />
it safe in case you need to adjust the tension at some other time.<br />
10. Installing "in-frame" cover strips<br />
Screw the coverplate firmly into the frame.<br />
11. Half-round <strong>and</strong> quarter-round windows<br />
Install the rail as described in points 1 <strong>and</strong> 2a "St<strong>and</strong>ard<br />
installation".<br />
If installing a <strong>Luxaflex</strong> ® <strong>Duette</strong> ® blind, screw the hooks<br />
into the frame so they lie in a fold. For an "on-frame"<br />
situation, install the toggles so that the h<strong>and</strong>le lies in a fold.<br />
If installing a <strong>Luxaflex</strong> ® <strong>Plissé</strong> blind, screw the tensioning<br />
hooks into the frame. Space the hooks so that they lie with<br />
their eyes in the <strong>Plissé</strong>.<br />
DE-INSTALLING<br />
12. Raise the blind fully. Insert a screwdriver<br />
behind the headrail, between the bracket <strong>and</strong> the<br />
rail. Turn the screwdriver to release the headrail.<br />
de rail. Maak met de schroevendraaier een<br />
draaiende beweging en de bovenrail komt los.<br />
Note:<br />
If you are using tensioning cords, first<br />
remove the headrail, then the bottom guide.<br />
<strong>Luxaflex</strong> ® <strong>Duette</strong> ® <strong>and</strong> <strong>Plissé</strong> <strong>Shades</strong><br />
5 - 6
Installation <strong>and</strong> operating instructions<br />
MAINTENANCE<br />
The fabric of both <strong>Duette</strong> ® <strong>and</strong> <strong>Luxaflex</strong> ® <strong>Plissé</strong> fabrics cannot be separated from the headrail.<br />
To prevent the <strong>Duette</strong> ® <strong>and</strong> <strong>Plissé</strong> fabrics from becoming dirty, the blinds should be cleaned<br />
regularly with a feather duster or with a vacuum cleaner at a low setting. Stains should be removed<br />
as quickly as possible with a soft sponge <strong>and</strong> lukewarm water containing a non-synthetic detergent,<br />
if required.<br />
NB.<br />
<strong>Duette</strong> ® <strong>and</strong> <strong>Plissé</strong> fabrics with a metallized back should not be cleaned with water, since this could<br />
damage the metallized coating.<br />
In order to clean the whole blind, it is possible to submerge nonmetallized <strong>Plissé</strong>, coated <strong>Duette</strong><br />
<strong>and</strong> <strong>Plissé</strong> fabrics in a bath, together with the bottom rail. This does not apply to the black-out<br />
version. You should remove the steel weighting slat from the bottom rail by taking the plastic end<br />
cap out of the bottom rail before washing.<br />
®<br />
Proceed as follows:<br />
Fill a container, bath or basin with lukewarm water (30°C) <strong>and</strong> add a non-synthetic detergent,<br />
one cap per litre water. Lay the fabric in the water <strong>and</strong> hold the headrail above the water.<br />
The cleaning result will be better if the pleats are not held in the water as a bundle, but opened.<br />
Prevent the creasing or deforming of the fabric <strong>and</strong> the pleats. Use a soft sponge or brush on the<br />
fabric to clean any stains. Do not leave the fabric in the water for longer than two hours.<br />
Hang the fabric out fully above the bath <strong>and</strong> spray-clean it front <strong>and</strong> back, to ensure that dirt <strong>and</strong><br />
soap residue are removed from the fabric. Pull the fabric up carefully <strong>and</strong> ensure that the pleats fold<br />
correctly. Once the bundle of material has been completely folded together, press the headrail<br />
<strong>and</strong> bottom rail together again with both h<strong>and</strong>s. This will wring as much water as possible out<br />
of the fabric.<br />
Replace the steel weighting slat in the bottom rail. Now replace the <strong>Duette</strong> ® or <strong>Plissé</strong> shade in the<br />
mounting brackets, <strong>and</strong> allow the fabric to drop completely. You can try again to remove any marks<br />
or residual dirt with a slightly damp sponge. Now raise the fabric to ±300 mm under the headrail.<br />
Raise the fabric once every hour <strong>and</strong> then allow it to drop before raising it again to 300 mm under the headrail.<br />
Repeat this cycle until the fabric is dry. If the shade is wider than the bath at your disposal, you can<br />
clean the fabric with a soft sponge or have it cleaned by a professional cleaning service.<br />
Disclaimer<br />
The above recommendations have been drawn up with care. We are, nevertheless, unable to accept responsibility for the<br />
results of cleaning.<br />
<strong>Luxaflex</strong> ® <strong>Duette</strong> ® <strong>and</strong> <strong>Plissé</strong> <strong>Shades</strong><br />
6 - 6