Instructions for the Sleigh Cot/Bed - Boori
Instructions for the Sleigh Cot/Bed - Boori Instructions for the Sleigh Cot/Bed - Boori
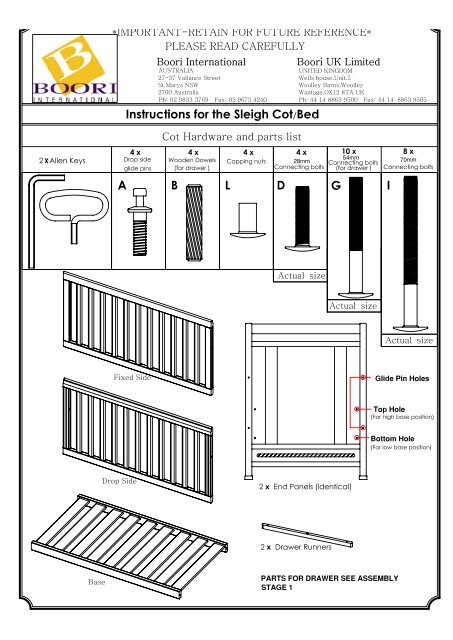
4 x 2 Allen Keys Drop side Base *IMPORTANT-RETAIN FOR FUTURE REFERENCE* A Drop Side 27-37 Vallance Street St.Marys NSW 2760 Australia Ph: 02 9833 3769 Fax: 02 9673 4240 Instructions for the Sleigh Cot/Bed glide pins Fixed Side PLEASE READ CAREFULLY Boori International AUSTRALIA Cot Hardware and parts list B 4 x Wooden Dowels (for drawer ) Capping nuts L 4 x D Boori UK Limited UNITED KINGDOM Wells house.Unit.5 Woolley Barns,Woolley Wantage,OX12 8TA UK Ph: 44 14 8863 9500 Fax: 44 14 8863 9505 4 x 10 x 8 x 28mm Connecting bolts 54mm Connecting bolts (for drawer ) 70mm Connecting bolts Actual size G Actual size 2 x End Panels 855 (ldentical) 2 x Drawer Runners I Actual size Glide Pin Holes Top Hole (For high base position) Bottom Hole PARTS FOR DRAWER SEE ASSEMBLY STAGE 1 757 (For low base position)
- Page 2 and 3: FOR AUSTRALIA AND NEW ZEALAND (AS/N
- Page 4: Stage 5 : Push both end panels outw
4 x<br />
2 Allen Keys Drop side<br />
Base<br />
*IMPORTANT-RETAIN FOR FUTURE REFERENCE*<br />
A<br />
Drop Side<br />
27-37 Vallance Street<br />
St.Marys NSW<br />
2760 Australia<br />
Ph: 02 9833 3769 Fax: 02 9673 4240<br />
<strong>Instructions</strong> <strong>for</strong> <strong>the</strong> <strong>Sleigh</strong> <strong>Cot</strong>/<strong>Bed</strong><br />
glide pins<br />
Fixed Side<br />
PLEASE READ CAREFULLY<br />
<strong>Boori</strong> International<br />
AUSTRALIA<br />
<strong>Cot</strong> Hardware and parts list<br />
B<br />
4 x<br />
Wooden Dowels<br />
(<strong>for</strong> drawer )<br />
Capping nuts<br />
L<br />
4 x<br />
D<br />
<strong>Boori</strong> UK Limited<br />
UNITED KINGDOM<br />
Wells house.Unit.5<br />
Woolley Barns,Woolley<br />
Wantage,OX12 8TA UK<br />
Ph: 44 14 8863 9500 Fax: 44 14 8863 9505<br />
4 x<br />
10 x<br />
8 x<br />
28mm<br />
Connecting bolts<br />
54mm<br />
Connecting bolts<br />
(<strong>for</strong> drawer )<br />
70mm<br />
Connecting bolts<br />
Actual size<br />
G<br />
Actual size<br />
2 x End Panels 855<br />
(ldentical)<br />
2 x Drawer Runners<br />
I<br />
Actual size<br />
Glide Pin Holes<br />
Top Hole<br />
(For high base position)<br />
Bottom Hole<br />
PARTS FOR DRAWER SEE ASSEMBLY<br />
STAGE 1<br />
757<br />
(For low base position)
FOR AUSTRALIA AND NEW ZEALAND (AS/NZS 2172:2003)<br />
RECOMMENDED MATTRESS SIZE 1310mm X 750mm X 110mm<br />
This cot has been manufactured <strong>for</strong> use with a mattress which measures 750mm wide by 1310mm long and<br />
a maximum thickness of 120mm. The width and length are specified because it is important that <strong>the</strong> gaps<br />
between <strong>the</strong> mattress sides and ends of <strong>the</strong> cot will not exceed 40mm. This is to minimise <strong>the</strong> risk of a child's<br />
limb becoming caught in <strong>the</strong> gap. The thickness of <strong>the</strong> mattress has been specified to ensure that <strong>the</strong><br />
depth of <strong>the</strong> cot is greater than 500mm with <strong>the</strong> mattress base in <strong>the</strong> lower position to minimise <strong>the</strong> risk of<br />
a child climbing or falling out of <strong>the</strong> cot.<br />
Warning:<br />
* TO ENSURE THE SAFETY,REGULARLY CHECK ALL THE CONNECTING BOLTS AND GLIDE PINS MAKING SURE THEY<br />
ARE TIGHT.<br />
* TO PREVENT FALLS OR SUFFOCATION THE MAXIMUM MATTRESS THICKNESS SHOULD NOT EXCEED 120MM.<br />
* TO PREVENT FALLS, THE MATTRESS BASE OF THIS COT SHOULD BE ADJUSTED TO THE LOWEST POSITION BEFORE<br />
THE CHILD CAN SIT UP.<br />
* Follow <strong>the</strong> manufacturer's assembly instructions in detail to ensure <strong>the</strong> safety features of <strong>the</strong> cot are not<br />
compromised.<br />
* Ensure <strong>the</strong> cot is placed at a reasonable distance from curtains, blinds, heaters and power points.<br />
* Keep cot free of any toys, cushions etc that could be used as a foothold or present a danger of<br />
suffocation or strangulation.<br />
* Keep medication, String, elastic or small items such as money out of reach from any position in <strong>the</strong> cot.<br />
FOR THE UK (BS EN716-1:1996 BS EN716-2:1996)<br />
IMPORTANT-RETAIN FOR FUTURE REFERENCE-READ CAREFULLY<br />
RECOMMENDED MATTRESS SIZE 1310mm X 750mm x 110mm<br />
If you leave <strong>the</strong> child unattended in <strong>the</strong> cot, always make sure that <strong>the</strong> dropside is in <strong>the</strong> highest position.<br />
This cot has been manufactured <strong>for</strong> use with a mattress which measures 750mm wide by<br />
1310mm long and a maximum thickness of 120mm. The thickness of <strong>the</strong> mattress has<br />
been specified to ensure that <strong>the</strong> depth of <strong>the</strong> cot is greater than 500mm with <strong>the</strong><br />
mattress base in <strong>the</strong> lower position and 200mm with <strong>the</strong> mattress in <strong>the</strong> highest position to<br />
minimise <strong>the</strong> risk of a child climbing or falling out of <strong>the</strong> cot.<br />
Warning:<br />
* TO ENSURE THE SAFETY, REGULARLY CHECK ALL THE CONNECTING BOLTS AND GLIDE PINS<br />
MAKING SURE THEY ARE TIGHT, CARE SHOULD BE TAKEN THAT NO SCREWS ARE LOOSE<br />
BECAUSE A CHILD COULD TRAP PARTS OF THE BODY OR CLOTHING (EG. Strings,<br />
necklaces,ribbons <strong>for</strong> babies dummies), WHICH WOULD POSE A RISK OF STRANGULATION.<br />
* TO PREVENT FALLS, THE MAXIMUM MATTRESS THICKNESS SHOULD NOT EXCEED 120MM.<br />
* TO PREVENT FALLS, THE MATTRESS BASE OF THIS COT SHOULD BE ADJUSTED TO THE LOWEST POSITION<br />
BEFORE THE CHILD CAN SIT UP.<br />
* Follow <strong>the</strong> manufacturer's assembly instructions in detail to ensure <strong>the</strong> safety features of <strong>the</strong> cot are not<br />
compromised.<br />
* Ensure <strong>the</strong> cot is placed at a reasonable distance from curtains, blinds, power points, heaters and<br />
sources of strong heat.<br />
* Keep cot free of any toys, cushions etc that could be used as a foothold or present a danger 42 of<br />
suffocation or strangulation.<br />
* Keep medication, String, elastic or small items such as money out of reach from any position in <strong>the</strong> cot.<br />
Maintenance of your <strong>Sleigh</strong> <strong>Cot</strong><br />
* TO ENSURE THE SAFETY OF YOUR COT, REGULARLY CHECK ALL THE CONNECTING BOLTS AND GLIDE PINS<br />
MAKING SURE THEY ARE TIGHT, CARE SHOULD BE TAKEN THAT NO SCREWS ARE LOOSE<br />
* GLIDE PINS AND BOLTS SHOULD BE TIGHTENED EVERY FOUR TO SIX MONTHS TO ENSURE COT REMAINS<br />
STABLE<br />
* TO CLEAN YOUR COT USE A SOFT CLOTH DAMPENED WITH WATER<br />
* DO NOT USE STRONG HOUSEHOLD CLEANERS<br />
* AVOID CONTACT WITH SHARP OBJECTS<br />
SLEIGH COT/ BED assembly instructions<br />
* WHEN MOVING YOUR COT DO NOT DRAG, ALWAYS LIFT AND PLACE IN POSITION
Stage 1 :<br />
Assembly of drawer as shown with 10 x 54mm connecting<br />
bolts and 4 x wooden dowels provided.<br />
Stage 2:<br />
Screw <strong>the</strong> drawer runners into <strong>the</strong> recess section of<br />
both end panels.<br />
Stage 3 :<br />
Connect fixed side panel to <strong>the</strong> two end panels with<br />
<strong>the</strong> 4 X70mm connecting bolts provided.(Do not<br />
tighten at this stage).<br />
Stage 4:<br />
Connect mattress base to <strong>the</strong> two end panels with<br />
<strong>the</strong> 4 X70mm connecting bolts provided.(Keep all<br />
bolts loose at this stage).<br />
Note:<br />
The upper holes on <strong>the</strong> end panels are <strong>for</strong> <strong>the</strong><br />
high base position.<br />
Screw 4 dropside glide pins into <strong>the</strong> end panels<br />
(Make sure <strong>the</strong>y are tight).<br />
STAGE 5: SEE REVERSE SIDE<br />
Assembly as a <strong>Cot</strong>:<br />
Front of Drawer<br />
Drawer Bottom<br />
<strong>Boori</strong> Country<br />
Callectian<br />
Drawer Bottom<br />
42<br />
Back of Drawer<br />
Centre Support<br />
Side of Drawer
Stage 5 :<br />
Push both end panels outward to allow space <strong>for</strong> assembly of dropside<br />
panel.Allow glide pins of one end panel into <strong>the</strong> runner first.Then allow<br />
<strong>the</strong> pins on <strong>the</strong> o<strong>the</strong>r into <strong>the</strong> runner by pulling both end panels inward.<br />
Ensure that correct side is facing out<br />
Assembly as a <strong>Cot</strong>:<br />
Fully screw in <strong>the</strong> bolts on both end bars of dropside panel.<br />
Tighten all <strong>the</strong> connecting bolts.(Do not over tighten).Block remaining<br />
holes on <strong>the</strong> end panel with 4 capping bolts ane 4 capping nuts provided.<br />
Note:<br />
To disassemble <strong>the</strong> cot just follow assembly instructions in reverse<br />
order.<br />
To lower <strong>the</strong> dropside panel pull <strong>the</strong> dropside panel up to <strong>the</strong> top<br />
position.Hold it in that position while using your leg to push (at <strong>the</strong> centre<br />
of bottom bar) inward.Then allow <strong>the</strong> dropside panel to slide down.<br />
To raise <strong>the</strong> dropside panel ,pull <strong>the</strong> dropside panel up (from centre of<br />
<strong>the</strong> top bar) until it clicks into <strong>the</strong> locking position.<br />
Converting to <strong>the</strong> Junior <strong>Bed</strong>:<br />
Remove <strong>the</strong> drop side (see cot assembly instructions).<br />
Remove <strong>the</strong> 4 drop side glide pins.<br />
Reposition <strong>the</strong> base to <strong>the</strong> lower position (bottom hole of end panels).<br />
Remove <strong>the</strong> fixed side.<br />
Block <strong>the</strong> top whole with <strong>the</strong> 40mm connecting bolts and capping nuts provided.<br />
Converting to a Lounge:<br />
Re-attach fixed side.<br />
<strong>Boori</strong> Country<br />
Callectian<br />
<strong>Boori</strong> Country<br />
Callectian<br />
<strong>Boori</strong> Country<br />
Callectian<br />
42


