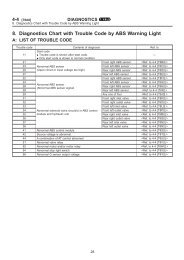
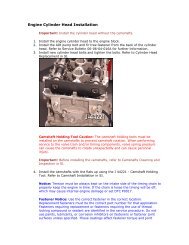
Under-dash Fuse/Relay Box - JustAnswer
Under-dash Fuse/Relay Box - JustAnswer
Under-dash Fuse/Relay Box - JustAnswer

You also want an ePaper? Increase the reach of your titles
YUMPU automatically turns print PDFs into web optimized ePapers that Google loves.
<strong>Under</strong>-<strong>dash</strong> <strong>Fuse</strong>/<strong>Relay</strong> <strong>Box</strong><br />
Removal/Installation<br />
CAUTION:<br />
All SRS electrical wiring harnesses are covered with<br />
yellow outer insulation.<br />
Before disconnecting the SRS wire harness, install the<br />
short connector (s) on the airbag (s).<br />
Replace the entire affected SRS harness assembly if<br />
it has an open circuit or damaged wiring.<br />
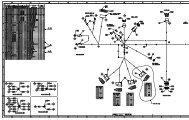
SRS MAIN HARNESS<br />
(Covered with yellow outer insulation)<br />
NOTE: The radio may have a coded theft protection circuit.<br />
Be sure to get the customer's code number before<br />
— Disconnecting the battery.<br />
— Removing the No.39 (10 A) fuse in the under-hood<br />
fuse/relay box.<br />
— Removing the radio.<br />
After service, reconnect power to the radio and turn it on.<br />
When the word "CODE" is displayed, enter the customer's<br />
5-digit code to restore radio operation.<br />
1. Disconnect the battery negative cable, then disconnect<br />
the positive cable.<br />
2. Remove the access panel from the steering wheel,<br />
then remove the short connector (RED).<br />
3. Disconnect the 3-P connector between the driver's<br />
airbag and cable reel.<br />
DRIVER'S AIRBAG CABLE REEL<br />
3-P CONNECTOR<br />
DRIVER'S<br />
AIRBAG<br />
3-P CONNECTOR<br />
SHORT<br />
CONNECTOR<br />
(RED)<br />
ACCESS<br />
PANEL<br />
4. Connect the short connector (RED) to the airbag side<br />
of the connector.<br />
5. Remove the glove box.<br />
6. Disconnect the 3-P connector between the front passenger's<br />
airbag and SRS main harness, and connect<br />
the short connector (RED) to the airbag side of the<br />
connector.<br />
SHORT CONNECTOR<br />
(RED)<br />
FRONT PASSENGER'S<br />
AIRBAG 3-P CONNECTOR<br />
SRS MAIN HARNESS<br />
(cont'd)
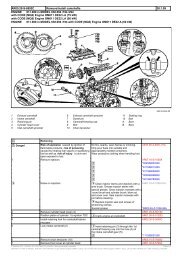
<strong>Under</strong>-<strong>dash</strong> <strong>Fuse</strong>/<strong>Relay</strong> <strong>Box</strong><br />
Removal/Installation (cont'd)<br />
6. Remove the <strong>dash</strong>board lower cover, knee bolster,<br />
and <strong>dash</strong>board lower frame.<br />
KNEE<br />
BOLSTER<br />
DASHBOARD LOWER<br />
FRAME<br />
DASHBOARD LOWER COVER<br />
7. Remove the driver's foot rest (see section 20).<br />
8. Remove the door sill molding and left kick panel.<br />
DOOR SILL MOLDING<br />
LEFT KICK PANEL<br />
CLIPS<br />
9. Remove the two mounting bolts and pull the under<strong>dash</strong><br />
fuse/relay box away from the left kick panel.<br />
UNDER-DASH<br />
FUSE/RELAY<br />
BOX<br />
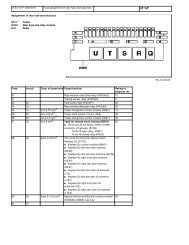
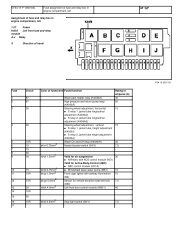
10. Disconnect the under-<strong>dash</strong> fuse/relay box connectors<br />
and take out the under-<strong>dash</strong> fuse/relay box.<br />
NOTE: The SRS main harness connector is doublelocked.<br />
To remove it, first lift the connector lid, then<br />
press the connector tab down and pull the connector<br />
out.<br />
SRS MAIN<br />
HARNESS<br />
UNDER-DASH FUSE/RELAY BOX<br />
TAB CONNECTOR<br />
LID
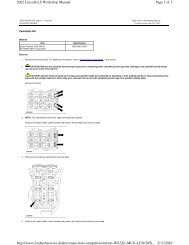
Installation:<br />
1. Reconnect the connectors to the under-<strong>dash</strong> fuse/relay<br />
box.<br />
NOTE: To reinstall the SRS main harness connector,<br />
push it into position until it clicks, then close the<br />
connector lid.<br />
2. Install the under-<strong>dash</strong> fuse/relay box.<br />
3. Reinstall the <strong>dash</strong>board lower frame, knee bolster<br />
and <strong>dash</strong>board lower cover.<br />
KNEE<br />
BOLSTER<br />
DASHBOARD LOWER<br />
FRAME<br />
DASHBOARD LOWER COVER<br />
4. Disconnect the short connector (s) (RED) from the<br />
airbag(s).<br />
5. Reconnect the airbag 2-P connector (s).<br />
6. Attach the driver's airbag short connector (RED) to<br />
the access panel and reinstall the panel.<br />
DRIVER'S AIRBAG<br />
DRIVER'S AIRBAG<br />
3-P CONNECTOR<br />
7. Reinstall the glove box.<br />
SHORT<br />
CONNECTOR<br />
(RED)<br />
CABLE REEL<br />
3-P CONNECTOR<br />
ACCESS PANEL<br />
8. Connect both the negative cable and positive cable<br />
to the battery.<br />
9. Confirm that all systems work properly.