Your Optus Premium Speed WiFi Cable modem - netgear
Your Optus Premium Speed WiFi Cable modem - netgear
Your Optus Premium Speed WiFi Cable modem - netgear

Create successful ePaper yourself
Turn your PDF publications into a flip-book with our unique Google optimized e-Paper software.
<strong>Your</strong> <strong>Optus</strong> <strong>Premium</strong> <strong>Speed</strong><br />
<strong>WiFi</strong> <strong>Cable</strong> <strong>modem</strong><br />
USer GUide<br />
Full of<br />
handy hints.<br />
P/N 202-10818-02<br />
1382777E 0411 166321.indd 1 7/04/11 10:41 AM
introduction<br />
Welcome to the exciting world of <strong>Optus</strong> Broadband and high quality<br />
<strong>Optus</strong> Local Access Telephony. <strong>Your</strong> new <strong>WiFi</strong> <strong>Cable</strong> Modem acts as<br />
a cable <strong>modem</strong> for providing premium speed internet with the ability<br />
to also provide your home phone service.<br />
This guide provides procedures for operating and troubleshooting<br />
your <strong>WiFi</strong> <strong>Cable</strong> Modem.<br />
Please note: This equipment requires power to operate. If you have<br />
a telephony service, this is also provided via this equipment, please<br />
ensure that the equipment remains powered at all times to ensure<br />
uninterrupted service.<br />
Carefully read all safety and operating instructions before operating<br />
this product. Retain this guide for future use.<br />
Customer<br />
Username ........................................................................<br />
@optusnet.com.au<br />
1382777E 0411 166321.indd 2 7/04/11 10:41 AM
Contents<br />
Before you begin 2<br />
Front panel and normal operations description 3<br />
Back panel description 4<br />
Macintosh installation 5<br />
Using WPS to configure your wireless 5<br />
Using a Wireless adapter (or Wireless Enabled Computer) 9<br />
Changing your <strong>WiFi</strong> cable <strong>modem</strong> password 10<br />
Security 11<br />
Managing your <strong>Optus</strong> cable account 11<br />
Technical support contact details 11<br />
Frequently asked questions 12<br />
it’s easy.<br />
1382777E 0411 166321.indd 1 7/04/11 10:41 AM
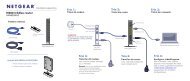
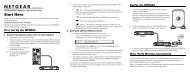
Before you begin<br />
<strong>Your</strong> <strong>WiFi</strong> <strong>Cable</strong> Modem package will contain the following items:<br />
CG 3000 <strong>WiFi</strong> <strong>Cable</strong> Modem<br />
Install Guide<br />
Power Supply<br />
<strong>Optus</strong> CD Rom<br />
2 BEFORE YOU BEGIN<br />
Keep me handy<br />
your user information<br />
SSID:<br />
PASSPHRASE:<br />
For wireless support please contact Netgear on 1300 361 254<br />
1277910 04/07<br />
Wireless Information Card<br />
Ethernet <strong>Cable</strong><br />
Telephone <strong>Cable</strong><br />
1382777E 0411 166321.indd 2 7/04/11 10:41 AM
Front Panel description<br />
The front panel of your <strong>WiFi</strong> <strong>Cable</strong> Modem provides status LED’s that indicate how well and what state<br />
your <strong>WiFi</strong> <strong>Cable</strong> Modem is operating. See below table for more information on front panel LED status<br />
indicator functions.<br />
1. POWer ON, power is applied to the <strong>WiFi</strong> <strong>Cable</strong> <strong>modem</strong><br />
2. dS ON, the <strong>WiFi</strong> <strong>Cable</strong> <strong>modem</strong> is receiving data from the cable network<br />
3. US ON, the <strong>WiFi</strong> <strong>Cable</strong> <strong>modem</strong> is sending data to the cable network<br />
4. iNTerNeT ON, the <strong>WiFi</strong> <strong>Cable</strong> <strong>modem</strong> is registered on the network and fully operational<br />
5. LAN 1-4<br />
6. TeL2<br />
7. TeL1<br />
8. WireLeSS LiNK<br />
9. WPS<br />
1 2 3 4 5 6 7 8 9<br />
ON, a device is connected to one of the Ethernet ports<br />
BLiNKiNG indicates that data is being transferred over the Ethernet connection<br />
ON indicates telephony service is enabled. Blinks when line 2 is in use<br />
OFF indicates that phone service for TEL 2 is not enabled<br />
ON indicates telephony service is enabled. Blinks when line 1 is in use<br />
OFF indicates that phone service for TEL 1 is not enabled<br />
By default, the wireless <strong>modem</strong> router is set up to work as a wireless access point.<br />
Pressing this button turns the wireless access point feature on and off. You can also do<br />
this through the Wireless Settings screen.<br />
You can use the Wi-Fi Protected Setup (WPS) feature with clients on the network that are<br />
Wi-Fi certified and WPA capable.<br />
FRONT PANEL DESCRIPTION 3<br />
1382777E 0411 166321.indd 3 7/04/11 10:42 AM
Back Panel description<br />
The following picture shows the description and function of the back panel components on your <strong>modem</strong>.<br />
1. TeLePhONe<br />
1 ANd 2<br />
4 BACK PANEL DESCRIPTION<br />
1 2 3 4 5 6<br />
RJ-11 telephone ports connect to home telephone wiring to conventional<br />
telephones or fax machines<br />
2. LAN Four RJ-45 Ethernet ports connect to the Ethernet port on your PC or your home network<br />
Connects to a printer or mass storage device. This feature is currently disabled. This can<br />
3. USB<br />
only be made active by a remote software upgrade<br />
Note: <strong>Your</strong> service does not support data connections via USB, please connect your computer via the Ethernet<br />
port to ensure optimal connection speed.<br />
4. CABLe F-connector connects to an active cable signal from <strong>Optus</strong><br />
Connects your residential gateway to the AC power adapter that is provided<br />
with your <strong>WiFi</strong> <strong>Cable</strong> <strong>modem</strong><br />
5. POWer<br />
Caution: Avoid damage to your equipment. Only use the power supply that<br />
is provided with your <strong>modem</strong><br />
6. ON/OFF SWiTCh Turns the device on or off. It is recommended that the device remains on at all times.<br />
1382777E 0411 166321.indd 4 7/04/11 10:42 AM
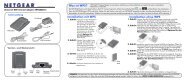
Macintosh installation<br />
To use your <strong>WiFi</strong> <strong>Cable</strong> Modem with a Macintosh computer please ensure your computer is set up to use<br />
DHCP (consult your Macintosh user guide for more information) and then connect the Ethernet cable to your<br />
Macintosh and the Modem.<br />
When power is applied to the <strong>WiFi</strong> <strong>Cable</strong> Modem, the test light turns on for about 15 seconds and then goes<br />
off. The Power, Internet and Wireless lights should all be lit.<br />
Wait for the Internet light to turn amber.<br />
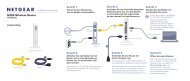
Using Push ‘N’ Connect (WPS) to<br />
Configure <strong>Your</strong> Wireless<br />
Network<br />
If your wireless clients support Wi-Fi Protected Setup (WPS), you can use this feature to configure the<br />
router’s SSID and security settings and, at the same time, connect the wireless client securely and easily to<br />
the router. 1 WPS automatically configures the SSID and wireless security settings for the router (if the router<br />
is in its default state) and broadcasts these settings to the wireless client.<br />
MACINTOSH INSTALLATION 5<br />
1382777E 0411 166321.indd 5 7/04/11 10:42 AM
i<br />
If the router has already been configured manually, and either WPS-PSK or WPA2-PSK security has<br />
been enabled, a wireless client can be connected quickly and simply by using the WPS method of<br />
connecting to the wireless network. In this case, the existing wireless settings are broadcast to the<br />
WPS-capable client.<br />
i<br />
NeTGeAr’s Push ‘N’ Connect feature is based on the Wi-Fi Protected Setup (WPS) standard.<br />
All other Wi-Fi-certified and WPS-capable products should be compatible with NETGEAR products<br />
that implement Push ‘N’ Connect.<br />
If you choose to use WPS, the only security methods supported are WPA-PSK and WPA2-PSK.<br />
WEP security is not supported by WPS.<br />
These instructions assume that you are configuring WPS on the router for the first time and<br />
connecting a WPS-capable device.<br />
For a list of other Wi-Fi-certified products available from NETGEAR, go to http://www.wi-fi.org.<br />
To set up basic wireless connectivity:<br />
1. Log in to the wireless <strong>modem</strong> router<br />
at its default address of http://192.168.0.1.<br />
On the router main menu.<br />
2. On the router main menu, select<br />
Add a WPS Client (computers that<br />
will connect wirelessly to the router<br />
are clients). The Add WPS Client<br />
wizard screen displays. Click Next.<br />
6 USING PUSH ‘N’ CONNECT (WPS) TO CONFIGURE YOUR WIRELESS<br />
i<br />
You can also enter either of these addresses<br />
to connect to your wireless router:<br />
http://www.routerlogin.net or<br />
http://www.routerlogin.com.<br />
1382777E 0411 166321.indd 6 7/04/11 10:42 AM
3. Select the method for adding the<br />
WPS client. A WPS client can be added<br />
using the Push Button method or the<br />
PIN method.<br />
Using the Push Button.<br />
This is the preferred method.<br />
• Select the Push Button radio box and<br />
either press the WPS Push Button on the<br />
side of the router or click the soft WPS<br />
Push Button on the screen (as shown<br />
on right).<br />
• The router will attempt to communicate<br />
with the client; you have 2 minutes to<br />
enable WPS from the client device using<br />
the client’s WPS networking utility.<br />
entering a PiN. If you want to use the<br />
PIN method, select the PIN radio box.<br />
A screen similar to the one shown on the<br />
right displays.<br />
• Go to your wireless client and, from<br />
obtain the wireless client’s security PIN,<br />
or follow the client’s WPS utility<br />
instructions to generate a security PIN.<br />
the client’s WPS utility,<br />
• Then, enter this PIN in the enter<br />
Client’s PiN field provided on the<br />
router and click Next. You have<br />
4 minutes to enable WPS on the<br />
router using this method.<br />
USING PUSH ‘N’ CONNECT (WPS) TO CONFIGURE YOUR WIRELESS 7<br />
1382777E 0411 166321.indd 7 7/04/11 10:42 AM
Using either method, the client wireless device will attempt to detect the WPS signal from the<br />
router and establish a wireless connection in the time allotted.<br />
• If no connection is detected, then no SSID or security settings are configured on the router.<br />
• If a connection is established, the router WPS screen displays a message confirming that the<br />
wireless client was successfully added to the wireless network. (The router has generated an<br />
SSID, implemented WPA/WPA2 wireless security (including a PSK security password) on the<br />
router and has sent this configuration to the wireless client.)<br />
4. Note the new SSID and WPA/WPA2 password for the wireless network.<br />
To access the Internet from any computer connected to your wireless <strong>modem</strong> router, launch<br />
a browser such as Microsoft Internet Explorer or Mozilla Firefox. You should see the wireless<br />
<strong>modem</strong> router’s Internet LED blink, indicating communication to the ISP.<br />
i<br />
If you are planning a mixed network of WPS capable devices and non-WPS capable devices,<br />
NETGEAR suggests that you set up your wireless network and security settings manually first,<br />
and use WPS only for adding additional WPS capable devices.<br />
For more information on setting up your wireless network and configuring your wireless security<br />
settings, see the User Manual located online at help.optuszoo.com.au/help/cable<br />
i<br />
If you require Wi-Fi support for your <strong>Optus</strong>-supplied NETGEAR Wi-Fi ADSL Modem Router and<br />
Wi-Fi Adapter, please contact NETGEAR on 1300 361 254.<br />
8 USING PUSH ‘N’ CONNECT (WPS) TO CONFIGURE YOUR WIRELESS<br />
1382777E 0411 166321.indd 8 7/04/11 10:42 AM
Using a Non-Netgear wireless<br />
adapter or wireless enabled<br />
computer<br />
You may already have a computer with wireless capability. You will need to enter your Wireless security<br />
information, such as your SSID and WPA passphrase into the Wireless Network Setup utility:<br />
1. Power on your laptop and when Windows has started, go to the Start menu.<br />
2. Click on the Control Panel and Switch to Classic View.<br />
3. Double-click on the Wireless Network Setup Wizard and follow the prompts.<br />
4. Enter the wireless information for your network.<br />
This information can be found on the wireless information card that came with your <strong>Optus</strong> <strong>WiFi</strong> <strong>Cable</strong> Modem,<br />
or on the label printed on the base of your <strong>WiFi</strong> <strong>Cable</strong> Modem.<br />
Keep me handy<br />
your user information<br />
SSID:<br />
PASSPHRASE:<br />
For wireless support please contact Netgear on 1300 361 254<br />
1277910 04/07<br />
• Both the SSid and WPA passphrase are all in uppercase characters.<br />
• The SSID consists of the characters “OPTUSV” followed by the last 6 characters of the CM MAC Address.<br />
These characters are the letters A-F and the digits 0-9.<br />
• The WPA passphrase consists of three or four 5-character “words” followed by<br />
a 5 digit random number consisting of the digits 1-9 only.<br />
There is no particular significance to the words used – words have been used rather than random letters<br />
to make the passphrase easier to remember and type.<br />
If you would prefer to use a different passphrase, this can be changed on the Wireless Settings page.<br />
For <strong>Optus</strong> <strong>Cable</strong> Broadband support in setting up a wired internet connection from your <strong>modem</strong> to your<br />
computer, please contact <strong>Optus</strong> on 133 937<br />
USING A NON-NETGEAR WIRELESS ADAPTER OR WIRELESS ENABLED COMPUTER 9<br />
SELECTIvE CALL FEATURES 9<br />
1382777E 0411 166321.indd 9 7/04/11 10:42 AM
Changing your <strong>WiFi</strong> <strong>Cable</strong><br />
Modem password<br />
If you wish to change your <strong>WiFi</strong> <strong>Cable</strong> Modem password, please follow the steps below:<br />
1. Open your web browser and change the address to http://192.168.0.1<br />
2. Enter the default username and password as follows:<br />
Default Username: admin<br />
Default Password: password<br />
3. From the menu on the top click Administration<br />
and then select the management tab.<br />
4. To change the password, type a new password and retype<br />
it in the re-enter New Password box to confirm it. Then<br />
click Save settings to have the password changed.<br />
5. Write down your new password and keep it safe. You may<br />
want to write it down with the Settings Summary page if<br />
you printed it earlier.<br />
Note: You will need to use this new password to access<br />
any of your <strong>WiFi</strong> <strong>Cable</strong> Modem’s advanced features or to<br />
reconfigure your service. If you forget this password you<br />
can reset your <strong>WiFi</strong> <strong>Cable</strong> Modem by pressing and holding<br />
the reset button in for five seconds, this will also delete<br />
any other customised settings you have set.<br />
10 CHANGING YOUR WIFI CABLE MODEM PASSWORD<br />
1382777E 0411 166321.indd 10 7/04/11 10:43 AM
Security<br />
The Internet is your gateway to the world and while security issues shouldn’t stop you enjoying your Internet<br />
experience, you need to ensure that you take precautions to protect your computer.<br />
optuszoo.com.au/help/cable/safety for more information.<br />
Managing your <strong>Optus</strong> <strong>Cable</strong> account<br />
For information on managing your <strong>Optus</strong> <strong>Cable</strong> account see optuszoo.com.au/help/cable/myaccount<br />
Technical Support Contact details<br />
For <strong>Optus</strong> <strong>Cable</strong> Broadband support in setting up a wired Internet connection from your <strong>modem</strong> to your<br />
computer, please contact <strong>Optus</strong> on 133 937.<br />
SECURITY, MANAGING YOUR OPTUS CABLE ACCOUNT, TECHNICAL SUPPORT CONTACT DETAILS 11<br />
1382777E 0411 166321.indd 11 7/04/11 10:43 AM
Frequently Asked Questions<br />
This section provides answers to frequently asked questions regarding your <strong>Optus</strong> Telephony and<br />
Broadband Service.<br />
Q. What if i don’t subscribe to a telephony service from <strong>Optus</strong>, can i still use this <strong>WiFi</strong> cable <strong>modem</strong><br />
to make and receive phone calls?<br />
A. No. A Telephone service is enabled for each telephone port on the <strong>WiFi</strong> cable <strong>modem</strong>. Please contact<br />
<strong>Optus</strong> on 133 937 or visit your nearest <strong>Optus</strong> Outlet to arrange installation of your telephone service.<br />
Q. Can i use my existing phone number with the <strong>WiFi</strong> cable <strong>modem</strong>?<br />
A. In most cases you should be able to keep your existing phone number. Please contact <strong>Optus</strong> on 133 937<br />
or visit your nearest <strong>Optus</strong> Outlet for more information about using an existing telephone number.<br />
Q. do i automatically receive broadband with the <strong>WiFi</strong> cable <strong>modem</strong>?<br />
A. <strong>Your</strong> device acts as a cable <strong>modem</strong> and may be used to provide a telephone service, broadband service,<br />
or both services. Please contact <strong>Optus</strong> on 133 937 or visit your nearest <strong>Optus</strong> Outlet for more information<br />
if you are not currently subscribing to <strong>Optus</strong> Broadband.<br />
Q. how many telephones can i connect?<br />
A. You can connect up to two phone lines with a maximum of two extensions on each phone line.<br />
If you have existing phone sockets in the house, we may use these extensions where applicable.<br />
Q. Can i use my <strong>Optus</strong> Broadband and make telephone calls at the same time?<br />
A. Absolutely! The Telephone service is provided separately from your broadband service. <strong>Your</strong> broadband<br />
service does not affect the quality of your telephone calls. If these services are enabled by <strong>Optus</strong>, you can<br />
make telephone calls and use your <strong>Optus</strong> broadband at the same time.<br />
12 FREQUENTLY ASKED QUESTIONS<br />
1382777E 0411 166321.indd 12 7/04/11 10:43 AM
1382777E 0411 166321.indd 13 7/04/11 10:43 AM<br />
13
1382777E 04/11<br />
1382777E 0411 166321.indd 14 7/04/11 10:43 AM