Installation Guide - netgear
Installation Guide - netgear
Installation Guide - netgear

Create successful ePaper yourself
Turn your PDF publications into a flip-book with our unique Google optimized e-Paper software.
Cable/DSL Wireless Router<br />
MODEL MR814<br />
<strong>Installation</strong> <strong>Guide</strong>
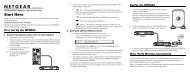
Introduction<br />
Wireless Router MR814<br />
Thank you for purchasing a NETGEAR MR814 Cable/DSL Wireless Router. With this router<br />
you can have secure Internet access through a high-speed DSL or cable modem and share the<br />
connection with several computers.<br />
This installation guide shows you how to connect the router and configure it for secure<br />
Internet access. Setup is easy. Follow the instructions in this guide and your system will be up<br />
and running quickly.<br />
If you have problems, there is a troubleshooting section on pages 13-15 to help you. You can<br />
also get more detailed troubleshooting information from the Reference Manual on the CD,<br />
online from www.NETGEAR.com or by phone. There is a short glossary available on page 16<br />
to help answer any questions you have about terminology. A more extensive glossary can be<br />
found in the Reference Manual.<br />
1
<strong>Installation</strong> Overview<br />
Estimated time: 15 to 30 minutes to complete the installation.<br />
1. Gather the configuration information you have for your working DSL or cable modem<br />
connection to the Internet.<br />
2. Install the router between the DSL or cable modem and one computer.<br />
3. Configure that computer to work with the router and restart the computer and modem.<br />
4. Configure the router and go online to test the connection.<br />
5. Connect other computers, configure them and restart each. (optional)<br />
6. Configure for content filtering or port forwarding. (optional)<br />
On the MR814 GearBox CD, you’ll find the MR814 <strong>Installation</strong> Assistant, which supplements<br />
the instructions in this installation guide by animating the step-by-step procedures given here.<br />
For more detailed information about installation, troubleshooting and configuration<br />
procedures, see the Reference Manual on the CD.<br />
2
What’s in the Box<br />
Power adapter<br />
Wireless Router<br />
MR814<br />
Vertical Stand<br />
MR814 Wireless Router<br />
GearBox CD, installation guide,<br />
support information card &<br />
warranty/registration card<br />
When you open the box, verify that you received everything.<br />
The package includes:<br />
• MR814 Cable/DSL Wireless Router (The term Gateway and Router are often used<br />
interchangeably. Both perform the same function of allowing multiple computers to share<br />
the Internet.)<br />
• AC power adapter<br />
• Vertical stand<br />
• MR814 GearBox CD, including a full Reference Manual and <strong>Installation</strong> Assistant.<br />
• MR814 <strong>Installation</strong> <strong>Guide</strong> (this document)<br />
• Warranty and registration card<br />
• Support information card<br />
• NETGEAR Router ISP <strong>Guide</strong> (also available online and on the CD)<br />
If the support information card is missing, you can get contact information at www. NETGEAR.com<br />
in the Customer Service area.<br />
3
1<br />
Prepare to Install the Router<br />
Verify Your Equipment<br />
Before installing the MR814 router, you should have:<br />
• An external DSL or cable modem with an<br />
Ethernet port set up and working with one<br />
computer.<br />
• Working ISP Internet Connection<br />
• Internet Explorer 5.0 or later OR Netscape<br />
Navigator 4.7 or later.<br />
You’ll be installing the router between the modem and the computer.<br />
For each computer that you want to connect to the router, you must have<br />
• An available RJ-45 Ethernet port (or adapter) — either built-in or from a network<br />
interface card (NIC) installed in the computer OR a 2.4 GHz wireless adapter (Wi-Fi<br />
802.11b at 11Mbps).<br />
Note: If you have a built-in modem or a modem card, the telephone jack for the<br />
modem looks very similar to an RJ-45 Ethernet port, but the RJ-45 port is larger.<br />
• TCP/IP networking installed.<br />
• Windows® computers: Client for Microsoft® Networks software installed.<br />
4<br />
Note: TCP/IP and Client for Microsoft Networks is installed on most Windows<br />
computers. If you can view Web sites with a browser, you are ready to go. Please<br />
see the Reference Manual on the CD if you need help installing either on a<br />
Windows computer.<br />
• A Category 5 (Cat 5) Ethernet patch cable<br />
DSL or cable modem<br />
Phone jack or<br />
cable outlet
Gather ISP Configuration Information for<br />
Your Working Connection to the Internet<br />
Later in the setup process you’ll need to configure the router to work with your network. A<br />
Setup Wizard is available to help you through this procedure. Alternatively, you can configure<br />
the router yourself using information that you can get from your computer or your ISP about<br />
your current Internet connection.<br />
This page and the next page include blanks for you to fill in and refer to later. To get the<br />
needed information from your computer:<br />
• Windows 95/98/Me: Open the Network control panel, select a TCP/IP entry, and click<br />
Properties.<br />
• Windows 2000/XP: Open Local Area Network Connection and click Properties.<br />
• Macintosh®: Open the TCP/IP (or Network) control panel.<br />
Your ISP should have provided you with a summary sheet of all the information needed to connect your<br />
computer to the Internet. Additionally, the NETGEAR Router ISP <strong>Guide</strong> gives the requirements for many<br />
ISPs. If you cannot locate the information, you’ll have to contact your ISP.<br />
Host and Domain Names<br />
Some ISPs use a specific host or domain name—like CCA7324-A or home. If you haven’t<br />
been given specific information about host or domain names then use the following examples<br />
as a guide:<br />
• If your main e-mail account with your ISP is aaa@yyy.com, then use aaa as your host<br />
name. (Your ISP might call this your account, user, host, computer or system name.)<br />
• If your ISP’s mail server is mail.xxx.yyy.com, then use xxx.yyy.com as the domain name.<br />
ISP Account name:<br />
ISP Domain name:<br />
5
ISP Login Name<br />
If your ISP requires a login name and password (possibly because you have a PPPoE account),<br />
fill in the following:<br />
Login name: (may be your full e-mail address)<br />
Password:<br />
Service name: (if required by your ISP)<br />
Note: The login name could be called a user name or account name by your ISP.<br />
The login name is case sensitive. You must type it exactly as given by your ISP. For<br />
example, c_jones is a different login name than C_Jones or cjones.<br />
Fixed (or Static) IP Address<br />
If you have a static IP address through your ISP, fill in the following information:<br />
Internet IP address:<br />
Subnet mask: .<br />
.<br />
.<br />
.<br />
.<br />
.<br />
Note: For example, a<br />
valid IP address could<br />
be 169.254.141.148.<br />
Gateway IP address: . . .<br />
ISP DNS Server Address Information<br />
If you were given specific Domain Name System (DNS) server addresses, fill in the following:<br />
DNS Server IP address(es): . . .<br />
. . .<br />
Wireless Settings<br />
Wireless Network Name (called a Service Set Identifier or SSID). This can be anything up to<br />
32 characters as long as you can use the same name with all devices in your wireless network.<br />
The default is Wireless.<br />
Wireless Network Name:<br />
Note: Case Sensitive<br />
Security Encryption Passphrase (called Wired Equivalent Privacy or WEP). Encryption will protect<br />
your network from evesdroppers. The Passphrase can be anything as long as you use the same one<br />
for all devices in your wireless network. The default setting for Security Encryption is Disabled.<br />
Security Encryption Passphrase:<br />
Note: Case Sensitive<br />
6
2<br />
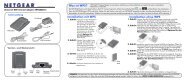
Install the Router<br />
After unpacking the box and locating the configuration<br />
information, you’re ready to install the router. You may also<br />
configure the router from a wireless computer. If so, set the<br />
computer’s Wireless Network Name (SSID) to Wireless and<br />
disable the Security Encryption (WEP).<br />
Note: You do not have to power down any equipment to<br />
do this, but if you need to move your computers<br />
(perhaps to get to ports in the back), you may want to<br />
shut down the computers before moving them around.<br />
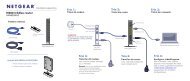
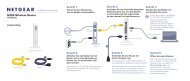
1. Locate the Ethernet cable currently going from the DSL<br />
or cable modem to the computer that you use to access<br />
the Internet. See Cable A in the illustration.<br />
Note: You must use this cable to connect the DSL or cable modem to your router<br />
since this may be a special cable even though it looks like other LAN cables.<br />
2. Remove this cable from the computer and insert that end into the Internet port<br />
on the router. (See the label on the bottom of the router to locate the Internet port.)<br />
3. Skip this step if you are using a wireless computer. Use the Ethernet patch cable to<br />
connect the computer to one of the four numbered Ethernet ports on the router. See<br />
Cable B in the illustration.<br />
4. Connect the power adapter’s cord into the back of the router and then plug the adapter<br />
into a power source such as a wall socket or power strip.<br />
Note: If you want to connect other computers to the router, don’t connect them<br />
now. Do that after you know that the modem/router setup works with one computer.<br />
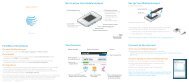
Check the setup<br />
• After supplying power to the router, the Test light<br />
turns on for a few seconds and then goes off.<br />
Note: If the Test light stays on or blinks, go to Troubleshooting on page 13.<br />
• The Power, Internet and Wireless lights should be lit.<br />
• If a computer is connected and powered up the number<br />
of the connected port should be lit and may blink to<br />
show network activity.<br />
Computer<br />
Cable/DSL Wireless Router MR814<br />
Note: If the connection is a 100 Mbps connection, the number is green. If it is a 10<br />
Mbps connection, the number is yellow. If either the Power, Internet, or port<br />
number light isn’t lit, go to Troubleshooting on page 13.<br />
B<br />
A<br />
Phone jack or<br />
cable outlet<br />
DSL or<br />
cable<br />
modem<br />
7
3<br />
Configure the Computer to Work with<br />
the Router and Restart the Network<br />
Next, you make sure that the computer can interact with the router. To do this, you configure<br />
the TCP/IP settings on the computer and then restart the network. How you do this depends<br />
on your computer.<br />
Windows Operating Systems<br />
Normally, you leave the TCP/IP setup parameters at their factory default settings unless you<br />
have a specific reason to change them. You should verify that the computer is set to ‘obtain an<br />
IP address automatically’ in the Network control panel.<br />
Windows 98 or Me<br />
Windows 2000 or XP<br />
1. Choose Settings>Control Panel<br />
from the Start menu.<br />
2. Double-click the Network icon.<br />
3. Click the Configuration tab.<br />
4. In the list of installed network<br />
components, select the TCP/IP<br />
entry for the computer’s<br />
Ethernet adapter or NIC.<br />
5. Click Properties.<br />
6. Click the IP Address tab.<br />
7. If not selected, select Obtain an<br />
IP address automatically.<br />
8. Click the Gateway tab.<br />
9. Select and remove any IP Gateway<br />
addresses that are listed.<br />
10. Click OK and click OK again to.<br />
close the Network control panel.<br />
11. Go to Restarting the Network on the<br />
next page.<br />
8<br />
Windows 98/Me<br />
1. Right-click My Network Place and<br />
choose Properties.<br />
2. Double-click Local Area Network<br />
Connection and click Properties.<br />
3. Select Internet Protocol (TCP/IP) and<br />
click Properties.<br />
4. Select Obtain IP address automatically<br />
and Obtain DNS server address<br />
automatically.<br />
5. Click OK twice and click Close.<br />
6. Go to Restarting the Network.
Macintosh Operating System<br />
Mac OS® 8.6 or 9.x<br />
1. Choose Control Panels >TCP/IP<br />
from the Apple (apple) menu.<br />
2. If not already selected, select Ethernet<br />
in the Connect via list.<br />
3. Select Using DHCP Server in the<br />
Configure list.<br />
4. Click the close box.<br />
5. Click Save.<br />
6. Go to Restarting the Network.<br />
Mac OS X<br />
1. Choose System Preferences from the Apple menu. Mac OS 8.6/9.x<br />
2. Double-click Network.<br />
3. If not already selected, select Built-in Ethernet in the Configure list.<br />
4. If not already selected, select Using DHCP in the TCP/IP tab.<br />
5. Click Save.<br />
6. Go to Restarting the Network.<br />
Linux® or UNIX® Operating System<br />
If you’re installing the router with a Linux-based or UNIX-based computer, see your system<br />
documentation to set up TCP/IP networking to obtain IP addresses automatically using DHCP.<br />
Restarting the Network<br />
Once you’ve set up your computer to work with the router, you must reset the network for the<br />
devices to be able to communicate.<br />
1. Turn off or unplug the DSL or cable modem and router.<br />
2. Turn on or plug in the DSL or cable modem and wait for 1-2 minutes<br />
until the lights indicate that service is established again.<br />
3. Plug in the router and wait about 10 seconds until the Test light turns off.<br />
4. Restart the computer that is connected to the router.<br />
Note: If the Test light stays lit, go to Troubleshooting on page 13.<br />
9
4<br />
Configure the Router and Test the<br />
Connection<br />
Now you configure the router to work with your DSL or cable connection. You configure your<br />
router using Internet browser software such as Microsoft® Internet Explorer 5.0 or Netscape<br />
Navigator® 4.7 or later. You can either use the Smart Wizard or configure the router yourself.<br />
1. Start a browser on the computer connected to the router.<br />
2. In the Address or Location box, type http://192.168.0.1 and press Enter or Return.<br />
Note: You may want to bookmark this address in your browser for handy access in<br />
the future.<br />
3.<br />
4.<br />
In the User Name box, type admin<br />
In the Password box, type password<br />
Note: Case Sensitive<br />
5. Click OK.<br />
The router’s Setup Wizard page appears.<br />
6. To have the Setup Wizard automatically configure the router, click Yes, click Next and<br />
follow the instructions on screen.<br />
To configure it yourself, click No, then click Next and continue with the steps listed here.<br />
7. Fill in the form on the Basic Settings page. Refer to the information on pages 5-6 above<br />
you filled in previously.<br />
Note: Helpful information appears on the right side of the page to assist you as you<br />
fill in the form. You may also find pertinent information in the NETGEAR Router ISP<br />
<strong>Guide</strong>.<br />
8. Click Apply to have your information stored on the router.<br />
Test the Connection<br />
1. Click the Test button on the Basic Settings page.<br />
This should open a new browser window and take you to NETGEAR’s Web site<br />
(www.NETGEAR.com).<br />
Note: If NETGEAR’S Web site doesn’t appear, go to Troubleshooting on page 13.<br />
2. Close the browser window showing NETGEAR’s success page.<br />
3. Click the Logout button on the left navigation area.<br />
10<br />
Note: If you get asked about closing the browser window, click Yes.
5<br />
Connect and Configure Other Computers<br />
(optional)<br />
Now that you have one computer set up to access the Internet through the router, you can<br />
connect other computers so they can share the modem.<br />
Wired Computers<br />
Wireless Computers<br />
1. Connect a Category 5 Ethernet patch<br />
cable between another computer and<br />
one of the remaining numbered<br />
Ethernet ports on the router.<br />
2. Check to make sure that the<br />
associated port number light is lit.<br />
The light flashes when data is being<br />
transferred over the connection.<br />
Note: If the numbered light isn’t lit, go to Troubleshooting on page 13.<br />
3. Go back to <strong>Installation</strong> Step 3<br />
(pages 8 and 9) and go through<br />
the sequence of steps applicable<br />
for each computer.<br />
4. Restart each computer.<br />
5. Test each computer’s connection<br />
by going to NETGEAR’s Web site<br />
(www.NETGEAR.com) from each<br />
computer.<br />
Note: Check the documentation that<br />
came with your Wireless Adapter to<br />
complete these items.<br />
1. Set the computer’s Wireless Network Name<br />
(SSID) to the same name as the router. The<br />
default is Wireless. Note: Case Sensitive<br />
2. Set the computer’s Security Encryption (WEP)<br />
to match the router settings. The same<br />
Passphrase must be used on all devices or all<br />
must be disabled. The default is Disabled.<br />
Note: If you have more than 4<br />
computers to connect to this router,<br />
Cable/DSL Wireless Router MR814<br />
you must connect them to a hub or<br />
switch (such as the NETGEAR 5-port or 8-port Fast Ethernet Switch) and then connect<br />
the hub or switch to the router. By using hubs or switches, you may connect up to 253<br />
computers to the router, although a maximum of 32 wireless computers are supported. 11
6<br />
Optional Configurations<br />
Content Filtering<br />
After you have successfully set up the router so that you have Internet access, you can configure<br />
it to filter out inappropriate web pages.<br />
1. Start your browser and open the Settings pages by going to http://192.168.0.1.<br />
2. To block keywords or Internet domains, click Block Sites under the Content Filtering<br />
heading.<br />
3. Select the Turn Keyword Blocking On check box.<br />
4. Type a keyword or domain name to block in the box and click Add Keyword. (For<br />
example, you may want to block sites with the word “sex” in the address.)<br />
5. Continue adding names and keywords until you are finished.<br />
6. Click Apply to save your changes.<br />
Note: For more information about content filtering and reporting features, see the<br />
Reference Manual on the MR814 GearBox CD.<br />
Internet Services and Gaming<br />
To have a Web server, e-mail server, or other server on your network accessible from the<br />
Internet, to play Internet-enabled games, or to use Internet communication features such as<br />
chat, you’ll have to allow access to those computers from the Internet. You do this by<br />
configuring the Port Forwarding feature of the router using the Settings pages.<br />
1. Start your browser and open the Settings pages by going to http://192.168.0.1.<br />
2. Click Port Forwarding.<br />
3. Configure each computer as needed. Read the Help pane for specific information.<br />
4. Click Apply.<br />
12<br />
Note: For more information about port forwarding, click the Port Forwarding Help<br />
link on the index page for the MR814 GearBox CD.
Troubleshooting<br />
No lights are lit on the router<br />
The router has no power.<br />
• Make sure the power cord is properly connected to the router.<br />
• Make sure the power adapter is properly connected to a functioning power outlet. If it is<br />
in a power strip, make sure the power strip is turned on.<br />
• Make sure you are using the correct NETGEAR power adapter supplied with your router.<br />
Test light remains lit<br />
After you plug in the power adapter, the Test light should turn on and<br />
then, after approximately 10 seconds, turn off.<br />
If the Test light does not turn off, pull the adapter out of its power<br />
source and then plug it in again. Contact NETGEAR if this doesn’t solve the problem.<br />
The Internet light doesn’t light up<br />
The Power light and at least one numbered light is lit, but the Internet<br />
light isn’t lit.<br />
You have the wrong cable between the router and the modem. Use the<br />
cable that came with the modem.<br />
There is no numbered light lit for a connected device<br />
There’s a hardware connection problem.<br />
• Make sure the cable connectors are securely plugged in at the router and the device.<br />
• Make sure the connected device is turned on.<br />
• Be sure the correct cable is used. For computers, use a Category 5 Ethernet patch cable. For<br />
other devices, you may need a cross-over cable or may need to use the uplink port or uplink<br />
switch. A device with Auto Uplink (MDI/MDIX) ports will adjust automatically.<br />
13
I cannot get onto the Internet with a computer<br />
You may not have restarted the computer or the network to have TCP/IP changes take effect.<br />
• Restart the computer.<br />
• Unplug the router, and then restart the network. See Restarting the Network on page 9.<br />
Your computer may not recognize any addresses.<br />
• If you typed in addresses of one or two DNS servers when you configured the router,<br />
restart your computer. Open the router’s Settings pages and verify that the DNS addresses<br />
appear. See instructions on page 10 to view the router’s Basic Settings page.<br />
Your computer may not have the correct TCP/IP settings to recognize the router.<br />
• Restart the computer and check that you have TCP/IP set up properly on your computer.<br />
For Windows, the Network Properties should have Obtain an IP address automatically<br />
selected (see page 8). For Macintosh computers, the TCP/IP or Network control panel<br />
should be set to Using DHCP Server (see page 9).<br />
• You may also verify that the gateway address or the router’s local IP address is 192.168.0.1.<br />
The computer’s IP address should be between 192.168.0.2 and 192.168.0.254.<br />
Your router might not be able to obtain a IP address from the ISP.<br />
1. Start your browser, type the address for an external site (like www.NETGEAR.com),<br />
and press Enter (Windows) or Return (Macintosh).<br />
2. Go to the router’s Settings pages by going to http://192.168.0.1.<br />
3. In the User ID box type admin, in the Password box type password, and click OK.<br />
4. Under the Maintenance heading, click Router Status.<br />
5. Check that an IP address is shown for the WAN Port.<br />
If you see 0.0.0.0, contact your ISP to get current configuration information.<br />
Your wireless connection settings may be incorrect.<br />
• Verify the computer’s Wireless Network Name (SSID) and Secure Encryption (WEP)<br />
settings match the router’s settings.<br />
You may be out of range of the wireless broadcast.<br />
• Try to move the computer closer to the wireless router.<br />
14
Resetting TCP/IP Properties (Windows)<br />
If you’re on a Windows computer and are still having problems, you may try the following<br />
procedure before contacting technical support.<br />
Windows 98/Me<br />
Windows 2000<br />
Windows XP<br />
1. Click the Start button and 1. Click the Start button 1. Open My Network Places.<br />
then click Run.<br />
and then click Run.<br />
2. Click View network<br />
2. Type winipcfg and then 2. Type CMD and<br />
connections (Network Tasks).<br />
click OK.<br />
click OK.<br />
3. Click your enabled LAN<br />
3. Select your Ethernet adapter. 3. Type ipconfig/all.<br />
connection.<br />
For any Windows computer, if you are using the recommended default TCP/IP settings,<br />
they should be:<br />
• IP Address: between 192.168.0.2 and 192.168.0.254<br />
• Subnet Mask: 255.255.255.0<br />
• Default Gateway: 192.168.0.1<br />
4. Click More Info and verify<br />
that the DNS Servers box<br />
displays 192.168.0.1.<br />
5. Click Release All and<br />
then Renew All.<br />
6. Verify that you got a valid<br />
address and click OK.<br />
4. Type ipconfig/release.<br />
5. Type ipconfig/renew.<br />
6. Verify that you got a<br />
valid address and close<br />
the window.<br />
4. Click Repair this<br />
connection (Network Tasks).<br />
5. Verify that you got a valid<br />
address and close the<br />
window.<br />
Note: For Windows XP, you’ll<br />
find the TCP/IP information in<br />
the Details area.<br />
15
Glossary of Terms<br />
You’ll find a more extensive glossary in the Reference Manual on the MR814 GearBox CD.<br />
Category 5 (CAT5): A twisted pair cable that meets specified requirements for high-speed networking.<br />
Domain Name System (DNS) server: A server that matches URLs (such as www.<strong>netgear</strong>.com) to<br />
numeric IP addresses.<br />
IP Address: A 4-part number uniquely defining each host on the Internet. Usually written in dotteddecimal<br />
notation with separating periods (for example, 134.177.244.57).<br />
ISP: Internet Service Provider.<br />
Local Area Network (LAN): A communications network within a limited area, such as one building.<br />
PPP: Point-to-Point Protocol, the standard Internet protocol for dial-up connections.<br />
PPP over Ethernet (PPPoE): A protocol for connecting remote hosts to the Internet over an always-on<br />
connection by simulating a dial-up connection.<br />
TCP/IP: Transfer Control Protocol (TCP) with Internet Protocol (IP). The main internetworking protocol<br />
used in the Internet.<br />
Service Set ID (SSID): The technical term for the Wireless Network Name. Each device in a wireless<br />
network must use the same SSID. May also be called ESSID.<br />
Wide Area Network (WAN): A long distance link used to extend or connect remotely located local area<br />
networks (for example, connecting your home computer to the Internet).<br />
Wired Equivalent Privacy (WEP): A way to encrypt data traveling over the wireless network to protect<br />
against evesdroppers. Each device in a wireless network must use the same WEP Passphrase or keys<br />
or WEP must be disabled. 128-bit encryption is the strongest available.<br />
Router Specifications<br />
Routing Protocols: TCP/IP, RIP-1, RIP-2, DHCP, NAT, PPTP, PPPoE, IPSec, L2TP<br />
Dimensions: W: 255 mm (10.0") D: 169 mm (6.7") H: 34 mm (1.3")<br />
Weight: 0.62 kg (1.4 lbs.)<br />
Microprocessor: ARM7, core<br />
Memory: 1 MB Flash, 8 MB SDRAM<br />
LAN: 10BASE-T or 100BASE-TX, RJ-45 or 802.11b 2.4 GHz wireless (Wi-Fi)<br />
WAN: 10BASE-T, RJ-45<br />
Power Adapter: 12 V DC 1.2 A with localized plug<br />
Environmental Specifications<br />
Operating temperature: 0 to 40°C (32˚ to 104˚F)<br />
Operating humidity: 90% maximum relative humidity, noncondensing<br />
Electromagnetic<br />
Emissions: FCC Part 15 Class B<br />
VCCI Class B<br />
EN 55 022 (CISPR 22), Class B Interface Specifications<br />
16
Voluntary Control Council for Interference (VCCI) Statement<br />
This equipment is in the second category (information equipment to be used in residential areas) and conforms to the<br />
standards set by the Voluntary Control Council for Interference by Data Processing Equipment and Electronic Office<br />
Machines that are aimed at preventing radio interference in residential areas.<br />
EN 55 022 Declaration of Conformance<br />
This is to certify that the NETGEAR Model MR814 Cable/DSL Wireless Router is shielded against the generation of<br />
radio interference in accordance with the application of Council Directive 89/336/EEC, Article 4a. Conformity is<br />
declared by the application of EN 55 022 Class B (CISPR 22).<br />
Federal Communications Commission (FCC) Compliance Notice: Radio Frequency Notice<br />
This equipment has been tested and found to comply with the limits for a Class B digital device, pursuant to part 15<br />
of the FCC Rules. These limits are designed to provide reasonable protection against harmful interference in a<br />
residential installation. This equipment generates, uses, and can radiate radio frequency energy and, if not installed and<br />
used in accordance with the instructions, may cause harmful interference to radio communications. However, there is<br />
no guarantee that interference will not occur in a particular installation. If this equipment does cause harmful<br />
interference to radio or television reception, which can be determined by turning the equipment off and on, the user is<br />
encouraged to try to correct the interference by one or more of the following measures:<br />
• Reorient or relocate the receiving antenna.<br />
• Increase the separation between the equipment and receiver.<br />
• Connect the equipment into an outlet on a circuit different from that to which the receiver is<br />
connected.<br />
• Consult the dealer or an experienced radio/TV technician for help.<br />
Canadian Department of Communications Radio Interference Regulations<br />
This digital apparatus (NETGEAR Model MR814 Cable/DSL Wireless Router) does not exceed the Class B limits for<br />
radio-noise emissions from digital apparatus as set out in the Radio Interference Regulations of the Canadian<br />
Department of Communications.<br />
Règlement sur le brouillage radioélectrique du ministère des Communications<br />
Cet appareil numérique (NETGEAR Model MR814 Cable/DSL Wireless Router) respecte les limites de bruits<br />
radioélectriques visant les appareils numériques de classe B prescrites dans le Règlement sur le brouillage radioélectrique<br />
du ministère des Communications du Canada.<br />
Statement of Conditions<br />
In the interest of improving internal design, operational function, and/or reliability, NETGEAR reserves the right to<br />
make changes to the products described in this document without notice.<br />
NETGEAR does not assume any liability that may occur due to the use or application of the product(s) or circuit<br />
layout(s) described herein.<br />
Certificate of the Manufacturer/Importer<br />
It is hereby certified that the NETGEAR Model MR814 Cable/DSL Wireless Router has been suppressed in<br />
accordance with the conditions set out in the BMPT-AmtsblVfg 243/1991 and Vfg 46/1992. The operation of some<br />
equipment (for example, test transmitters) in accordance with the regulations may, however, be subject to certain<br />
restrictions. Please refer to the notes in the operating instructions.<br />
Federal Office for Telecommunications Approvals has been notified of the placing of this equipment on the market and<br />
has been granted the right to test the series for compliance with the regulations.<br />
Bestätigung des Herstellers/Importeurs<br />
Es wird hiermit bestätigt, daß das Model MR814 Cable/DSL Wireless Router gemäß der im BMPT-AmtsblVfg<br />
243/1991 und Vfg 46/1992 aufgeführten Bestimmungen entstört ist. Das vorschriftsmäßige Betreiben einiger Geräte<br />
(z.B. Testsender) kann jedoch gewissen Beschränkungen unterliegen. Lesen Sie dazu bitte die Anmerkungen in der<br />
Betriebsanleitung.<br />
Das Bundesamt für Zulassungen in der Telekommunikation wurde davon unterrichtet, daß dieses Gerät auf den Markt<br />
gebracht wurde und es ist berechtigt, die Serie auf die Erfüllung der Vorschriften hin zu überprüfen.<br />
17
Technical Support<br />
PLEASE RETAIN PROOF OF PURCHASE AND THE WARRANTY INFORMATION.<br />
To register your product, get product support or obtain product information and product<br />
documentation, go to http://www.NETGEAR.com/register.<br />
You will find technical support information at: http://www.NETGEAR.com/ through the<br />
customer service area. If you want to contact technical support by telephone, see the support<br />
information card for the correct telephone number for your country.<br />
Technical Support is available 24 hours a day, 7 days a week.<br />
NETGEAR, INC.<br />
Support Information<br />
Phone: 1-888-NETGEAR (US and Canada only)<br />
E-mail: support@NETGEAR.com<br />
www.NETGEAR.com<br />
© 2002 by NETGEAR, Inc. All rights reserved.<br />
NETGEAR is a registered trademark of NETGEAR, Inc. in the United States and/or other countries.<br />
Other brand and product names are trademarks or registered trademarks of their respective holders.<br />
Information is subject to change without notice.<br />
*M1-MR814NA-0*<br />
M1-MR814NA-0<br />
August 2002