Oil Watchman Instructions :: Commercial Fuel Solutions Ltd
Oil Watchman Instructions :: Commercial Fuel Solutions Ltd
Oil Watchman Instructions :: Commercial Fuel Solutions Ltd

You also want an ePaper? Increase the reach of your titles
YUMPU automatically turns print PDFs into web optimized ePapers that Google loves.
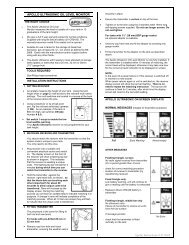
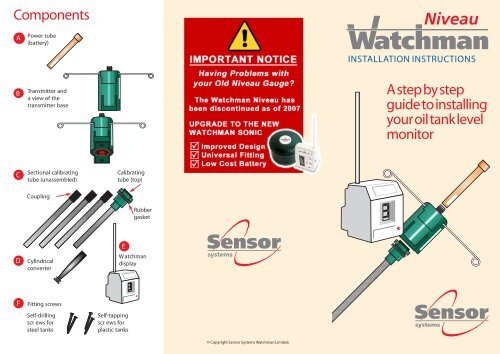
Components<br />
A<br />
Power tube<br />
(battery)<br />
B Transmitter and<br />
a view of the<br />
transmitter base<br />
C<br />
Sectional calibrating<br />
tube (unassembled)<br />
Coupling<br />
D Cylindrical<br />
converter<br />
F Fitting screws<br />
Self-drilling<br />
scr ews for<br />
steel tanks<br />
Self-tapping<br />
scr ews for<br />
plastic tanks<br />
Calibrating<br />
tube (top)<br />
Rubber<br />
gasket<br />
E<br />
W atchman<br />
display<br />
© Copyright Sensor Systems <strong>Watchman</strong> Limited,<br />
INSTALLATION INSTRUCTIONS<br />
A step by step<br />
guide to installing<br />
your oil tank level<br />
monitor
Step 1. Identify the<br />
shape of your tank<br />
Rectangular,<br />
vertical<br />
or cubic<br />
shaped<br />
tanks<br />
If your steel or<br />
plastic tank looks like<br />
one of these shapes<br />
move on to Step 2.<br />
For horizontal<br />
cylindrical tanks<br />
If your tank is shaped like a<br />
horizontal cylinder you must<br />
first use the cylindrical<br />
converter supplied.<br />
First<br />
insert<br />
the<br />
convertor<br />
A<br />
Remove both after<br />
the conversion process<br />
D<br />
Secondly<br />
attach the<br />
power<br />
tube<br />
B<br />
First push the cylindrical converter (D)<br />
onto the base of the transmitter (B) and<br />
then screw the power tube (A) onto the<br />
thread at the opposite end of the<br />
transmitter.<br />
NOTE: Hand tighten only!<br />
A number of sounds will be heard and<br />
then after 25 seconds you will hear two<br />
beeps. Immediately remove the power<br />
tube (A) and then remove the<br />
cylindrical converter (D) from the<br />
transmitter (B).<br />
Your transmitter has now been<br />
converted to read a cylindrical<br />
shaped tank.<br />
Step 2. Tank preparation<br />
Please note – it is important to keep all items dry<br />
during installation<br />
Pre-drilled tanks<br />
There may already be a 30mm pre-drilled opening in<br />
the tank top and possibly a tube fitted – if so, remove<br />
the cover and dispose of the tube.<br />
Undrilled tanks<br />
Where drilling is required choose a<br />
position on top of the tank surface<br />
where the calibrating tube (C) and<br />
transmitter (B) will be fitted. This must<br />
be on a surface that<br />
is at the same<br />
level and no<br />
30mm<br />
hole<br />
saw<br />
OR<br />
higher than any opening at the top of the tank (filling<br />
point etc). Take care not to choose an area on which<br />
water could gather i.e. a dent/depression or a position<br />
directly above any restricted area inside the tank.<br />
Drill a hole in the place that you have selected on the<br />
tank’s top surface using a 30mm hole-saw.<br />
Step 3. Tube assembly<br />
and trimming<br />
Assemble the calibrating tube (C) by firmly inserting the sections into each<br />
other until they click together. Make it up to approximately the height of<br />
your tank*.<br />
NOTE: Make sure that each<br />
tube is properly ‘clipped’ together and will not separate.<br />
The final tube must have no coupling section at the bottom.<br />
Once assembled hold the tube so that the<br />
top is level with the top surface of the tank<br />
and cut the bottom off the tube at the<br />
point where you want the <strong>Watchman</strong><br />
Niveau to show Zero. This should be<br />
roughly 10% (at least three inches or<br />
75mm) up from the outlet pipe where the<br />
oil leaves the tank.<br />
Choose a suitable position for<br />
transmitter<br />
Outlet<br />
Cut off the<br />
tube to<br />
establish<br />
‘Zero‘ level<br />
75mm<br />
*Notes for calibrating the height of your tank<br />
When the fluid level in your tank drops below the end of the calibrating<br />
tube (C) this will register Zero on your <strong>Watchman</strong> Niveau. The shorter the<br />
tube is cut the more reserve there will be in the tank when at Zero.<br />
If when you assemble the calibrating tube (C) it’s too short for your tank’s<br />
height / diameter, please contact Sensor Systems to obtain additional longer<br />
sections.<br />
Step 4. Calibrating<br />
Take the calibrating tube (C), which you<br />
have trimmed to length and push it into<br />
the transmitter base (B). Hold the tube in<br />
a horizontal position to ensure there is no<br />
obstruction. Then screw the power tube<br />
(A) onto the transmitter (B).<br />
You will hear a number of sounds and<br />
after 25 seconds you will hear three<br />
beeps. The <strong>Watchman</strong> Niveau has now<br />
been calibrated for your tank’s size.<br />
Immediately remove the power tube (A)<br />
from the transmitter (B).<br />
Step 5. Fitting<br />
After calibration lower the calibrating<br />
tube (C) into the hole in the tank. Make<br />
sure that you keep the rubber gasket in<br />
place – this provides a seal between the<br />
tank and the tube. Make sure that the<br />
top of the tube is properly located into<br />
the 30 mm hole.<br />
Fit the transmitter (B) onto the top of<br />
the tube and push it down firmly. Use<br />
the correct type of screws dependng on<br />
whether the tank is steel or plastic to<br />
tighten the<br />
transmitter down<br />
fully onto the tube.<br />
Plug the <strong>Watchman</strong><br />
Display (E) into a<br />
mains electrical<br />
socket and switch it<br />
on. The <strong>Watchman</strong><br />
display will show the serial number of the<br />
unit in single digits and then an ‘r’. Make<br />
a note of this number and enter this,<br />
along with the other information<br />
requested, on the Guarantee card for<br />
return to Sensor Systems <strong>Watchman</strong> <strong>Ltd</strong>.<br />
Lastly, fit the power tube (A) onto the<br />
thread on the top of the transmitter (B).<br />
NOTE: Hand-tighten only! Finally view<br />
the display (E) – this will change from<br />
the ‘r’ to the level in the tank within a<br />
few minutes.<br />
First attach<br />
the the<br />
calibrating<br />
tube<br />
A<br />
Secondly<br />
attach the<br />
power tube<br />
C<br />
A<br />
C<br />
B<br />
B<br />
Rubber<br />
gasket<br />
B<br />
B
Level displays<br />
Your <strong>Watchman</strong> Niveau displays<br />
the level in your tank in 1 ⁄10 of its<br />
usable volume, ignoring a small<br />
area in the top of the tank, to<br />
allow for room for expansion in<br />
hot weather.<br />
F Full<br />
9 from 9 ⁄10 to Full<br />
8 from 8 ⁄10 to 9 ⁄10<br />
7 from 7 ⁄10 to 8 ⁄10<br />
6 from 6 ⁄10 to 7 ⁄10<br />
5 from 5 ⁄10 to 6 ⁄10<br />
4 from 4 ⁄10 to 5 ⁄10<br />
3 from 3 ⁄10 to 4 ⁄10<br />
2 from 2 ⁄10 to 3 ⁄10<br />
1 from 1 ⁄10 to 2 ⁄10<br />
0 from 1 ⁄10 to Run out!<br />
User <strong>Instructions</strong><br />
Other displays Reason<br />
Red light flashing once every Display has not heard from the transmitter<br />
3 seconds with the “ r “ since the display was last plugged in and<br />
Display switched on<br />
Red light flashing once every<br />
second with the fluid<br />
levels 1 and 0<br />
Indicates that your tank is low 1 is from<br />
2 1 1<br />
⁄10 down to ⁄10,0 is from ⁄10 to Run Out!<br />
Fluid level together with You will soon need a new Power Tube battery*.<br />
“Bat Low” As long as your level display is not flashing<br />
it is valid<br />
Fluid level digit flashing – the Display has not heard from the tank transmitter<br />
level is more than 24 hours old for over 24 hours – may be due to a flat Power<br />
and may no longer be valid! Tube Battery*<br />
C means “Connection Fault” This indicates that damage may have ocurred<br />
to your <strong>Watchman</strong> transmitter and it has an<br />
internal fault. A replacement product will be<br />
required, please contact Sensor Systems<br />
* Please call Sensor Systems to locate your nearest power tube stockist
Operation<br />
On start-up the transmitter will transmit the level every 6<br />
seconds for 10 1 ⁄2 minutes and then, in normal operation,<br />
will update the level once every hour or within 15 minutes<br />
of a level change. If the <strong>Watchman</strong> display has not heard<br />
from its transmitter for more than 24 hours the number<br />
displayed will ash to indicate that it is older than 24<br />
hours and may not now be valid.<br />
How to change Power Tube battery<br />
or reboot your system<br />
1 Switch your <strong>Watchman</strong> Niveau display o and on<br />
again – you will see the serial number displayed<br />
followed by “ r “ standing for rest or reset<br />
2 Unscrew and remove the Power Tube from your<br />
transmitter, wait for 2 minutes and then screw on your<br />
new Power Tube (if replacing). The action of tting the<br />
Power Tube to the transmitter will reboot the system<br />
3 Within a few minutes your <strong>Watchman</strong> Niveau will<br />
display your tank level<br />
User <strong>Instructions</strong><br />
Remember to dispose of your old power tube<br />
thoughtfully and in accordance with local regulations.<br />
The power tube contains alkaline cells and must not be<br />
exposed to excessive heat or put in a re.<br />
© Sensor Systems <strong>Watchman</strong> Limited, Shearf Drive,<br />
Lurgan, Co. Armagh. BT66 8DD<br />
Email: service@commercialfuelsolutions.co.uk<br />
Telephone + 44 (0) 2380 231 007<br />
<strong>Watchman</strong> Niveau User Version 1 February 2004