LS9 Quick Reference Card - Panduit
LS9 Quick Reference Card - Panduit LS9 Quick Reference Card - Panduit
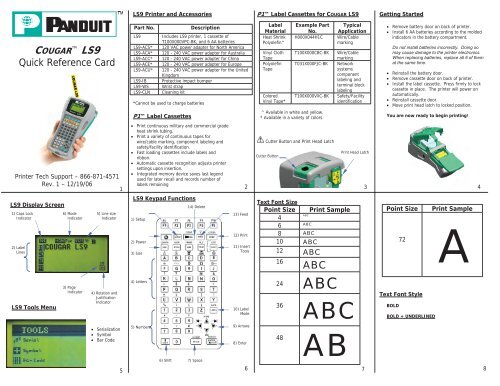
COUGAR LS9 Quick Reference Card Printer Tech Support – 866-871-4571 Rev. 1 – 12/19/06 LS9 Display Screen 1) Caps Lock Indicator 2) Label Lines LS9 Tools Menu 6) Mode Indicator 5) Line size Indicator 3) Page Indicator 4) Rotation and Justification Indicator Serialization Symbol Bar Code 1 5 LS9 Printer and Accessories Part No. Description LS9 Includes LS9 printer, 1 cassette of T100X000VPC-BK, and 6 AA batteries LS9-ACS* 120 VAC power adapter for North America LS9-ACA* 120 - 240 VAC power adapter for Australia LS9-ACC* 120 - 240 VAC power adapter for China LS9-ACE* 120 - 240 VAC power adapter for Europe LS9-ACU* 120 - 240 VAC power adapter for the United Kingdom LS9-IB Protective impact bumper LS9-WS Wrist strap LS9-CLN Cleaning kit *Cannot be used to charge batteries P1 Label Cassettes Print continuous military and commercial grade heat shrink tubing. Print a variety of continuous tapes for wire/cable marking, component labeling and safety/facility identification. Fast loading cassettes include labels and ribbon. Automatic cassette recognition adjusts printer settings upon insertion. Integrated memory device saves last legend used for later recall and records number of labels remaining LS9 Keypad Functions 1) Setup 2) Power 3) Size 4) Letters 5) Numbers 6) Shift 14) Delete 7) Space 2 13) Feed 12) Print 11) Insert Tools 10) Label Mode 9) Arrows 8) Enter 6 P1 Label Cassettes for COUGAR LS9 Label Material Heat Shrink Polyolefin^ Vinyl Cloth Tape Polyolefin Tape Colored Vinyl Tape* ^ Available in white and yellow. * Available in a variety of colors. Cutter Button and Print Head Latch Cutter Button Text Font Size Point Size Print Sample ABC 4 ABC 6 8 ABC 10 ABC 12 ABC 16 ABC 24 ABC 36 48 Example Part Typical No. Application H000X044H1C Wire/Cable marking T100X000CBC-BK Wire/Cable marking T031X000FJC-BK Network systems component labeling and terminal block labeling T100X000VXC-BK Safety/Facility identification ABC AB Print Head Latch 7 3 Getting Started Remove battery door on back of printer. Install 6 AA batteries according to the molded indicators in the battery compartment. Do not install batteries incorrectly. Doing so may cause damage to the printer electronics. When replacing batteries, replace all 6 of them at the same time. Reinstall the battery door. Remove cassette door on back of printer. Install the label cassette. Press firmly to lock cassette in place. The printer will power on automatically. Reinstall cassette door. Move print head latch to locked position. You are now ready to begin printing! Point Size Print Sample 72 Text Font Style BOLD BOLD + UNDERLINED A 4 8
COUGAR <strong>LS9</strong><br />
<strong>Quick</strong> <strong>Reference</strong> <strong>Card</strong><br />
Printer Tech Support – 866-871-4571<br />
Rev. 1 – 12/19/06<br />
<strong>LS9</strong> Display Screen<br />
1) Caps Lock<br />
Indicator<br />
2) Label<br />
Lines<br />
<strong>LS9</strong> Tools Menu<br />
6) Mode<br />
Indicator<br />
5) Line size<br />
Indicator<br />
3) Page<br />
Indicator 4) Rotation and<br />
Justification<br />
Indicator<br />
Serialization<br />
Symbol<br />
Bar Code<br />
1<br />
5<br />
<strong>LS9</strong> Printer and Accessories<br />
Part No. Description<br />
<strong>LS9</strong> Includes <strong>LS9</strong> printer, 1 cassette of<br />
T100X000VPC-BK, and 6 AA batteries<br />
<strong>LS9</strong>-ACS* 120 VAC power adapter for North America<br />
<strong>LS9</strong>-ACA* 120 - 240 VAC power adapter for Australia<br />
<strong>LS9</strong>-ACC* 120 - 240 VAC power adapter for China<br />
<strong>LS9</strong>-ACE* 120 - 240 VAC power adapter for Europe<br />
<strong>LS9</strong>-ACU* 120 - 240 VAC power adapter for the United<br />
Kingdom<br />
<strong>LS9</strong>-IB Protective impact bumper<br />
<strong>LS9</strong>-WS Wrist strap<br />
<strong>LS9</strong>-CLN Cleaning kit<br />
*Cannot be used to charge batteries<br />
P1 Label Cassettes<br />
Print continuous military and commercial grade<br />
heat shrink tubing.<br />
Print a variety of continuous tapes for<br />
wire/cable marking, component labeling and<br />
safety/facility identification.<br />
Fast loading cassettes include labels and<br />
ribbon.<br />
Automatic cassette recognition adjusts printer<br />
settings upon insertion.<br />
Integrated memory device saves last legend<br />
used for later recall and records number of<br />
labels remaining<br />
<strong>LS9</strong> Keypad Functions<br />
1) Setup<br />
2) Power<br />
3) Size<br />
4) Letters<br />
5) Numbers<br />
6) Shift<br />
14) Delete<br />
7) Space<br />
2<br />
13) Feed<br />
12) Print<br />
11) Insert<br />
Tools<br />
10) Label<br />
Mode<br />
9) Arrows<br />
8) Enter<br />
6<br />
P1 Label Cassettes for COUGAR <strong>LS9</strong><br />
Label<br />
Material<br />
Heat Shrink<br />
Polyolefin^<br />
Vinyl Cloth<br />
Tape<br />
Polyolefin<br />
Tape<br />
Colored<br />
Vinyl Tape*<br />
^ Available in white and yellow.<br />
* Available in a variety of colors.<br />
Cutter Button and Print Head Latch<br />
Cutter Button<br />
Text Font Size<br />
Point Size Print Sample<br />
ABC<br />
4<br />
ABC<br />
6<br />
8 ABC<br />
10 ABC<br />
12 ABC<br />
16<br />
ABC<br />
24 ABC<br />
36<br />
48<br />
Example Part Typical<br />
No. Application<br />
H000X044H1C Wire/Cable<br />
marking<br />
T100X000CBC-BK Wire/Cable<br />
marking<br />
T031X000FJC-BK Network<br />
systems<br />
component<br />
labeling and<br />
terminal block<br />
labeling<br />
T100X000VXC-BK Safety/Facility<br />
identification<br />
ABC<br />
AB<br />
Print Head Latch<br />
7<br />
3<br />
Getting Started<br />
Remove battery door on back of printer.<br />
Install 6 AA batteries according to the molded<br />
indicators in the battery compartment.<br />
Do not install batteries incorrectly. Doing so<br />
may cause damage to the printer electronics.<br />
When replacing batteries, replace all 6 of them<br />
at the same time.<br />
Reinstall the battery door.<br />
Remove cassette door on back of printer.<br />
Install the label cassette. Press firmly to lock<br />
cassette in place. The printer will power on<br />
automatically.<br />
Reinstall cassette door.<br />
Move print head latch to locked position.<br />
You are now ready to begin printing!<br />
Point Size Print Sample<br />
72<br />
Text Font Style<br />
BOLD<br />
BOLD + UNDERLINED<br />
A<br />
4<br />
8
Serialization Tool<br />
1. Press F4 (<strong>Quick</strong> key for wire marking)<br />
2. Set length as 1.50 (see length selection table in<br />
section 10 for additional size<br />
recommendations)<br />
3. Press ENTER<br />
4. Type “I/O:”<br />
5. Press the INSERT key and select Serial<br />
6. Enter a start value of 01, stop value of 02, and<br />
increment value of 1<br />
7. Press ENTER<br />
8. Press PRINT<br />
Example using T100X000CBC-BK, continuous cloth tape<br />
for wire/cable marking:<br />
I/O:01<br />
I/O:01<br />
I/O:01<br />
I/O:01<br />
I/O:01<br />
I/O:01<br />
I/O:01<br />
I/O:01<br />
I/O:01<br />
Other Functions<br />
POWER – Turn printer on or off<br />
SETUP – Access the Set Up menu<br />
DELETE – Erase characters and tools<br />
CLEAR – Clear the entire screen<br />
FEED – Feed labels<br />
PRINT – Print labels<br />
COPIES – Print multiple copies or a selection of pages<br />
SIZE – Select the text font size<br />
LENGTH – Set the length of continuous label media<br />
STYLE – Select the text font style<br />
ALIGN – Change the label justification<br />
LINE – Add vertical and horizontal lines to a label<br />
FRAME – Add a frame around a label<br />
PAGE – Move to another page<br />
FILE – Access the file manager<br />
INSERT – Insert a new tool<br />
EDIT – Edit an existing tool<br />
LABEL – Change the label mode<br />
CAPS – Turn caps lock on or off<br />
HOME – Move to home position on screen<br />
END – Move to end position on screen<br />
SHIFT – Access secondary functions on keypad<br />
SPACE – Add a space to a label<br />
ACCENT – Insert an international character<br />
I/O:02<br />
I/O:02<br />
I/O:02<br />
I/O:02<br />
I/O:02<br />
I/O:02<br />
I/O:02<br />
I/O:02<br />
I/O:02<br />
ENTER – Move to the next line or accept menu changes<br />
ROTATE – Rotate the label 90, 180, or 270 degrees<br />
Wire/Cable Marking Length Selection<br />
Lengths For Wire and Cable Marking<br />
with Continuous Tape<br />
Wire/ Wire/Cable Suggested<br />
Cable Size Diameter Marker<br />
Length<br />
in. mm in. mm<br />
Cat. 5E/4 .25 6.4 1.50 38.2<br />
Cat. 5E/25 .51 13.0 2.00 50.8<br />
Cat. 5E/50 .66 16.8 2.50 63.6<br />
Cat. 5E/100 .96 24.4 3.75 95.2<br />
Cat. 6 .21-.27 5.3–6.9 1.50 38.2<br />
18 AWG .11 2.8 0.75 19.0<br />
16 AWG .12 3.0 0.75 19.0<br />
14 AWG .16 4.1 1.00 25.4<br />
12 AWG .18 4.6 1.25 31.8<br />
10 AWG .20 5.1 1.25 31.8<br />
8 AWG .28 7.1 1.75 44.6<br />
6 AWG .32 8.1 1.75 44.6<br />
4 AWG .37 9.4 1.75 44.6<br />
3 AWG .40 10.2 2.00 50.8<br />
2 AWG .43 10.9 2.00 50.8<br />
1 AWG .51 13.0 2.50 63.6<br />
1/0 .55 14.0 2.50 63.6<br />
2/0 .59 15.0 2.50 63.6<br />
3/0 .65 16.5 2.75 70.0<br />
4/0 .70 17.8 3.00 76.2<br />
Set Up Menu<br />
Special Functions (F Keys)<br />
F1 – Display F key menu<br />
F2 – Store and recall user profiles<br />
F3 – Display label cassette information<br />
F4 – <strong>Quick</strong> key for wire marking (use with continuous<br />
vinyl cloth tape)<br />
F5 – DIN Mode for European Terminal Blocks<br />
Symbol Tool<br />
1. Press the INSERT key and select Symbol<br />
2. Select symbol number 16 from the library<br />
3. Press ENTER<br />
4. Press SPACE<br />
5. Type “CAUTION”<br />
6. Press PRINT<br />
Example using T100X000VXC-BK, black on yellow<br />
continuous vinyl tape:<br />
41 Symbols, Including:<br />
And many more…<br />
Free COUGAR <strong>LS9</strong> Downloads Available<br />
Online at www.panduit.com<br />
Detailed Operator’s Manuals in English, French,<br />
German, Italian, Spanish, and Portuguese<br />
Replacement <strong>Quick</strong> <strong>Reference</strong> <strong>Card</strong>s in English,<br />
French, German, Italian, Spanish, and Portuguese<br />
Product bulletin with part ordering information<br />
Patch Panel/Face Plate Labeling<br />
Example using T0380X000VPC-BK, black on white<br />
continuous vinyl tape:<br />
Bar Code Tool<br />
PANDUIT<br />
Example using<br />
T100X000VPC-BK,<br />
black on white continuous vinyl tape<br />
9 10 11<br />
12<br />
Languages – Set the printer language<br />
Units – Select inches or mm<br />
Bar Code – Set the default bar code settings<br />
Contrast – Lighten or darken the display<br />
Heat – Adjust the heat of the print head<br />
Version – Display the current operating system<br />
version number<br />
Factory Defaults – Return printer settings to<br />
factory default values<br />
Cut/Pause – Pause a multi-label print job to cut<br />
between labels<br />
Auto-off – Turn the 5 minute automatic shut-off<br />
function on or off<br />
CAUTION<br />
Additional Information<br />
The COUGAR <strong>LS9</strong> is part of a complete line of<br />
identification solutions from <strong>Panduit</strong>, which also<br />
includes the PANTHER LS8 Hand-Held Thermal<br />
Transfer Printer with Revolutionary label cut-tolength<br />
functionality.<br />
The PANTHER LS8 prints die-cut and continuous<br />
P1 Label Cassettes.<br />
The PANTHER LS8 features a USB interface for<br />
importing data, system upgrades, and printing<br />
labels from a wireless laptop or desktop computer.<br />
See the printer comparison chart in section 16 or<br />
visit www.panduit.com for more information.<br />
1. Type “A”<br />
2. Press the INSERT key and select Serial<br />
3. Enter a start value of 01, stop value of 04, and<br />
increment value of 1<br />
4. Press ENTER<br />
5. Press Shift + LENGTH<br />
6. Set length as 0.65<br />
7. Press LINE and select @ PAGES – Yes<br />
8. Press ENTER<br />
9. Press PRINT<br />
A01 A02 A03 A04<br />
1. Press the INSERT key and select Bar Code<br />
2. Scroll right and type text in the window<br />
3. Press ENTER<br />
4. Press ENTER<br />
5. Press PRINT<br />
Printer Comparison<br />
PART NO. <strong>LS9</strong>-QS-A, Rev. 1<br />
Toll free technical support: 1-866-871-4571<br />
Toll free customer service: 1-800-777-3300<br />
Also visit www.panduit.com<br />
13 14 15 16


