WHIPPING: METHOD 1: WHIPPING: - Rope Works
WHIPPING: METHOD 1: WHIPPING: - Rope Works
WHIPPING: METHOD 1: WHIPPING: - Rope Works

You also want an ePaper? Increase the reach of your titles
YUMPU automatically turns print PDFs into web optimized ePapers that Google loves.
© 1999, Gerald L. Findley 5<br />
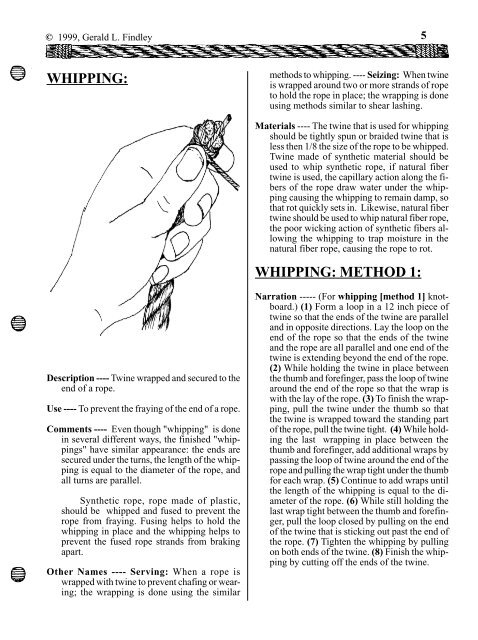
<strong>WHIPPING</strong>:<br />
Description ---- Twine wrapped and secured to the<br />
end of a rope.<br />
Use ---- To prevent the fraying of the end of a rope.<br />
Comments ---- Even though "whipping" is done<br />
in several different ways, the finished "whippings"<br />
have similar appearance: the ends are<br />
secured under the turns, the length of the whipping<br />
is equal to the diameter of the rope, and<br />
all turns are parallel.<br />
Synthetic rope, rope made of plastic,<br />
should be whipped and fused to prevent the<br />
rope from fraying. Fusing helps to hold the<br />
whipping in place and the whipping helps to<br />
prevent the fused rope strands from braking<br />
apart.<br />
Other Names ---- Serving: When a rope is<br />
wrapped with twine to prevent chafing or wearing;<br />
the wrapping is done using the similar<br />
methods to whipping. ---- Seizing: When twine<br />
is wrapped around two or more strands of rope<br />
to hold the rope in place; the wrapping is done<br />
using methods similar to shear lashing.<br />
Materials ---- The twine that is used for whipping<br />
should be tightly spun or braided twine that is<br />
less then 1/8 the size of the rope to be whipped.<br />
Twine made of synthetic material should be<br />
used to whip synthetic rope, if natural fiber<br />
twine is used, the capillary action along the fibers<br />
of the rope draw water under the whipping<br />
causing the whipping to remain damp, so<br />
that rot quickly sets in. Likewise, natural fiber<br />
twine should be used to whip natural fiber rope,<br />
the poor wicking action of synthetic fibers allowing<br />
the whipping to trap moisture in the<br />
natural fiber rope, causing the rope to rot.<br />
<strong>WHIPPING</strong>: <strong>METHOD</strong> 1:<br />
Narration ----- (For whipping [method 1] knotboard.)<br />
(1) Form a loop in a 12 inch piece of<br />
twine so that the ends of the twine are parallel<br />
and in opposite directions. Lay the loop on the<br />
end of the rope so that the ends of the twine<br />
and the rope are all parallel and one end of the<br />
twine is extending beyond the end of the rope.<br />
(2) While holding the twine in place between<br />
the thumb and forefinger, pass the loop of twine<br />
around the end of the rope so that the wrap is<br />
with the lay of the rope. (3) To finish the wrapping,<br />
pull the twine under the thumb so that<br />
the twine is wrapped toward the standing part<br />
of the rope, pull the twine tight. (4) While holding<br />
the last wrapping in place between the<br />
thumb and forefinger, add additional wraps by<br />
passing the loop of twine around the end of the<br />
rope and pulling the wrap tight under the thumb<br />
for each wrap. (5) Continue to add wraps until<br />
the length of the whipping is equal to the diameter<br />
of the rope. (6) While still holding the<br />
last wrap tight between the thumb and forefinger,<br />
pull the loop closed by pulling on the end<br />
of the twine that is sticking out past the end of<br />
the rope. (7) Tighten the whipping by pulling<br />
on both ends of the twine. (8) Finish the whipping<br />
by cutting off the ends of the twine.
6<br />
+ +<br />
<strong>WHIPPING</strong><br />
1.<br />
2.<br />
3.<br />
4.<br />
(12 inch twine)<br />
----------------------------------------<br />
© 1999, Gerald L. Findley<br />
---------------------------------------diameter<br />
5.<br />
of rope<br />
||<br />
6. pull<br />
------><br />
7. <br />
8.<br />
cut off ends<br />
+ +
© 1999, Gerald L. Findley 7<br />
<strong>WHIPPING</strong>: <strong>METHOD</strong> 2:<br />
Narration ----- (For whipping [method 2] knotboard.)<br />
(1) Form a bight in the end of a 24 inch<br />
piece of twine and lay it parallel to the end of<br />
the rope so that part of the short side of the<br />
bight is extending beyond the end of the rope.<br />
(2) Take a wrap around the end of the rope;<br />
hold the bight and the wrap in place with the<br />
thumb and forefinger; pull wrap tight. (3) When<br />
the length of the whipping is equal to the diameter<br />
of the rope, reeve the end of the twine<br />
through the eye of the bight. (4) Pull wrappings<br />
tight. (5) Pull on the end of the twine that is<br />
extending beyond the end of the rope until a<br />
bight of the free end of the twine is pulled under<br />
and to the mid point of the wrappings. (6)<br />
Finish the whipping by cutting off the ends of<br />
the twine.<br />
+ +<br />
<strong>WHIPPING</strong><br />
<strong>METHOD</strong> 2<br />
1.<br />
2.<br />
3.<br />
bight<br />
pull tight<br />
------><br />
diameter of rope<br />
|----------|<br />
----------------------------------------
8<br />
----------------------------------------<br />
4.<br />
5.<br />
6.<br />
pull tight<br />
------><br />
pull to center<br />
cut off ends<br />
+ +<br />
© 1999, Gerald L. Findley<br />
+ +<br />
<strong>WHIPPING</strong><br />
<strong>METHOD</strong> 3<br />
1. short bight<br />
2. 12 inch twine<br />
3.<br />
pull tight<br />
-----><br />
----------------------------------------
© 1999, Gerald L. Findley 9<br />
----------------------------------------<br />
4.<br />
5.<br />
6.<br />
diameter of rope<br />
|-------|<br />
<br />
7. cut of ends<br />
pull<br />
------><br />
+ +<br />
<strong>WHIPPING</strong>: <strong>METHOD</strong> 3<br />
Narration ----(For whipping [ method 3] knotboard.)<br />
(1) Form a bight in a 6 inch piece of<br />
twine; lay the bight parallel to the end of the<br />
rope with the ends of the twine extending past<br />
the end of the rope. (2) Lay the end of a 24<br />
inch piece of twine next to the loop with the<br />
long end extending past the end of the rope.<br />
(3) Take a wrap around the end of the rope;<br />
hold the bight and the wrap in place with the<br />
thumb and forefinger; pull wrap tight.<br />
(4) When the length of the whipping is equal<br />
to the diameter of the rope, reeve the end of<br />
the twine through the eye of the bight. (5) Use<br />
the bight to pull the free end of the twine under<br />
the wrappings. (6) Tighten the whipping<br />
by pulling on the ends of the twine. (7) Finish<br />
the whipping by cutting off the end of the twine.<br />
BOUND <strong>WHIPPING</strong>:<br />
Description ---- A whipping with strands across<br />
the wraps.<br />
Use ---- As a secure permanent whipping.<br />
Comments ---- Bound whipping secures the wrapping<br />
turns by adding frapping turns to a standard<br />
whipping.<br />
Other Names ---- Sailmaker's Whipping, (usually<br />
done with a needle).<br />
Tying a Bound Whipping:<br />
STEP 1: Lay a loop formed from a 24 inch piece<br />
of twine in one of the grooves between the<br />
strands of the rope. The end of the twine toward<br />
the standing part of the rope should be<br />
about 3 inches long.
10<br />
STEP 2: Wrap the twine around the end of the<br />
rope, work toward the standing part of the rope.<br />
STEP 3: When the length of the whipping is equal<br />
to the diameter of the rope, close the loop by<br />
pulling on the end of the twine that extends<br />
beyond the end of the rope.<br />
diameter of rope<br />
|---------|<br />
pull<br />
------><br />
STEP 4: Pull on both ends of the twine to tighten<br />
the whipping around the rope.<br />
pull<br />
<br />
STEP 5: Separate the ends of the rope strands,<br />
pull the twine between the strand to the right<br />
of the groove that the twine was originally laid<br />
in and the other two strands.<br />
-------><br />
pull<br />
STEP 6: Use a fid to lift the strand of the rope as<br />
shown in the diagram (this is the same strand<br />
that the twine went around at the end of the<br />
rope), reeve the twine under the strand; pull<br />
twine tight.<br />
© 1999, Gerald L. Findley<br />
STEP 7: Lay the twine over the original groove<br />
and then pull the twine between the ends of<br />
the rope strands so that the twine is around the<br />
rope strand to the left of the original groove;<br />
pull twine tight.<br />
pull tight<br />
-------><br />
STEP 8: Use a fid to lift the rope strand as shown<br />
in the diagram (this is the same strand that the<br />
twine went around at the end of the rope); reeve<br />
the ends of the twine through the opening and<br />
tie a half knot as shown in the diagram; pull<br />
twine tight.<br />
half knot<br />
fid -------<br />
---------<br />
STEP 9: Reeve the ends of the twine through the<br />
opening again; tie a second half knot in the<br />
opposite direction as shown in the diagram; pull<br />
twine tight to form a square knot.<br />
half knot<br />
-----<br />
STEP 10: Remove the fid and trim the ends of<br />
the twine close to the surface of the rope.<br />
[NOTE] If synthetic rope and twine were used the<br />
ends of the rope and the twine may be fused.