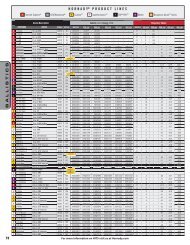
Lock-N-Load AP - Hornady
Lock-N-Load AP - Hornady
Lock-N-Load AP - Hornady

Create successful ePaper yourself
Turn your PDF publications into a flip-book with our unique Google optimized e-Paper software.
2: Installing the Shell Plate<br />
Raise the Ram approximately 2" and place Block under Sub Plate (24). This disengages the Index Pawls (32),<br />
and allows for free rotation of the Shell plate.<br />
Put a small amount of general-purpose grease on the Shell Plate Ball Detents located on bottom side of Shell<br />
Plate (12), and on the top surface of the Sub-Plate (24).<br />
Align the Shell Plate* with the keyed Drive Hub (29).<br />
Place the 3/8" Shell Plate Retainer Bolt (9) thru the 3/8" Flat Washer (28), (large end up) and thread the bolt<br />
into the Drive Hub (29).<br />
Tighten the bolt (9) using a 5/16" Allen wrench, only tight enough to prevent it from coming loose.<br />
Stretch the Case Retainer Spring (17) over the top of the Shell Plate (12).<br />
Remove Block from under Sub-Plate (24) and make sure it is in the Retainer Spring Grove (17A).<br />
While cycling the Press, push the Case Retainer Spring (17) into the relieved area on the Sub-Plate (24). You<br />
will have to cycle the press a couple of stations to receive these results.<br />
EZject<br />
Figure 2: Installing Shell Plate<br />
- 5 -<br />
SHELL PLATE RETAINER BOLT (9)<br />
FLAT WASHER (28)<br />
SHELL PLATE (12)<br />
RETAINER SPRING-<br />
GROOVE (17A)<br />
DRIVE HUB (29)<br />
SUB PLATE (24)