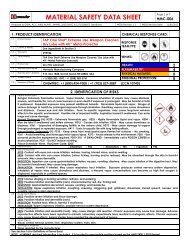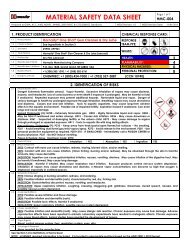
Lock-N-Load AP - Hornady
Lock-N-Load AP - Hornady
Lock-N-Load AP - Hornady

You also want an ePaper? Increase the reach of your titles
YUMPU automatically turns print PDFs into web optimized ePapers that Google loves.
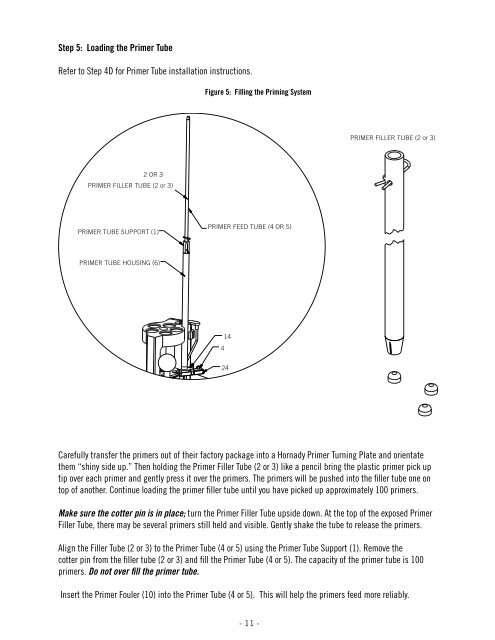
Step 5: <strong>Load</strong>ing the Primer Tube<br />
Refer to Step 4D for Primer Tube installation instructions.<br />
2 OR 3<br />
PRIMER FILLER TUBE (2 or 3)<br />
PRIMER TUBE SUPPORT (1)<br />
PRIMER TUBE HOUSING (6)<br />
Figure 5: Filling the Priming System<br />
PRIMER FEED TUBE (4 OR 5)<br />
4<br />
14<br />
24<br />
Carefully transfer the primers out of their factory package into a <strong>Hornady</strong> Primer Turning Plate and orientate<br />
them “shiny side up.” Then holding the Primer Filler Tube (2 or 3) like a pencil bring the plastic primer pick up<br />
tip over each primer and gently press it over the primers. The primers will be pushed into the filler tube one on<br />
top of another. Continue loading the primer filler tube until you have picked up approximately 100 primers.<br />
Make sure the cotter pin is in place; turn the Primer Filler Tube upside down. At the top of the exposed Primer<br />
Filler Tube, there may be several primers still held and visible. Gently shake the tube to release the primers.<br />
Align the Filler Tube (2 or 3) to the Primer Tube (4 or 5) using the Primer Tube Support (1). Remove the<br />
cotter pin from the filler tube (2 or 3) and fill the Primer Tube (4 or 5). The capacity of the primer tube is 100<br />
primers. Do not over fill the primer tube.<br />
Insert the Primer Fouler (10) into the Primer Tube (4 or 5). This will help the primers feed more reliably.<br />
- 11 -<br />
PRIMER FILLER TUBE (2 or 3)