A pin-prick as spy-hole - Xplora
A pin-prick as spy-hole - Xplora
A pin-prick as spy-hole - Xplora
Create successful ePaper yourself
Turn your PDF publications into a flip-book with our unique Google optimized e-Paper software.
S C I E N C E C E N T E R<br />
o p s c h o o l<br />
A PIN-PRICK AS SPY-HOLE<br />
Who wants to be seen when they are <strong>spy</strong>ing? A newspaper with a <strong>hole</strong> in<br />
is a bit obvious don’t you think? How about a box with a <strong>hole</strong> the size<br />
of a <strong>pin</strong>-<strong>prick</strong>? Will it show you what’s around you? That’s what you are<br />
going to fi nd out with this exhibit: the ‘camera obscura’, a forerunner of<br />
the camera. Do you see anything?<br />
Materials:<br />
WHAT DO YOU NEED?<br />
Big cardboard box (at le<strong>as</strong>t 50 x 50<br />
centimeters)<br />
Large sheet of white paper<br />
M<strong>as</strong>king tape<br />
Aluminum foil<br />
Gaffer tape<br />
Glue<br />
Black pullover / towel<br />
BUILDING PLAN<br />
NATURAL SCIENCE Light<br />
TECHNOLOGY Structures<br />
Tools:<br />
Pencil<br />
Ruler<br />
Awl<br />
Scissors<br />
Thumbtack<br />
Comp<strong>as</strong>ses<br />
Before he starts building, a builder of exhibits fi rst makes a building plan of the exhibit.<br />
That’s what you are going to do too. A building plan shows how something is made and<br />
how big it will be.<br />
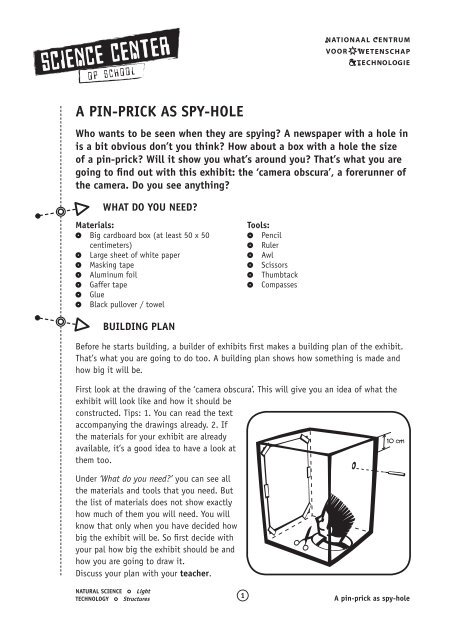
First look at the drawing of the ‘camera obscura’. This will give you an idea of what the<br />
exhibit will look like and how it should be<br />
constructed. Tips: 1. You can read the text<br />
accompanying the drawings already. 2. If<br />
the materials for your exhibit are already<br />
available, it’s a good idea to have a look at<br />
them too.<br />
Under ‘What do you need?’ you can see all<br />
the materials and tools that you need. But<br />
the list of materials does not show exactly<br />
how much of them you will need. You will<br />
know that only when you have decided how<br />
big the exhibit will be. So fi rst decide with<br />
your pal how big the exhibit should be and<br />
how you are going to draw it.<br />
Discuss your plan with your teacher.<br />
1 A <strong>pin</strong>-<strong>prick</strong> <strong>as</strong> <strong>spy</strong>-<strong>hole</strong>
S C I E N C E C E N T E R<br />
o p s c h o o l<br />
Now use a pencil and ruler to make a building plan in your workbook. You both make<br />
your own building plan in your workbooks, but you do it in the same way. You make<br />
the drawing to scale 1:2. This means that one centimeter in the drawing is really two<br />
centimeters in real life. So if your real cardboard box is fi fty centimeters high, it is<br />
twenty-fi ve centimeters high in the drawing. Write the real me<strong>as</strong>urements next to the<br />
different parts. In your building plan, you should also mark where <strong>hole</strong>s should be in the<br />
box. For this, use the description under ‘How are you going to make it?’<br />
You are going to show the building plan to the rest of your cl<strong>as</strong>s. Tell them how you<br />
plan to build the exhibit. Ask the other children and the teacher what they think of the<br />
building plan. Maybe they have an idea to make it even better.<br />
Show your improved building plan to the teacher. When he or she h<strong>as</strong> approved your<br />
drawing, you can start making the list of materials together.<br />
LIST OF MATERIALS<br />
The building plan is ready, so you now know the size of all the materials and you can<br />
count how many of each part you need. Make the list of materials in your workbook and<br />
give the list to your teacher. Ask him or her where you can get these things. Then you<br />
can really start building!<br />
HOW ARE YOU GOING TO MAKE IT?<br />
To build an exhibit together you have to discuss a lot and make agreements. How are you<br />
going to tackle it? Who does what?<br />
Divide up the different t<strong>as</strong>ks <strong>as</strong> fairly <strong>as</strong> possible.<br />
Try to work together <strong>as</strong> much <strong>as</strong> possible, so that you both get some experience of<br />
building. If you come across a diffi cult word, look it up in a dictionary.<br />
1.<br />
Take a good look at the drawing on the previous page. We will call the side of the box in which<br />
you stick your head the bottom. The side of the box that is behind your head in the drawing is<br />
the back. The side that your head faces is the front.<br />
2.<br />
Take the cardboard box. Decide which sides will be the bottom, front and back. Seal the bottom of<br />
the box with tape.<br />
3.<br />
Start by making <strong>hole</strong>s in the box. At the back of the bottom of the box, cut out a <strong>hole</strong> with the<br />
scissors. Make the <strong>hole</strong> big enough for your head to just fi t through. Take a good look at the<br />
drawing to see how you should make the <strong>hole</strong>.<br />
Fix gaffer tape around the edge of the <strong>hole</strong> so that it does not tear.<br />
NATURAL SCIENCE Light<br />
TECHNOLOGY Structures<br />
2<br />
A <strong>pin</strong>-<strong>prick</strong> <strong>as</strong> <strong>spy</strong>-<strong>hole</strong>
S C I E N C E C E N T E R<br />
o p s c h o o l<br />
4.<br />
Make a round <strong>hole</strong> in the middle of the upper<br />
side of the back of the box. First draw this<br />
<strong>hole</strong> with comp<strong>as</strong>ses. The circle must have<br />
a diameter of 3 centimeters and start 10<br />
centimeters under the upper edge of the box.<br />
Then <strong>prick</strong> out the circle with the awl.<br />
5.<br />
Cut out a piece of aluminum foil that is slightly<br />
bigger than the circle. Fix it over the circle with<br />
m<strong>as</strong>king tape on the outside of the box.<br />
6.<br />
Glue a large sheet of white paper to the inside<br />
of the front of the box.<br />
Make sure that the w<strong>hole</strong> side is covered with<br />
white paper. Use more than one sheet if you<br />
need to.<br />
7.<br />
Seal the top of the box. Now put the box on<br />
your head. Inspect the corners and seams of the<br />
box. Is there light coming in anywhere? If so,<br />
stick gaffer tape over the place on the inside of<br />
the box.<br />
Don’t worry about the light that comes into the<br />
box around your neck.<br />
8.<br />
Now use a thumbtack to <strong>prick</strong> a small <strong>hole</strong> in<br />
the middle of the aluminum foil.<br />
9.<br />
Decorate the outside of the camera obscura.<br />
Make it look attractive!<br />
HOW DOES IT WORK?<br />
The exhibit is ready. It works best outside because there is a lot of light there. It works <strong>as</strong><br />
follows. Stand with your back to the sun and stick your head through the opening in the<br />
bottom. Make sure that you are looking towards the white paper (the screen).<br />
Wrap the black pullover or a towel around your neck so that no light enters the box<br />
through the <strong>hole</strong> in the bottom. Give your eyes time to get used to the dark. Then look<br />
carefully at the screen. What do you see?<br />
NATURAL SCIENCE Light<br />
TECHNOLOGY Structures<br />
3<br />
A <strong>pin</strong>-<strong>prick</strong> <strong>as</strong> <strong>spy</strong>-<strong>hole</strong>
S C I E N C E C E N T E R<br />
o p s c h o o l<br />
WHAT DO YOU SEE HAPPENING?<br />
Now look for the science behind the exhibit. This exhibit is about the camera obscura. Do<br />
the research below. Write the answers in your workbook under ‘Research report 1’.<br />
1.<br />
Go outside and place the exhibit on your head. You should see the things around you on the<br />
screen. Take another good look. Do you see them the right way round or upside down? Are they<br />
mirrored or not? Walk around a bit and see how the pictures change.<br />
2.<br />
See if you can see two objects around you (one of which is further away than the other) at the<br />
same time on the screen. Which is bigger? Are they both <strong>as</strong> clear on the screen or is one object<br />
clearer than the other?<br />
Now make the <strong>hole</strong> in the aluminum foil bigger with the point of a pencil. Press the pencil into<br />
the aluminum up to half of the diameter of the pencil.<br />
Now see if you can still see two objects around you at the same time. What do you see now?<br />
Compare this with what you saw through the small <strong>hole</strong>.<br />
N.B. If you want to have a small <strong>hole</strong> again, you can replace the aluminum with a new piece.<br />
Make a new <strong>hole</strong> in the foil with a thumbtack.<br />
WHAT’S THE ANSWER?<br />
Now you are going to fi nd information about the camera obscura. You can look for<br />
information in the school media library, the library or the Internet.<br />
Go to www.sciencecenteropschool.nl and then to ‘primary school pupils’ and click on ‘links’.<br />
Under the title of your exhibit, you will fi nd a number of websites with background<br />
information.<br />
Answer the questions below and write the answers in your workbook under ‘Research<br />
report 2’.<br />
Operation / Science:<br />
Why can you see the things around you in a camera obscura? How does the light go through the<br />
little <strong>hole</strong>? How do you see the image on the inside of the box?<br />
Invention:<br />
Who invented the name ‘camera obscura’? When w<strong>as</strong> that? W<strong>as</strong> this person also the inventor of<br />
the camera obscura?<br />
Application:<br />
A camera uses the same principle <strong>as</strong> the camera obscura. What are the similarities and differences<br />
between a camera obscura and a camera?<br />
Let your teacher read your answers.<br />
NATURAL SCIENCE Light<br />
TECHNOLOGY Structures<br />
4<br />
A <strong>pin</strong>-<strong>prick</strong> <strong>as</strong> <strong>spy</strong>-<strong>hole</strong>


