T2 Humeral Nailing System Operative Technique - Stryker
T2 Humeral Nailing System Operative Technique - Stryker
T2 Humeral Nailing System Operative Technique - Stryker
You also want an ePaper? Increase the reach of your titles
YUMPU automatically turns print PDFs into web optimized ePapers that Google loves.
<strong>Operative</strong> <strong>Technique</strong> – Retrograde <strong>Technique</strong><br />
End Cap Insertion<br />
After removal of the Target Device, an<br />
End Cap is used to reduce the potential<br />
for bony ingrowth into the proximal<br />
threads of the nail.<br />
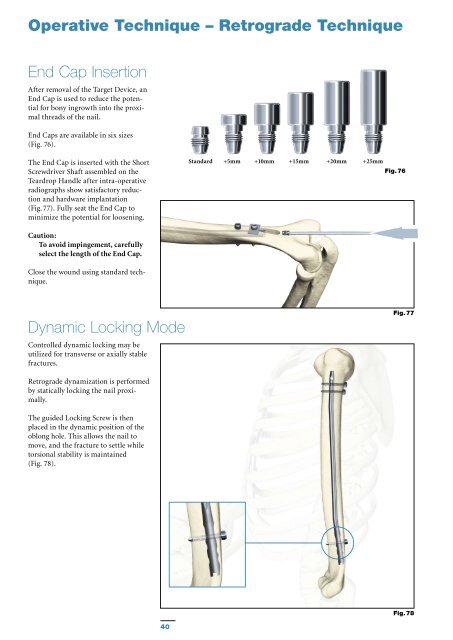
End Caps are available in six sizes<br />
(Fig. 76).<br />
The End Cap is inserted with the Short<br />
Screwdriver Shaft assembled on the<br />
Teardrop Handle after intra-operative<br />
radiographs show satisfactory reduction<br />
and hardware implantation<br />
(Fig. 77). Fully seat the End Cap to<br />
minimize the potential for loosening.<br />
Caution:<br />
To avoid impingement, carefully<br />
select the length of the End Cap.<br />
Close the wound using standard technique.<br />
Dynamic Locking Mode<br />
Controlled dynamic locking may be<br />
utilized for transverse or axially stable<br />
fractures.<br />
Retrograde dynamization is performed<br />
by statically locking the nail proximally.<br />
The guided Locking Screw is then<br />
placed in the dynamic position of the<br />
oblong hole. This allows the nail to<br />
move, and the fracture to settle while<br />
torsional stability is maintained<br />
(Fig. 78).<br />
40<br />
Standard +5mm +10mm +15mm +20mm +25mm<br />
Fig. 76<br />
Fig. 77<br />
Fig. 78


