Using the Leigh Dovetail Jig - ShopNotes
Using the Leigh Dovetail Jig - ShopNotes Using the Leigh Dovetail Jig - ShopNotes
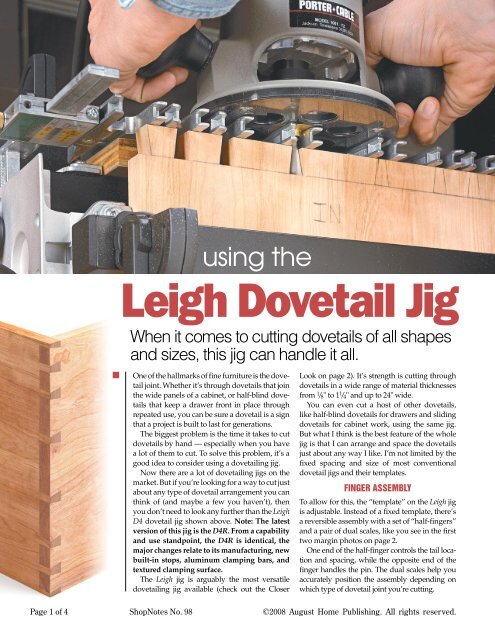
using the Leigh Dovetail Jig When it comes to cutting dovetails of all shapes and sizes, this jig can handle it all. One of the hallmarks of fine furniture is the dovetail joint. Whether it’s through dovetails that join the wide panels of a cabinet, or half-blind dovetails that keep a drawer front in place through repeated use, you can be sure a dovetail is a sign that a project is built to last for generations. The biggest problem is the time it takes to cut dovetails by hand — especially when you have a lot of them to cut. To solve this problem, it’s a good idea to consider using a dovetailing jig. Now there are a lot of dovetailing jigs on the market. But if you’re looking for a way to cut just about any type of dovetail arrangement you can think of (and maybe a few you haven’t), then you don’t need to look any further than the Leigh D4 dovetail jig shown above. Note: The latest version of this jig is the D4R. From a capability and use standpoint, the D4R is identical, the major changes relate to its manufacturing, new built-in stops, aluminum clamping bars, and textured clamping surface. The Leigh jig is arguably the most versatile dovetailing jig available (check out the Closer Look on page 2). It’s strength is cutting through dovetails in a wide range of material thicknesses from 1 /8" to 1 1 /4" and up to 24" wide. You can even cut a host of other dovetails, like half-blind dovetails for drawers and sliding dovetails for cabinet work, using the same jig. But what I think is the best feature of the whole jig is that I can arrange and space the dovetails just about any way I like. I’m not limited by the fixed spacing and size of most conventional dovetail jigs and their templates. FINGER ASSEMBLY To allow for this, the “template” on the Leigh jig is adjustable. Instead of a fixed template, there’s a reversible assembly with a set of “half-fingers” and a pair of dual scales, like you see in the first two margin photos on page 2. One end of the half-finger controls the tail location and spacing, while the opposite end of the finger handles the pin. The dual scales help you accurately position the assembly depending on which type of dovetail joint you’re cutting. Page 1 of 4 ShopNotes No. 98 ©2008 August Home Publishing. All rights reserved.
- Page 2 and 3: To lay out the dovetails, you loose
- Page 4: any change to the position of the f
using <strong>the</strong><br />
<strong>Leigh</strong> <strong>Dovetail</strong> <strong>Jig</strong><br />
When it comes to cutting dovetails of all shapes<br />
and sizes, this jig can handle it all.<br />
One of <strong>the</strong> hallmarks of fine furniture is <strong>the</strong> dovetail<br />
joint. Whe<strong>the</strong>r it’s through dovetails that join<br />
<strong>the</strong> wide panels of a cabinet, or half-blind dovetails<br />
that keep a drawer front in place through<br />
repeated use, you can be sure a dovetail is a sign<br />
that a project is built to last for generations.<br />
The biggest problem is <strong>the</strong> time it takes to cut<br />
dovetails by hand — especially when you have<br />
a lot of <strong>the</strong>m to cut. To solve this problem, it’s a<br />
good idea to consider using a dovetailing jig.<br />
Now <strong>the</strong>re are a lot of dovetailing jigs on <strong>the</strong><br />
market. But if you’re looking for a way to cut just<br />
about any type of dovetail arrangement you can<br />
think of (and maybe a few you haven’t), <strong>the</strong>n<br />
you don’t need to look any fur<strong>the</strong>r than <strong>the</strong> <strong>Leigh</strong><br />
D4 dovetail jig shown above. Note: The latest<br />
version of this jig is <strong>the</strong> D4R. From a capability<br />
and use standpoint, <strong>the</strong> D4R is identical, <strong>the</strong><br />
major changes relate to its manufacturing, new<br />
built-in stops, aluminum clamping bars, and<br />
textured clamping surface.<br />
The <strong>Leigh</strong> jig is arguably <strong>the</strong> most versatile<br />
dovetailing jig available (check out <strong>the</strong> Closer<br />
Look on page 2). It’s strength is cutting through<br />
dovetails in a wide range of material thicknesses<br />
from 1 /8" to 1 1 /4" and up to 24" wide.<br />
You can even cut a host of o<strong>the</strong>r dovetails,<br />
like half-blind dovetails for drawers and sliding<br />
dovetails for cabinet work, using <strong>the</strong> same jig.<br />
But what I think is <strong>the</strong> best feature of <strong>the</strong> whole<br />
jig is that I can arrange and space <strong>the</strong> dovetails<br />
just about any way I like. I’m not limited by <strong>the</strong><br />
fixed spacing and size of most conventional<br />
dovetail jigs and <strong>the</strong>ir templates.<br />
FINGER ASSEMBLY<br />
To allow for this, <strong>the</strong> “template” on <strong>the</strong> <strong>Leigh</strong> jig<br />
is adjustable. Instead of a fixed template, <strong>the</strong>re’s<br />
a reversible assembly with a set of “half-fingers”<br />
and a pair of dual scales, like you see in <strong>the</strong> first<br />
two margin photos on page 2.<br />
One end of <strong>the</strong> half-finger controls <strong>the</strong> tail location<br />
and spacing, while <strong>the</strong> opposite end of <strong>the</strong><br />
finger handles <strong>the</strong> pin. The dual scales help you<br />
accurately position <strong>the</strong> assembly depending on<br />
which type of dovetail joint you’re cutting.<br />
Page 1 of 4 <strong>ShopNotes</strong> No. 98 ©2008 August Home Publishing. All rights reserved.
To lay out <strong>the</strong> dovetails, you loosen <strong>the</strong><br />
fingers and slide <strong>the</strong>m along <strong>the</strong> support<br />
bars to match your dovetail layout — unlike<br />
most jigs which force you to design or adjust<br />
to match <strong>the</strong> spacing of <strong>the</strong> template. And<br />
since each finger controls both parts of <strong>the</strong><br />
dovetail, any change you make to <strong>the</strong> tail is<br />
automatically accounted for in <strong>the</strong> pin.<br />
Locking <strong>the</strong> fingers in place with a<br />
screwdriver (supplied with <strong>the</strong> jig) fixes<br />
<strong>the</strong> arrangement of both <strong>the</strong> tails and <strong>the</strong><br />
pins so <strong>the</strong>y mate perfectly once you cut<br />
<strong>the</strong> joint. As with any jig, you’ll probably<br />
need to do a little “tweaking” to get a perfect<br />
fit (more on that later). But once that’s<br />
complete, you can cut joint after joint<br />
knowing each one will fit perfectly.<br />
As I mentioned, <strong>the</strong> finger assembly is<br />
reversible. With <strong>the</strong> assembly set so <strong>the</strong><br />
white portion of <strong>the</strong> scale is to <strong>the</strong> right,<br />
like you see in <strong>the</strong> center photo, you’re<br />
ready to cut through dovetails. Flipping<br />
<strong>the</strong> assembly end for end places <strong>the</strong> green<br />
part of <strong>the</strong> dual scale to <strong>the</strong> right, allowing<br />
you to cut half-blind dovetails.<br />
Assembly. You will need to do some<br />
assembly before using <strong>the</strong> jig. The finger<br />
assembly goes toge<strong>the</strong>r quick. All you<br />
have to do is attach <strong>the</strong> scales to each end.<br />
The stops, cams, and clamping bars go<br />
on next. Add in <strong>the</strong> time it takes to make<br />
Closer Look at <strong>the</strong> Original D4:<br />
Feature-Packed <strong>Jig</strong><br />
Dual scales allow for accurate<br />
positioning of <strong>the</strong> finger assembly<br />
and fine-tuning of <strong>the</strong> fit<br />
Shop-made base<br />
allows you to clamp jig<br />
securely to benchtop<br />
a plywood base (for clamping <strong>the</strong> jig to a<br />
benchtop), and you’ll have a couple hours<br />
invested in <strong>the</strong> entire assembly process.<br />
Setting up <strong>the</strong> <strong>Jig</strong>. With <strong>the</strong> assembly<br />
complete, you’ll need to spend a little time<br />
adjusting <strong>the</strong> stops so <strong>the</strong> workpieces are<br />
positioned perfectly square once <strong>the</strong>y’re in<br />
<strong>the</strong> jig (bottom margin photo).<br />
This doesn’t take much time after making<br />
a couple squaring blanks from some<br />
scrap plywood. Plus, it gives you a chance<br />
to familiarize yourself with <strong>the</strong> jig.<br />
Instruction Manual. The manual that<br />
comes with <strong>the</strong> jig is one of <strong>the</strong> most<br />
detailed I’ve ever seen. And its step-bystep<br />
sections cover <strong>the</strong> wide variety of<br />
dovetails you can cut with <strong>the</strong> <strong>Leigh</strong> jig.<br />
Cost & Availability. As you might expect,<br />
a dovetail jig with all this capability won’t<br />
be cheap. For <strong>the</strong> bread-and-butter work of<br />
through and half-blind dovetail joints, <strong>the</strong><br />
basic jig (with a set of bits) will run close<br />
to $500 (D4R). And you can run <strong>the</strong> cost<br />
hundreds more by adding additional bits<br />
and accessories for cutting through mortise<br />
and tenon joints, box joints, and even<br />
some custom joints.<br />
The <strong>Leigh</strong> D4R dovetail jig and optional<br />
accessories are available through many<br />
woodworking stores and catalogs. To find<br />
a list of sources, visit www.leighjigs.com.<br />
Adjustable half-fingers<br />
allow for variably sized and<br />
spaced dovetails<br />
Metal clamping<br />
bar keeps<br />
workpiece secure<br />
Easy-to-use cams lock<br />
clamping bar against<br />
workpiece to prevent<br />
shifting during <strong>the</strong> cut<br />
Stop aligns<br />
workpiece to<br />
finger assembly<br />
for accurate<br />
joints<br />
Checking out<br />
<strong>the</strong> Details<br />
{ Fingers. The adjustable half fingers<br />
allow for variable spacing and sizing of<br />
both <strong>the</strong> pins and tails of a dovetail joint<br />
to suit your project design.<br />
{ Scales. A dual scale (white/green)<br />
at each end of <strong>the</strong> finger assembly<br />
helps align <strong>the</strong> fingers parallel to <strong>the</strong><br />
workpiece and allows you to accurately<br />
“dial-in” <strong>the</strong> fit of <strong>the</strong> joint.<br />
{ Cams & Stops. Adjustable cams<br />
lock <strong>the</strong> workpiece securely in place<br />
and adjustable stops ensure <strong>the</strong> workpiece<br />
is positioned properly.<br />
Page 2 of 4 2 <strong>ShopNotes</strong> No. 98 ©2008 August Home Publishing. All rights reserved. No. 57
Routing <strong>the</strong> Through <strong>Dovetail</strong><br />
{ Bits by <strong>the</strong> pair.<br />
Through dovetails<br />
require a pair of<br />
bits — a dovetail<br />
bit for <strong>the</strong> tails, and<br />
a straight bit for<br />
routing <strong>the</strong> pins.<br />
Once <strong>the</strong> jig is assembled, you’re<br />
just about guaranteed a perfect<br />
dovetail. All you need to do at this<br />
point is follow a few key steps.<br />
SET UP THE FINGER ASSEMBLY<br />
To keep <strong>the</strong> finger assembly level<br />
during setup and use, you’ll need<br />
to install a spacer under <strong>the</strong> upper<br />
clamp bar to begin <strong>the</strong> setup for<br />
cutting <strong>the</strong> tails (photo 1 at right).<br />
After clamping <strong>the</strong> spacer in<br />
place, install <strong>the</strong> finger assembly<br />
in <strong>the</strong> “PIN” position. So why place<br />
<strong>the</strong> fingers in <strong>the</strong> “PIN” position if<br />
<strong>the</strong> tails are cut first? Simple, it’s <strong>the</strong><br />
only way to access <strong>the</strong> screws that<br />
allow you to adjust <strong>the</strong> fingers.<br />
Sliding <strong>the</strong> fingers around<br />
is how you arrange <strong>the</strong><br />
dovetail pattern. To do this, I<br />
find it works best to lay out <strong>the</strong><br />
pattern on <strong>the</strong> end of one of my<br />
tail boards first, <strong>the</strong>n slip it into<br />
<strong>the</strong> jig (photo 2 at right).<br />
Locating <strong>the</strong> fingers is just a matter<br />
of mating a pair of fingers and<br />
centering it over <strong>the</strong> pin portion<br />
of <strong>the</strong> layout. This gives you <strong>the</strong><br />
smallest pin possible (my preference).<br />
For larger pins, space each<br />
pair of fingers slightly apart. Note:<br />
You only need a half finger for <strong>the</strong><br />
half pins at each end of <strong>the</strong> board.<br />
ROUTING THE TAILS<br />
Now you’re just about ready to cut<br />
<strong>the</strong> tails. To do this, you’ll need to<br />
flip <strong>the</strong> finger assembly around,<br />
place it in <strong>the</strong> “TAILS” position, and<br />
<strong>the</strong>n lock it in place.<br />
The exact placement of<br />
<strong>the</strong> assembly isn’t critical<br />
since you’ll be making<br />
a cut straight through<br />
<strong>the</strong> workpiece. But it is<br />
important that <strong>the</strong> finger<br />
assembly be parallel to<br />
<strong>the</strong> workpiece. The scale<br />
at each end of <strong>the</strong> finger<br />
assembly will help you<br />
align it just right.<br />
To cut <strong>the</strong> tails, you’ll<br />
need to install one of <strong>the</strong><br />
many dovetail bits available<br />
for <strong>the</strong> jig along with<br />
a bushing. The jig is supplied<br />
with a pair of bits<br />
(margin photo). And <strong>the</strong>y<br />
work fine for through<br />
dovetails in materials 1 /2"<br />
to 1 /16" thick.<br />
Cutting Depth. Once<br />
you have <strong>the</strong> bit and a<br />
bushing installed, you’re<br />
ready to set <strong>the</strong> cutting<br />
depth. I drew a baseline<br />
on my tail board to match<br />
<strong>the</strong> thickness of <strong>the</strong> mating<br />
pin board. With <strong>the</strong><br />
baseline in place, I found<br />
it easy to split <strong>the</strong> line with<br />
<strong>the</strong> bit to cut just a hair<br />
deep (inset photo below).<br />
This way, once you glue<br />
things up, you can sand <strong>the</strong> ends of<br />
<strong>the</strong> joint perfectly flush.<br />
At this point, you’re ready to<br />
rout <strong>the</strong> tails in all <strong>the</strong> tail boards.<br />
Note: The inside face of <strong>the</strong> tail<br />
boards should be facing out as<br />
you make <strong>the</strong> cut for <strong>the</strong> tails. And<br />
as long as you have<br />
<strong>the</strong> depth of cut<br />
3<br />
{ The Initial Setup. Although you’ll rout <strong>the</strong><br />
tails to start with, <strong>the</strong> first step is to install <strong>the</strong><br />
finger assembly in <strong>the</strong> “PIN” position.<br />
{ Adjust <strong>the</strong> Fingers. <strong>Using</strong> <strong>the</strong> tail board<br />
as a guide, adjust <strong>the</strong> fingers to match<br />
nearly any layout you can come up with.<br />
set correctly, you can cut <strong>the</strong> tail<br />
boards for <strong>the</strong> actual project.<br />
Routing <strong>the</strong> tails is just a matter<br />
of guiding <strong>the</strong> bushing along <strong>the</strong><br />
inside edges of <strong>the</strong> fingers (photo at<br />
left). Just be sure to rout down <strong>the</strong><br />
slot formed by <strong>the</strong> rounded ends of<br />
<strong>the</strong> fingers, not <strong>the</strong> straight ones.<br />
ROUTING THE PINS<br />
With <strong>the</strong> tails routed, you have<br />
half <strong>the</strong> joint complete. To rout <strong>the</strong><br />
pins, you’ll need to turn <strong>the</strong> finger<br />
assembly over so it’s back in <strong>the</strong><br />
“PINS” position, without making<br />
< Routing <strong>the</strong> Tails. After setting<br />
<strong>the</strong> bit to “split” <strong>the</strong> baseline<br />
in half (inset photo), rout <strong>the</strong> tails<br />
by guiding <strong>the</strong> router bushing into<br />
<strong>the</strong> slots to remove <strong>the</strong> waste.<br />
Page 3 of 4 <strong>ShopNotes</strong> No. 98 ©2008 August Home Publishing. All rights reserved.<br />
1<br />
2
any change to <strong>the</strong> position of <strong>the</strong><br />
fingers. And here’s where <strong>the</strong> scale<br />
setting will really come into play.<br />
Since <strong>the</strong> finger assembly guides<br />
<strong>the</strong> bushing (and bit) along <strong>the</strong><br />
angled fingers, how far in (or out)<br />
<strong>the</strong> assembly is changes <strong>the</strong> fit of<br />
<strong>the</strong> joint. So you’ll need to make<br />
some test cuts in some scrap to<br />
fine-tune <strong>the</strong> fit (<strong>the</strong> same thickness<br />
as your pin boards).<br />
It’s best to set <strong>the</strong> finger assembly<br />
so <strong>the</strong> pins start off too big. Then<br />
you can slide <strong>the</strong> finger assembly<br />
in and shave a little off each pin<br />
until <strong>the</strong> fit is just right.<br />
The pins are cut with <strong>the</strong> straight<br />
bit. So after installing it in place<br />
5<br />
You can do a lot more with <strong>the</strong> <strong>Leigh</strong><br />
jig than cut through dovetails. A couple<br />
common dovetail joints you can<br />
handle easily are <strong>the</strong> half-blind and<br />
sliding dovetails shown at right.<br />
Half-Blind. The design of <strong>the</strong><br />
finger assembly on <strong>the</strong> <strong>Leigh</strong> jig<br />
makes quick work of cutting variably<br />
sized and spaced half-blind<br />
dovetails. You can design a drawer<br />
any size you’d like, instead of having<br />
to “fit” it to <strong>the</strong> fixed templates<br />
on most o<strong>the</strong>r dovetail jigs.<br />
Sliding. Ano<strong>the</strong>r handy joint<br />
you can cut with <strong>the</strong> <strong>Leigh</strong> jig is <strong>the</strong><br />
sliding dovetail. For that, <strong>the</strong> finger<br />
assembly and a guide bar (supplied<br />
with <strong>the</strong> jig) guide <strong>the</strong> router<br />
as you cut each half of <strong>the</strong> joint.<br />
of <strong>the</strong> dovetail bit, you’ll need to<br />
adjust <strong>the</strong> depth of cut to match <strong>the</strong><br />
thickness of <strong>the</strong> tail boards. Here<br />
again, I like to set <strong>the</strong> cutting depth<br />
just a hair deep.<br />
Once that’s complete, you can<br />
rout out <strong>the</strong> waste between <strong>the</strong> pins.<br />
Note: The outside face of <strong>the</strong> pin<br />
board should be facing out.<br />
TESTING THE FIT<br />
Completing <strong>the</strong> pins allows you<br />
to test fit <strong>the</strong> joint. But as you may<br />
recall, <strong>the</strong> finger assembly on <strong>the</strong><br />
jig was set to make <strong>the</strong> pins a little<br />
oversized to start with.<br />
This means <strong>the</strong> two halves of <strong>the</strong><br />
joint probably won’t fit toge<strong>the</strong>r<br />
perfectly. What you’re<br />
looking for is a nice sliding<br />
fit (photo at left).<br />
If you find <strong>the</strong> joint is<br />
too tight or won’t fit at<br />
all, simply slide <strong>the</strong> finger<br />
assembly away from<br />
you a little and lock it in<br />
place. Then reinstall <strong>the</strong><br />
same board and “shave”<br />
< Test <strong>the</strong> Fit. The goal is to adjust <strong>the</strong> finger assembly to<br />
rout <strong>the</strong> pins so <strong>the</strong>y just slide into <strong>the</strong> tail board with firm pressure.<br />
Once you’re <strong>the</strong>re, you can rout all <strong>the</strong> pin boards.<br />
{ Half-Blind <strong>Dovetail</strong>s. Building drawers<br />
with half-blind dovetails is a snap — even with<br />
<strong>the</strong> variable size and spacing shown above.<br />
{ Routing <strong>the</strong> Pins. To rout <strong>the</strong> pins, flip <strong>the</strong> finger<br />
assembly around and set <strong>the</strong> cutting depth of <strong>the</strong> straight<br />
bit. Rout <strong>the</strong> pin board with <strong>the</strong> outside face facing out.<br />
<strong>the</strong> pins slightly with <strong>the</strong> assembly<br />
in <strong>the</strong> new position.<br />
You’ll need to repeat this process<br />
until <strong>the</strong> joint slides toge<strong>the</strong>r. If <strong>the</strong><br />
fit is too loose, just slide <strong>the</strong> finger<br />
assembly towards you slightly and<br />
try again with a new pin board (or<br />
cut <strong>the</strong> end off <strong>the</strong> old one).<br />
Once you have <strong>the</strong> fit <strong>the</strong> way you<br />
like, you can rout <strong>the</strong> pins in all <strong>the</strong><br />
pin boards — and <strong>the</strong>n you’re ready<br />
to assemble your project.<br />
Expand <strong>the</strong> Possibilities:<br />
Additional Joints with <strong>the</strong> <strong>Leigh</strong> <strong>Jig</strong><br />
{ Sliding <strong>Dovetail</strong>s. The sliding dovetail<br />
shown above is <strong>the</strong> perfect way to join shelves<br />
and partitions toge<strong>the</strong>r securely in any project.<br />
Page 4 of 4 4 <strong>ShopNotes</strong> No. 98 ©2008 August Home Publishing. All rights reserved. No. 57<br />
4


