DR POWERWAGON 4 x 2 - DR Power Equipment
DR POWERWAGON 4 x 2 - DR Power Equipment
DR POWERWAGON 4 x 2 - DR Power Equipment

Create successful ePaper yourself
Turn your PDF publications into a flip-book with our unique Google optimized e-Paper software.
<strong>DR</strong> ®<br />
<strong>POWERWAGON</strong> <br />
4 x 2<br />
Safety and Operating Instructions<br />
Important!<br />
Please read the Safety & Operating Instructions and the separate Engine Manufacturer's Owner's<br />
Manual to become familiar with the basic features of the <strong>DR</strong> ® <strong>POWERWAGON</strong> 4 x 2 before<br />
operating it.<br />
Country Home Products, Inc.<br />
www.dr-owner.com
And congratulations on your purchase of a<br />
new <strong>DR</strong> ® <strong>POWERWAGON</strong> 4 X 2!<br />
We have done our utmost to ensure your<br />
<strong>DR</strong> ® <strong>POWERWAGON</strong> 4 X 2 will be one of<br />
the most trouble-free and satisfying pieces of<br />
equipment you have ever owned. Please let us<br />
know of any questions or problems you may<br />
have. We want to answer or correct them as<br />
quickly as possible. (When you do call or<br />
write, please have your serial number and/or<br />
order number handy—it will speed things up!)<br />
We also hope to hear from you on how much<br />
you like your new helper.<br />
And, please tell your friends about your<br />
new <strong>DR</strong> ® <strong>POWERWAGON</strong> 4 X 2. Having<br />
<strong>DR</strong> ® Owners spread the word about our<br />
products and our way of doing business is the<br />
best advertising we can have, and the best way<br />
to help us provide even better service in the<br />
years to come.<br />
Thanks once again!<br />
For all of us at...<br />
COUNTRY HOME PRODUCTS
Introduction<br />
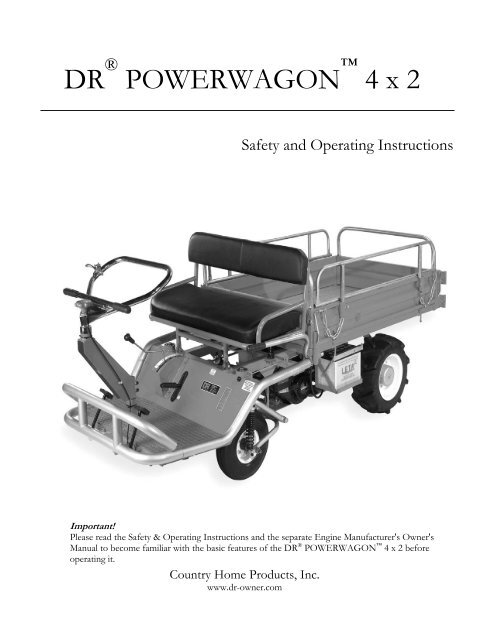
Your new <strong>DR</strong>® <strong>POWERWAGON</strong> 4 x 2 is a carefully designed product launched to meet<br />
our customer's needs for a vehicle that can transport one or two people along with a load of<br />
up to 500 pounds on slopes up to 20 degrees and 1000 pounds on level ground. This new<br />
model of <strong>Power</strong>wagon features easy operation, minimal effort to transport heavy loads,<br />
low fuel consumption, and rugged construction. Since its debut, this bestseller has turned<br />
out to be a favorite worldwide.<br />
All of our products are designed and manufactured to meet our customer’s high standards<br />
for rugged and quality products. This <strong>Power</strong>wagon 4 x 2 has been extensively tested in<br />
typical home and field environments. As a result, this <strong>Power</strong>wagon 4 x 2 has shown<br />
outstanding performance, high reliability and easy operation.<br />
Your new <strong>DR</strong>® <strong>POWERWAGON</strong> 4 x 2 features a low center of gravity, powerful<br />
climbing capability and large payload capacity and can operate under all weather and field<br />
conditions. We are proud to provide you with this safe, comfortable, easy to use and<br />
economical <strong>Power</strong>wagon 4 x 2.<br />
Please read this manual carefully before operating your <strong>DR</strong>® <strong>Power</strong>wagon 4 x 2. It<br />
contains important safety information, and instructions for set up, operation and<br />
maintenance.<br />
COPYRIGHT<br />
©2002 Country Home Products, Inc. All rights reserved.<br />
Country Home Products, Inc.<br />
Meigs Road<br />
P.O. Box 25<br />
Vergennes, VT 05491<br />
Toll-free phone: 1-800-<strong>DR</strong>-OWNER (376-9637)<br />
Fax: 1-802-877-1213<br />
Web site: www.dr-owner.com<br />
E-mail: info@countryhomeproducts.com<br />
Page 3
Table Of Contents<br />
Introduction…………………………………………………………………………. 3<br />
Safety Information…………………………………………………………………... 5<br />
Safety With Gas <strong>Power</strong>ed Machines…………………………………………………. 6<br />
Special Note for California and Washington State Owners…………………………... 6<br />
Safety Labels………………………………………………………………………… 6<br />
Transporting the <strong>DR</strong>® <strong>Power</strong>wagon 4 x 2………………………………………... 9<br />
Preparing the <strong>DR</strong>® <strong>Power</strong>wagon 4 x 2 for Operation…………………………….. 10<br />
Checking and Adding Oil……………………………………………………………. 10<br />
Adding Fuel…………………………………………………………………………. 11<br />
Fuel Shut Off and Cap………………………………………………………………. 11<br />
Connecting the Battery……………………………………………………………… 11<br />
Operator Controls…………………………………………………………………… 12<br />
Engine Choke………………………………………………………………………... 12<br />
Engine Starting………………………………………………………………………. 13<br />
Driving the <strong>DR</strong>® <strong>Power</strong>wagon 4 x 2……………………………………………… 14<br />
Installation of the Optional Side Rails……………………………………………….. 15<br />
Cargo Bed Information……………………………………………………………… 15<br />
Rear Cargo Door…………………………………………………………………….. 16<br />
Cargo Bed Lock……………………………………………………………………... 16<br />
Vehicle Weight and Cargo Capacity…………………………………………………. 16<br />
Maintenance Information……………………………………………………………. 17<br />
Tools Required………………………………………………………………………. 17<br />
Engine Oil…………………………………………………………………………… 17<br />
Changing Oil………………………………………………………………………… 17<br />
Spark Plug…………………………………………………………………………… 18<br />
Air Filter……………………………………………………………………………... 18<br />
Transmission………………………………………………………………………… 18<br />
Brake Information…………………………………………………………………… 19<br />
Wheel Shear Bolts…………………………………………………………………… 20<br />
Fuel Filter and System……………………………………………………………….. 20<br />
Belt Information…………………………………………………………………….. 21<br />
Changing Belts……………………………………………………………………… 22<br />
Tire Information……………………………………………………………………. 22<br />
Engine Mounts……………………………………………………………………… 22<br />
Other Lubrication…………………………………………………………………… 22<br />
Checking The Nuts and Bolts……………………………………………………….. 23<br />
Torque Information…………………………………………………………………. 23<br />
Battery Information…………………………………………………………………. 23<br />
Warranty……………………………………………………………………………. 25<br />
Page 4
Safety Information<br />
• Dress Appropriately: Wear shoes with non-slip treads or safety shoes if you have them.<br />
Do not operate the machine while barefoot or wearing open sandals. Avoid loose<br />
clothing or jewelry, which might get caught in the machine’s moving parts.<br />
• Check out the area you will be operating in before using your <strong>Power</strong>wagon 4 x 2.<br />
Avoid excessively rugged or steep terrain.<br />
• Caution: When traveling in high gear, do not use the pedal brake and the parking brake<br />
at the same time or pull the parking brake and press the clutch at the same time or the<br />
transmission may be damaged.<br />
• Do not use the parking brake when traveling in high gear.<br />
• Do not overload. The <strong>Power</strong>wagon 4 x 2 is rated for 1000 pounds of cargo<br />
weight on hard level ground and 500 on slopes up to 20 degrees.<br />
• Drive in low gear when traveling with heavy loads or over rough terrain.<br />
• Slow down when making turns.<br />
• Do not change direction quickly on rough terrain.<br />
• Caution: Do not change gears while in motion. Stop the vehicle to change gears.<br />
• Do not force the shift lever. When the vehicle is stopped pump the brake pedal and<br />
then the clutch before trying to change gears. You may need to wait a few seconds for<br />
the transmission to stop turning.<br />
• Do not carry passengers when traveling up, sideways, or down hills.<br />
• Be sure to keep pedestrians above you at all times when traveling up and down slopes.<br />
• Caution: Only use low gear when traveling up or down slopes.<br />
• Be sure to use the parking brake when stopped.<br />
• Remove the key when not in use to prevent unauthorized use.<br />
• Built in safety features are effective only when maintained and kept in place. Do not,<br />
under any conditions, remove, cut, bend, weld or change standard parts on any<br />
equipment. A change made on your own can make the vehicle unsafe and may void<br />
your warranty.<br />
• Always shut off the engine, allow to cool, remove the spark plug wire, apply<br />
parking brake and chock the wheels prior to making any adjustments to the vehicle.<br />
• Keep combustible substances away from engine when hot.<br />
• When using the <strong>DR</strong>® <strong>Power</strong>wagon 4 x 2 don’t take things for granted. When in<br />
doubt about the equipment or the surroundings, stop the machine and take the time to<br />
look things over. Make sure that you have 100% control of your machine at all times.<br />
• Do Not Overload the <strong>DR</strong>® <strong>Power</strong>wagon 4 x2. Be careful of top heavy loads; the<br />
higher the load, the higher the chance the machine may tip over. Also, loads may shift<br />
during operation, so secure your loads and make them even, when possible to be safe.<br />
Page 5
• Do not rev the engine. Excessive speed or tampering with the engine governor can be<br />
dangerous.<br />
• Keep your hands away from the belts and pulleys when the engine is running.<br />
• Be particularly careful of small children and pets. Never allow children to operate the<br />
vehicle. Never carry children, adults or pets in the wagon bed. Use caution when<br />
operating the vehicle around other people or animals.<br />
• Do not operate the vehicle under the influence of drugs or alcohol.<br />
Safety with Gasoline- <strong>Power</strong>ed Machines<br />
• Do not run the machine in an enclosed area or without proper ventilation.<br />
• Store all fuel in containers specifically designed for this purpose. Plastic containers are<br />
more likely to prevent sediment and condensation problems.<br />
• Fill the gas tank outdoors with the engine off. Don’t handle gasoline if you or anyone<br />
nearby is smoking, or if you are near a fire, sparks, or anything that could cause gasoline<br />
vapors to ignite or explode.<br />
• If gasoline is spilled, do not attempt to start the engine. Move the machine away from<br />
the area of the spill and avoid creating any source of ignition until the gasoline vapors<br />
have dissipated. Wipe up any spilled fuel to prevent a fire hazard, and properly dispose<br />
of the waste.<br />
• Allow the engine to cool before storing in any enclosure. Never store the machine near<br />
an open flame or sparks.<br />
• Some state and local regulations require the use of a spark arrester on gasoline powered<br />
engines. Contact your local fire marshal or forest service for specific information in your<br />
area. If you are required to use a spark arrester, please contact one of our Customer<br />
Service Representatives 1-800 <strong>DR</strong>-OWNER (376-9637) who will assist you in obtaining<br />
one.<br />
Special Note for California and Washington State Owners<br />
• California and Washington states require the use of spark arresters on internal<br />
combustion engines. Failure of the owner/ operator to maintain this equipment in<br />
compliance with state regulations is a misdemeanor under California law and may be in<br />
violation of other state and federal regulations. Contact your local fire marshal or forest<br />
service for specific information in your area.<br />
Country Home Products, Inc. reserves the right to discontinue, change and improve its<br />
products at any time without notice or obligation to the purchaser.<br />
The descriptions and specifications contained in this manual were in effect at the time of<br />
printing. Some equipment described in this manual may be optional. Some illustrations may<br />
not be applicable to your machine.<br />
Page 6
Safety Labels<br />
Take some time to become familiar with these safety information labels. Replace missing or<br />
damaged labels immediately. Note: these illustrations are not actual size.<br />
OPERATE SAFELY<br />
Stop before<br />
Shifting.<br />
Max Load is 500<br />
pounds on a slope<br />
and 1000 pounds on<br />
hard, level ground.<br />
Do not operate on<br />
slopes greater than<br />
20 degrees.<br />
High Speed is 9<br />
MPH. Use care in<br />
HIGH gear.<br />
Use care in turning,<br />
abrupt changes in<br />
direction could cause<br />
the vehicle to turn<br />
over.<br />
Use LOW gear in<br />
rough terrain, on<br />
slopes or in wet<br />
conditions.<br />
Set the Parking<br />
Brake whenever the<br />
vehicle is parked.<br />
BEFORE STARTING<br />
Read Safety Manual<br />
Set the Parking Brake<br />
Check the gas and oil<br />
levels<br />
Check tire pressure<br />
Check that the dump<br />
lever latch is secure.<br />
Use choke on engine for<br />
cold starting<br />
TO START ENGINE<br />
Push in the clutch<br />
and brake pedals.<br />
Release the parking<br />
brake.<br />
Set the shift lever to<br />
Neutral.<br />
Set the parking<br />
brake.<br />
Set the throttle at<br />
the halfway position<br />
If engine has not<br />
been used recently,<br />
set the choke lever.<br />
Turn the key to the<br />
starting position and<br />
hold until the engine<br />
starts, but no longer<br />
than 3 seconds.<br />
Release the key<br />
when the engine<br />
starts.<br />
If the choke was<br />
set, then slowly return<br />
the choke lever to the<br />
run position.<br />
Adjust the throttle.<br />
Release the parking<br />
brake<br />
Set the shift lever to<br />
HIGH, LOW, or<br />
Reverse.<br />
Slowly release the<br />
clutch and brake<br />
pedals.<br />
TO STOP ENGINE<br />
Push in the clutch<br />
and brake pedals.<br />
Set the Parking<br />
Brake.<br />
Turn the key to off.<br />
TO DUMP<br />
Open the tailgate<br />
and secure it against<br />
the side panel.<br />
Pull the dump lever<br />
release handle.<br />
Lift the dump lever.<br />
Lower the dump<br />
lever and be sure it is<br />
secured.<br />
Close the tailgate.<br />
Page 7<br />
HIGH<br />
N -<br />
Start<br />
LOW<br />
N<br />
REVERSE
Model # PWR8-USA<br />
Light Utility Vehicle<br />
Operating Vehicle Weight<br />
650 pounds<br />
Gross Vehicle Weight Limit<br />
2050 pounds on Level<br />
1650 pounds on 20 o Slope<br />
S F<br />
Page 8<br />
Choke Lever<br />
Run Choke
Transporting the <strong>DR</strong>® <strong>POWERWAGON</strong> 4 x 2<br />
• The <strong>DR</strong>® <strong>Power</strong>wagon 4 x 2 can be transported in the bed of a full size pick up truck<br />
or vehicle that can accommodate a pallet 45 x 108 inches, weighing 750 lbs.<br />
• You will need:<br />
• 2 Ramps ( 2 x 10 x 7 ft. long)<br />
• Wire cutters<br />
• Knife<br />
• Hammer<br />
• Screwdriver<br />
• Two helpers<br />
• The <strong>DR</strong>® <strong>Power</strong>wagon 4 x 2 is shipped fully assembled, fixed to a pallet. The pallet<br />
can only be loaded on your vehicle one way at the trucking depot. The front of the <strong>DR</strong>®<br />
<strong>Power</strong>wagon 4 x 2 will be towards the front of the truck.<br />
• Secure the <strong>DR</strong>® <strong>Power</strong>wagon 4 x 2 to your vehicle.<br />
• Upon arrival at home, carefully remove the wrapping from the machine, cut the banding<br />
and remove the wheel chocks.<br />
• Place the ramps from the back of the pallet to the ground. Make sure that the ramps are<br />
lined up with the wheels.<br />
• DO NOT ATTEMPT TO <strong>DR</strong>IVE THE VEHICLE DOWN THE RAMPS WITH THE<br />
ENGINE RUNNING. DO NOT STAND BEHIND THE VEHICLE WHEN<br />
OFFLOADING.<br />
• You should become familiar with the controls prior to unloading. Please be sure to know<br />
the location of the hand and foot brake as well as the gearshift.<br />
• Be sure to read the Safety and Operating Instructions provided with your machine before<br />
attempting to operate the <strong>DR</strong>® <strong>Power</strong>wagon 4 x 2.<br />
Page 9
Preparing The <strong>DR</strong>® <strong>POWERWAGON</strong> 4 x 2 For Operation<br />
We have done our utmost to make it easy to get your <strong>DR</strong>© <strong>POWERWAGON</strong> 4 x 2 ready<br />
to roll. Please take a few minutes to read through this manual and your engine manual before<br />
attempting operation.<br />
Checking and Adding Oil:<br />
For your convenience the <strong>DR</strong>® <strong>POWERWAGON</strong> 4 x 2 is shipped fully assembled, with<br />
oil in the engine and transmission. However it is always wise to check the oil levels before<br />
operation. Make sure that the machine is on a level surface and unscrew the oil cap as shown.<br />
Oil should be at the level shown in figure 1. Add oil with the yellow cap off until oil starts to<br />
drip out. You can add oil here or at the oil fill shown in figure 2.<br />
Figure 1<br />
Oil Level<br />
Checking the Transmission Oil:<br />
The transmission is shipped with gear oil but should<br />
be checked before operation. If necessary, add SAE<br />
90W gear oil until it shows 2/3 in the sight glass. See<br />
Figure 3.<br />
Page 10<br />
Oil fill<br />
Figure 2<br />
Figure 3<br />
Add Trans. oil<br />
Oil sight window<br />
Drain plug
Adding Fuel:<br />
Caution: Do not smoke or allow others to smoke or have any sparks or other<br />
sources of ignition near by while filling the gas tank. Only fill the tank outdoors.<br />
The fuel tank is located under the seat. See Figure<br />
4. The seat is held on hinges and folds forward<br />
to allow access to the tank. The tank holds<br />
approximately 2 ½ gallons of gasoline. The<br />
<strong>DR</strong>® <strong>POWERWAGON</strong> 4 x 2 uses regular<br />
unleaded fuel with a minimum octane rating of<br />
85, and should be filled to about 1 ½ inches<br />
below the top of the filler neck to allow for fuel<br />
expansion. Refer to your engine manual for<br />
detailed fuel information.<br />
Fuel Shut Off and Cap:<br />
Please take note of the fuel level gage we have<br />
incorporated into the gas cap. Also, there is a<br />
fuel shut off valve at the bottom of the tank.<br />
The lever has a red plastic handle, and off is up<br />
and on is down. See Figure 5. Important:<br />
Please be sure to shut off the fuel lever when<br />
transporting the <strong>DR</strong>® <strong>POWERWAGON</strong> 4 x<br />
2. Whenever you add fuel inspect the fuel system<br />
for leaks.<br />
Connect the Battery<br />
Do not smoke or allow others to smoke or have the battery near sparks or other<br />
sources of ignition while performing maintenance on or connecting or disconnecting<br />
the battery.<br />
Your machine is shipped with negative battery cable disconnected. Unscrew the wing nut on<br />
the negative battery post ( - ) and place the green battery wire on the post and replace the wing<br />
nut.<br />
Page 11<br />
Figure 4<br />
Raise Seat<br />
Fuel Tank<br />
Fuel Shut Lever (Off Position)<br />
Figure 5
Operator Controls<br />
Please take some time to become familiar with the operator controls, and their function and<br />
location.<br />
Shift<br />
Brake Pedal<br />
Your machine is equipped with Operator Presence Safety Devices. The machine will start only with<br />
the handbrake actuated and the gear shift in the neutral start position. Please note that there are two<br />
neutral positions, but only one will allow starting. The starter will crank, but the engine will not start.<br />
After the operator shifts into forward or reverse the operator must be seated for the engine to operate.<br />
Engine choke: The choke control is located next to the engine start switch. (Figure 7) Pulling the<br />
knob forward activates the choke for starting. Pushing the knob fully to the rear de-activates<br />
the choke for normal operation. If necessary, you can access the choke on the engine from the<br />
side by reaching under the frame as shown. (Figure 8.) Move the lever to the right before starting<br />
and then back to the run position once the engine has started.<br />
Choke Cable<br />
Figure 7<br />
Engine Start Switch<br />
Parking Brake<br />
Clutch<br />
Figure 6<br />
Page 12<br />
Choke<br />
Cargo Bed<br />
Cargo Bed Release<br />
Choke Location<br />
Figure 8
Engine Starting<br />
Page 12<br />
Now that you have checked the oil, transmission and fuel and are familiar with the controls<br />
you are ready to start the engine. We know you are anxious to drive your <strong>DR</strong>®<br />
<strong>Power</strong>wagon 4 x 2 but here are just a few more tips before you are ready.<br />
• Move choke lever to start.<br />
• Depress the clutch pedal (left pedal) and move the gear selector to the neutral-start<br />
position. Note: if the gear selector seems difficult to shift pump the brake.<br />
• Make sure the parking brake is set.<br />
• Move the throttle (on the left side of the handlebar) to S (slow). Note the throttle location<br />
on the left side of the handlebar in Figure 8-B. We have changed the location after the<br />
cover photo was taken.<br />
Throttle in Slow<br />
position<br />
Figure 8-B<br />
• Depress the brake pedal (right pedal).<br />
• Turn the key on the start switch and release when the engine starts.<br />
• You can get off the vehicle and move the choke to run.<br />
Page 13
Driving the <strong>DR</strong>® <strong>Power</strong>wagon 4 x 2<br />
For your first time out it is best to not carry any passengers until you are comfortable with the<br />
vehicle. Take a moment to review your surroundings and terrain. Be aware of all bystanders<br />
and make sure that they are aware of you. Make sure that no bystanders or pets are in front of<br />
or behind the vehicle.<br />
This vehicle is not intended or equipped for public road or highway use. Do not<br />
drive on public roads, highways or sidewalks.<br />
• Start your engine. See Page 13.<br />
• Depress the foot brake.<br />
• Depress the clutch.<br />
• Move the throttle lever to run or fast.<br />
• Release the parking brake.<br />
• Move the gearshift to low gear. If the gear selector does not move easily do not force it.<br />
Slowly pump the foot brake and try again. This is normal; the rear brake and parking<br />
brake are part of the transmission.<br />
Caution: Never try to shift the gears while the vehicle is in motion.<br />
• Slowly take your foot off the brake and slowly release the clutch. As you release the clutch<br />
the vehicle will start to move.<br />
• To stop, depress the clutch and slowly press the foot brake.<br />
• When stopped, place the gear selector in neutral and apply the parking brake.<br />
• Throttle the engine down<br />
• Turn the key to the off position<br />
This same sequence is used for reverse and high gear. Take some time to practice driving in<br />
low and reverse before trying the high gear. The <strong>DR</strong>® <strong>Power</strong>wagon will travel<br />
approximately 8 to 9 mph in high gear and this can seem fast, and should only be used on flat<br />
terrain. Note: Top speed is approximate and depends on many factors such as belt wear, tire<br />
pressure, and engine condition. Your top speed may vary.<br />
Caution: Use only low gear when traveling up or down slopes or with loads, or<br />
damage may occur to the belts or transmission.<br />
Page 14
Installation of Optional Side Rails<br />
You can purchase the<br />
optional side rails that are<br />
shown in full on the front<br />
cover. Installation is quite<br />
easy. Pry off the caps that<br />
are in the tops of the tubes,<br />
the install the rails as<br />
shown. Screw in the bolts<br />
in all the tubes and tighten<br />
with an adjustable wrench.<br />
Save the caps with your<br />
Operating Manual.<br />
Cargo Bed Information<br />
Figure 10<br />
Bolts<br />
Latch Bracket<br />
Latch lever<br />
Page 15<br />
Figure 9<br />
The Cargo bed has simple but sturdy latch<br />
mechanisms as shown in Figure 10. The<br />
sides are hinged at the bottom and the rear<br />
door is hinged at the corner. To unlock,<br />
move the lever to a straight up position<br />
and slide the lever out of the latch bracket<br />
in the direction of the arrow.<br />
One end of the chain can slide off the<br />
lever and hook onto the latch bracket. See<br />
Figure 4 on page 11. This will allow the<br />
side to lay flat if you wish.
Rear Cargo Door<br />
You can unlatch the bed door the same way as<br />
shown in Figure 10, and swing it all the way<br />
around and latch the door to the side. Secure the<br />
lever to the latch bracket on the bed side. See<br />
Figure 11.<br />
Important: Secure the rear bed door raising the<br />
cargo bed.<br />
Cargo Bed Lock<br />
The cargo bed has a lock that can be released by pulling the release lever in the direction of the<br />
arrow as shown in Figure 12.<br />
Important: Always place your hand<br />
Cargo Bed Lever<br />
on the cargo bed lever when unlocking<br />
the cargo bed to prevent the bed from<br />
tipping with unbalanced loads.<br />
Lift the cargo bed lever to tilt the bed.<br />
There is a rod located above the choke<br />
that can be raised up to keep the bed in<br />
a tilted position.<br />
Try to keep the loads balanced and<br />
even.<br />
Figure 13<br />
Cargo Bed Release<br />
Vehicle Weight and Cargo Capacity:<br />
1000 pounds on level ground with two people on board.<br />
500 pounds on a 20-degree slope with one person on board.<br />
Page 16<br />
Rear Door<br />
Latch Bracket<br />
Figure 11<br />
Rear Door<br />
Important: Do not overload<br />
The vehicle weighs 650 pounds without cargo or people. The maximum weight limit (vehicle<br />
people and cargo) on level ground is 2050 pounds. On a 20-degree slope the weight limit is<br />
1650 pounds.
Maintenance Information<br />
The following section contains some useful information on the care and maintenance of your<br />
<strong>DR</strong>® <strong>Power</strong>wagon 4 x 2. One of the more important items is checking the engine oil<br />
before you start your engine and changing the oil regularly. Never run your engine with low or<br />
dirty oil.<br />
Tools Required:<br />
You will need metric and fractional wrenches, sockets and Allen wrenches. Also, a set of<br />
straight and Phillips screwdrivers and pliers are needed. The chassis was made exclusively for<br />
us in Taiwan and requires metric tools. The engine, gas tank, and wire harness was<br />
manufactured in the US and requires fractional tools.<br />
Engine Oil:<br />
Your engine holds approximately 7/8 of a quart (28 ounces) of SAE 30 high quality detergent<br />
oil for operation in temperatures 40 degrees F and above. Refer to your engine manual for oil<br />
viscosity in lower operating temperatures.<br />
Caution: The use of multi-viscosity oils (5w-30, 10w-30, etc.) will result in higher than normal<br />
oil consumption. When using multi-viscosity oil, check the oil level often. Multi-viscosity oils<br />
are recommended for use in temperatures below 40 degrees.<br />
Caution: SAE 30 oil, if used below 40 degrees (4 degrees C), will result in hard starting and<br />
possible engine bore damage due to inadequate lubrication.<br />
Check engine oil every 8 hours or daily.<br />
Important: Change the oil after the first 5 hours of use, then every 50 hours or every<br />
season. Change the oil every 25 hours when operating the engine under heavy load or<br />
in high temperatures.<br />
Always disconnect the spark plug<br />
when Servicing the engine or vehicle.<br />
Changing the Oil:<br />
Allow the engine to cool.<br />
Place a suitable container under the oil drain.<br />
Clean the area around the oil plug and the cap.<br />
Remove the drain plug and allow all the oil to<br />
drain. Replace the plug, remove the oil cap<br />
and add oil until it shows at the level in Figure<br />
1 on Page 10. Replace the cap and recycle the<br />
Page 17<br />
Figure 14<br />
Oil Cap<br />
Oil Drain
used oil according to your local regulations.<br />
Spark Plug:<br />
The spark plug gap should be set at .030. The plug is a RC12YC resistor type plug. This plug<br />
requires a 5/8 spark plug wrench for removal and installation.<br />
Air Filter:<br />
Always disconnect the spark plug wire before servicing.<br />
Your engine has a flat cartridge type filter element. The Briggs and Stratton number is 491588.<br />
It does not have a pre cleaner. Replacement is recommended every 25 hours or sooner in<br />
dusty environments. Check your filter if your engine runs poorly, idles rough, or lacks power.<br />
Removal requires a 5/16-nut driver or socket<br />
wrench, or a flat head screwdriver. Lift the<br />
cover about an inch so that it clears the tabs on<br />
the bottom of the cover. Then slide the cover<br />
down between the orange chassis and the<br />
spring. The element can then be replaced.<br />
When replacing the cover make sure that the<br />
tabs in the bottom of the cover fit into the slots<br />
on the air cleaner base.<br />
See your engine manual for more information.<br />
Transmission:<br />
Always disconnect the spark plug wire before servicing.<br />
The transmission is filled with gear oil at the factory, however it is wise to check it before you<br />
run the <strong>DR</strong>® <strong>Power</strong>wagon 4 x 2 and then every eight hours or daily. It requires 2 liters<br />
(2.114 quarts) of 90w-gear oil. It is recommended that you change the oil after 200 hours. See<br />
Figure 3 on Page 10 for the location of the drain, fill and sight glass. When checking the<br />
engine oil make a habit of checking the transmission oil as well. The oil should show 2/3 in<br />
the sight glass.<br />
Page 18<br />
Choke Air Cleaner<br />
Cover<br />
Screw<br />
Figure 15
Brake Information:<br />
Always disconnect the spark plug wire before servicing.<br />
Adjustment and repair of the brakes should be<br />
done carefully to ensure proper braking and that<br />
the front and rear are adjusted together.<br />
The front and rear brakes operate simultaneously<br />
from the foot pedal. The rear brake can be<br />
operated from the hand (parking brake) also. They<br />
are actuated via cables that run from the pedal to<br />
the brake. There are three cables that run to a<br />
support bracket located under the floor in between<br />
the front wheels. See Figure 16. The bottom cable<br />
is the rear brake. The rear brake also has a support<br />
bracket at the rear end of the cable. See Figure 17.<br />
The cables have adjustment nuts that can lengthen<br />
or shorten the cables.<br />
• To shorten the cable and increase the brake<br />
pressure, loosen the nut toward the front of<br />
the machine and tighten the rear nut against<br />
the support bracket.<br />
Rear Support Bracket<br />
• It is recommended that you adjust the front<br />
right and left equally.<br />
• Loosen both forward nuts equally and tighten<br />
the rear nuts so that the brakes are locked on<br />
Figure 17<br />
•<br />
and then back the rear nuts off ¼ to 3/8 inch. Re-tighten the front nuts.<br />
Be careful not to over-tighten the cables before you back the nuts off. You just want to<br />
tighten the cable so that the brake levers on the inside of the wheels are fully actuated.<br />
Move those levers by hand so that you get a feel for how much to tighten the cables.<br />
• Adjust the left and right equally or you may find that the vehicle pulls to the right or left.<br />
Caution: After adjusting the brakes, test them. Set the parking brake, start the<br />
engine and press the brake pedal. Depress the clutch and put the vehicle in gear.<br />
Slowly release the clutch. If the vehicle starts to move the brakes must be adjusted<br />
again. If the engine stalls, the brakes are operating properly. Then try operating the<br />
vehicle carefully in low gear at a slow speed without passengers or loads.<br />
Important: The rear wheels have two shear bolts under each wheel hub. These will allow the<br />
rear wheels to continue to rotate for a foot or so before they engage the wheel axle. You will<br />
notice that if you were moving forward when you applied the hand brake the vehicle can still<br />
roll back a foot or so until the shear bolts engage. See the next section for more information.<br />
Page 19<br />
Cable Jam Nuts<br />
Support Bracket<br />
To Rear Brake<br />
Figure 16<br />
To Brake Pedal
Wheel Shear Bolts:<br />
We included two extra shear bolts with your <strong>DR</strong>® <strong>Power</strong>wagon 4 x 2. These are meant to<br />
shear before damage can be done to the transmission. If you find that only one wheel is<br />
driving or hear rattling from the rear wheel hubs you may have broken shear bolts. These are<br />
easy to replace. You will need a 14 mm wrench or socket and an 8 mm Allen wrench.<br />
Always disconnect the spark plug wire<br />
before servicing.<br />
• Remove the wheel hubcap by removing the<br />
bolt in the center.<br />
• Rotate the wheel slightly to take the tension<br />
off the bolts. The inner hub is slotted. The<br />
bolts should be away from either end of the<br />
slots.<br />
• If the old bolts are no longer attached, find<br />
the through hole and install the new bolts as<br />
shown in Figure 18.<br />
Fuel Filter and System:<br />
Always disconnect the spark plug wire before servicing.<br />
The fuel line runs from the valve on the fuel tank to a fuel filter. The line runs from the filter<br />
to the engine. There are no user serviceable parts in the filter and it should be replaced every<br />
200 hours, or when it becomes clogged.<br />
Caution: Do not smoke or allow others to smoke or have any sparks or other<br />
sources of ignition near by while filling the gas tank or servicing the fuel system. Only<br />
fill the tank outdoors.<br />
To determine if the filter is clogged, close the valve under the tank. Have a suitable container<br />
handy to catch the fuel. Disconnect the fuel line from either the engine or engine side of the<br />
fuel filter. Put the end of the hose in the container and turn the tank valve on. Fuel should<br />
flow freely through the filter into the container. Remember that the fuel system is gravity fed<br />
and the hose should be lower than the tank.<br />
Your engine does not have a fuel pump and fuel flows only because the tank is higher than the<br />
carburetor.<br />
• Always use fresh, regular gasoline with a minimum 85 octane.<br />
• Only buy gasoline in quantities that you will use up in one month. Gasoline can become<br />
stale and can cause poor engine performance.<br />
• At the end of the season empty the gas tank, and run the engine until it runs out of gas.<br />
This will help keep the carburetor from getting gummed up.<br />
Page 20<br />
Shear Bolts<br />
Hub Slots<br />
Figure 18
• Alternately, you can purchase gas stabilizer and add that to the fuel in the tank and then<br />
run the engine. Follow the directions on the stabilizer.<br />
Belt Information:<br />
• The <strong>DR</strong>® <strong>Power</strong>wagon is equipped with 2 agricultural duty belts. They are 55-inch<br />
belts and the replacement number is 4340-0550L. They should be replaced in pairs.<br />
• If you find that the vehicle is starting to lose speed and power, and the engine is operating<br />
normally you may need to check the belts.<br />
• Always check the engine operation before you adjust the belts. A dirty air filter, clogged<br />
fuel filter, or a fouled spark plug can exhibit the same symptoms.<br />
The belts become tight when you release the clutch pedal. A cable runs from the clutch pedal<br />
to a support bracket. The end of the cable housing is attached to the support bracket with two<br />
nuts. The cable wire then runs to the idler roller lever. The idler roller lever is spring-loaded at<br />
the upper end. The spring runs from the lever to the spring support bracket and is connected<br />
to a threaded adjustment rod. The adjustment rod is attached to the spring support bracket<br />
with two nuts. With the clutch engaged the spring length should be 7 1/4 inches from the end<br />
of the hook to the end of the opposite hook. With the clutch pedal pushed in the spring<br />
should measure 7 7/8 inches. See Figure 21.<br />
Caution: Improper belt tension can cause excessive belt wear and low power if too loose. If<br />
the belts are too tight then it will be hard or impossible to shift gears and transmission damage<br />
could occur.<br />
There are two belt guides that are attached to<br />
the engine as shown in Figure 19. These are<br />
set at the factory and should never need<br />
adjustment. If you find that removal is<br />
necessary then the upper guide should be set<br />
at 3/8 inches from the belt, and the lower<br />
guide should be 1/4 inch from the belt. These<br />
guides enable the belts to slip on the engine<br />
pulley when the clutch is disengaged. Also<br />
note that the distance between the belts at the<br />
idler pulley should be 2 1/2 inches with the<br />
clutch engaged. See Figure 20.<br />
2 1/2 inches<br />
1/4 inch<br />
3/8 inch<br />
Figure 20<br />
Page 21<br />
Clutch Idler Pulley<br />
Clutch Spring<br />
Adjustment<br />
Figure 19<br />
Clutch Cable support bracket<br />
7 1/4 inches<br />
Figure 21<br />
Belt Guides<br />
Clutch Cable
Caution: If the belt guides are improperly set, it may cause the gears to grind when shifting, or<br />
machine movement even when the clutch is disengaged.<br />
Changing Belts:<br />
Always disconnect the spark plug wire before servicing. Chock the wheels.<br />
• Place the gear shifter in neutral.<br />
• Loosen the nuts at the spring support bracket and disconnect the spring.<br />
• With the belts now loose, it will be possible to roll them off the rear pulley by rotating the<br />
pulley backwards and guiding the belt off. It is easier to roll the inside belt off to the<br />
inside of the rear pulley.<br />
• Take the outside belt off the front pulley.<br />
• If you find that the front belt guides need to be loosened, first clean the area around the<br />
guides with a rag, then scribe or mark their location with a scribe or marker. This will<br />
make replacement easier.<br />
• Take the inside belt off the front pulley.<br />
• Place the new belts on the machine. It is easier to place the belts on the engine pulley first,<br />
then roll them onto the rear pulley.<br />
• Replace the belt guides in the original location, if they were removed.<br />
Tire Information:<br />
In addition to visually checking the tires daily, you should check the tire every 50 hours with a<br />
tire pressure gage. The tires have tubes.<br />
• Front tire pressure should be kept at 30 psi. Type: 4.00-6 4PR The maximum load rating<br />
is 265 pounds at 31 Psi.<br />
• Rear tire pressure should be kept at 26 psi. Type: 19 x 8.00-10 4pr The maximum load<br />
rating is 825 pounds at 34 Psi.<br />
Engine Mounts:<br />
The engine mounting bolts should be checked for tightness every 50 hours. The rubber<br />
engine mounts should be checked every 25 hours for signs of cracking. Check the engine<br />
crankshaft pulley bolt every 50 hours.<br />
Other Lubrication:<br />
Lubricate cables, all pivot points such as the gear shift pivot, dump latch, seat pivot, clutch<br />
idler, and bed pivot every 200 hours or at least once a month with SAE 30W oil.<br />
There are two grease fittings at the rear of the front wheel mounts. These should receive<br />
grease every 50 hours, using good quality lithium grease.<br />
Page 22
Checking the Bolts and Nuts:<br />
Be sure to check for loose bolts and nuts and tighten them when necessary.<br />
Be sure to check the wheel hub bolts after using the vehicle for 100 hours or on bi-weekly<br />
basis.<br />
Torque values of the bolts are given as follows: .<br />
Specification Torque<br />
3/8"-16 NC (Ordinary) 30 foot-lbs.<br />
3/8"- 16 NC (Medium) 32 foot-lbs.<br />
7/16-14 NC (Medium) 35 foot-lbs.<br />
M14xP2.0 (Rod Joint) 70 foot-lbs.<br />
Battery Information:<br />
Your <strong>DR</strong>® <strong>Power</strong>wagon 4 x 2 has an automotive style 12 volt lead-acid battery.<br />
Maintenance on this battery is similar to that of your car.<br />
Always disconnect the spark plug wire before servicing.<br />
Caution: Always wear eye protection when servicing the battery.<br />
Caution: Always wear acid resistant gloves when servicing the battery<br />
Caution: Never smoke or allow others to smoke or be near any other sources of<br />
ignition when servicing the battery.<br />
• Remove the battery cell cap. Add distilled water to the cell or cells if needed. Replace the<br />
cap.<br />
Important: Remember that battery acid is corrosive and can cause burns. Your battery and<br />
terminals and posts should be cleaned periodically with a mild solution of baking soda and<br />
water, and then rinsed thoroughly with plain water.<br />
Page 23
Notes:<br />
Page 24
1-Year Limited Warranty<br />
Terms and Conditions<br />
The <strong>DR</strong>® <strong>POWERWAGON</strong> 4 X 2 is warranted for one (1) year against defects in materials or<br />
workmanship when put to ordinary and normal residential use; ninety (90) days for any other use. The<br />
engine is warranted separately by the engine manufacturer.<br />
For the purposes of all the above warranties, “ordinary and normal residential use” refers to noncommercial<br />
residential use and does not include misuse, accidents or damage due to inadequate<br />
maintenance.<br />
Country Home Products, Inc. certifies that the <strong>DR</strong>® <strong>POWERWAGON</strong> 4 X 2 is fit for ordinary<br />
purposes for which a product of this type is used. Country Home Products, Inc. however, limits the<br />
implied warranties of merchantability and fitness in duration to a period of one (1) year in residential<br />
use; ninety (90) days for non residential use.<br />
The 1-Year Limited Warranty on the <strong>DR</strong>® <strong>POWERWAGON</strong> 4 X 2 starts from the date the machine<br />
ships from our factory. The 1-Year Limited Warranty is applicable only to the original owner.<br />
The owner is responsible for the performance of the required maintenance as defined by the<br />
manufacturer's owner's manuals. The owner is responsible for replacement of normally wearing parts<br />
such as belts, bearings, batteries and brake. Attachments and accessories to the machine are not<br />
covered by this warranty.<br />
During the warranty period the warranty holder is responsible for any and all shipping and<br />
transportation charges, if required.<br />
SOME STATES DO NOT ALLOW LIMITATIONS ON THE LENGTH OF IMPLIED<br />
WARRANTIES, SO THE ABOVE LIMITATIONS MAY NOT APPLY TO YOU.<br />
Country Home Products, Inc. shall not be liable under any circumstances for any incidental or<br />
consequential damages or expenses of any kind, including, but not limited to, cost of equipment<br />
rentals, loss of profit, or cost of hiring services to perform tasks normally performed by the <strong>DR</strong>®<br />
<strong>POWERWAGON</strong> 4 X 2.<br />
SOME STATES DO NOT ALLOW THE EXCLUSION OR LIMITATION OF INCIDENTAL<br />
OR CONSEQUENTIAL DAMAGES, SO THE ABOVE LIMITATIONS MAY NOT APPLY TO<br />
YOU.<br />
Customer Service Hotline<br />
Country Home Products, Inc.’s objective is to have 100% satisfied customers. For that reason, we<br />
operate a 6-day-a-week Technical Service Department for our Owners. You can access a<br />
Representative by dialing our TOLL-FREE Hotline at 1-800-<strong>DR</strong>-OWNER(376-9637). The sole job of<br />
our well-trained and friendly folks is to ensure that you get any help you need in a timely fashion. They<br />
are there to answer all your questions including (1) inquiries on any of the above warranties, (2)<br />
inquiries about replacement parts, or (3) your questions regarding service, maintenance and operation.<br />
Our Customer Service Representatives will also be happy to answer any of your questions regarding the<br />
separate warranties on all engines. However, to obtain service, repair or replacement of any engine<br />
within the time period covered by the manufacturer’s limited warranty, follow the instructions and<br />
warranty information specifically pertaining to those items provided by their separate manufacturers.<br />
THIS WARRANTY GIVES YOU SPECIFIC LEGAL RIGHTS, AND YOU ALSO HAVE OTHER<br />
RIGHTS THAT VARY FROM STATE TO STATE.<br />
COUNTRY HOME PRODUCTS, Inc.<br />
Meigs Road, P.O. Box 25, Vergennes, Vermont 05491<br />
1-800-<strong>DR</strong>-OWNER(376-9637) • www.dr-owner.com ©2002 CHP, Inc.<br />
Page 25
Daily Checklist for the <strong>DR</strong>® <strong>Power</strong>wagon 4 x 2<br />
To help maintain your <strong>DR</strong>® for optimum performance, we recommend you follow this<br />
checklist each tome you use your machine.<br />
GAS: Fill the gas tank with clean, fresh, unleaded gas.<br />
OIL: Check the oil and add more if necessary (do not overfill).<br />
SPARK PLUG: Clean the spark plug and replace if needed.<br />
AIR FILTER: A clean air filter will mean an easier starting and better running engine. You<br />
should replace the paper air filter every 25 hours of use or more frequently if you are using<br />
the machine in dusty conditions.<br />
ENGINE AIR-COOLING SYSTEM: It is important to keep the engine clean of debris.<br />
Regularly remove debris from the blower housing and cooling fins. A dirty engine retains<br />
heat and can cause damage to the internal engine parts.<br />
BELTS: Check the belts for wear, proper alignment and tension.<br />
TRANSMISSION: Check the gear oil level at the sight window and make sure it shows in<br />
2/3 of the window. Add SAE 90 gear oil if necessary.<br />
COUNTRY HOME PRODUCTS, Inc.<br />
Meigs Road, P.O. Box 25, Vergennes, Vermont 05491<br />
1-800-<strong>DR</strong>-OWNER(376-9637) • www.dr-owner.com ©2002 CHP, Inc. 164241<br />
Page 26