Perfect Fire Operators Manual Model DTP-56 - Evenheat Kilns
Perfect Fire Operators Manual Model DTP-56 - Evenheat Kilns
Perfect Fire Operators Manual Model DTP-56 - Evenheat Kilns

You also want an ePaper? Increase the reach of your titles
YUMPU automatically turns print PDFs into web optimized ePapers that Google loves.
TABLE OF CONTENTS<br />
PERFECT-FIRE FEATURES ...................................... 1<br />
KEY AND LED FUNCTIONS<br />
KEY FUNCTIONS .................................................. 2<br />
LED FUNCTIONS .................................................. 3<br />
PROGRAMMING<br />
CHOOSING THE FIRING DATA .................................... 4<br />
PROGRAMMING MODE (entering the firing data) ................. 5<br />
REVIEWING AND CHANGING FIRING DATA ....................... 6<br />
RUN MODE (running the program) ............................... 6<br />
TO MANUALLY STOP THE FIRING .................................. 6<br />
SAMPLE PROGRAMS<br />
FIRING TO A CONE 06 USING THE CONE FEATURE ................. 7<br />
FIRING TO 1830F (999C) USING TEMPERATURE ..................... 7<br />
FAST FIRE WITH A HOLD AT THE SET POINT .......................... 8<br />
HINTS, SHORTCUTS AND SUGGESTIONS ....................... 8<br />
ERROR MESSAGES ........................................... 9<br />
SPECIFICATIONS ............................................. 9<br />
CHOOSING TEMPERATURE/CONE<br />
TEMPERATURE FIRINGS ........................................... 10<br />
CONE FIRINGS ................................................... 10<br />
© EVENHEAT® KILN, INC. 1992
PERFECT-FIRE FEATURES<br />
The PERFECT-FIRE is a digitally programmable temperature controller. It allows the user to specify the rate of<br />
temperature increase, final firing temperature (set point) and a hold or soak time at the set point. It also offers<br />
special features such as firing by cone number, "Soft <strong>Fire</strong>" and a delay start. The PERFECT-FIRE incorporates<br />
sealed, membrane switches to help keep dirt out and quality in. Its large 4 digit display is easily seen from a<br />
distance. Programming is easy with simple keystrokes. A group of LED's indicate the exact position during the<br />
programming and firing modes.<br />
The rate at which the temperature increases can be very important. Glass artists need a controlled rate to<br />
avoid breakage, porcelain artists typically fire slowly and the heat-treater must follow close specifications. The<br />
PERFECT-FIRE satisfies these needs by allowing the ramp rate to program at any speed between 10 and 3999<br />
degrees per hour in either temperature or cone modes.<br />
The final firing temperature or setpoint can be programmed to any temperature, in 1 degree increments, up<br />
to 2400 o F ( 1315 o C ). This option allows heat-treaters and glass artists as well as those working with clay bodies<br />
to select the temperature at which to fire. It also enables the ceramic and porcelain artists to "split" cones. The<br />
"Soft <strong>Fire</strong>" feature can be used with this option.<br />
The set point can also be programmed using a cone number. This option addresses the preference of firing to<br />
a cone number and finds its use primarily in ceramic and porcelain work. The PERFECT-FIRE contains data on<br />
the typical firing range of cones: 022 to 10. The user merely chooses the cone number at which to fire and the<br />
PERFECT-FIRE does the rest. It should be noted that firing by cone is best accomplished using the "Soft <strong>Fire</strong>"<br />
feature.<br />
Many processes include maintaining the set point temperature for a period of time. This is referred to as Soak<br />
or Hold time. The PERFECT-FIRE has the ability to maintain the final temperature from 1 minute to 40 hours !!<br />
This feature is very handy for those doing heat treating and some glass work.<br />
The PERFECT-FIRE employs a feature we call "Soft <strong>Fire</strong>". It was designed to work in conjunction with the cone<br />
mode to best mimic a cone firing, but it can also be used when firing to a temperature. This feature slows<br />
down the latter portion of the firing automatically and maintains a predetermined time/temperature rate. Its<br />
use is recommended for ceramic and porcelain.<br />
A delay start feature is also incorporated into the PERFECT-FIRE. This allows the user to start the firing process at<br />
a later time. This feature finds use in areas where energy costs are less at particular times during the day. A<br />
maximum delay start of 40 hours is possible.<br />
The PERFECT-FIRE is very simple to program and use.<br />
❖ A simple series of keystrokes is used to choose and store all data.<br />
❖ The four digit display is large and can be seen from a distance.<br />
❖ A group of LED's indicate exact position during programming and firing.<br />
Temperatures are displayed in either Fahrenheit or Celsius. This is indicated on the 4 digit display with either an<br />
F or C respectively. This option has been factory set.<br />
1
KEY FUNCTIONS<br />
Six keys are needed to operate the PERFECT-FIRE.<br />
KEY AND LED FUNCTIONS<br />
❖ START The START key is a multi-function key. It starts as well as stops the firing process and can be used<br />
to override any programmed delay or hold times.<br />
Pressing the START key, while the program is not running ( Off indicator light will be on ), will<br />
start the firing process.<br />
Pressing the START key, while the program is running ( Off indicator light is off ), will force the<br />
program to go to the next position in the firing program and override any predetermined delay<br />
or hold times. Repeated pressing will stop the firing process ( Off indicator light will be on ).<br />
❖ SELECT The SELECT key is used when programming in firing data. It scrolls the program to each of the<br />
four positions to allow for data entry. The four positions include Temperature, Delay Time,<br />
Rate o /Hour and Hold Time.<br />
❖ ENTER The ENTER key is used to store the programmed data in the controllers memory. When using the<br />
ENTER key it is necessary to press and hold the key down until the display flashes off and back<br />
on again. This indicates the data has been stored.<br />
❖ CONE The CONE key is used when it is desired to fire to a cone number instead of a temperature.<br />
When pressed, C --- will appear in the display. The typical ceramic and porcelain range of 022<br />
to 10 is available. The user simply chooses the cone number and the controller does the rest.<br />
See the Cone Firing section for temperature equivalents of pre-programmed cone numbers.<br />
❖ & The up and down arrows are used to change the values in the display during programming.<br />
When held down, the speed at which the values change increases. If tapped, speed remains<br />
the same. If left released for a brief period, speed decreases.<br />
2
LED INDICATORS<br />
KEY AND LED FUNCTIONS<br />
There are five LED indicators that are used in the programming and run modes.<br />
❖ Temp/Off Flashes while in the programming mode indicating that final temperature (set point) data is<br />
now being programmed. While at this position, the user has the choice of programming using<br />
temperature or cone number.<br />
On steady indicates that the unit is off.<br />
❖ Delay Time Flashes while in the programming mode indicating that delay start time data is now being<br />
programmed.<br />
On steady while in the run mode and indicates the controller is counting down the delay<br />
start time.<br />
❖ Rate o /Hr Flashes while in the programming mode indicating that rate per hour data is now being<br />
programmed.<br />
On steady while in the run mode indicating the controller is ramping up at the programmed<br />
rate to the set point.<br />
❖ Hold Time Flashes while in the programming mode indicating that "Soft <strong>Fire</strong>" or hold time data is now<br />
being programmed.<br />
On steady while in the run mode indicating the controller is holding the ( set point ) for time<br />
programmed or is operating the Soft <strong>Fire</strong> feature.<br />
❖ HEATING This LED will turn "on" and "off" during the firing. It indicates when power is being applied to<br />
the heating elements. When "on", power is being applied. When "off", power is not being<br />
applied.<br />
3
CHOOSING THE FIRING DATA<br />
PROGRAMMING<br />
There are four specific pieces of information that must be determined before programming the PERFECT-FIRE:<br />
Final Temperature ( set point ), Delay Start Time, Rate of Temperature Increase and Hold Time/Soft <strong>Fire</strong>. These<br />
pieces of information are called firing data.<br />
❖ Final Temperature ( set point )<br />
❖ Delay Time<br />
This is the end or final temperature that the kiln will achieve. The final temperature is often<br />
referred to as the set point. This data can be entered in two ways: by temperature or by cone<br />
number. To program the temperature directly, the user chooses any temperature up to 2400 o F<br />
or 1315 o C. This is accomplished using the arrow keys. To program by cone number, the user<br />
chooses any cone number between 022 and 10. See the Cone Firing section for temperature<br />
equivalents of pre-programmed cone numbers. This is accomplished using the cone and arrow<br />
keys. To find out what final temperature or cone number to use, consult the dealer or<br />
manufacturer of the product.<br />
The delay time is a special feature that allows the user to delay the actual start of the firing. This<br />
feature finds use where power costs are lower at different times of the day. The delay start is<br />
programmable in 15 minute increments up to 40 hours, use the arrows keys to set. If no delay is<br />
desired, set delay to 0. It should be noted at this point that a kiln or oven should not be fired<br />
unattended.<br />
❖ Rate of Temperature Increase<br />
Most fired items demand a controlled temperature increase. Typical rates include: Porcelain @<br />
300 o F ( 148 o C ) per hour, Ceramic @ 400 to 500 o F ( 204 to 260 o C ) per hour, Glass @ 500 to 1200 o F<br />
( 260 to 649 o C ) per hour or faster depending on glass, Metals vary depending on type and<br />
process. Use the arrow keys to set. These rates are typical and can be changed to suit the<br />
products and desired outcome.<br />
❖ Hold Time/Soft <strong>Fire</strong><br />
Known also as soak time, Hold Time allows the user to maintain the final temperature or set<br />
point for a given period of time. Hold time is programmable from 0 to 40 hours in 1 minute<br />
increments. Typical hold times include: Metals - vary depending on type and process, Ceramic,<br />
Porcelain and Glass - many find a 10 minute hold beneficial on low fires such as decal work.<br />
Use arrow keys to set. The Soft <strong>Fire</strong> feature is also programmable at this point. Unlike the hold,<br />
the soft fire slows the firing rate down as it gets close to the final temperature. It is<br />
recommended that all ceramic and porcelain firings use this soft fire feature in combination<br />
with cone programming except where noted. Metal and glass firings should avoid this soft fire<br />
feature in general. Use down arrow to set. When programming using cone, Soft <strong>Fire</strong> is chosen<br />
automatically.<br />
4
PROGRAMMING<br />
PROGRAMMING MODE ( entering the firing data )<br />
Once the firing data has been determined it can now be put into the PERFECT-FIRE. This is done in what is<br />
called the programming mode. Before entering the firing data, the PERFECT-FIRE must be in the Off position:<br />
Off light should be on.<br />
1. Press and release the Select key. The Temp/Off LED will be flashing. The previous final temperature or set<br />
point will be displayed. At this point the user has two choices: firing by temperature ( A ) or firing by cone<br />
number ( B ).<br />
A. Firing by temperature.<br />
a. Press the arrow keys to raise or lower the displayed temperature. Maximum programmable<br />
temperature is 2400 o F or 1315 o C. Do not exceed the rated temperature of the kiln or oven.<br />
b. Press and hold the Enter key momentarily to store the temperature data.<br />
B. Firing by cone number.<br />
a. Press the Cone key. The display will show C ---.<br />
b. Press the arrow keys to choose cone number between 022 and 10. Do not exceed the rated<br />
temperature of the kiln or oven. It is very important that the correct cone be chosen. Firing to<br />
an 06 cone is not the same as firing to a 6 cone!! The user must be familiar with cones<br />
regardingthis point.See the Cone Firing section for temperature equivalents of<br />
pre-programmed cone numbers.<br />
c. Press and hold the enter key momentarily to store the cone data.<br />
d. The display will show the cone equivalent in degrees. Check this against the cone chart<br />
included in this manual to verify.<br />
2. Press and release the Select key. The Delay Time LED will be flashing. The previously used delay time will be<br />
displayed. Press the arrow keys to choose the desired delay start time, if any. Delay time is set in 15 minute<br />
increments with a maximum delay of 40 hours. This value may be left at zero if no delay is needed. Press<br />
and hold the Enter key momentarily to store the delay time data.<br />
3. Press and release the Select key. The Rate o /Hr LED will be flashing. The previously used rate per hour will be<br />
displayed. Press the arrow keys to change this rate if desired. The rate can be programmed between 10<br />
and 3999 degrees per hour. It should be noted that a particular type of kiln or oven can only heat so fast.<br />
Programming in a faster rate than the kiln can maintain will result in a basically "full on" setting. Press and<br />
hold the Enter key momentarily to store the rate per hour data.<br />
4. Press and release the Select key. The Hold Time LED will be flashing. The previously used hold time or soft fire<br />
will be displayed. Press the arrow keys to change this hold time or soft fire if desired. The hold time can be<br />
programmed from 0 minutes ( no hold ) to 40 hours. To use the soft fire option, press the down arrow key.<br />
Soft <strong>Fire</strong> is located just below 0. Press and hold the enter key momentarily to store the hold time data.<br />
5. Press and release the Select key. The Time/Off LED will be on and the temperature of the kiln or oven will<br />
be displayed. Programming of the firing data is now complete.<br />
5
PROGRAMMING<br />
REVIEWING AND CHANGING THE FIRING DATA<br />
Once all of the firing data is entered it is now possible to go back through each of the four positions and<br />
review the data for errors and make corrections if necessary.<br />
❖ Press and release the Select key. The Temp/Off LED will begin flashing. Check the final temperature for<br />
accuracy. If the temperature data is incorrect, use the arrows and/or cone keys to correct it and press<br />
the Enter key. If the data is correct, or was corrected, press the Select key. Use this same procedure to<br />
review and correct the remaining positions.<br />
RUN MODE ( running the program )<br />
The run mode essentially means the PERFECT-FIRE is using the programmed firing data to operate the kiln or<br />
oven. During the run mode the temperature is displayed continually while the lights indicate the position<br />
within the firing. The heat light will also be turning "on" and "off" to indicate when power is supplied to the<br />
heating elements.<br />
❖ With the PERFECT-FIRE in the off position ( Off light on ), press and release the Start key.<br />
The PERFECT-FIRE is now in the run mode. It first checks the Delay Time position. If a delay start time was<br />
programmed the Delay Time light will be on and the display will show time remaining before start up. If<br />
no Delay Time was programmed, or when the delay time has timed out, the controller moves to the<br />
Rate o /Hr position. This is indicated by the Rate o /Hr light being on. Once in the Rate o /Hr position, the<br />
PERFECT-FIRE will increase the temperature in the kiln or oven at the rate programmed until it reaches<br />
the final temperature or set point. Once at the set point the PERFECT-FIRE will check the Hold Time<br />
position. The Hold Time light will be on indicating the temperature is being maintained for the<br />
programmed amount of time or operating the soft fire. If no hold or soft fire was chosen the<br />
PERFECT-FIRE will move on to the next position which is Off. The Temp/Off light will be on. The firing cycle<br />
is then complete.<br />
TO MANUALLY STOP THE FIRING<br />
As noted previously, the PERFECT-FIRE will complete the firing and return to the off position automatically. In<br />
some cases it is also necessary to stop the firing manually, i.e. leaving the kiln unattended. To stop the firing:<br />
❖ Press the Start key until the Temp/Off light comes on.<br />
The Start key is a multi functional switch. It is used to start the program, stop the program, and can be<br />
used to bypass any programmed delay or hold times.<br />
6
SAMPLE PROGRAMS<br />
FIRING TO A CONE 06 USING THE CONE FEATURE<br />
This sample firing involves firing to a cone 06, no delay start time, 400 o F ( 204 o C ) per hour while using the Soft<br />
<strong>Fire</strong> feature.<br />
1. Press Select. The Temp/Off light will be flashing.<br />
2. Press Cone. C --- will be displayed. Use down arrow until display reads 06.<br />
3. Press Enter and hold momentarily until display flashes on and off.<br />
4. Press Select. The Delay Time light will be flashing. Use down arrow to choose 0.<br />
5. Press Enter and hold momentarily until display flashes on and off.<br />
6. Press Select. The Rate o /Hr light will be flashing. Use arrow keys to choose 400 ( 204 ).<br />
7. Press Enter and hold momentarily until display flashes on and off.<br />
8. Press Select. The Hold Time light will be flashing. "Soft" ( Soft <strong>Fire</strong> ) is chosen automatically<br />
when firing by cone.<br />
9. Press Select. The Temp/Off light will be on. Programming is complete.<br />
10. Press Start to run the program.<br />
FIRING TO 1830F ( 999C ) USING TEMPERATURE<br />
This sample firing involves firing to 1830 o F ( 999 o C ), no delay start time, 400 o F ( 204 o C ) per hour with no hold<br />
time. This sample is basically the same sample as that seen above, except that the set point is chosen using<br />
temperature instead of cone.<br />
1. Press Select. The Temp/Off light will be flashing. Use arrows to choose 1830 ( 999 ).<br />
2. Press Enter and hold momentarily until display flashes on and off.<br />
3. Press Select. The Delay Time light will be flashing. Use down arrow to choose 0.<br />
4. Press Enter and hold momentarily until display flashes on and off.<br />
5. Press Select. The Rate o /Hr light will be flashing. Use arrow keys to choose 400 ( 204 ).<br />
6. Press Enter and hold momentarily until display flashes on and off.<br />
7. Press Select. The Hold Time light will be flashing. Use down arrow to choose 0.<br />
8. Press Select. The Temp/Off light will be on. Programming is complete.<br />
9. Press Start to run the program.<br />
7
FAST FIRE WITH A HOLD AT THE SET POINT<br />
SAMPLE PROGRAMS<br />
This sample firing involves firing to 1875 o F (1024 o C ), no delay start, 3999 degrees per hour with a 15 minute<br />
hold time at the set point. As noted, the kiln or oven is not likely to respond to 3999 degrees per hour. This<br />
setting is used to take the temperature of the unit up as fast as possible, or what is commonly referred to as a<br />
fast fire.<br />
1. Press Select. The Temp/Off light will be flashing. Use arrows to choose 1875 ( 1024 ).<br />
2. Press Enter and hold momentarily until display flashes on and off.<br />
3. Press Select. The Delay Time light will be flashing. Use down arrow to choose 0.<br />
4. Press Enter and hold momentarily until display flashes on and off.<br />
5. Press Select. The Rate o /Hr light will be flashing. Use up arrow to choose 3999.<br />
6. Press Enter and hold momentarily until display flashes on and off.<br />
7. Press Select. The Hold Time light will be flashing. Use down arrow to choose 15.<br />
8. Press Select. The Temp/Off light will be on. Programming is complete.<br />
9. Press Start to run the program.<br />
HINTS, SHORTCUTS AND SUGGESTIONS<br />
❖ To review the programmed firing data just press the Select key repeatedly. After data has been reviewed<br />
return to the off position.<br />
❖ While reviewing you can change any firing data you wish. Use the arrow keys to change and press enter.<br />
Continue to review until you are satisfied with programmed data.<br />
❖ It is suggested that you review the firing data before every firing to verify its contents. It only takes about<br />
five seconds. It's much easier to make program changes before the firing than after!!<br />
❖ If you want to bypass the delay time and start firing immediately, just press the Start key once. The<br />
PERFECT-FIRE will go directly to Rate o /Hr and start firing. The same can be said for the Hold Time. If you<br />
want to end the firing without completing the hold, just press Start one time and the PERFECT-FIRE will go<br />
to the off position.<br />
❖ We ask that you please understand the cone chart and know which cone you are firing. As stated before,<br />
a cone 06 is not the same as a cone 6. If you program a cone 6 for an 06 you will most likely end up with<br />
an overfired mess and a big headache. Please avoid this by knowing to which cone your ware is fired<br />
and program accordingly.<br />
❖ The Soft <strong>Fire</strong> feature can be used when programming by temperature and by cone number. Its use is<br />
highly recommended for clay bodies but not glass and metals.<br />
8
HINTS, SHORTCUTS AND SUGGESTIONS<br />
❖ The devise that senses the temperature is called the thermocouple. It is inserted into the kiln chamber and<br />
produces a small signal relative to temperature. This signal is seen by the PERFECT-FIRE and converted to a<br />
temperature. It is important that care be taken to avoid damaging this devise when working near and<br />
loading or unloading the kiln or oven.<br />
❖ The temperature accuracy of the PERFECT-FIRE is ).5% of the span. This makes for very accurate and<br />
repeatable firings. It should be noted that the size or mass of the load can effect the final outcome,<br />
particularly in ceramics and porcelain. In such cases it may be necessary to decrease or increase the set<br />
point. Typically 5 to 10 degrees will suffice.<br />
❖ Always turn the power off when firing is complete or when leaving the kiln or oven unattended.<br />
ERROR MESSAGES<br />
❖ EEEE This error code indicates a thermocouple problem. The thermocouple is either destroyed or<br />
connected improperly. Check thermocouple and all thermocouple connections thoroughly.<br />
❖Err2 This error indicates invalid data has been detected. This forces the unit to shut down and display<br />
this error code. To reset the unit, remove and reapply power.<br />
SPECIFICATIONS<br />
Power Requirements .................. 115 VAC )5%, 208 VAC )10%, 230 VAC)10% @ 50-60 Hz<br />
Thermocouple ........................ 14 gauge, Type K<br />
Operating Temperature Range ....... 0 to 100 o F ( -17 to 38 o C )<br />
Display Resolution .................... 1 o<br />
Ramp Rate ( degrees/hour ) .......... 1 o /hour min. to 3999 o /hour max.<br />
Ramp Time ........................... 40 hour max.<br />
Hold Period ........................... 40 hour max.<br />
Set Point Range ...................... 0 to 2400 o F ( -17 to 1315 o C )<br />
Temperatures in this manual are quoted in both Fahrenheit and Celsius. Celsius temperatures are those in<br />
parenthesis. The PERFECT-FIRE has been factory set for either Fahrenheit or Celsius scales depending upon<br />
requests and final destination. Contact your dealer/distributor if a change in scale is needed. The following<br />
conversion formulas give a very close approximation.<br />
To convert Fahrenheit to Celsius.<br />
o C = ( o F - 32 ) x 5/9<br />
example: ( 2000 o F -32 ) x 5/9 = 1968 x 5/9 = 1093 o C<br />
To convert Celsius to Fahrenheit.<br />
o F = ( o C x 9/5 ) + 32<br />
example: ( 1093 o C x 9/5 ) + 32 = 1967 + 32 = 1999 o F<br />
9
TEMPERATURE FIRINGS<br />
CHOOSING TEMPERATURE/CONE<br />
Given the multitude of products and processes it is impossible to give specifications regarding final firing<br />
temperatures. This information is available from the supplier or manufacturer of the particular product. Many<br />
products are labeled or contain information in the packaging relating to the specific firing needs. If in doubt,<br />
it is suggested that contact be made with the supplier/manufacturer.<br />
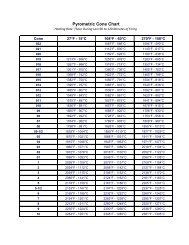
CONE FIRINGS<br />
The cone temperature equivalents shown in the With Soft <strong>Fire</strong> column are those chosen automatically by the<br />
PERFECT-FIRE when programmed using the cone feature. The Soft <strong>Fire</strong> feature is chosen automatically when<br />
firing by cone. You do not have to use the Soft <strong>Fire</strong> option when firing by cone, however, it is recommended.<br />
The cone temperature equivalents shown in Without Soft <strong>Fire</strong> can be used when it is desired to fire to a cone<br />
number without using the Soft <strong>Fire</strong> feature. These temperatures must be entered manually and are not chosen<br />
automatically by the PERFECT-FIRE. It should be noted again that the relative size of the load can effect the<br />
results of the firing and that adjustment of the set point may be necessary.<br />
CONE NUMBER WITH SOFT FIRE WITHOUT SOFT FIRE<br />
o o<br />
F ( C)<br />
o o<br />
F ( C)<br />
022 1069 (576) 1086 (586)<br />
021 1116 (602) 1137 (614)<br />
020 1157 (624) 1175 (635)<br />
019 1234 (667) 1261 (683)<br />
018 1285 (696) 1323 (717)<br />
017 1341 (727) 1377 (747)<br />
016 1407 (763) 1458 (792)<br />
015 1454 (789) 1479 (804)<br />
014 1533 (833) 1540 (838)<br />
013 1596 (868) 1<strong>56</strong>6 (852)<br />
012 1591 (866) 1623 (884)<br />
011 1627 (886) 1641 (894)<br />
010 1629 (887) 1641 (894)<br />
09 1679 (914) 1693 (923)<br />
08 1733 (944) 1751 (955)<br />
07 1783 (972) 1803 (984)<br />
06 1816 (991) 1830 (999)<br />
05 1888 (1031) 1915 (1046)<br />
04 1922 (1049) 1940 (1060)<br />
03 1987 (1086) 2014 (1101)<br />
02 2014 (1101) 2048 (1120)<br />
01 2043 (1117) 2079 (1137)<br />
1 2077 (1136) 2109 (1154)<br />
2 2088 (1142) 2124 (1162)<br />
3 2106 (1152) 2134 (1168)<br />
4 2134 (1167) 2167 (1186)<br />
5 2151 (1177) 2185 (1196)<br />
6 2194 (1201) 2232 (1222)<br />
7 2219 (1214) 2264 (1240)<br />
8 2257 (1236) 2305 (1263)<br />
9 2300 (1259) 2336 (1280)<br />
10 2345 (1284) 2381 (1305)<br />
10