Multi Jig SVS-50 Instructions - Rockler.com
Multi Jig SVS-50 Instructions - Rockler.com Multi Jig SVS-50 Instructions - Rockler.com
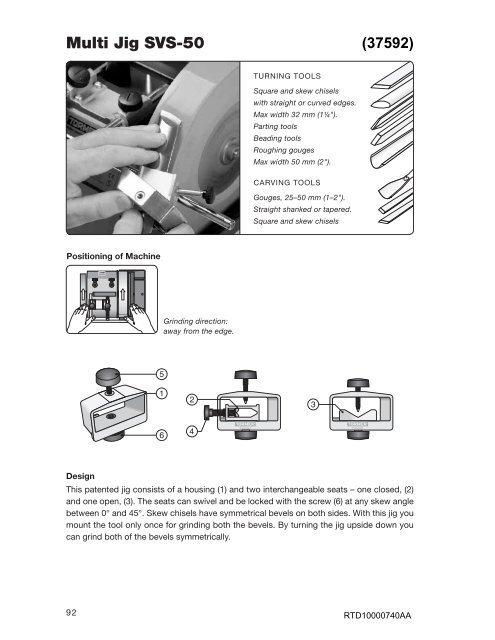
Multi Jig SVS-50 Positioning of Machine 92 Grinding direction: away from the edge. TURNING TOOLS Square and skew chisels with straight or curved edges. Max width 32 mm (1¼"). Parting tools Beading tools Roughing gouges Max width 50 mm (2"). CARVING TOOLS Gouges, 25–50 mm (1–2"). Straight shanked or tapered. Square and skew chisels (37592) Design This patented jig consists of a housing (1) and two interchangeable seats – one closed, (2) and one open, (3). The seats can swivel and be locked with the screw (6) at any skew angle between 0° and 45°. Skew chisels have symmetrical bevels on both sides. With this jig you mount the tool only once for grinding both the bevels. By turning the jig upside down you can grind both of the bevels symmetrically. RTD10000740AA
- Page 2 and 3: The closed seat has been developed
- Page 4 and 5: Selection Chart 1 2 3 4 Straight ed
- Page 6 and 7: Settings Set the jig and lock the p
- Page 8 and 9: Sharpening Once you have created th
- Page 10 and 11: Principle of creating the curve Sha
- Page 12 and 13: Parting and Beading Tools The Open
- Page 14 and 15: Carving Gouges with a Straight Shan
- Page 16 and 17: Now sharpen again with a very light
- Page 18 and 19: Square Carving Chisels The Open Sea
- Page 20: Setting the edge angle Grinding Set
<strong>Multi</strong> <strong>Jig</strong> <strong>SVS</strong>-<strong>50</strong><br />
Positioning of Machine<br />
92<br />
Grinding direction:<br />
away from the edge.<br />
TURNING TOOLS<br />
Square and skew chisels<br />
with straight or curved edges.<br />
Max width 32 mm (1¼").<br />
Parting tools<br />
Beading tools<br />
Roughing gouges<br />
Max width <strong>50</strong> mm (2").<br />
CARVING TOOLS<br />
Gouges, 25–<strong>50</strong> mm (1–2").<br />
Straight shanked or tapered.<br />
Square and skew chisels<br />
(37592)<br />
Design<br />
This patented jig consists of a housing (1) and two interchangeable seats – one closed, (2)<br />
and one open, (3). The seats can swivel and be locked with the screw (6) at any skew angle<br />
between 0° and 45°. Skew chisels have symmetrical bevels on both sides. With this jig you<br />
mount the tool only once for grinding both the bevels. By turning the jig upside down you<br />
can grind both of the bevels symmetrically.<br />
RTD10000740AA
The closed seat has been developed for the precision sharpening of turning skew chisels<br />
with an oval or square section and with curved or straight edges. Since the chisel is<br />
mounted in the centre of the seat, the bevels are ground to exactly the same shape. The<br />
turning skew chisel is mounted with a side screw (4). Tool size 13 mm (½") to 35 mm (1").<br />
It is also suitable for carving skew chisels longer than approx 110 mm (4¾").<br />
The open seat, where the tool is fixed with a top screw (5), is used for tools which have the<br />
edge ground square across the shank, such as parting tools, roughing gouges and wide<br />
carving gouges. Both seats are mounted with a bottom screw (6), which also locks the<br />
chosen skew angle. A scale on each seat shows the skew angle.<br />
The closed seat is for skew<br />
chisels. The tool is fixed with<br />
the side screw (4). The top<br />
screw (5) is not used.<br />
The open seat is designed for tools which have the edge square<br />
across the shank. The tool is fixed with the top screw in the housing<br />
(5). As the seat can be turned, it can also be used for short<br />
skew chisels.<br />
Grinding Direction<br />
Grinding away from the edge with Universal Support placed horizontally is re<strong>com</strong>mended.<br />
This gives you following advantages:<br />
With the lighter grinding pressure you can more easily control the operation.<br />
Especially advantageous when grinding small tools.<br />
As no water flows over the edge, it is easier to see where the grinding takes place.<br />
The rotation of the stone pulls the jig towards the Universal Support.<br />
<br />
No risk of vibration.<br />
93
Turning Skew Chisels<br />
Flat or Oval with a Straight Edge<br />
Here is shown the shaping of a flat skew, which has a rectangular section.<br />
The oval skew is done in the same way.<br />
You can do the initial shaping either directly on the Tormek machine or on your bench<br />
grinder using the Tormek Bench Grinder Mounting Set BGM-100 (page 29). When you need<br />
to remove a lot of steel, e.g. when decreasing the edge angle or changing the skew angle,<br />
you can use a bench grinder which removes steel faster. This is due to the low grinding<br />
pressure when sharpening a skew (see curved edge page 100).<br />
These three factors determine the geometry of a skew.<br />
The setting of the jig to the<br />
skew angle, JS.<br />
94<br />
The protrusion of the tool in<br />
the jig, P.<br />
Universal Support position.<br />
Use hole B.<br />
The Turning Tool Setter TTS-100 controls these factors. Select the profile you want from the<br />
chart on the next page and use the three factors, which will give that shape. Then note the<br />
settings on the Profile Label and put it on the ferrule. After the initial shaping you can exactly<br />
replicate your favourite shape at every sharpening in less than a minute.<br />
Note the settings on a Profile Label<br />
and put it in on the ferrule. A set of<br />
labels <strong>com</strong>es with the jig.
Selection Chart<br />
1<br />
2<br />
3<br />
4<br />
Straight edges<br />
=30°<br />
Straight edges<br />
=45°<br />
Radius edges<br />
=30°<br />
Radius edges<br />
=45°<br />
Flat<br />
Flat<br />
Flat<br />
Flat<br />
Oval<br />
Oval<br />
Oval<br />
Oval<br />
JS 20°<br />
P 65<br />
Hole B<br />
JS 20°<br />
P 55<br />
Hole B<br />
JS 30°<br />
P 75<br />
Hole B<br />
JS 30°<br />
P 65<br />
Hole B<br />
For tight spots, detail work and<br />
finest finish.<br />
For professional level turners.<br />
For broad application.<br />
Easier to control than<br />
a 30° edge angle.<br />
For tight spots, detail work and<br />
finest finish.<br />
For professional level turners.<br />
For broad application.<br />
Easier to control than<br />
a 30° edge angle.<br />
These geometries, i.e. the shape and edge angle, are re<strong>com</strong>mended by experienced woodturners<br />
and recognized woodturning workshops around the world, e.g. Craft Supplies in<br />
USA and Drechselstube Neckarsteinach in Germany.<br />
Since a skew can have an unlimited number of <strong>com</strong>binations of skew angles, shapes and<br />
edge angles, a new tool has a more or less a different shape than any of the shapes on the<br />
chart. Therefore, you first need to shape your tool to one of the shapes on this chart. Then<br />
the following sharpenings will be an easy task and done in less than a minute.<br />
Note Stick to the shape you have selected and do not switch from one<br />
shape to another. Then you will get the full benefit of the Tormek TTS-100<br />
Setter, since you can instantly replicate exactly the same shape every time.<br />
Should you need a different shape, then buy another tool and grind it to<br />
your alternative shape. This way of working will give you more time for turning<br />
and fewer interruptions for shaping and sharpening.<br />
Tip Like many professional turners you should put a curve on the edge. This<br />
is easily done with the <strong>SVS</strong>-<strong>50</strong> jig (page 100). Shaping a skew with a curved<br />
edge is faster since the reduced area in contact with the grindstone results<br />
in a higher grinding pressure.<br />
95
Position of the Universal Support<br />
You can work with the Universal Support placed either horizontally with the stone running<br />
away from the edge or vertically so the stone runs towards the edge.<br />
In the horizontal position the rotation of the grindstone pulls the jig towards the Universal<br />
Support. In the vertical position, the grinding pressure is increased by the rotation of the<br />
stone but you must watch that you keep pressing the jig firmly towards the Universal Support<br />
to ensure that the edge does not catch the stone.<br />
In this instruction, we show the horizontal position. When much steel needs to be removed<br />
for the initial shaping, you could beneficially work with the Universal Support placed vertically.<br />
For future sharpenings, you should always work in the horizontal position so the rotation<br />
of the stone pulls the jig towards the Universal Support and that you eliminate the risk<br />
that the edge catches into the stone.<br />
Horizontal mount. The stone<br />
runs away from the edge.<br />
96<br />
Vertical mount. The stone runs<br />
towards the edge.<br />
Round Off the Corners On a Flat Skew<br />
Before shaping a flat (rectangular) skew for the first time,<br />
you should for two reasons, check that the corners are<br />
rounded off. Firstly, the tool works more smoothly on your<br />
lathe tool rest and secondly the skew lines up more easily<br />
in the seat of the jig.<br />
The rounding off can be done on your Tormek machine.<br />
You can even polish the surfaces on the honing wheel for<br />
the lowest possible friction on the tool rest of your lathe.<br />
A flat skew should have<br />
rounded off corners.
Settings<br />
Set the jig and lock the position<br />
securely with the bottom screw<br />
(6).<br />
Horizontally<br />
The closed seat<br />
Current design<br />
Mount the tool. Lock with the<br />
side screw (4).<br />
Vertically<br />
Earlier design<br />
Check that the tool is aligned<br />
so the shape later on will be<br />
exactly replicated.<br />
Set the Universal Support.<br />
You can work with the Universal<br />
Support mounted either horizontally<br />
or vertically (page 96).<br />
Use the inner hole of the setter.<br />
Both metal discs must touch<br />
the stone.<br />
This seat has been re-designed<br />
(2006). It is now 10 mm shorter<br />
and also slanted in order to<br />
permit the sharpening of shorter<br />
tools. If you have the longer<br />
seat, you should trim it to 52 mm<br />
(2").<br />
97
Lift the tool and then move it<br />
sideways during the sharpening.<br />
Do not slide the tool. Press with<br />
your thumb close to the edge.<br />
98<br />
Shaping<br />
Activate the grindstone during<br />
the grinding process with the<br />
coarse side of the Stone Grader<br />
SP-6<strong>50</strong>.<br />
Shaping wide chisels<br />
Apply forward pressure on the<br />
handle side to <strong>com</strong>pensate for<br />
the force of the stone against<br />
the tool.<br />
Grind until the bevels are symmetrical.<br />
If necessary grind the<br />
first side again.<br />
When shaping a wide chisel, you can increase the efficiency of<br />
the stone by grinding half the width at a time. The grinding pressure<br />
will increase, which makes the stone grind faster.<br />
Turn the jig around and shape<br />
the other side. Apply forward<br />
pressure on the handle side.<br />
When the desired shape is achieved, check that the protrusion<br />
has not decreased during the shaping. If so, re-position the tool<br />
to the right protrusion and then <strong>com</strong>plete the shaping. By doing<br />
so, you ensure that you will exactly replicate the edge geometry at<br />
future sharpenings.<br />
Complete the sharpening with<br />
the entire bevel on the stone.<br />
Lift the tool to move it sideways.
Sharpening<br />
Once you have created the shape of the edge it is an easy task to quickly re-sharpen the<br />
tool. Do the three settings noted on the Profile Label carefully and you will obtain exactly the<br />
same shape every time even when the stone wears and decreases in diameter.<br />
Set the jig, JS. Mount the tool with a fixed<br />
protrusion, P.<br />
Honing<br />
Move the Universal Support to<br />
the honing wheel and position<br />
identically with the Setter.<br />
Set the Universal Support.<br />
Use hole B.<br />
Hone both the sides alternately until the burr is removed and the<br />
bevels are polished to a mirror finish.<br />
99
Flat or Oval Skews with a Curved Edge<br />
You can put a curved (convex) edge on both your flat and oval skews. You pivot the jig with<br />
the tool on the Universal Support to create the curve. This curved edge has certain advantages<br />
and has been popularized amongst others by the Australian professional woodturner<br />
Richard Raffan. He prefers a slightly curved edge, which is shown in full scale on the next<br />
page.<br />
To achieve this shape, you need to set the <strong>SVS</strong>-<strong>50</strong> jig on 30° instead of 20° for the straight<br />
edge shape. Even here, you will need to remove quite a bit steel, which can take 10–20<br />
minutes depending on the original shape. But again, this is a once only task, from which you<br />
will benefit at future sharpenings.<br />
Since the contact area against the grindstone on a convex edge is smaller than on a plain<br />
edge, the resulting grinding pressure is higher when applying the same force on the tool.<br />
(The grinding pressure is the force you apply onto the tool divided by the grinding area.)<br />
A certain grinding pressure is required to maintain an active grindstone surface so it does<br />
not be<strong>com</strong>e glazed. When shaping or sharpening a skew chisel with a straight edge, which<br />
has a large grinding area, you therefore need to re-activate the grindstone frequently with<br />
the Stone Grader SP-6<strong>50</strong>.<br />
Since the grinding pressure is higher – even with the same force applied on the tool – on a<br />
skew with a convex edge, the grindstone activates itself and therefore grinds more effectively.<br />
This is why a skew with a convex edge is shaped faster than a skew with a straight<br />
edge.<br />
Grinding area and grinding pressure<br />
Straight edge. Large grinding<br />
area. Same as the entire<br />
grinding bevel. Low resulting<br />
grinding pressure. Grindstone<br />
requires activating.<br />
100<br />
Convex edge. Smaller grinding<br />
area. Higher resulting grinding<br />
pressure. The grindstone works<br />
more effectively.
Principle of creating the curve<br />
Shaping and sharpening<br />
Pivot the jig so you create the<br />
shape of the edge.<br />
Turn the jig around and shape<br />
the other side.<br />
Honing<br />
Move the Universal Support to<br />
the honing wheel and position<br />
identically with the Setter.<br />
Watch that you do not grind too<br />
much on the long point.<br />
Pivoting the jig on the bevelled<br />
corner of the jig (A) creates<br />
the curve. Do not turn the jig<br />
more than the max. shown so<br />
the seat rests on the Universal<br />
Support all the time.<br />
This is a suitable shape (full<br />
scale) for a 19 mm (¾") oval<br />
skew.<br />
Grind until the bevels are symmetrical. If necessary, grind the first<br />
side again.<br />
Hone both the sides alternately until the burr is removed and the<br />
bevels are polished to a mirror finish.<br />
101
Customized Profiles<br />
You can also sharpen skews with different geometries other than the standard shapes provided<br />
by the TTS-100 Setter. This is the way you can replicate an existing edge geometry<br />
on a skew with a straight edge.<br />
1. Mount the tool with a 65 mm protrusion using the TTS-100 Setter.<br />
2. Set the skew angle as shown below.<br />
3. Set the edge angle with the Universal Support. Use the Marker Method (page 41).<br />
4. Note the protrusion (P) and the jig setting on the recipe label, which <strong>com</strong>es with the<br />
jig. Put the label on the ferrule. Protect it with clear varnish.<br />
When resharpening the edge angle, you should use the Spacer Block Method (page 41).<br />
102<br />
Tip If the geometry does not differ too much from the shapes the TTS-100<br />
offers, you should consider changing the shape to the TTS-100 shape for<br />
easier replication in the future.
Parting and Beading Tools<br />
The Open Seat is Used<br />
Lock the seat with the bottom<br />
screw (6) in the straight position<br />
(0°). The seat should touch the<br />
stop (7).<br />
Press with your fingers close to<br />
the edge for best control while<br />
your other hand ensures that<br />
the tool is vertical.<br />
Grind until the bevels are symmetrical.<br />
If necessary grind the<br />
first side again<br />
Mount the tool protruding (P)<br />
75–100 mm (3–4") and lock it<br />
with the top screw (5).<br />
Ensure that the entire flange<br />
of the jig is in contact with the<br />
Universal Support<br />
Set the edge angle by adjusting<br />
the Universal Support. When<br />
replicating an existing angle,<br />
use the Marker Method, (p 41).<br />
When the first side is ground<br />
then turn the tool around and<br />
grind the other side.<br />
Honing. Move the Universal Support to the honing wheel side<br />
and hone the bevels with the tool still mounted in the jig. Set the<br />
Universal Support so that you get the same honing angle as the<br />
grinding angle. Use the Marker Method.<br />
103
Roughing Gouges<br />
The Open Seat is Used<br />
Lock the seat with the bottom<br />
screw (6) in the straight position<br />
(0°). The seat should touch the<br />
stop (7).<br />
Roll the gouge on the Universal<br />
Support while you slide it<br />
across the stone so that the<br />
stone wears evenly.<br />
Honing<br />
104<br />
Mount the gouge protruding (P)<br />
75–100 mm (3–4") and lock it<br />
with the top screw (5).<br />
Ensure that the entire flange<br />
of the jig is in contact with the<br />
Universal Support.<br />
Move the Universal Support to the leather honing wheel. Hone<br />
and polish the bevel with the tool still mounted in the jig. Set the<br />
Universal Support so that you have the same honing angle as the<br />
grinding angle. Use the Marker Method.<br />
Set the edge angle by adjusting<br />
the Universal Support. When<br />
replicating an existing angle,<br />
use the Marker Method, (p 41).<br />
Grind until you can feel the burr<br />
along the entire edge.
Carving Gouges with a Straight Shank<br />
The Open Seat is Used<br />
The Principle<br />
Use the technique as described in the chapter Sharpening Techniques for Carving Gouges<br />
and V-tools on page 20.<br />
Edge Angle<br />
As described in the chapter above on page 24, the choice of edge angle is very important<br />
for a carving gouge. The method of setting the jig for a certain angle depends on whether<br />
you want to replicate an existing edge angle or if you want to put a new edge angle on your<br />
tool.<br />
When replicating an existing edge angle, you should use the Marker Method, which is described<br />
on page 41. If you want to put a new edge angle to your tool, you can either set the<br />
angle by eye or you can use the AngleMaster (page 140).<br />
Shaping the edge<br />
Shape the edge by resting the<br />
tool on the Universal Support<br />
placed horizontally and close<br />
to the stone.<br />
Flatten and smooth the blunt<br />
edge with the fine side of the<br />
Tormek Stone Grader, SP-6<strong>50</strong>.<br />
Line of light<br />
The blunt edge now appears<br />
as a line of light, which is your<br />
guide on where to grind.<br />
105
Mounting the tool and setting the jig<br />
Lock the seat with the bottom<br />
screw (6) in the straight position,<br />
(0°). The seat should touch<br />
the stop (7).<br />
Grinding<br />
Always grind where the line of<br />
light is thickest whilst rolling the<br />
tool on the Universal Support.<br />
Grade the grindstone for fine<br />
sharpening with the fine side<br />
of the Stone Grader SP-6<strong>50</strong>.<br />
106<br />
Mount the gouge protruding (P)<br />
75–100 mm (3–4") and lock it<br />
with the top screw (5).<br />
Ensure that the entire flange<br />
of the jig is in contact with the<br />
Universal Support.<br />
Continue grinding. Check the<br />
result frequently.<br />
Set the edge angle by adjusting<br />
the Universal Support. When<br />
replicating an existing angle,<br />
use the Marker Method.<br />
Line of light<br />
Check frequently where the<br />
grinding is taking place. Grind<br />
until you have a thin and even<br />
line of light.<br />
Remove the burr on the leather<br />
honing wheels so that you can<br />
more clearly observe the line<br />
of light.
Now sharpen again with a very<br />
light pressure. Check frequently<br />
to ensure that you do not<br />
over-grind.<br />
Important It is very easy to be misled by the burr and mistake the burr for<br />
the line of light! Therefore you must remove the burr frequently during the<br />
finishing of the grinding operation, so you clearly can watch the progress of<br />
a gradually thinning the line of light.<br />
It is easy to over-sharpen the<br />
edge at the end of the process.<br />
If this happens, you need to<br />
reshape the edge and start<br />
again from the beginning.<br />
Honing<br />
Keep the tool in the jig and<br />
hone and polish the inside on<br />
the Profiled Leather Honing<br />
Wheel LA-120.<br />
Stop sharpening immediately<br />
when the line of light disappears,<br />
which is a sign that the<br />
edge is sharp.<br />
Be careful when you grind at<br />
the sides of the tool so that you<br />
do not round off the corners.<br />
Woodcarving tools should have<br />
sharp corners!<br />
Hone and polish the bevel. Set the Universal Support so that the<br />
honing angle is the same as the grinding angle. Use the Marker<br />
Method. Hone away the burr and polish the bevel to a mirror<br />
finish.<br />
107
Testing the Sharpness<br />
Keep the tool mounted in the jig and test the sharpness. Push the edge across the fibres in<br />
a piece of wood. The edge should cut easily and leave a smooth surface without tearing the<br />
fibres. Since the tool is still mounted in the jig and the Universal Support is left in its position,<br />
you can if necessary easily go back and continue the honing.<br />
108
Square Carving Chisels<br />
The Open Seat is Used<br />
The min length of blade for this jig is approx 100 mm (4") at 25° edge angle. For shorter<br />
blades, down to 75 mm (3"), you use the <strong>SVS</strong>-32 jig (page 65).<br />
Lock the seat with the bottom<br />
screw (6) in the straight position<br />
(0°). The seat should touch the<br />
stop (7).<br />
Mount the chisel protruding (P)<br />
min 100 mm (4"). Lock with the<br />
top screw (5).<br />
Sharpen the first side. Press with your thumb close to the edge<br />
for best control. Lift the tool and then move it sideways so that<br />
the stone wears equally. When a burr has developed on the entire<br />
edge, turn the jig around and sharpen the other side.<br />
Set the edge angle by adjusting<br />
the Universal Support. When<br />
replicating an existing angle,<br />
use the Marker Method.<br />
Ensure that the entire flange<br />
of the jig is in contact with the<br />
Universal Support.<br />
Honing. Keep the tool in the jig and move to the leather honing wheel. Set the Universal Support<br />
so that the honing angle is the same as the grinding angle. Use the Marker Method. Hone away the<br />
burr and polish the bevels to a mirror finish.<br />
109
Carving Skew Chisels<br />
The Closed Seat is Used<br />
These tools are manufactured with a skew angle of approx. 25°. You can sharpen your<br />
chisel either with the existing skew angle or you can shape it to a new skew angle of your<br />
choice.<br />
For using this jig the chisel must have a certain min. length, which depends on the edge<br />
angle and the skew angle. At a 25° edge angle and a 25° skew angle the min length of blade<br />
is approx. 105 mm (4"). The shape of the shank must also be able to be locked in the seat,<br />
otherwise use the open seat.<br />
Setting the existing skew angle<br />
Mount the tool protruding (P)<br />
<strong>50</strong>–75 mm (2–3") and lock it<br />
with the side screw (4).<br />
Setting a new skew angle<br />
A scale on the seat enables you<br />
to set the desired skew angle.<br />
110<br />
Mark a line across the stone<br />
guided by the Universal Support.<br />
Use a water proof pen if<br />
the stone is wet or a pencil.<br />
Lock the position with the<br />
bottom screw (6).<br />
Put the tool on the Universal<br />
Support and turn it until the<br />
bevel is parallel to the line.<br />
Tighten the bottom screw (6).<br />
Mount the tool protruding (P)<br />
<strong>50</strong>–75 mm (2–3") and lock it<br />
with the side screw (4).
Setting the edge angle<br />
Grinding<br />
Set the edge angle by adjusting the Universal Support.<br />
When replicating an existing angle, use the Marker Method.<br />
When setting a new angle you can use the AngleMaster.<br />
Grindstone Condition<br />
Usually carving chisels only need fine sharpening. Therefore<br />
you normally grade the grindstone to a finer grit with<br />
the Stone Grader SP-6<strong>50</strong> (page 138). When you need to<br />
shape the chisel, you use the normal fast grinding condition<br />
of the grindstone.<br />
Honing<br />
Grind the first side. Press with<br />
your thumb close to the edge<br />
for the best control. Lift the<br />
tool and then move it sideways.<br />
When a burr has developed<br />
on the entire edge, turn the jig<br />
around and grind the other side.<br />
Keep the tool in the jig and move to the leather honing wheel. Set the Universal Support so that the<br />
honing angle is the same as the grinding angle. Use the Marker Method. Hone away the burr and<br />
polish the bevels to a mirror finish.<br />
111


