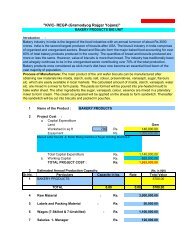
sewing machine operations mannual prepared by: orient craft - smallB
sewing machine operations mannual prepared by: orient craft - smallB
sewing machine operations mannual prepared by: orient craft - smallB

Create successful ePaper yourself
Turn your PDF publications into a flip-book with our unique Google optimized e-Paper software.
SEWING MACHINE OPERATIONS MANNUAL<br />
PREPARED BY:<br />
ORIENT CRAFT FASHFION INSTITUTE OF TECHNOLOGY<br />
Chenetha bhavan, Nampally, Hyderabad- 500 001<br />
SUBMITTED TO:<br />
GERMAN DEVELOPMENT CO-OPERATION-GTZ<br />
21, Jor Bagh, New Delhi – 110 003<br />
Page | 1
CONTENTS<br />
PARTICULARS Page No.<br />
CHAPTER – I 6<br />
INTRODUCTION<br />
CHAPTER – II 7 To 22<br />
SEWING MACHINE<br />
1. INVENTION OF THE SEWING MACHINE<br />
2. HISTORY OF SEWING MACHINE<br />
3. PARTS OF SEWING MACHINE<br />
4. MACHINE TERMINOLOGY<br />
5. MODERN INDUSTRIAL SEWING MACHINES<br />
A. MULTI - NEEDLE PLEAT GAUGE<br />
B. OVERLOCK MACHINE<br />
C. BARTAK SEWING MACHINE<br />
D. BUTTON SEWING MACHINE<br />
E. BUTTON HOLE MACHINE<br />
F. FEED OF THE ARM<br />
6. MEASURING TOOLS<br />
CHAPTER – III 23 To 27<br />
SELECTION CRITERIA FOR SMO TRAINEES<br />
1. Page board test<br />
2. Color Blindness<br />
3. Visual Dexterity<br />
CHAPTER - IV - TRAINING OF SEWING MACAHINE OPERATORS 28 To 87<br />
1. PAPER EXERCIESES 29 to 61<br />
A. Pedal Control at Maximum Velocity<br />
B. Precise stops at maximum speed<br />
C. Straight stitches at maximum velocity<br />
D. Change of Direction with Needle Down<br />
E. Sewing Curve with One Hand<br />
F. Sewing in Circles<br />
G. Judging changes of direction<br />
H. Sewing curves<br />
I. Over Lock Sewing straight line<br />
J. Over Lock Exact stop<br />
K. Sewing curves<br />
2. THREADING OF MACHINE (Single needle lock stitch <strong>machine</strong>) 62 To 65<br />
Page | 2
A. Thread the Machine and Draw up the Bobbin Thread<br />
B. Threading the bobbin case<br />
C. Bobbin winding<br />
3. FABRIC EXERCISES 66 To 87<br />
A. Sewing 6”x 6” Sewing off the material<br />
B. Sewing 6”x 6” Staying Within Material<br />
C. Sewing 6”x 6” back tack<br />
D. Sew Over 3 Sides 6”x 12”<br />
E. 12 X 6 Top stitch<br />
F. Backtack 6”x 1`2”<br />
G. Baste 6” X 6” in Chain<br />
CHAPTER - V 88 To 90<br />
MEASUREMENTS AND SIZE CHART<br />
1. CIRCUMFERENCE MEASUREMENTS<br />
2. STANDARD MEASUREMENT FOR CHILDREN<br />
3. STANDARD MEASUREMENT FOR TEENAGERS<br />
CHAPTER - VI 91 To 100<br />
MACHINE MAINTAINANCE & SAFETY PRECATIONS<br />
A. Safety- Rules<br />
B. Important safety instructions<br />
C. Machine adjustments and control<br />
CHAPTER - VII 101 To 112<br />
NEEDLE<br />
1. SELECTION OF NEEDLE<br />
2. PART OF THE MACHINE NEEDLS<br />
3. STANDARD NEEDLES<br />
4. TYPE OF NEEDLE AND THEIR USE<br />
5. NEEDLE SIZE AND RELEVANCE OF TYPE OF THE MATERIAL TO BE STICHED<br />
CHAPTER - VIII 113 To 116<br />
SEWING THREAD AND SELECTION CRITERIA<br />
CHAPTER - IX 117 To 127<br />
TYPES OF STITCHES AND SEAM<br />
1. STITCH CLASSIFICATIONS<br />
2. SEAM TYPES AND CLASSIFICATIONS<br />
3. SEAMS & STITCHES OF MEN`S SHIRT<br />
4. SEAMS & STITCHES OF MENS`S TROUSER<br />
5. SEAMS & STITCHES OF DENIM TROUSER<br />
6. SEAMS & STITCHES OF POLO T - SHIRT<br />
Page | 3
7. SEAMS & STITCHES OF ROUND NECK T – SHIRT<br />
CHAPTER - X 128 To 132<br />
DIFFERENT TYPES OF SEWING DEFECTS & REMIDIES<br />
1. DOUBLE NEEDLE LOCK STICH MACHINE<br />
2. BUTTON HOLING SEWING MACHINE<br />
3. BUTTON STITCH MACHINE<br />
4. OVER LOCK MACHINE<br />
CHAPTER - XI - GARMENT MANUFACTURING 133 To 226<br />
PARTS AND ASSEMBLY PREPARATION OF A SHIRT<br />
1. Straight Long Seams with minimal bursts<br />
2. Attaching one piece to other using folder<br />
3. Placket facing attach using folder<br />
4. Hemming <strong>operations</strong> using folder<br />
5. Square pocket attach<br />
6. Rounded bottom pocket attach<br />
7. Bottom triangle pocket attach<br />
8. Diamond pocket attach<br />
9. Long & Short seams with needle down stoppages at corners<br />
10. Collar run stitch operation<br />
11. Top stitch along edges<br />
12. Hem along the contour<br />
13. Mock neck band hem<br />
14. Sewing with template<br />
15. Mock pick stitching<br />
16. Top stitch handling tree piles<br />
17. Mock centre stitch collar<br />
18. Mock topstitch collar<br />
19. Cuff hem<br />
20. Mock run stitch cuffs<br />
21. Binding operation<br />
22. Binding operation using a folder<br />
23. Mock continuous slv placket attach using a folder<br />
24. Mock split edge placket attach operation using folder<br />
25. Attach two plies using folder<br />
26. Pleats<br />
27. Mock yoke attach with folder<br />
28. Shoulder attach without folder<br />
29. Topstitch shoulder<br />
Page | 4
30. Shoulder attach using folder<br />
31. Sew contour fabric to straight fabric<br />
32. Mock collar attach<br />
33. Binding <strong>operations</strong><br />
34. Mock collar finish<br />
35. Lap seam along contour<br />
36. Mock sleeve attach operation (Lap Seam)<br />
37. Lap seam along contour using folder<br />
38. Mock sleeve attach operation (Lap seam) with folder<br />
39. Topstitch along contour over lap seam<br />
40. Topstitch along contour over lap seam using folder<br />
41. Topstitch sleeve attach<br />
42. Topstitch sleeve attach using folder<br />
43. Hemming long contours (Curved)<br />
44. Long straight hemming<br />
45. Hemming long contours (Curved) using folder<br />
46. Long straight hemming using folder<br />
CHAPTER – XII 227 To 241<br />
DIFFERENT TYPES OF SEWING ATTACHMENTS AND USE ON MACHINE<br />
1. Various Collar Operations<br />
2. Yoking and Shoulder Joining:<br />
3. Pocket Hemming<br />
4. Cuff Hemming - Short Sleeve<br />
5. Tail Hemming<br />
6. Button Stay Hemming<br />
7. Cuff Hemming - Long Sleeve<br />
8. Setting Sleeve Plackets<br />
9. Closing Side Seams<br />
10. Sleeve Setting<br />
11. Attach Center Placket<br />
12. Pleat Gauge<br />
CHAPTER – XII<br />
MONTHLY SCHEDULE FOR SEWING MACHINE OPERATOR TRAINING PROGRAMME 242 To 243<br />
Page | 5
INTRODUCTION<br />
CHAPTER - I<br />
Apparel and Textile industry in India is the largest employer after agriculture. It<br />
provides direct employment to 35 million people and another 56 million are engaged in<br />
related activities. Around 14% of industrial production of the country is contributed <strong>by</strong> the<br />
sector. Indeed the apparel sector place a major role in Indian economy and also in foreign<br />
exchange earnings. Apparel exports contribute approximately 9% in India’s total exports<br />
earnings and accounts for about 4% of world trade in textiles and apparels. It is pertinent to<br />
mention that the apparel sector predominantly consist of Small and Medium Enterprises<br />
(SMEs). With the abolition of quota regime under WTO and opening of markets, there is<br />
competition from many countries to retain the existing global market share and also look for<br />
new markets. India has set a target under 11 th plan to earn $ 50 billion through exports of<br />
textiles and apparels. To reach the target Indian apparel industry has to work on many<br />
fronts to be successful in a totally competitive international environment particularly<br />
focusing on factors like development of skilled human resource, quality and productivity,<br />
design development and product diversification and improving lead time and pricing,<br />
effective marketing management.<br />
Indian Small and Medium Enterprises (SMEs) alone cannot attain competitiveness<br />
without the support of likeminded international partners like German Technical Co<br />
operation (GTZ) to enhance the competitiveness of SMEs. Indeed GTZ is committed under<br />
SME Financing and Development Project for the development of apparel sector and<br />
identified it as the priority sector for intervention.<br />
Against the back ground the GTZ has undertaken the task of MSMEs competency<br />
building through business development services in Readymade garments cluster at<br />
Hyderabad with the support of Orient Craft Fashion Institute of Technology (OCFIT)<br />
particularly in preparing manual for <strong>sewing</strong> <strong>machine</strong> operators.<br />
In furtherance of the same, OCFIT with a view to assist development of readymade<br />
garment cluster in Hyderabad focusing around 50 RMGs (16 micro units, 14 small units and<br />
20 medium and large units), studied their working pattern, commercial viability and<br />
<strong>prepared</strong> this manual to assist the <strong>sewing</strong> <strong>machine</strong> operators.<br />
Indeed this manual is <strong>prepared</strong> based on best international <strong>sewing</strong> practices world<br />
over with a focus on exports of readymade garments from India through SMEs.<br />
Page | 6
CHAPTER - II<br />
SEWING MACHINE<br />
Page | 7
1. INVENTION OF THE SEWING MACHINE<br />
The democratization of fashion began with the invention of the <strong>sewing</strong> <strong>machine</strong>, which<br />
turned a handi<strong>craft</strong> into an industry. The <strong>sewing</strong> <strong>machine</strong> made the mass production of clothing<br />
possible. In 1829, a French tailor named Thimmonier patented a wooden chain-stitch <strong>sewing</strong><br />
<strong>machine</strong>, but all existing models were destroyed <strong>by</strong> rioting tailors who feared for their jobs. Walter<br />
Hunt, an American, developed a <strong>sewing</strong> <strong>machine</strong> in 1832 but failed to patent it. Thus, the man who<br />
is usually credited with its invention is Elias Howe, who patented his in 1846. All of Howe’s <strong>machine</strong>s<br />
were run <strong>by</strong> hand.<br />
In 1859, Isaac Singer, whose name has become a household word because of his mass<br />
production of the <strong>sewing</strong> <strong>machine</strong>. He developed the foot treadle, an improvement that left the<br />
hands free to guide the fabric, and mass-produced these <strong>machine</strong>s. Singer spent $1 million a year on<br />
sales promotion and, <strong>by</strong> 1867, was producing a thousand <strong>machine</strong>s per day (Electrically powered<br />
models were not available until 1921). To save time and to keep control over production,<br />
entrepreneurs brought workers and <strong>machine</strong>ry together in factories. This caused many people in<br />
search of work to move to the cities where the factories were located.<br />
In 1849, when the Gold Rush attracted thousands of men in California in search of gold, a 20year<br />
old Bavarian immigrant <strong>by</strong> the name of Levi Strauss opened a dry goods store in San Francisco.<br />
In 1873 he began to manufacture long-wearing pants with riveted pockets, using a tough cotton<br />
fabric called serge de Nimes. (Loomed in Nimes, France), later shortened to denim. They are an item<br />
of wearing apparel that has remained basically the same for nearly 150 years.<br />
Another early use for <strong>sewing</strong> <strong>machine</strong>s was to make Civil War uniforms. The Union army<br />
recorded the chest an height measurements of more than a million soldiers to come up with the first<br />
standardization of sizes. After the war, <strong>sewing</strong> <strong>machine</strong>s and uniform sizing promoted the mass<br />
production of everyday men’s wear.<br />
Page | 8
2. HISTORY OF SEWING MACHINE<br />
Historians of the early days of the <strong>sewing</strong> <strong>machine</strong> can argue for hours over the simple<br />
matter of who invented what is, in many ways, one of the most important <strong>machine</strong>s ever<br />
devised.<br />
The story really starts in 1755 in London when a German immigrant, Charles Wiesenthal,<br />
took out a patent for a needle to be used for mechanical <strong>sewing</strong>. There was no mention of a<br />
<strong>machine</strong> to go with it, and another 34 years were to pass before Englishman Thomas Saint<br />
invented what is generally considered to be the first real <strong>sewing</strong> <strong>machine</strong>.<br />
In 1790 the cabinet maker patented a <strong>machine</strong> with which an awl made a hole in leather<br />
and then allowed a needle to pass through. Critics of Saint's claim to fame point out that<br />
quite possibly Saint only patented an idea and that most likely the <strong>machine</strong> was never built.<br />
It is known that when an attempt was made in the 1880s to produce a <strong>machine</strong> from Saint's<br />
drawings it would not work without considerable modification.<br />
The story then moves to Germany where, in around 1810, inventor Balthasar Krems<br />
developed a <strong>machine</strong> for <strong>sewing</strong> caps. No exact dates can be given for the Krems models as<br />
no patents were taken out.<br />
An Austrian tailor Josef Madersperger produced a series of <strong>machine</strong>s during the early years<br />
of the 19th century and received a patent in 1814. He was still working on the invention in<br />
1839, aided <strong>by</strong> grants from the Austrian government, but he failed to get all the elements<br />
together successfully in one <strong>machine</strong> and eventually died a pauper. Two more inventions<br />
were patented in 1804, one in France to a Thomas Stone and a James Henderson -- a<br />
<strong>machine</strong> which attempted to emulate hand <strong>sewing</strong> -- and another to a Scott John Duncan<br />
for an embroidery <strong>machine</strong> using a number of needles. Nothing is known of the fate of<br />
either invention.<br />
America's first real claim to fame came in 1818 when a Vermont churchman John Adams<br />
Doge and his partner John Knowles produced a device which, although making a reasonable<br />
stitch, could only sew a very short length of material before laborious re-setting up was<br />
necessary.<br />
One of the more reasonable claimants for inventor of the <strong>sewing</strong> <strong>machine</strong> must be<br />
Barthelme Thimmonier who, in 1830, was granted a patent <strong>by</strong> the French government. He<br />
used a barbed needle for his <strong>machine</strong> which was built almost entirely of wood. It is said that<br />
he originally designed the <strong>machine</strong> to do embroidery, but then saw its potential as a <strong>sewing</strong><br />
<strong>machine</strong>.<br />
Page | 9
Unlike any others who went before him, he was able to convince the authorities of the<br />
usefulness of his invention and he was eventually given a contract to build a batch of<br />
<strong>machine</strong>s and use them to sew uniforms for the French army. In less than 10 years after the<br />
granting of his patent Thimmonier had a factory running with 80 <strong>machine</strong>s, but then ran<br />
into trouble from Parisian tailors. They feared that, were his <strong>machine</strong>s successful, they<br />
would soon take over from hand <strong>sewing</strong>, putting the <strong>craft</strong>smen tailors out of work.<br />
Late one night a group of tailors stormed the factory, destroying every <strong>machine</strong>, and causing<br />
Thimmonier to flee for his life. With a new partner he started again, produced a vastly-<br />
improved <strong>machine</strong> and looked set to go into full-scale production; but the tailors attacked<br />
again. With France in the grip of revolution, Thimmonier could expect little help from the<br />
police or army and fled to England with the one <strong>machine</strong> he was able to salvage.<br />
He certainly produced the first practical <strong>sewing</strong> <strong>machine</strong>, was the first man to offer<br />
<strong>machine</strong>s for sale on a commercial basis and ran the first garment factory. For all that, he<br />
died in the poor house in 1857.<br />
In America a quaker Walter Hunt invented, in 1833, the first <strong>machine</strong> which did not try to<br />
emulate hand <strong>sewing</strong>. It made a lock stitch using two spools of thread and incorporated an<br />
eye-pointed needle as used today. But again it was unsuccessful for it could only produce<br />
short, straight, seams.<br />
Nine years later Hunt's countryman, John Greenough, produced a working <strong>machine</strong> in which<br />
the needle passed completely through the cloth. Although a model was made and exhibited<br />
in the hope of raising capital for its manufacture, there were no takers.<br />
Perhaps all the essentials of a modern <strong>machine</strong> came together in early 1844 when<br />
Englishman John Fisher invented a <strong>machine</strong> which although designed for the production of<br />
lace, was essentially a working <strong>sewing</strong> <strong>machine</strong>. Probably because of miss-filing at the<br />
patent office, this invention was overlooked during the long legal arguments between Singer<br />
and Howe as to the origins of the <strong>sewing</strong> <strong>machine</strong>.<br />
Despite a further flurry of minor inventions in the 1840s, most Americans will claim that the<br />
<strong>sewing</strong> <strong>machine</strong> was invented <strong>by</strong> Massachusetts farmer Elias Howe who completed his first<br />
prototype in 1844 just a short time after Fisher.<br />
A year later it was patented and Howe set about trying to interest the tailoring trade in his<br />
invention. He even arranged a competition with his <strong>machine</strong> set against the finest hand<br />
sewers in America. The <strong>machine</strong> won hands down but the world wasn't ready for<br />
mechanized <strong>sewing</strong> and, despite months of demonstrations, he had still not made a single<br />
sale.<br />
Desperately in debt Howe sent his brother Amasa to England with the <strong>machine</strong> in the hope<br />
that it would receive more interest on the other side of the Atlantic. Amasa could find only<br />
one backer, a corset maker William Thomas, who eventually bought the rights to the<br />
invention and arranged for Elias to come to London to further develop the <strong>machine</strong>.<br />
Page | 10
The two did not work well together, each accusing the other of failing to honor agreements<br />
and eventually Elias, now almost penniless, returned to America. When he arrived home he<br />
found that the <strong>sewing</strong> <strong>machine</strong> had finally caught on and that dozens of manufacturers,<br />
including Singer, were busy manufacturing <strong>machine</strong>s -- all of which contravened the Howe<br />
patents.<br />
A long series of law suits followed and were only settled when the big companies, including<br />
Wheeler & Wilson and Grover & Baker, joined together, pooled their patents, and fought as<br />
a unit to protect their monopoly.<br />
Singer did not invent any notable <strong>sewing</strong>-<strong>machine</strong> advances, but he did pioneer the hirepurchase<br />
system and aggressive sales tactics.<br />
Both Singer and Howe ended their days as multi-millionaires.<br />
So the argument can go on about just who invented the <strong>sewing</strong> <strong>machine</strong> and it is unlikely<br />
that there will ever be agreement. What is clear, however, is that without the work of those<br />
long-dead pioneers, the dream of mechanized <strong>sewing</strong> would never have been realized.<br />
Page | 11
3. PARTS OF SEWING MACHINE:<br />
Page | 12
4. MACHINE TERMINOLOGY<br />
The parts of the lockstitch <strong>machine</strong>, which are identified below.<br />
Arm The horizontal part of the head that houses the drive shafts.<br />
Bed The working surface of the <strong>machine</strong> under winch is located the<br />
mechanism at handles the lower thread. On a flat bed <strong>machine</strong>, the bed<br />
rests In the cut-out of the table.<br />
Belt (motor belt or <strong>machine</strong><br />
belt)<br />
The circular strap that transmits motion from the pulley to the hand<br />
wheel, allowing the <strong>machine</strong> to operate.<br />
Bobbin Mechanism The parts - bobbin, bobbin case, and bobbin tension spring - that control<br />
the lower thread and Its tension.<br />
Bobbin winder The part that fills another bobbin while the <strong>machine</strong> is stitching.<br />
check spring (tension spring or<br />
take-up spring)<br />
A small wire spring behind or at the top of the tension discs. It provides<br />
a. small amount of tension on the needle thread and acts as a shock<br />
absorber. On some <strong>machine</strong>s, the check spring is mounted separately.<br />
Faceplate The cover on the left side of the bead that covers the needle bar and the<br />
presser bar.<br />
feed dogs (feed dog, feeder or<br />
feed) fly wheel)<br />
The toothed mechanism beneath the presser foot that moves fabric<br />
forward and backward.<br />
Fittings The parts - presser foot, feed dogs, and throat plate - that control the<br />
cloth during stitching.<br />
Hand wheel (balance or<br />
flywheel)<br />
The part that controls the motion of the <strong>machine</strong> manually and/or<br />
electrically.<br />
Head The part of the <strong>machine</strong> above the table, containing the stitching<br />
mechanism.<br />
Heel The back of the presser foot.<br />
Hook(rotary hook or <strong>machine</strong><br />
hook)<br />
Knee Lift (Knee Lifter or knee<br />
press)<br />
A rotating device that hooks the needle thread to carry it around the<br />
bobbin and form the “lock” on the lockstitch.<br />
A lever mounted at the right under the <strong>sewing</strong> table to lift and lower the<br />
presser foot with the right knee.<br />
Motor The electrical unit that drives the <strong>machine</strong>.<br />
Page | 13
Needle The part that penetrates the fabric. It carries the thread to the hook or<br />
shuttle and up again to make the stitch.<br />
Needle bar A vertical bar that holds one or more needles and moves the needle up<br />
and down.<br />
Needle screw (needle bar clamp) The screw that holds the needle in the needle bar.<br />
Oil gauge The part that Indicates the amount of oil in self-oiling <strong>machine</strong>s.<br />
Pan (<strong>machine</strong> pan) The metal pan. under the head that catches oil, lint and metal shards.<br />
On self-lubricating <strong>machine</strong>s, it holds the oil.<br />
Presser bar The bar to which the presser foot is attached.<br />
Presser bar lifter A lever at the back of presser bar to raise and lower the presser foot <strong>by</strong><br />
hand. It is used to raise the presser foot when winding a bobbin and<br />
when not stitching.(Its use is discouraged in industrial <strong>sewing</strong> because it<br />
wastes time and energy).<br />
Presser foot A device that holds the fabric in place for stitching.<br />
Pressure regulator Control that regulates the amount of pressure on the (pressure dial)<br />
presser foot.<br />
Pretension A simple tension disc used to regulate the thread so that it will feed into<br />
the tension assembly evenly.<br />
Pulley The wheel attached to the motor. It transmits motion from the motor to<br />
the hand wheel <strong>by</strong> means of a leather belt.<br />
Rotary hook assembly The part that holds the bobbin case.<br />
Shuttle An oscillating device that carries the needle thread around the bobbin<br />
and forms the “lock” on the lockstitch.<br />
Slack thread regulator A metal hook or bar near the tension discs.<br />
Slide plate (slide or bed slide) A removable cover at the left of the <strong>machine</strong> bed that bed allows access<br />
to the lower mechanism.<br />
Sole (shoe or slipper) The bottom part of the presser foot that contracts the cloth.<br />
Stand A metal structure upon which the table is mounted.<br />
Stitch hole (needle hole) The hole in the throat plate. The needle carries the thread into the hole<br />
so that it can interlock with the bobbin thread.<br />
Stitch regulator A device that regulates stitch length.<br />
Switch (power switch) A key or button that turns the <strong>machine</strong> on and off.<br />
Page | 14
Table The cabinet upon which the bead rests, it generally has a drawer on the<br />
left side.<br />
Take-up lever The part that first loosens the top thread during the stitch formation,<br />
then removes any slack to set or lock the stitch.<br />
Take-up lever guard A piece of metal in front of the thread take-up lever.<br />
Tension discs Two concave discs that control the delivery of the upper thread from<br />
the spool to the needle.<br />
Thread guides (thread eyelets) The parts that guide the thread from the thread cone (thread eyelets) to<br />
the needle. They smooth the thread and protect it from abrasion.<br />
Thread retainer (pretension) A three-hole guide that applies a small amount of tension on the thread<br />
so it win flow into the tension discs uniformly.<br />
Thread stand A metal device that holds thread cones.<br />
Throat plate The smooth surface directly under the presser foot that includes the<br />
stitch hole and surrounds the feed dog. It protects the lower mechanism<br />
from a build-up of excess lint.<br />
Toes (Prongs) The front end of the presser foot, or the part that faces the oncoming<br />
cloth. It is frequently upturned. On feet such as the zipper foot, cording<br />
foot, and shirring foot, there is only one toe.<br />
Treadle (foot treadle) A metal platform on which the feet rest.(Note: In case of an accident,<br />
the clutch control releases the hand wheel so that it can be turned).<br />
Page | 15
5. MODERN INDUSTRIAL SEWING MACHINES<br />
A. MULTI – NEEDLE PLEAT GAUGE<br />
Imperial multi-needle pleat gauges for tuxedo front shirts - both men's<br />
and ladies'.<br />
Several pleat types are available; including exposed and covered types<br />
illustrated above.<br />
Attachments available for Union Special 54400 (type 401 stitch)<br />
<strong>machine</strong>s or 52 Class (type 101 stitch) <strong>machine</strong>.<br />
Exact finish size and samples are required. Please Submit Samples with<br />
Order.<br />
Both Union Special 54400 and Imperial 52 Class <strong>machine</strong>s also available.<br />
Page | 16
B. OVERLOCK MACHINE<br />
Type of stitch Lock stitch<br />
Machine speed 2500[s.p.m/r.p.m]<br />
Type of motor used Induction motor<br />
Type of lubrication Automatic<br />
Oil used G2<br />
Type of feed Different feed<br />
Type of needle DP X 5<br />
Type of bed Cylindrical bed<br />
Purpose of <strong>machine</strong> Loops attaching<br />
Power consumption 3/4HP<br />
Page | 17
C. BARTACK SEWING MACHINE<br />
Type of stitch Lock stitch<br />
Machine speed 2500[s.p.m/r.p.m]<br />
Type of motor used Induction motor<br />
Type of lubrication Automatic<br />
Oil used G2<br />
Type of feed Different feed<br />
Type of needle DP X 5<br />
Type of bed Cylindrical bed<br />
Purpose of <strong>machine</strong> Loops attaching<br />
Power consumption 3/4HP<br />
Page | 18
D. BUTTON SEWING MACHINE<br />
Type of stitch Lock stitch<br />
Machine speed 2500[s.p.m/r.p.m]<br />
Type of motor used Induction motor<br />
Type of lubrication Automatic<br />
Oil used G2<br />
Type of feed Different feed<br />
Type of needle DP X 17<br />
Type of bed Cylindrical bed<br />
Purpose of <strong>machine</strong> Button <strong>sewing</strong><br />
Power consumption 3/4HP<br />
Page | 19
E. BUTTON HOLE MACHINE<br />
Type of stitch Lock stitch [bobbin, bobbin case are used].<br />
Machine speed 3600 -4000[s.p.m/r.p.m]<br />
Type of motor used Induction motor<br />
Type of lubrication Automatic<br />
Oil used G1<br />
Type of needle DP X 5<br />
Type of bed Raised bed<br />
Purpose of <strong>machine</strong> Making button holes<br />
Power consumption 3/4HP<br />
Page | 20
F. FEED OF THE ARM<br />
Type of stitch Chine stitch<br />
Machine speed 4000[s.p.m/r.p.m]<br />
Type of motor used Clutch motor<br />
Type of lubrication Automatic & manuals<br />
Oil used G1<br />
Type of feed Needle feed<br />
Type of needle TV X 1orTV X 64<br />
Type of bed Cylindrical bed<br />
Purpose of <strong>machine</strong> Joining sleeves, side of trouser<br />
Power consumption 1/2 HP<br />
Page | 21
6. MEASURING TOOLS<br />
Fabric Scissors<br />
Paper Scissors<br />
Seam ripper Measuring Tape<br />
Trimmer<br />
Pencil & Eraser<br />
Tracing Wheel<br />
Measuring Scale<br />
Page | 22
CHAPTER-III<br />
SELECTION CRITERIA FOR SMO TRAINEES<br />
Page | 23
The Candidate for the SMO Training Programme must have the minimum<br />
qualification of 8 th Standard.<br />
The Candidate’s age preferably should be between 18 to 25 years.<br />
The objective of the program is to meet the skill requirements of the apparel<br />
industry and to create gainful employment opportunities for rural BPL families in<br />
apparel industry. So, keeping in view the requirements of the industry, the candidate<br />
for the SMO Programme has to pass through the following tests:<br />
1. PEG BOARD TEST<br />
The Peg Board Test is conducted to know the hand movement of the candidate. The Purdue<br />
Pegboard has been used extensively for various applications. It has two types of activity:<br />
one measures gross movements of the hands, fingers, and arms, and the other measures<br />
assembly or fingertip dexterity.<br />
The Peg Board Test consists of a rectangular board that holds cylindrical pegs. The pegs are<br />
approximately two inch (2.5 cm) in height, and are colored red on one side, black on the<br />
other. Two tests were chosen for this research. The peg board test requires subjects to<br />
transfer the pegs from one hole in the tray to another. The peg board test requires subjects<br />
to pick up a peg, transfer it to the other hand while turning it over, and replace it with the<br />
opposite side facing up.<br />
The operator will be given 80 sec of time to complete it. The operator has to complete the<br />
exercises given in the given span of period.<br />
Page | 24
2. COLOR BLINDNESS TEST<br />
The colour blindness test used test to check color vision deficiencies. There are different<br />
sets available which are often used for pilot, police officer and other job recruitments,<br />
where perfect colour vision is a precondition.<br />
This is a test plate in which everyone should see a "12".<br />
This plate is designed to separate the type of color defectives and the level to which they<br />
are observed. Most will see the number "26" clearly while some will only see a "2" or a "6"<br />
or no numerals at all.<br />
Can you trace a line from one "X" to the other? Someone with normal color vision will trace<br />
an orange/brown purple line and those with a slight deficiency will follow a different path.<br />
Page | 25
Some of the Examples are:<br />
The operator will be shown 10 figures. Each carries 5 sec of time. The operator must be able<br />
to recognize the Letter or Number which is in the Figure in the given span of time.<br />
Page | 26
3. VISUAL DEXTERITY TEST<br />
Example:<br />
Practice:<br />
Visual Dexterity test is the crucial one which plays major role in knowing the Eye<br />
Coordination of the operator.<br />
Eye coordination is a crucial skill involving how effective we are at translating what our eyes<br />
see into appropriate physical responses, such as anticipating the motion of a line in its way<br />
so that we could find out the exact destiny of the line. The operator will be given two<br />
exercises; each carries 30 sec of time to complete it. The operator has to complete the<br />
exercises given in the given span of period.<br />
8<br />
5<br />
3<br />
2<br />
7<br />
1<br />
6<br />
9<br />
4<br />
10<br />
Page | 27
CHAPTER-IV<br />
TRAINING OF SEWING MACHINE OPERATORS<br />
1. PAPER EXERCISES<br />
Page | 28
STOP<br />
A. Pedal Control at Maximum Velocity<br />
MACHINE: SNLS EXERCISE – 1 DURATION: 6 SECS<br />
Page | 29<br />
START
Machine: SNLS<br />
Exercise : Pedal Control at Maximum Velocity<br />
Starting Position:<br />
The apprentice should sit facing the <strong>sewing</strong> <strong>machine</strong> with<br />
both feet on the pedal and the right knee against the knee lift.<br />
Paper in starting position. No thread in <strong>machine</strong>.<br />
Methodology:<br />
Security<br />
The timekeeper starts the chronometer.<br />
Place paper under the <strong>machine</strong> so that the dotted<br />
line lies directly under the needle.<br />
Sew at maximum speed without leaving boundary.<br />
stop at the end of the column with the needle at top<br />
position (1 stitch tolerance).<br />
Raise the foot and slide the paper to the next<br />
column.<br />
Place paper under the <strong>machine</strong> so that the dotted<br />
line lies directly under the needle.<br />
Sew the second line until the end.<br />
Raise the foot and slide paper to the next column.<br />
Stop the chronometer when apprentice sets paper<br />
on the third column.<br />
Hold the paper with the thumb under the paper.<br />
Maintain fingers away from needle at all times.<br />
use glasses.<br />
Avoid using loose clothing and/or long and loose hair.<br />
Quality<br />
Do not tear paper.<br />
The stitch line should remain straight and within the<br />
column limits<br />
Ergonomics<br />
Sited in front of the <strong>sewing</strong> <strong>machine</strong>.<br />
Both feet on pedal<br />
Goal:<br />
6 Seconds<br />
Illustration:<br />
Exercise Number :<br />
Paper Exercise #1<br />
Page | 30
chair and Machine at a comfortable height.<br />
Back rest facing forward.<br />
Waste<br />
Throw away used paper. Use paper several times<br />
Abilities developed<br />
Pedal control<br />
Straight stitches centered at a 3/8” at maximum velocity.<br />
Use of knee lift to elevate <strong>machine</strong> foot.<br />
Necessary material<br />
SNLS without thread<br />
Paper exercise #1<br />
Page | 31
B. Precise stops at maximum speed<br />
MACHINE: SNLS EXERCISE – 2 DURATION: 6 SECS<br />
START<br />
STOP<br />
Page | 32
Machine: SNLS<br />
Exercise : Precise stops at maximum speed<br />
Starting Position:<br />
The apprentice should sit facing the <strong>sewing</strong> <strong>machine</strong><br />
with both feet on the pedal and the right knee against<br />
the knee lift. Paper in starting position. No thread in<br />
<strong>machine</strong>.<br />
Methodology:<br />
Security<br />
The timekeeper starts the chronometer.<br />
Place paper under the <strong>machine</strong> so that the<br />
dotted line lies directly under the needle.<br />
Sew at maximum speed without leaving<br />
boundary.<br />
stop at the end of the 1 st column with the<br />
needle at top position (1 stitch tolerance).<br />
Raise the foot and slide the paper to the next<br />
column.<br />
Place paper under the <strong>machine</strong> so that the<br />
dotted line lies directly under the needle.<br />
Sew the second line until the end.<br />
Raise the foot and slide paper to the next<br />
column.<br />
Stop the chronometer when apprentice sets<br />
paper on the third column.<br />
Hold the paper with the thumb under the paper.<br />
Maintain fingers away from needle at all times.<br />
use glasses.<br />
Avoid using loose clothing and/or long and loose hair.<br />
Quality<br />
Do not tear paper.<br />
The stitch line should remain straight and within the<br />
column limits<br />
Ergonomics<br />
Sited in front of the <strong>sewing</strong> <strong>machine</strong>.<br />
Both feet on pedal<br />
Goal: 6 Seconds<br />
Illustration:<br />
Exercise Number :<br />
Paper exercise # 2<br />
Page | 33
chair and Machine at a comfortable height.<br />
Back rest facing forward.<br />
Waste<br />
Throw away used paper. Use paper several times<br />
Abilities developed<br />
Pedal control<br />
Straight stitches centered at a 3/8” at maximum<br />
velocity.<br />
Use of knee lift to elevate <strong>machine</strong> foot.<br />
Necessary material<br />
SNLS without thread<br />
Paper exercise #2<br />
Page | 34
STOP<br />
C. Straight stitches at maximum velocity<br />
MACHINE: SNLS EXERCISE – 3 DURATION: 10 SECS<br />
Page | 35<br />
START
Machine: SNLS<br />
Exercise : Straight stitches at maximum velocity<br />
Starting Position:<br />
The apprentice should sit facing the <strong>sewing</strong> <strong>machine</strong> with<br />
both feet on the pedal and the right knee against the knee lift.<br />
Paper in starting position. No thread in <strong>machine</strong>.<br />
Methodology:<br />
The timekeeper starts the chronometer.<br />
Place paper under the <strong>machine</strong> so that the dotted<br />
line lies directly under the needle.<br />
Sew at maximum speed in a straight line within<br />
boundaries.<br />
Stop with the pedal at the end of the rectangle with<br />
the needle at the top position.<br />
Make sure the stitches do not leave the rectangle.<br />
Lift the <strong>machine</strong>’s foot and slide paper so that the<br />
second dotted line lies directly under the needle.<br />
Sew at maximum speed in a straight line within<br />
boundaries.<br />
Stop with the pedal once the apprentice has<br />
reached the end of the rectangle, keeping the<br />
needle in the<br />
top position.<br />
Lift the <strong>machine</strong>’s foot and slide paper so that the<br />
third dotted line lies directly under the needle.<br />
The chronometer is stopped once the paper is<br />
placed under the third dotted line.<br />
Note: Each cycle includes two lines<br />
Security<br />
Hold the paper with the thumb under the paper.<br />
Maintain fingers away from needle at all times.<br />
Use glasses.<br />
Avoid using loose clothing and/or long and loose hair.<br />
Quality<br />
Do not tear paper.<br />
The stitch line should remain straight and within<br />
Boundaries.<br />
Ergonomics<br />
Sited in front of the <strong>sewing</strong> <strong>machine</strong>.<br />
Both feet on pedal<br />
Chair and Machine at a comfortable height.<br />
Goal : 10 Seconds Exercise Number :<br />
Illustration:<br />
Paper exercise #3<br />
Page | 36
Back rest facing forward.<br />
Waste<br />
Throw away used paper. Use paper several times<br />
Abilities developed<br />
Exact Stops<br />
Straight stitches at maximum velocity centered at<br />
118” margin.<br />
Use of knee lift to elevate <strong>machine</strong> foot.<br />
Necessary material<br />
SNLS without thread<br />
Paper exercise #3<br />
Page | 37
D. Change of Direction with Needle Down<br />
MACHINE:SNLS EXERCISE – 4 DURATION: 10 SECS<br />
Page | 38<br />
START<br />
STOP
Machine: SNLS<br />
Exercise : Change of Direction with Needle Down<br />
Starting Position:<br />
The apprentice should sit facing the <strong>sewing</strong> <strong>machine</strong><br />
with both feet on the pedal and the right knee against<br />
the knee lift. Paper in starting position. No thread in<br />
<strong>machine</strong>.<br />
Methodology:<br />
The timekeeper starts the chronometer.<br />
Place paper under the <strong>machine</strong> so that the<br />
dotted line lies directly under the needle.<br />
Sew at maximum speed in a straight line so<br />
that stitches lie over doffed line.<br />
Stop with needle in down position when the<br />
apprentice reaches the square.<br />
Make sure the stitches do not leave the<br />
square.<br />
Lift the foot and turn the paper 90° clockwise.<br />
Lower <strong>machine</strong>s foot and sew towards next<br />
square.<br />
Stop with needle in down position when the<br />
apprentice reaches square.<br />
Lift the foot and turn the paper 90° clockwise.<br />
Sew at maximum speed in a straight line so<br />
that stitches lie over dotted line and stop<br />
when the last<br />
square is reached.<br />
Lift foot and place paper to start second cycle<br />
Place paper under the <strong>machine</strong> so that the<br />
dotted line lies directly under the needle.<br />
Lower <strong>machine</strong>s foot.<br />
stop chronometer when the <strong>machine</strong>’s foot is<br />
lowered<br />
Note: Each cycle contains 3 lines and 2 90° turns.<br />
SECURITY<br />
Hold the paper with the thumb under the paper.<br />
Maintain fingers away from needle at all times.<br />
use glasses. -]<br />
Avoid using lo6se clothing and/or long and loose hair.<br />
QUALITY<br />
Do not tear paper.<br />
Make turns with needle at down position and within<br />
Goal: 10 Seconds<br />
Illustration:<br />
Exercise Number :<br />
Paper exercise:4<br />
Page | 39
square<br />
limits.<br />
1/16’ Misalignment with dotted line.<br />
ERGONOMICS<br />
Sited in front of the <strong>sewing</strong> <strong>machine</strong>.<br />
Both feet on pedal<br />
chair and Machine at a comfortable height.<br />
Back rest facing forward.<br />
WASTE<br />
Throw away used paper. Use paper several times<br />
ABILITIES DEVELOPED<br />
Exact Stops<br />
Straight stitches at maximum velocity.<br />
Use of push button to control <strong>machine</strong>s foot.<br />
NECESSARY MATERIALS<br />
SNLS without thread<br />
Paper exercise #4<br />
Page | 40
STOP<br />
E. Sewing Curve with One Hand<br />
MACHINE: SNLS EXERCISE – 5 DURATION: 6 SECS<br />
Page | 41<br />
START
Machine: SNLS<br />
Exercise : Sewing Curve with One Hand<br />
Starting Position:<br />
The apprentice should sit facing the <strong>sewing</strong> <strong>machine</strong> with<br />
both feet on the pedal the right knee against the knee lift.<br />
Paper in starting position. No thread in <strong>machine</strong>.<br />
Methodology:<br />
Security:<br />
The timekeeper starts the chronometer.<br />
Place paper under the <strong>machine</strong> so that the line lies<br />
directly under the needle.<br />
Sew at maximum speed following the curved line<br />
using only the LH on the paper, turning the wrist.<br />
Stop at the end of the line with the needle on the<br />
top position.<br />
Slide the paper with the LH while the <strong>machine</strong> foot<br />
is at the uppermost position.<br />
Place paper under the <strong>machine</strong> so that the line lies<br />
directly under the needle to start the second cycle.<br />
The chronometer is stopped when the apprentice is<br />
set for the next cycle.<br />
Hold the paper with the thumb under the paper.<br />
Maintain fingers away from needle at all times.<br />
Use glasses.<br />
Avoid using loose clothing and/or long and loose hair.<br />
Quality:<br />
Do not tear paper.<br />
Maintain margin at +/-1/16" with respect to line.<br />
Sew without stopping.<br />
Goal: 6 seconds<br />
Illustration:<br />
Exercise Number :<br />
Paper exercise # 5<br />
Page | 42
Ergonomics:<br />
Sited in front of the <strong>sewing</strong> <strong>machine</strong>.<br />
Both feet on pedal<br />
Chair and Machine at a comfortable height.<br />
Back rest facing forward.<br />
Waste:<br />
Throw away used paper. Use paper several times<br />
Abilities Developed:<br />
Sewing curved lines at a constant margin.<br />
Changing direction without stopping.<br />
Use of push button to control <strong>machine</strong>s foot.<br />
Necessary Materials:<br />
SNLS without thread<br />
Paper exercise #5<br />
Page | 43
F. Sewing in Circles<br />
MACHINE: SNLS EXERCISE – 6 DURATION: 34 SECS<br />
START STOP<br />
Page | 44
Machine: SNLS<br />
Exercise : Sewing in Circles<br />
Starting Position:<br />
The apprentice should sit facing the <strong>sewing</strong> <strong>machine</strong> with<br />
both feet on the pedal and the right knee against the knee lift.<br />
Paper in starting position. No thread in <strong>machine</strong>.<br />
Methodology:<br />
Security<br />
The timekeeper starts the chronometer.<br />
Place paper under the <strong>machine</strong> so that the line lies<br />
directly under the needle.<br />
Sew at maximum speed following the curved line<br />
without stopping, turning the paper to form an<br />
eight.<br />
Use index fingers to pivot paper.<br />
stop at the end with the needle on the top position.<br />
Turn and slide the paper while the <strong>machine</strong> foot is<br />
at the uppermost position towards the next cycle.<br />
Place paper under the <strong>machine</strong> so that the line lies<br />
directly under the needle.<br />
The chronometer is stopped when the apprentice is<br />
set for the next cycle.<br />
Hold the, paper with the thumb under the paper.<br />
Maintain fingers away from needle at all times.<br />
Use glasses.<br />
Avoid using loose clothing and/or long and loose hair.<br />
Quality<br />
Do not tear paper.<br />
Maintain margin at ÷/-l/16” with respect to line.<br />
Sew without stopping.<br />
Ergonomics<br />
Sited in front of the <strong>sewing</strong> <strong>machine</strong>.<br />
Both feet on pedal<br />
chair and Machine at a comfortable height.<br />
Goal: 14 seconds Exercise Number :<br />
Illustration:<br />
Paper exercise # 6<br />
Page | 45
Back rest facing forward.<br />
Waste<br />
Throw away used paper. Use paper several times<br />
Abilities developed<br />
Sewing curved lines at a constant margin.<br />
Changing direction without stopping.<br />
Use of push button to control <strong>machine</strong> foot.<br />
Necessary<br />
SNLS without thread<br />
Paper exercise # 6<br />
Page | 46
G. Judging changes of direction<br />
MACHINE: SNLS EXERCISE – 7 DURATION: 20 SECS<br />
Page | 47
Machine: SNLS<br />
Exercise : Judging changes of direction.<br />
Starting Position: The apprentice should sit facing the <strong>sewing</strong><br />
<strong>machine</strong> with both feet on the pedal and the right knee against<br />
the knee lift. Paper in starting position. No thread in <strong>machine</strong>.<br />
Methodology:<br />
The timekeeper starts the chronometer.<br />
Place paper under the <strong>machine</strong> so that the dotted line<br />
lies directly under the needle.<br />
Sew at maximum speed in a V- shape line so that<br />
stitches lie over doffed line.<br />
Stop with needle in down position when the apprentice<br />
reaches the V- shape.<br />
Make sure the stitches do not leave the V- shape.<br />
Lift the foot and turn the paper 90° clockwise.<br />
Lower <strong>machine</strong>s foot and sew towards next V- shape .<br />
Stop with needle in down position when the apprentice<br />
reaches V- shape .<br />
Lift the foot and turn the paper 60° clockwise.<br />
Sew at maximum speed in a straight line so that stitches<br />
lie over dotted line and stop when the last<br />
V- shape is reached.<br />
Lift foot and place paper to start second cycle<br />
Place paper under the <strong>machine</strong> so that the dotted line<br />
lies directly under the needle.<br />
Lower <strong>machine</strong>s foot.<br />
stop chronometer when the <strong>machine</strong>’s foot is lowered<br />
Note: Each cycle contains 8 lines and 7 60° turns.<br />
Security<br />
Hold the paper with the thumb under the paper.<br />
Maintain fingers away from needle at all times.<br />
use glasses. -]<br />
Avoid using lo6se clothing and/or long and loose hair.<br />
Quality<br />
Do not tear paper.<br />
Make turns with needle at down position and within square<br />
limits.<br />
1/16’ Misalignment with dotted line.<br />
Ergonomics<br />
Sited in front of the <strong>sewing</strong> <strong>machine</strong>.<br />
Goal: 20<br />
Seconds<br />
Illustration:<br />
Exercise Number :<br />
Paper exercise # 7<br />
Page | 48
Both feet on pedal<br />
chair and Machine at a comfortable height.<br />
Back rest facing forward.<br />
Waste<br />
Throw away used paper. Use paper several times<br />
Abilities developed<br />
Exact Stops<br />
Straight stitches at maximum velocity.<br />
Use of push button to control <strong>machine</strong>s foot.<br />
Necessary material<br />
SNLS without thread<br />
Paper exercise # 7<br />
Page | 49
H. Sewing curves<br />
MACHINE: SNLS EXERCISE – 8 DURATION: 20 SECS<br />
Page | 50
Machine: SNLS<br />
Exercise : Sewing curves<br />
Starting Position:<br />
The apprentice should sit facing the <strong>sewing</strong> <strong>machine</strong><br />
with both feet on the pedal and the right knee against<br />
the knee lift. Paper in starting position. No thread in<br />
<strong>machine</strong>.<br />
Methodology:<br />
Security<br />
The timekeeper starts the chronometer.<br />
Place paper under the <strong>machine</strong> so that the line<br />
lies directly under the needle.<br />
Sew at maximum speed following the curved<br />
line without stopping.<br />
Use index fingers to pivot paper.<br />
Stop at the end with the needle on the top<br />
position..<br />
Place paper under the <strong>machine</strong> so that the line<br />
lies directly under the needle.<br />
The chronometer is stopped when the<br />
apprentice is set for the next curve.<br />
Hold the, paper with the thumb under the paper.<br />
Maintain fingers away from needle at all times.<br />
Use glasses.<br />
Avoid using loose clothing and/or long and loose hair.<br />
Quality<br />
Do not tear paper.<br />
Maintain margin at ÷/-l/16” with respect to line.<br />
Sew without stopping.<br />
Ergonomics<br />
Sited in front of the <strong>sewing</strong> <strong>machine</strong>.<br />
Both feet on pedal<br />
chair and Machine at a comfortable height.<br />
Back rest facing forward.<br />
Goal: 20 Seconds<br />
Illustration:<br />
Exercise Number :<br />
Paper exercise # 8<br />
Page | 51
Waste<br />
Throw away used paper. Use paper several times<br />
Abilities developed<br />
Sewing curved lines at a constant margin.<br />
Changing direction without stopping.<br />
Use of push button to control <strong>machine</strong> foot.<br />
Necessary materials<br />
SNLS without thread<br />
Paper exercise # 8<br />
Page | 52
I. O / L Sewing straight line<br />
MACHINE: O/L EXERCISE – 9 DURATION: 10 SECS<br />
Page | 53
Machine: O / L<br />
Exercise : O / L Sewing straight line<br />
Starting Position:<br />
The apprentice should sit facing the <strong>sewing</strong> <strong>machine</strong> with<br />
left feet on the pedal and the right feet on the lifter. Paper<br />
in starting position. No thread in <strong>machine</strong>.<br />
Methodology:<br />
Security<br />
The timekeeper starts the chronometer.<br />
Place paper under the <strong>machine</strong> so that the line<br />
lies directly under the pressure foot.<br />
Sew at maximum speed in a straight line within<br />
boundaries.<br />
Stop with the pedal at the end of the rectangle<br />
with the needle at the top position.<br />
Make sure the stitches do not leave the rectangle.<br />
Lift the <strong>machine</strong>’s foot and slide paper so that the<br />
second line lies directly under the pressure foot.<br />
Sew at maximum speed in a straight line within<br />
boundaries.<br />
Stop with the pedal once the apprentice has<br />
reached the end of the rectangle, keeping the<br />
needle in the<br />
top position.<br />
Lift the <strong>machine</strong>’s foot and slide paper so that the<br />
third dotted line lies directly under the needle.<br />
The chronometer is stopped once the paper is<br />
placed under the third dotted line.<br />
Hold the paper with the thumb under the paper.<br />
Maintain fingers away from needle at all times.<br />
Use glasses.<br />
Avoid using loose clothing and/or long and loose hair.<br />
Quality<br />
Do not tear paper.<br />
The stitch line should remain straight and within<br />
Boundaries.<br />
Ergonomics<br />
Sited in front of the <strong>sewing</strong> <strong>machine</strong>.<br />
Left feet on pedal & right feet on lifter.<br />
Chair and Machine at a comfortable height.<br />
Goal: 10 Seconds<br />
Illustration:<br />
Exercise Number :<br />
Paper exercise # 9<br />
Page | 54
Back rest facing forward.<br />
Waste<br />
Throw away used paper. Use paper several times<br />
Abilities developed<br />
Exact Stops<br />
Straight stitches at maximum velocity centered at<br />
118” margin.<br />
Use of knee lift to elevate <strong>machine</strong> foot.<br />
Necessary material<br />
O / L without thread<br />
Paper exercise #9<br />
Page | 55
J. O / L Exact stop<br />
MACHINE: O/L EXERCISE – 10 DURATION: 20 SECS<br />
Page | 56
Machine: O / L<br />
Exercise : O / L Exact stop<br />
Starting Position:<br />
The apprentice should sit facing the <strong>sewing</strong> <strong>machine</strong> with<br />
left feet on the pedal and the right feet on the lifter.<br />
Paper in starting position. No thread in <strong>machine</strong>.<br />
Methodology:<br />
Security<br />
The timekeeper starts the chronometer.<br />
Place paper under the <strong>machine</strong> so that the line<br />
lies directly under the pressure foot.<br />
Sew at maximum speed in a line within<br />
boundaries.<br />
Stop with the pedal at the end of the straight<br />
line with the needle and turn to 120° and stitch<br />
correspondingly..<br />
Make sure the stitches do not leave the<br />
rectangle.<br />
Lift the <strong>machine</strong>’s foot and slide paper so that<br />
the second line lies directly under the pressure<br />
foot.<br />
Stop with the pedal once the apprentice has<br />
reached the end of the line, keeping in the top<br />
position.<br />
Lift the <strong>machine</strong>’s foot and slide paper so that<br />
the third dotted line lies directly under the<br />
pressure foot.<br />
The chronometer is stopped once the paper is<br />
placed under the third dotted line.<br />
Hold the paper with the thumb under the paper.<br />
Maintain fingers away from needle at all times.<br />
Use glasses.<br />
Avoid using loose clothing and/or long and loose hair.<br />
Quality<br />
Do not tear paper inside of the lines..<br />
The stitch line should remain straight and within<br />
Boundaries.<br />
Ergonomics<br />
Sited in front of the <strong>sewing</strong> <strong>machine</strong>.<br />
Left feet on pedal & right feet on lifter.<br />
Chair and Machine at a comfortable height.<br />
Back rest facing forward.<br />
Goal: 20 Seconds<br />
Illustration:<br />
Exercise Number :<br />
Paper exercise # 10<br />
Page | 57
Waste<br />
Throw away used paper. Use paper several times<br />
Abilities developed<br />
Exact Stops<br />
Straight stitches at maximum velocity centered<br />
at 118” margin.<br />
Use of knee lift to elevate <strong>machine</strong> foot.<br />
Necessary material<br />
O / L without thread<br />
Paper exercise #9<br />
Page | 58
K. Sewing curves<br />
MACHINE: O/L EXERCISE – 11 DURATION: 15 SECS<br />
Page | 59
Machine: SNLS<br />
Exercise : Sewing curves<br />
Starting Position:<br />
The apprentice should sit facing the <strong>sewing</strong> <strong>machine</strong> with left<br />
feet on the pedal and the right feet on the lifter. Paper in<br />
starting position. No thread in <strong>machine</strong>.<br />
Methodology:<br />
Security<br />
The timekeeper starts the chronometer.<br />
Place paper under the <strong>machine</strong> so that the line lies<br />
directly under the pressure foot.<br />
Sew at maximum speed in a line within boundaries.<br />
Stop with the pedal at the end of the straight line<br />
with the needle and turn to 120° and stitch<br />
correspondingly..<br />
Make sure the stitches do not leave the rectangle.<br />
Lift the <strong>machine</strong>’s foot and slide paper so that the<br />
second line lies directly under the pressure foot.<br />
Stop with the pedal once the apprentice has<br />
reached the end of the line, keeping in the top<br />
position.<br />
Lift the <strong>machine</strong>’s foot and slide paper so that the<br />
third dotted line lies directly under the pressure<br />
foot.<br />
The chronometer is stopped once the paper is<br />
placed under the third dotted line.<br />
Hold the paper with the thumb under the paper.<br />
Maintain fingers away from needle at all times.<br />
Use glasses.<br />
Avoid using loose clothing and/or long and loose hair.<br />
Quality<br />
Do not tear paper inside of the lines..<br />
The stitch line should remain straight and within<br />
Boundaries.<br />
Ergonomics<br />
Sited in front of the <strong>sewing</strong> <strong>machine</strong>.<br />
Left feet on pedal & right feet on lifter.<br />
Chair and Machine at a comfortable height.<br />
Back rest facing forward.<br />
Goal: 20 Seconds<br />
Illustration:<br />
Exercise Number :<br />
Paper exercise # 11<br />
Page | 60
Waste<br />
Throw away used paper. Use paper several times<br />
Abilities developed<br />
Exact Stops<br />
Straight stitches at maximum velocity centered at<br />
118” margin.<br />
Use of knee lift to elevate <strong>machine</strong> foot.<br />
Necessary material<br />
O / L without thread<br />
Paper exercise #8<br />
Page | 61
2. THREADING OF MACHINE (Single needle lock stitch <strong>machine</strong>)<br />
Page | 62
A. Thread the Machine and Draw up the Bobbin Thread<br />
1. Turn the <strong>machine</strong> off and remove your feet from the treadle. If there is no needle in the<br />
<strong>machine</strong>, run the <strong>machine</strong> out. Then insert a new needle. Check to be sure there is no lint or<br />
dust between the tensions discs or in the thread guide.<br />
2. Raise the thread take-up lever to its highest point.<br />
3. Place the thread on the thread stand. Then pass the thread over the guide at the top of the<br />
thread stand and through the hole in the spool pin(s).<br />
4. Guide the thread into the right (or top) hole of the needle-thread retainer. Then, guide it<br />
through the center hole and, finally the bottom (or left) hole.<br />
5. Guide the thread between the tension discs. Pull it into the check spring and under the slack<br />
thread retainer or vertical bar.<br />
6. Guide the thread from right to left into the eye of the take-up lever.<br />
7. Guide the thread through the remaining guides. The last thread guide is located directly<br />
above the long groove on the needle.<br />
8. Trim the thread end as needed and thread it into the eye of the needle from left to right.<br />
Note: The thread always threads from the long eye or groove on one side of the needle to<br />
the short eye on the other<br />
9. Pull the thread end about 3” (15cm) and hold the thread loosely in your left band.<br />
10. Release the brake and turn the hand wheel so that the needle moves down and up again to<br />
catch the bobbin thread. If the thread doesn’t come up, check the <strong>machine</strong> threading.<br />
Remove the bobbin case, rethread, and insert again<br />
Note: If you continue to turn the hand wheel, you may create a thread jam.<br />
11. Pull the needle thread taut to bring the bobbin thread up through the needle hole.<br />
12. Pull both threads between the prongs or toes of the foot, and then under the presser foot to<br />
the back of the <strong>machine</strong> leaving a 5” (15cm) tail.<br />
13. Draw the thread path for a lockstitch <strong>machine</strong>.<br />
Page | 63
B. Threading the bobbin case<br />
1. Removing the bobbin case<br />
Raise the bobbin case latch to remove the bobbin case<br />
2. Threading the bobbin case<br />
Pass the thread through the slit 1 in the bobbin case and route it under tension<br />
spring 2<br />
Hold the large of the bobbin case and set the bobbin case into the hook.<br />
Place the bobbin in the case taking care of the winding direction of the thread.(The<br />
bobbin should turn in the direction of arrow B when the thread is pulled in the<br />
direction of arrow A)<br />
Page | 64
C. Bobbin winding<br />
1) Route the thread in the order of A, B, and C, and then wind it round the bobbin several times.<br />
2) Set bobbin presser 1 down to make the winder come in contact with the belt.<br />
3) Adjust adjustment screw 2 of the amount of bobbin thread to be wound round the bobbin so that<br />
the<br />
bobbin is wound with thread about 80%.Turn the adjustment screw 2 clockwise to increase the<br />
bobbin<br />
thread amount or counterclockwise to decrease it.<br />
4) If thread is wound unevenly, move winder tension adjust base 3 to the right or left until it is<br />
correctly<br />
positioned.<br />
5) The moment the bobbin has been wound up, the bobbin presser is released, and the bobbin<br />
winder will<br />
stop automatically.<br />
Page | 65
3. FABRIC EXERCISES<br />
TRAINING OF SEWING MACHINE OPERATORS<br />
Page | 66
A. Sewing 6”x 6” Sewing off the material<br />
MACHINE: SNLS EXERCISE: SEW 6” X 6”, SEWING OFF<br />
6”<br />
6” X 6”<br />
Seam Type<br />
DURATION: 15 SECS<br />
Page | 67<br />
6”
Machine: SNLS<br />
Exercise: Sewing 6”x 6” Sewing off the material.<br />
Starting Position:<br />
The apprentice should sit facing the <strong>sewing</strong> <strong>machine</strong> with<br />
Both feet on the pedal and the right knee against the knee lift.<br />
Place material close to the apprentice.<br />
Methodology:<br />
Security<br />
The timekeeper starts the chronometer.<br />
Take fabric with LH and scissors with RH<br />
simultaneously.<br />
Move fabric to the front, and lift <strong>machine</strong> toot.<br />
Place fabric under foot and up to guide at a 1/4"<br />
margin.<br />
Sew at maximum speed until the first edge,<br />
respecting the margin of 1/4".<br />
Stop when fabric leaves the <strong>machine</strong> and cut threads.<br />
Lift <strong>machine</strong> foot and turn fabric counterclockwise,<br />
Place fabric under foot and up to guide at a 1/4”<br />
margin.<br />
Lower <strong>machine</strong> foot.<br />
Sew at maximum speed until the second edge,<br />
respecting the margin of V..<br />
Stop when fabric leaves the <strong>machine</strong> and cut threads.<br />
Lift <strong>machine</strong> foot.<br />
Place fabric under foot and up to guide at a 1/4"<br />
margin.<br />
Lower <strong>machine</strong> foot.<br />
Sew at maximum speed until the third edge,<br />
respecting the margin of 1/4"<br />
Stop when fabric leaves the <strong>machine</strong> and cut threads.<br />
Lift <strong>machine</strong> foot and tum cloth counterclockwise.<br />
Place fabric under foot and up to guide at a 1/4"<br />
margin.<br />
Lower <strong>machine</strong> foot.<br />
Sew at maximum speed until the fourth edge,<br />
respecting the margin 1/4"<br />
Stop when fabric leaves the <strong>machine</strong> and cut threads.<br />
Take fabric with LH and scissors with RH and cut<br />
threads.<br />
The apprentice must be careful not to prick himself with<br />
The needle.<br />
Quality<br />
Maintain a margin of 1/4” (+-1/16).<br />
Ergonomics<br />
chair and Machine at a comfortable height. Back rest facing<br />
Goal:15 Seconds Exercise Number :<br />
Illustration:<br />
Fabric Exercise #1<br />
Page | 68
forward.<br />
Waste<br />
Use fabric various times while practicing.<br />
Abilities Developed<br />
Sewing in a straight line at maximum speed.<br />
Pedal control.<br />
Consistency in margins.<br />
Necessary Materials<br />
SNLS<br />
2 thread cone<br />
2 bobbins.<br />
6” x 6” fabric<br />
Scissors<br />
Page | 69
B. Sewing 6”x 6” Staying Within Material<br />
MACHINE: SNLS<br />
EXERCISE: SEW 6” X 6”, STAYING WITH IN<br />
6<br />
Seam Type<br />
6” X 6”<br />
DURATION: 18 SECS<br />
Page | 70<br />
6”
Machine: SNLS<br />
Exercise : Sewing 6”x 6” Staying Within Material<br />
Starting Position:<br />
The apprentice should sit facing the <strong>sewing</strong> <strong>machine</strong> with both<br />
feet on the pedal and the right knee against the knee lift, Place<br />
fabric close to the apprentice.<br />
Methodology:<br />
Security<br />
The timekeeper starts the chronometer.<br />
Take fabric with LH and scissors with RH<br />
simultaneously.<br />
Move fabric to the front, and lift <strong>machine</strong> foot. Place<br />
fabric under foot and up to guide at a ¼” margin.<br />
Lower <strong>machine</strong> foot,<br />
Sew at maximum speed until the first edge, respecting<br />
the margin of ¼” (+-1/16).<br />
Stop with the needle at the lowest position exactly<br />
1/4” from the edge.<br />
Lift <strong>machine</strong> foot and turn fabric counterclockwise.<br />
Lower <strong>machine</strong> foot.<br />
Sew at maximum speed until the second edge,<br />
respecting the margin of 1/4“ (+-1/16”).<br />
Stop with the needle at the lowest position exactly ¼”<br />
from the edge.<br />
Lift <strong>machine</strong> foot and turn fabric counterclockwise,<br />
Lower <strong>machine</strong> foot.<br />
Sew at maximum speed until the third edge,<br />
respecting the margin of ¼”(+-1/16”).<br />
stop with the needle at the lowest position exactly %“<br />
from the edge,<br />
Lift <strong>machine</strong> foot and turn cloth counterclockwise,<br />
Lower <strong>machine</strong> foot.<br />
Sew at maximum speed until the fourth edge,<br />
respecting the margin of ¼” (+-1/16”)<br />
Stop when fabric leaves the <strong>machine</strong> and cut threads.<br />
Take fabric with LH and scissors with RH and cut<br />
threads,<br />
Timekeeper stops the chronometer.<br />
The apprentice must be careful not to prick himself with<br />
the needle.<br />
Quality<br />
Maintain a margin of 1/4” (+-1/16).<br />
Ergonomics<br />
chair and Machineat a comfortable height. Back rest facing<br />
forward.<br />
Goal: 18 Seconds Exercise Number :<br />
Illustration:<br />
Fabric Exercise #2<br />
Page | 71
Waste<br />
Use fabric various times while practicing.<br />
Abilities Developed<br />
Sewing in a straight line at maximum speed.<br />
Pedal control.<br />
Consistency in margins.<br />
Exact stops.<br />
Necessary Materials<br />
SNLS<br />
2 thread cone<br />
2 bobbins.<br />
6” x 6” fabric<br />
Scissors<br />
Page | 72
C. Sewing 6 x 6 back tack<br />
MACHINE: SNLS EXERCISE: SEW 6” X 6”, BACKTACK DURATION: 21 SECS<br />
6”<br />
Seam Type<br />
Page | 73<br />
6”
Machine: SNLS<br />
Exercise : Sewing 6 x 6 back tack<br />
Starting Position:<br />
Sit straight with two feet on the treadle. Keep the trimmer so<br />
as to access easily.<br />
Methodology:<br />
Security<br />
Pick two pieces of the fabrics one with each hand.<br />
Align the fabric while moving to the needle.<br />
Place the fabric under the needle! 1/4” from its top &<br />
1/4” from its side. Start <strong>sewing</strong>, with back tack<br />
Stop <strong>sewing</strong> at 1/4” from the bottom edge with<br />
needle down. Turn the fabric CCW 90 deg & start<br />
<strong>sewing</strong> in the same way for next 3 sides.<br />
When <strong>sewing</strong> the 4th side! Stop where the stitch has<br />
started & back tack (3 to 4 stitches).<br />
Keep away fingers from the needle.<br />
Quality<br />
Perfect alignment & regular stitch margin of 1/4’ Sharp corners.<br />
Number of back tack stitches. Avoid fullness.<br />
Ergonomics<br />
Keep two bundles one on each side of the body.<br />
Waste<br />
Abilities Developed<br />
Completely set SNLS <strong>machine</strong>.6 x 6 fabric pieces.<br />
Goal: 12 Seconds Exercise Number :<br />
Illustration:<br />
Fabric Exercise #3<br />
Page | 74
Necessary Materials<br />
SNLS<br />
2 Thread cone<br />
2 Bobbins<br />
6” x 6” fabric<br />
scissors<br />
Page | 75
D. Sew Over 3 Sides 6”x 12”<br />
MACHINE: SNLS EXERCISE: SEW 3 SIDES 6” X 12” DURATION: 21 SECS<br />
6”<br />
Seam Type<br />
Page | 76<br />
12”
Machine: SNLS<br />
Exercise : Sew Over 3 Sides 6”x 12”<br />
Starting Position:<br />
The apprentice should sit facing the <strong>sewing</strong> <strong>machine</strong> with both<br />
feet on the pedal and the right knee against the knee lift, Place<br />
fabric close to the operator.<br />
Methodology:<br />
Security<br />
The timekeeper starts the chronometer.<br />
Take corners of fabric with both hands.<br />
Lift <strong>machine</strong> root.<br />
Place fabric under foot and up to guide at a ¼”<br />
margin.<br />
Lower <strong>machine</strong> foot.<br />
Sew at maximum speed until the first edge, respecting<br />
the margin of ¼” (+-1/16”)).<br />
Stop with the needle at the lowest position exactly ¼”<br />
from the edge.<br />
Lift <strong>machine</strong> foot and turn fabric counterclockwise<br />
with LH.<br />
Lower <strong>machine</strong> foot.<br />
Sew at maximum speed until the second edge,<br />
respecting the margin of ¼” (+-1/16”)<br />
Stop with the needle at the lowest position exactly<br />
1/4” from the edge.<br />
Lift <strong>machine</strong> foot and turn fabric counterclockwise.<br />
Lower <strong>machine</strong> foot.<br />
Sew at maximum speed until the third edge,<br />
respecting the margin of’ 1/4” (+.l/16”).<br />
Stop when fabric leaves the <strong>machine</strong> and cut threads.<br />
Take fabric with LH and scissors with RH and cut<br />
threads.<br />
Timekeeper stops the chronometer.<br />
The apprentice must be careful not to prick himself with<br />
the needle.<br />
Use safety glasses.<br />
Avoid using loose clothing and/or long and loose hair.<br />
Quality<br />
Maintain a margin of 1/4” (+-1/16).<br />
Ergonomics<br />
chair and Machine at a comfortable height. Back rest facing<br />
forward.<br />
Goal:14 Seconds Exercise Number :<br />
Illustration:<br />
Fabric Exercise #4<br />
Page | 77
Waste<br />
Use fabric various times while practicing.<br />
Abilities Developed<br />
Sewing in a straight line at maximum speed.<br />
Pedal control.<br />
Consistency in margins.<br />
Exact stops.<br />
Joining and handling of large pieces<br />
Necessary Materials<br />
SNLS<br />
2 thread cone<br />
2 bobbins.<br />
6” x 6” fabric<br />
Scissors<br />
Page | 78
E. 12 X 6 Top stitch<br />
MACHINE: SNLS EXERCISE: 6” X 12” TOP STITCH DURATION: 14 SECS<br />
6”<br />
Seam Type<br />
Page | 79<br />
12”
Machine: SNLS<br />
Exercise : 12 X 6 Top stitch<br />
Starting Position:<br />
With both legs on treadle, pressure foot up.<br />
Methodology:<br />
Security<br />
Pick up the fabric from the side at the corners facing<br />
towards you with both hands.<br />
Keep RH side open corner near (under) the needle<br />
make sure of the stitch margin (1/4”) using the scale<br />
near needle. Put presser foot down.<br />
Start <strong>sewing</strong> maintaining straight line & stitch margin.<br />
Stop the needle at 1/4” from both sides. At that time<br />
needle should be down . Turn the fabric 90 Degrees<br />
anticlockwise. Start <strong>sewing</strong> st line and margin of 1/4”.<br />
Keeping needle down at that point , turn fabric 90 deg<br />
anticlockwise and sew off maintaining st. line and<br />
margin Lift the presser foot with knee lift and pull the<br />
fabric with left hand. Take the trimmer with RH and<br />
cut the thread. Time starts right from picking to the<br />
cutting of the thread. No back tack<br />
When placing the fabric under needle, needle should be up.<br />
Quality<br />
Alignment should be proper; stitch should be straight; stitch<br />
margin of 1/4”.<br />
Ergonomics<br />
. Trimmers should be small but easy to handle and operate.<br />
Waste<br />
While cutting the thread don’t pull more thread.<br />
Abilities Developed<br />
Alignment of parts;<br />
Maintaining the margin without the help of guides<br />
Stopping the <strong>machine</strong> where ever we want with<br />
needle down.<br />
Hands and eye coordination for faster turning of parts.<br />
Goal: 14 Seconds Exercise Number :<br />
Illustration:<br />
Fabric Exercise #5<br />
Page | 80
Necessary Materials<br />
12x12 Fabric<br />
Trimmer.<br />
Page | 81
F. Backtack 6”x 1`2”<br />
MACHINE: SNLS<br />
6”<br />
EXERCISE: BACKTACK 12” X 12”<br />
Seam Type<br />
DURATION: 20SECS<br />
Page | 82<br />
12”
Machine: SNLS<br />
Exercise : Backtack 6”x 1`2”<br />
Starting Position:<br />
Place the fabric on your lap, pick up using both hands, let<br />
both feet be on the treadle.<br />
Methodology:<br />
Security<br />
This exercise is carried on the fabric which comes<br />
from the exercise 12x6 top stitch.<br />
Initial markings have to be done on the fabric for<br />
backtacking.<br />
For this fold the given fabric, such that both edges<br />
coincide and crease at the center. Now fold on<br />
the folded fabric, such<br />
that edges coincides & crease.<br />
When the folded fabric is opened, it looks as<br />
indicated in sketch[2].<br />
Now you see three crease lines at A.B,C. Mark<br />
3/8” above and creased line.(A).Repeat above<br />
said step for ‘B’ and c.<br />
The fabric is ready for backtacking.<br />
Places at which back tacking have to be carried<br />
out are indicated in sketch 4.<br />
Backtack at point-I and sew tilt pcint-2 and at<br />
potnt-2 backtack and sew till -3 and at point-4<br />
backtack and sew till point-5 backtack & stop.<br />
Now the fabric should be as shown in sketch (5J.<br />
At point-5 stop and cut the thread using clipper<br />
and dispose.<br />
The apprentice must be careful not to prick himself with<br />
the needle.<br />
Use safety glasses.<br />
Avoid using loose clothing and/or long and loose hair.<br />
Quality<br />
Line sewn should be straight and length of backtacking<br />
should be within the boundary with an allowance of one<br />
stitch on either side, i.e. half a stitch outside or inside the<br />
band is ok, no more<br />
Ergonomics<br />
chair and Machine at a comfortable height. Back rest facing<br />
forward.<br />
Waste<br />
Use fabric various times while practicing.<br />
Goal: 15 Seconds Exercise Number :<br />
Illustration:<br />
Fabric Exercise #6<br />
Page | 83
Abilities Developed<br />
Sewing in a straight line at maximum speed.<br />
Pedal control.<br />
Cutting, Disposing and Stacking.<br />
Exact stops.<br />
Backtacking only within the boundary marked<br />
Necessary Materials<br />
SNLS<br />
Thread<br />
Bobbin<br />
12” x 6” fabric<br />
Scissors<br />
Page | 84
G. Baste 6” X 6” in Chain<br />
MACHINE: SNLS EXERCISE: HEMMING 6 7/8” X 6”, INCHAIN DURATION: 18SECS<br />
5 1/2”<br />
5”<br />
Seam Type<br />
Page | 85
Machine: SNLS<br />
Exercise : Baste 6” X 6” in Chain<br />
Starting Position:<br />
The apprentice should sit facing the <strong>sewing</strong> <strong>machine</strong> with both<br />
feet on the pedal and the right knee against the knee lift, Place<br />
fabric close to the operator.<br />
Methodology:<br />
The timekeeper starts the chronometer.<br />
Take fabric with LH.<br />
Fold fabric lightly on one side.<br />
Move towards <strong>machine</strong> foot.<br />
Lift <strong>machine</strong> foot.<br />
Verify the fold is ½”.<br />
Place fabric under foot and up to guide at a ¼” margin.<br />
Lower <strong>machine</strong> foot.<br />
Sew fabric with rhythm guiding it with the RH while the LH<br />
takes another fabric.<br />
Repeat the previous instructions until 5 pieces are sewn.<br />
Take fabric with LH and scissors with RH and cut threads.<br />
Timekeeper stops the chronometer.<br />
Security<br />
The apprentice must be careful not to prick himself with<br />
The needle.<br />
Use safety glasses.<br />
Avoid using loose clothing and/or long and loose hair.<br />
Quality<br />
Maintain a margin of ¼” (+-1/16”)<br />
Ergonomics<br />
Chair and Machine at a comfortable height. Back rest facing<br />
forward.<br />
Waste<br />
Use fabric various times while practicing.<br />
Goal: 30 Seconds Exercise Number :<br />
Illustration:<br />
Fabric Exercise #7<br />
Page | 86
Abilities Developed<br />
Sewing in a straight line at maximum speed.<br />
Pedal control.<br />
• Consistency in margins.<br />
• Exact stops.<br />
• Joining and handling of large pieces<br />
Necessary Materials<br />
SNLS<br />
2 Thread cone<br />
2 Bobbins<br />
6” x 6” fabric<br />
Scissors<br />
Page | 87
CHAPTER - V<br />
MEASUREMENTS AND SIZE CHART<br />
Page | 88
1. CIRCUMFERENCE MEASUREMENTS<br />
GRADE: 1" 1" 1 1/2" 1 1/2" 1 1/2" 2"<br />
SIZE: 6 8 10 12 14 16 18<br />
1 Bust: 34 35 36 37 1/2 39 40 1/2 42 1/2<br />
2 Waist; 24 25 26 27 1/2 29 30 1/2 32 1/2<br />
3 Abdomen: 32 1/2 33 1/2 34 1/2 36 37 1/2 39 41<br />
4 Hip: 35 1/2 36 1/2 37 1/2 39 40 1/2 42 44<br />
UPPER TORSO (bodice):<br />
5 Center length:<br />
Front 14 1/2 14 3/4 15 15 1/4 15 1/2 15 3/4 16<br />
Back 16 3/4 17 17 1/4 17 1/2 17 3/4 18 18 1/4<br />
6 Full length:<br />
Front 17 17 3/8 17 3/4 18 1/8 18 1/2 18 7/8 19 1/4<br />
Back 17 1/4 17 5/8 18 18 3/8 18 3/4 19 1/8 19 1/2<br />
7 Shoulder slope:<br />
8 Strap:<br />
Front 16 1/2 17 17 1/4 17 4/5 18 1/4 18 2/3 19 1/8<br />
Back 16 1/4 16 2/3 17 1/8 17 4/7 18 18 4/9 18 7/8<br />
Front 9 1/2 9 3/4 10 10 3/8 10 3/4 11 1/8 11 5/8<br />
9 Bust depth: 9 9 1/8 9 1/4 9 3/8 9 1/2 9 5/8 10<br />
Bust radius 2 3/4 2 7/8 3 3 1/8 3 1/4 3 3/8 3 ¾<br />
10 Bust span: 3 1/2 3 5/8 3 3/4 3 7/8 4 4 1/8 4 ¼<br />
11 Side length: 8 1/4 8 3/8 8 1/2 8 5/8 8 3/4 8 7/8 9<br />
12 Back neck: 2 3/4 2 7/8 3 3 1/8 3 1/4 3 3/8 3 ½<br />
13 Shoulder length: 5 1/8 5 1/5 5 1/4 5 3/8 5 1/2 5 5/8 5 4/5<br />
14 Across shoulder:<br />
Front 7 1/4 7 3/8 7 1/2 7 2/3 7 7/8 8 8 1/3<br />
Back 7 3/8 7 1/2 7 5/8 7 4/5 8 8 1/5 8 4/9<br />
15 Across chest: 6 61/4 6 3/8 6 4/7 6 3/4 7 7 1/5<br />
16 Across back: 6 3/4 6 7/8 7 7 1/5 7 3/8 7 4/7 7 4/5<br />
17 Bust arc: 9 1/4 9 1/2 9 3/4 10 1/8 10 1/2 10 7/8 11 3/8<br />
18 Back arc: 8 1/2 8 3/4 9 9 3/8 9 3/4 10 1/8 10 5/8<br />
19 Waist arc:<br />
Front 6 1/4 6 1/2 6 3/4 7 1/8 7 1/2 7 7/8 8 3/8<br />
Back 5 3/4 6 6 1/4 6 5/8 7 7 3/8 7 7/8<br />
20 Dart placement: 3 3 1/8 3 1/4 3 3/8 3 1/2 3 5/8 3 ¾<br />
LOWER TORSO (Skirt/Pant):<br />
21 Abdominal arc:<br />
Front 8 1/4 8 1/2 8 3/4 9 1/8 9 1/2 9 7/8 10 3/8<br />
Back 7 1/2 7 3/4 8 8 3/8 8 3/4 9 1/8 9 5/8<br />
22 Hip arc:<br />
Front 8 1/2 8 3/4 9 9 1/4 9 1/2 10 1/8 10 5/8<br />
Back 9 9 1/4 9 1/2 9 7/8 10 1/4 10 5/8 11 1/8<br />
23 Crotch depth: 9 1/2 9 3/4 10 10 1/4 10 1/2 10 3/4 11<br />
24 Hip depth:<br />
Center front 8 1/2 8 3/4 9 9 1/4 9 1/2 9 3/4 10<br />
Center back 8 1/4 8 1/2 8 3/4 9 9 1/4 9 1/2 9 ¾<br />
25 Side hip depth: 8 3/4 9 9 1/4 9 1/2 93/4 10 10 ¼<br />
26 Waist to ankle: 37 37 1/2 38 38 1/2 39 39 1/2 40<br />
Waist to Floor: 39 39 1/2<br />
40 40 41 1/2 42<br />
Waist to Knee: 22 1/2 22 5/8 23 23 3/8 23 3/4 24 1/8 24 ½<br />
27 Crotch Length 24 1/2 25 1/4 26 26 3/4 27 1/2 28 1/4 29<br />
Vertical Trunk 60 61 62 63 1/2 65 66 1/2 68 ½<br />
Page | 89
28 Upper Thigh 19 1/2 20 1/4 21 22 23 24 25 ¼<br />
Mid Thigh 17 17 1/2 18 18 3/4 19 1/2 20 1/4 21 ¼<br />
29 Knee 13 13 1/2 14 14 1/2 15 15 1/2 16<br />
30 Calf 11 11 1/2 12 12 1/2 13 13 1/2 14<br />
31 Ankle 9 1/2 9 3/4 10 10 1/4 10 1/2 10 3/4 11<br />
2. STANDARD MEASUREMENT FOR CHILDREN<br />
AGE GROUP CHEAST WAIST<br />
WAIST<br />
LENGTH<br />
ACROSS<br />
BACK<br />
SHORT<br />
SLEEVE<br />
LONG<br />
SLEEVE<br />
FULL<br />
LENGTH<br />
3-9<br />
MOUNTHS 19'' 19'' 6'' 8'' 2 3/4'' 6 1/2'' 14'' 18''<br />
1YEARS 20'' 19''-20'' 7'' 8 1/2'' 3'' 7'' 16'' 20''<br />
2YEARS 21'' 20''-21'' 8'' 8 3/4'' 3 1/4'' 8'' 16'' 22''<br />
3YEARS 22'' 21'' 9'' 9'' 3 1/2'' 8 3/4'' 20'' 24''<br />
4YEARS 23'' 22'' 9 1/2'' 9 1/2'' 4'' 9 1/2'' 20 1/2'' 25''<br />
5YEARS 24'' 23'' 10'' 10'' 4 1/2'' 11'' 22'' 26 1/2''<br />
6YEARS 24 1/2'' 24 1/2'' 10 1/2'' 10 1/2'' 4 3/4'' 11 1/2'' 22 1/2'' 27''<br />
7YEARS 25'' 25'' 11'' 11'' 5'' 12'' 23-24'' 27 1/2''<br />
8YEARS 26'' 25'' 11 1/2'' 11 1/2'' 5 1/2'' 12 1/2'' 24 1/2'' 28''<br />
9YEARS 27'' 25'' 12'' 12'' 6'' 13'' 26 1/2'' 28 1/0''<br />
10 YEARS 28'' 26'' 12 1/2'' 12 1/2'' 6 1/2'' 13 1/2'' 26 1/2-27 '' 29''<br />
11YEARS 28'' 28 1/2'' 13'' 13'' 7'' 14'' 27'' 30''<br />
3. STANDARD MEASUREMENT FOR TEENAGERS<br />
AGE<br />
GROUP<br />
12-13YEARS 14-15 YEARS 16-17 YEARS 18-19 YEARS<br />
CHEAST 30'' 32'' 34'' 35''<br />
WAIST 24'' 25'' 25 1/2'' 26''<br />
CENTER<br />
BACK<br />
WAIST<br />
LENGTH<br />
12 1/2'' 13'' 13 1/2'' 14''<br />
12 1/2'' 13 1/2'' 14 1/2'' 15''<br />
HIP 32'' 34'' 36'' 37''<br />
SLEEVE<br />
LENGTH<br />
16 1/2'' 17'' 17 1/2'' 18''<br />
Page | 90<br />
HIP
CHAPTER - VI<br />
MACHINE MAINTAINANCE & SAFETY PRECAUTIONS<br />
Page | 91
A. Safety- Rules<br />
Safety is important to everyone and it is your responsibility to maintain a safe working place.<br />
To maintain a safe environment, learn these safety rules and practice them at all times.<br />
When in doubt, ask the instructor<br />
Report any injuries or accidents immediately to the instructor.<br />
Report a breakage to a tool or <strong>machine</strong> to the instructor. If the equipment does not operate<br />
properly, notify the instructor immediately.<br />
Wipe up any oil specified on the floor immediately to prevent anyone from slipping.<br />
Keep aisles clear at all times.<br />
Operate only the <strong>machine</strong>s you have been trained to operate.<br />
Operate <strong>machine</strong>. only when the instructor or laboratory assistant is present.<br />
Operate <strong>machine</strong>s only with permission.<br />
Always inspect the <strong>machine</strong> before starting to work. Be sure it is clean and threaded<br />
correctly, with no loose threads on the pulley belt and all guards in place.<br />
Make only adjustments you have been trained to perform. Otherwise, as the instructor.<br />
When <strong>sewing</strong> on a power <strong>machine</strong>, wear low shoes and close-fitting clothing. Avoid loose<br />
fitting sleeves, sweaters, jewelry, ties, and ribbons when operating the <strong>machine</strong>. If your hair<br />
is long, tie it back.<br />
Always practice proper posture to reduce fatigue, help prevent accidents and increase<br />
efficiency. If possible, adjust the chair height 5) that your feet rest flat on the floor.<br />
Do not I your chair forward or toward while operate he <strong>machine</strong>.<br />
Use both hands to raise and lower the <strong>machine</strong> head.<br />
Always keep your head above the table.<br />
Keep your feet off the treadle when you are setting or threading the needle.<br />
Turn the motor off before you are not stitching.<br />
Turn the motor off before cleaning, Oiling or adjusting the <strong>machine</strong>.<br />
Page | 92
Turn the motor off before removing or replacing the pulley belt and run the <strong>machine</strong> out.<br />
Waft until all motion has stopped.<br />
Turn the motor off in case of an emergency or when in doubt.<br />
Turn the motor off before unplugging the <strong>machine</strong>.<br />
When unplugging the <strong>machine</strong>, hold onto the plug, not the cord.<br />
Do not use your hand to stop and start the hand wheel.<br />
Use your hand only to set the hand wheel.<br />
Before operating the <strong>machine</strong>, close the slide bed cover.<br />
Before operating the <strong>machine</strong>, be sure the needle is properly set and the bobbin is properly<br />
placed.<br />
When operating the <strong>machine</strong>, do not be careless~<br />
When operating the <strong>machine</strong>, do not talk with your colleagues.<br />
When operating the <strong>machine</strong>, keep your attention on your work and hands.<br />
When operating the <strong>machine</strong>, keep your hands at a safe distance from the needle.<br />
When operating the <strong>machine</strong>, keep your hands, scissors, and other sharp objects away from<br />
the belt.<br />
Keep the <strong>machine</strong> and work station clean with an tools in the side drawer.<br />
Use the proper needle for the job.<br />
Do not stitch over pins or put them in your mouth.<br />
When the <strong>machine</strong> is not in use, lower the foot and needle.<br />
Three-way plugs are a safety feature on the <strong>machine</strong>s. Do not cut off the ground prong.<br />
Unplug the <strong>machine</strong> at the end of the day.<br />
Know the location of the main power switch, outlets, and fuses in case of an emergency.<br />
Do not remove any safety devices from the <strong>machine</strong>s.<br />
Turn off the iron at the of the class.<br />
Always place the iron on the iron pad to avoid scorching the ironing board cover.<br />
Always place the industrial iron flat on the iron pad to avoid knocking it over.<br />
Page | 93
When trimming or cutting, put all trimmings in the wastebasket.<br />
Scissors should be handed to another person with the handles toward the person.<br />
Never toss or throw scissors or equipment.<br />
Do not eat, drink, or smoke in the work area.<br />
B. Important safety instructions<br />
Putting <strong>sewing</strong> systems into operation is prohibited until it has been ascertained that the <strong>sewing</strong><br />
systems in which these <strong>sewing</strong> <strong>machine</strong>s will be built into, have conformed with the safety<br />
regulations in your country.<br />
Technical service for those <strong>sewing</strong> systems is also prohibited.<br />
Observe the basic safety measures, including, but not limited to the following ones,<br />
whenever you use the <strong>machine</strong>.<br />
Read all the instructions, including, but not limited to this Instruction Manual before you use<br />
the <strong>machine</strong>.<br />
In addition, keep this Instruction Manual so that you may read it at anytime when necessary.<br />
Use the <strong>machine</strong> after it has been ascertained that it conforms with safety rules/standards<br />
valid in your Country.<br />
All safety devices must be in position when the <strong>machine</strong> is ready for work or in operation.<br />
The operation without the specified safety devices is not allowed.<br />
This <strong>machine</strong> shall be operated <strong>by</strong> appropriately-trained operators.<br />
For your personal protection, we recommend that you wear safety glasses.<br />
For the following, turn off the power switch or disconnect the power plug of the <strong>machine</strong><br />
from the receptacle.<br />
For threading needle(s), looper, spreader etc. and replacing bobbin.<br />
For replacing part(s) of needle, presser foot, throat plate, looper, spreader, feed dog, needle<br />
guard, folder, cloth guide etc.<br />
For repair work.<br />
When leaving the working place or when the working place is unattended.<br />
When using clutch motors without applying brake, it has to be waited until the motor<br />
stopped totally.<br />
If you should allow oil, grease, etc. used with the <strong>machine</strong> and devices to come in contact<br />
with your eyes or<br />
Page | 94
skin or swallow any of such liquid <strong>by</strong> mistake, immediately wash the contacted areas and<br />
consult a medical doctor.<br />
Tampering with the live parts and devices, regardless of whether the <strong>machine</strong> is powered, is<br />
prohibited.<br />
Repair, remodeling and adjustment works must only be done <strong>by</strong> appropriately trained<br />
technicians or<br />
General maintenance and inspection works have to be done <strong>by</strong> appropriately trained<br />
personnel.<br />
Page | 95
C. Machine adjustments and control<br />
Adjusting the Stitch Length Regulator<br />
The stitch length regulator controls the distance that the feed dogs move the material to the<br />
back of the <strong>machine</strong> to make a single stitch. On newer <strong>machine</strong>s, the stitch length regulator is often<br />
a large knob or a lever on the front of the <strong>machine</strong>, making It easy to regulate. On older <strong>machine</strong>s<br />
however, the stitch length regulator is more difficult to locate and reset and ft rarely has a guide<br />
indicating the setting.<br />
On most newer <strong>machine</strong>s, the length of each stitch is Indicated In millimeters (mm). On<br />
other <strong>machine</strong>s, the number of stitches per inch(SPI) is Indicated. This latter method is easier to use<br />
when adjusting the stitch length regulator.<br />
These general directions can be used for most <strong>machine</strong>s, however, when a <strong>machine</strong> manual<br />
is available, ft is always wise to review the directions in it.<br />
1. Begin with the power switch on arid the <strong>machine</strong> unthreaded. Place a piece of paper under<br />
the foot and stitch a straight line about 3” long.<br />
2. Remove the paper from the <strong>machine</strong>. Mark off 2”(5cm), placing the first mark midway<br />
between two needle perforations. Begriming at the first perforation following the first mark,<br />
count the number of perforations between the two marks. If the second line is between two<br />
perforations, add an additional perforation.<br />
3. To determine the number of stitches per inch (SPI), divide the number of perforations <strong>by</strong><br />
two - the number of inches stitched. There are 20 perforations between the two marks,<br />
there are 10 SPI.<br />
4. To determine the number of stitches per centimeter (SPO), divide <strong>by</strong> five - the number of<br />
centimeters stitched. If there are 20 perforations between the two lines, there are 4 SPC.<br />
5. To determine the number of millimeters in a stitch, divide the number of millimeters in a<br />
stitch, divide the number of millimeters (10) In a centimeter <strong>by</strong> the number of SPO<br />
(stitches/cm). If there are 4 SPC, each stitch Is 2.5mm (4 divided <strong>by</strong> 10) long.<br />
6. Set the stitch length to 2.5mm or 1OSPL. Stitch 3”. Mark off a 2” section, then count the<br />
stitches to confirm the accuracy of the setting. Repeat to set the stitch length to 1.5mm (17<br />
SPI), 2 (12 SPI). 3mm (8.8SPI), and 4 mm (6 SPI). Record your measurements In Table.<br />
1” No. of stitches/ inch = 8<br />
Page | 96
Stitch Length Measurements<br />
Machine<br />
Stitch length<br />
Setting<br />
301 1mm<br />
301 1.5mm<br />
301 2mm<br />
301 2.5mm<br />
301 3mm<br />
301 4mm<br />
Testing the tension<br />
No. of Stitches<br />
per inch<br />
For most stitching, a balance tension or balanced stitch is<br />
desired. When the tension is balanced, the threads interlock in the middle<br />
of the material to make a perfect or balanced stitch. The seam is flat and<br />
elastic without being loose, and there is no seam grin when the seam is<br />
stressed.<br />
Balanced Tension Tight upper tension Tight lower tension<br />
If there is too much pressure on the tension discs, not enough thread is fed into the stitching and the<br />
tension is right. The material puckers the seam is strained, and the stitches break. If there is too little<br />
pressure, too much thread is fed, the tension is too loose, and the seam is loose and weak.<br />
When the tension on the top, or needle, thread is too tight or the tension on the bottom or bobbin<br />
thread is too loose, the top thread lies along the surface of the material and the bobbin thread forms<br />
loops on the top.<br />
Page | 97
When the tension on the top, or needle, thread is too loose or the bottom, or bobbin, thread is too<br />
tight, the bottom thread lies along the underside of the material and the top thread forms loops on<br />
the underside.<br />
Adjusting the tension<br />
The tension of the stitch is regulated <strong>by</strong> two controls: the upper tension regulator and the bobbin<br />
case tension screw. The upper tension regulator is located on the front of the <strong>machine</strong> and adjusts<br />
the tension discs.<br />
The bobbin case tension screw, which is located on the bobbin case controls the tightness of the<br />
bobbin case spring. These controls increase or decrease the amount of pressure on the threads as<br />
they fed through the <strong>machine</strong>.<br />
Because the structure, texture, thickness, density, and resiliency of the material and the size and<br />
type of the thread affect the tension, the tension settings will vary with the material and the thread<br />
size and type. Test the tension before beginning a garment or <strong>sewing</strong> with a different fabric, thread,<br />
or <strong>machine</strong>.<br />
1. Identity the upper tension regulator and the bobbin case tension screw.<br />
2. Set the stitch length for 2 mm (128P1). Turn the upper tension regulator to the right 1/4 to<br />
1/2 turn.<br />
3. Fold one muslin rectangle in half crosswise and stitch on the straight grain about 1/2” from<br />
the edge.<br />
4. Examine the stitching to determine whether the stitching is balanced or unbalanced. If the<br />
needle tension is tight the needle thread lies flat on the top ply and loops of the bobbin<br />
Page | 98
thread are visible, If the bobbin tension Is tight, the bobbin thread lies flat and the loops of<br />
the needle thread are visible.<br />
5. Adjust the bobbin tension first. To determine if it needs an adjustment, place the filled<br />
bobbin In the bobbin case. Hold the end of the bobbin thread and jerk the thread slightly. It<br />
should drop several Inches. If it slides freely down the thread, it needs more tension; if<br />
doesn’t slide, it needs less.<br />
a. If it needs an adjustment, use a small screwdriver to loosen the screw on the bobbin<br />
case. For more tension, turn the screw in small increments and no more than 1/4<br />
turn between tests.<br />
b. Caution: The bobbin case screw is very short and will fall out if turned too far.<br />
6. To adjust the needle thread tension turn the tension regulator to the left to loosen it; turn it<br />
to the right to tighten.<br />
7. Adjust the tensions only as needed until the stitch is balanced.<br />
8. Experiment with stitching on a variety of fabrics.<br />
Machine Maintenance<br />
In the apparel industry, a clean, well-oiled <strong>machine</strong> is essential for safety and good performance, the<br />
same is true in the classroom. Generally cleanliness is the responsibility of the operators, including<br />
students who use the <strong>machine</strong>s. The <strong>machine</strong>s are given a quick cleaning after every eight hours of<br />
operation and a thorough cleaning once a week. When <strong>sewing</strong> materials that produce a lot of lint,<br />
the <strong>machine</strong>s are cleaned more frequently.<br />
Machine maintenance is also important in preventing stitching faults. Although stitching faults can<br />
be caused <strong>by</strong> the material, <strong>machine</strong>, or operator, most can be corrected <strong>by</strong> cleaning the <strong>machine</strong>, rethreading<br />
it, and/or changing the needle.<br />
In most plants, a quick cleaning is done <strong>by</strong> the operators once a day, but the responsibility for the<br />
more thorough cleaning varies from plant to plant. In some factories, it is done <strong>by</strong> the operators on<br />
Friday afternoon. In others, it is done <strong>by</strong> a mechanic - often, when the operators are not working.<br />
Cleaning the Machine<br />
When cleaning the <strong>machine</strong>, clean everything - the <strong>machine</strong> mechanism, <strong>machine</strong> table and stand,<br />
your tools, work station area, and even your hands - to avoid soiling the materials being sewn,<br />
prevent accidents, and avoid wear and damage to the <strong>machine</strong>.<br />
These directions focus on the lockstitch <strong>machine</strong>, but they can easily be adapted for other <strong>machine</strong><br />
types.<br />
Materials/Supplies<br />
Paint brush (1/2” wide)<br />
Clear disposable cloth or clean rag<br />
Screwdriver<br />
Sewing <strong>machine</strong> manual (when available)<br />
Page | 99
Air hose or industrial vacuum cleaner (when available)<br />
Caution: Before cleaning any <strong>machine</strong>, turn off the <strong>machine</strong> and run it out.<br />
1. Open the slide and remove the bobbin case, and then remove the throat plate. Occasionally<br />
remove the face plate from the left end of the head.<br />
2. Brush or blow away any lint, dust, or loose threads in the area around the feed dogs and<br />
rotary hook or shuttle. Do not use anything hard, such as a screw driver or scissor points, to<br />
remove the lint. When cleaning the over lock <strong>machine</strong>, open the cloth plate and looper<br />
cover to blow out any lint in those areas. On the blind stitch <strong>machine</strong>, open the plate to<br />
expose and clean the area around the spreader.<br />
3. Turn the hand wheel manually to expose any areas that might have been hidden initially;<br />
brush again.<br />
4. Carefully tilt the <strong>machine</strong> head back until the head rests on the post on the back of the table.<br />
5. Brush out any lint, dust, or threads in the lower part of the <strong>machine</strong>. Use a rag to remove<br />
any lint on the <strong>machine</strong>’s mechanism, excess oil in the pan, and, if appropriate, the oil pump<br />
screen.<br />
6. If the <strong>machine</strong> is not self-oiling, consult the manual for oiling directions. If the manual is not<br />
available, place one drop of oil on each moving part on the lower mechanism.<br />
7. Press the knee lift to the right and lower the <strong>machine</strong> head into position.<br />
8. Replace all plates and screws.<br />
9. Oil the upper mechanism <strong>by</strong> placing a c p of oil in each oil bole<br />
10. Replace the bobbin case.<br />
11. Check the needle to be sure it is clean and the eye is not clogged.<br />
12. Replace the needle if necessary.<br />
13. Wipe away any excess oil or dust on the head, <strong>machine</strong> bed, thread stand, motor, table and<br />
stand.<br />
14. If there is lint between the tension discs and in the thread guides, use thread to floss the<br />
tension discs and remove any lint.<br />
15. If you have oiled the <strong>machine</strong>, sew on a few scraps to remove any excess oil.<br />
16. Wash your hands after cleaning and oiling the <strong>machine</strong>.<br />
17. At the end of the day, put a piece of stitching patch under the foot, lower the foot, cover the<br />
<strong>machine</strong>, and pick up any trash.<br />
Page | 100
CHAPTER - VII<br />
NEEDLE<br />
Page | 101
1. SELECTION OF NEEDLE<br />
Basic Skills<br />
To use Industrial <strong>machine</strong>ry efficiently, you should be able to select and set a needle; adjust<br />
the stitch length regulator, pressure regulator, and knee lift; Identify balanced tension and adjust as<br />
needed; and select appropriate thread.<br />
Setting the Needle<br />
In the apparel industry, there are literally thousands of different <strong>machine</strong>s, each requiring a different<br />
needle type. On most newer <strong>machine</strong>s, the needle type for that particular <strong>machine</strong> is identified on<br />
the <strong>machine</strong> head. However, each needle manufacturer identified its needles in a different way; the<br />
needles for the same type of system may have several different names or numbers, depending on<br />
the manufacturer.<br />
Directions:<br />
1. Begin with the power switch off. Hand wheel until the needle moves <strong>machine</strong>s; you will turn<br />
the counterclockwise - the direction operating.<br />
2. Use a screwdriver or Allen wrench to loosen the screw in the needle bar just enough to<br />
release the needle.<br />
Changing the needle<br />
3. Remove the needle from the needle bar. If the needle is broken, remove any broken parts<br />
that may have dropped into the <strong>machine</strong>. If part of the shank remains in the needle bar after<br />
the screw is loosened, tap the needle bar with the handle of the screwdriver. If it still does<br />
not Fall out, turn the <strong>machine</strong> on, raise the presser foot, and stitch slowly until the vibration<br />
causes the needle to drop out.<br />
Page | 102
4. Dispose of the needle safely.<br />
5. Note To make a safe container for disposing needles; punch a small hole in the top of a<br />
discarded film container.<br />
6. Check the new needle for straightness <strong>by</strong> rolling it on the <strong>machine</strong> table. If the needle is<br />
straight, the blade of the needle will remain parallel to the table surface when it is rolled.<br />
Check the needle point for burrs <strong>by</strong> running your fingertip over the point.<br />
7. To check the needle and thread compatibility, thread the needle with a short length of<br />
thread. Hold the thread taut at each end in vertical position. The needle should spin slowly<br />
dawn and around the thread. If It slides slowly down and around the thread. If it slides too<br />
quickly or does not slide at all, try a different size needle or select another thread.<br />
8. Use your thumbnail to locate the long groove on the needle. This will help you to set the<br />
needle correctly.<br />
9. Hold the new needle between your right thumb and forefinger at the base of the shank<br />
where the groove begins.<br />
10. Locate the last thread guide on the needle bar. On straight-stitch <strong>machine</strong>s, the guide is<br />
generally to the left of the needle. Insert the needle into the needle bar so that the groove is<br />
facing the side with the last thread guide (left) and the eye is in line with the arm of the<br />
<strong>machine</strong>. Check to be sure the needle is inserted into the needle bar as high as possible.<br />
11. Tighten the needle bar screw.<br />
12. Tighten the <strong>machine</strong> and stitch slowly. If the needle is positioned correctly, there will be no<br />
skipped stitches and no unexpected noises. If it is not set properly, remove the needle and<br />
reset it.<br />
Reasons to Change a Needle<br />
There are many reasons for changing the needle. Some of them are:<br />
1. The needle is damaged: bent, burred, or broken.<br />
2. The needle is dull and makes a popping sound when stitching<br />
3. The thread breaks frequently during stitching.<br />
4. The <strong>machine</strong> is skip stitching.<br />
5. A different thread size is required.<br />
6. A different fabric is sewn with a different weight, thickness and construction.<br />
Page | 103
2. PART OF THE MACHINE NEEDLS<br />
1. Butt: A small pyramid at the upper end of the shank. It is<br />
designed to make a single-point contact with the hole in the<br />
needle bar.<br />
2. Shank: The upper end of the needle that is held in the needle<br />
bar <strong>by</strong> the needle screw. The shank is usually round, but it can<br />
have one or two flat sizes. Designed to support and stabilize the<br />
needle blade, the diameter of the shank is usually larger than<br />
the diameter of the blade.<br />
3. Shoulder: The beginning of the shank just above the needle<br />
blade.<br />
4. Blade: The thin section of the needle that extends from the<br />
shank to the eye. It is easily bent and should be examined for<br />
straightness periodically.<br />
5. Scarf (needle scarf, clearance above the eye, clearance cut, or<br />
spot): A small indentation above the eye that permits the hook<br />
or looper to pick up the thread loop. On some needles, the scarf<br />
is elongated and/or deeper to ensure that the needle thread<br />
loop will be large enough to prevent skip stitching.<br />
6. Land: A small hump on the blade immediately above the eye.<br />
Used instead of a scarf, its purpose is to enable the needle<br />
thread to make a larger loop and form a stitch.<br />
7. Eye: An opening in the needle blade at the lower end of the<br />
long groove that carries the thread into the material to the<br />
hook or looper to make a stitch. The size of the eye is<br />
proportional to the diameter of the blade.<br />
8. Point: The tapered end. It is often considered the most<br />
critical aspect of the needle. The most common needles have a<br />
round point, a ballpoint, or a cutting point as shown on page 44.<br />
Generally round points and ballpoints’ are used for woven and<br />
knit fabrics because they can penetrate the fabric <strong>by</strong> spreading<br />
the fibers or deflecting the yarns without damaging them. By<br />
contrast, needles with cutting points are used for leather.<br />
9. Tip: The part of the needle that pierces the material.<br />
10. Needle groove (long groove): A g channel on the black it is located on the side on which the need<br />
dread enters the eye a provides a Protective guide for the thread when the needle is rising and the<br />
needle- thread loop is enlarging.<br />
Page | 104
11. Short groove: A short channel immediately above the needle eye. Located on the side opposite<br />
the long groove, it is a guide for the needle thread and protects it from abrading when passing<br />
through the material.<br />
Needle Selection<br />
Once the needle system type Is determined, the needle selection - its needle point and size -<br />
depends primarily on the characteristics of the fabric, but also on the thread, seam type,<br />
and stitch type.<br />
Needle point<br />
The needle point is determined <strong>by</strong> the fabric weight and its structure. Round points have a conical<br />
shape designed to spread the yarns without breaking them; they are used for most woven and many<br />
knitted materials.<br />
Ballpoint needles have a rounded point and range from light to heavy. They are generally used for<br />
knits and stretch fabrics and sometimes for button <strong>sewing</strong> because they center most misaligned<br />
buttons and do not cut existing stitches.<br />
Cutting points have sharp cutting edges; they are used on leather, suede, and neoprene.<br />
Needle Size<br />
The needle size can be as small as 60 (0-6mm) or as large as 250 (2.5 mm). The metric size describes<br />
the diameter of the needle blade in hundredths of a millimeter. The needle size is determined <strong>by</strong> the<br />
thread size.<br />
If the needle is too fine, it will abrade the thread bend, break, affect the loop formation, and cause<br />
skipped stitches. if it is too course, it will damage the fabric, produce an unattractive seam, cause the<br />
seam to pucker, affect the loop formation, and cause skipped stitches.<br />
Generally the best choice is the smallest size that will not skip stitches.<br />
Round point Ball point Leather point<br />
Page | 105
3. STANDARD NEEDLES<br />
The configuration of these needles is based on the particular fabric to be sewn.<br />
Universal needle<br />
Uses: Safest needle choice for most fabrics.<br />
Configuration: Has slightly rounded point<br />
and elongated scarf to enable almost<br />
foolproof meeting of needle and bobbin<br />
hook.<br />
Troubleshooting: When fabric is not<br />
medium-weight woven, consider needle<br />
specifically suited to fabric. For example, size<br />
18 universal needle works on heavy denim,<br />
but size 18 jeans needle works better.<br />
Ballpoint and stretch needles<br />
Uses: Ballpoint needle for heavier, looser<br />
sweater knits; stretch needle for highly elastic<br />
fabrics, like<br />
Spandex, or Lycra.<br />
Configuration: Both have rounded points that<br />
penetrate between fabric threads rather than<br />
pierce them. (Stretch-needle point is slightly<br />
less rounded than ballpoint.)<br />
Troubleshooting: Test-stitch knits with<br />
ballpoint, stretch, and universal needles to see<br />
which doesn't cut yarn and yields best results. If<br />
ballpoint skips stitches, try stretch needle.<br />
Page | 106
Microtex and sharp needles<br />
Uses: Sewing microfiber, silk, synthetic<br />
leather; precisely stitching edges; and<br />
heirloom <strong>sewing</strong>.<br />
Configuration: Has an acute point.<br />
Troubleshooting: Essentially trouble-free,<br />
but fabric may require a Teflon, roller, or<br />
even/dual-feed presser foot.<br />
Denim (jeans) needle<br />
Uses: For heavyweight denim, duck,<br />
canvas, upholstery fabrics, artificial<br />
leather, and vinyl.<br />
Configuration: Has deeper scarf, acute<br />
point, and modified shaft to sew without<br />
pushing fabric down into needle-plate<br />
hole. Goes through fabric and meets<br />
bobbin hook better on dense woven<br />
fabrics.<br />
Troubleshooting: If stitches skip when<br />
<strong>sewing</strong> very heavy fabrics, try larger needle and<br />
sew more slowly or walk needle through fabric<br />
(<strong>by</strong> turning hand crank).<br />
Leather needle<br />
Uses: Excellent for <strong>sewing</strong> natural<br />
leather.<br />
Configuration: Has slight cutting point<br />
(almost like an arrowhead).<br />
Troubleshooting: On synthetic leather,<br />
unless it's very heavy synthetic, cuts<br />
rather than pierces stitch hole and can<br />
tear leather. Most synthetic leathers<br />
require Microtex or sharp needle.<br />
Handicap/self-threading needle<br />
Uses: Enables easier threading for sewers<br />
with vision problems.<br />
Configuration: Universal needle with slipin<br />
threading slot at the eye.<br />
Troubleshooting: Always pull sewn piece<br />
back away from needle before cutting<br />
thread so needle doesn't unthread.<br />
Needle works well on woven fabrics, but<br />
may occasionally snag knits, so test-sew<br />
to check for fabric and needle<br />
compatibility.<br />
Decorative needles<br />
The configuration is designed to wed thread to fabric for surface embellishment.<br />
Page | 107
Topstitching needle<br />
Uses: Topstitching.<br />
Configuration: Has extra-acute point,<br />
extra-large eye, and large groove for heavy<br />
thread.<br />
Troubleshooting: Use smallest size needle<br />
that accommodates your thread to avoid<br />
punching large holes in fabric.<br />
Metallic needle<br />
Uses: Sewing with decorative metallic<br />
threads.<br />
Configuration: Has universal or standard<br />
point; large, elongated eye; and large<br />
groove to allow fragile metallic and<br />
synthetic filament threads to flow<br />
smoothly.<br />
Troubleshooting: Metallic threads are very<br />
sensitive to problems in <strong>machine</strong>: Tiniest<br />
burr on thread path or needle can cause<br />
problems.<br />
Embroidery needle<br />
Uses: Machine embroidering or<br />
embellishing with decorative thread.<br />
Configuration: Has light point (neither<br />
sharp nor ballpoint) and enlarged eye to<br />
keep decorative threads from shredding or<br />
breaking, and prevent skipped stitches.<br />
Troubleshooting: If thread still shreds on<br />
dense or heavily stitched design, use larger<br />
size needle or Metallica needle.<br />
Quilting needle<br />
Uses: Piecing, quilting, and stippling.<br />
Configuration: Has special tapered shaft to<br />
prevent damaging fabrics when stitching<br />
multiple layers.<br />
Troubleshooting: Move fabric smoothly<br />
without pulling on needle when freemotion<br />
stitching to prevent breaking<br />
needle.<br />
Special-purpose needles<br />
These needles are used only with front-to-back threading <strong>machine</strong>s with zigzag features. Make sure<br />
your throat-plate needle hole is wide enough to accommodate needle's width, and zigzag width<br />
function is set at zero to prevent sideways movement.<br />
Page | 108
Hemstitch (wing) needle<br />
Uses: Hemstitching or heirloom<br />
embroidery on linen and batiste.<br />
Configuration: Has fins on sides of shank<br />
to create holes as you sew.<br />
Troubleshooting: Stitch is more effective<br />
when needle returns to same needle<br />
hole more than once. If needle pushes<br />
fabric into needle hole, put stabilizer<br />
under fabric.<br />
Triple needle<br />
Uses: Same uses as for double needle.<br />
Configuration: Cross bar on single shaft<br />
connects three needles to sew three<br />
stitching rows. Comes with universal<br />
point in 2.5mm and 3mm widths.<br />
Troubleshooting: Same as for double<br />
needle.<br />
Twin (double) needle<br />
Uses: Topstitching, pin tucking, and<br />
decorative stitching.<br />
Configuration: Two needles on single shaft<br />
produce two rows of stitches.<br />
Measurement between needles ranges<br />
from 1.6mm to 6mm, and needles come<br />
with universal, stretch, embroidery,<br />
denim, and Metallica points.<br />
Troubleshooting: Be sure throat plate<br />
allows for distance between needles.<br />
Spring needle<br />
Uses: Free-motion stitching with dropped<br />
feed dogs.<br />
Configuration: Has wire spring above point<br />
to prevent fabrics from riding up onto<br />
needle, eliminating need for presser foot.<br />
Troubleshooting: Before using, practice<br />
free-motion stitching with heavy regular<br />
needle, paper, and dropped feed dogs.<br />
Don't pull paper/fabric; instead gently<br />
guide it through stitching. Wear safety<br />
glasses for free-motion work, since needles often<br />
break.<br />
Page | 109
4. TYPE OF NEEDLE AND THEIR USE<br />
s.no Types of Sewing Machines<br />
Needle<br />
System<br />
1 Single Needle Lock Stitch Machines<br />
Single Needle Lock Stitch Machine witch Automatic Thread<br />
DA X 1or DB X 1<br />
2 Trimmer<br />
Single Needle Lock Stitch Machine witch Fabric Edge<br />
DA X 1or DB X 1<br />
3 Trimmer DA X 1or DB X 1<br />
4 Double Needle Lock Stitch Machine DP X 5<br />
5 Single Needle Lock Stitch Zigzag Machine DB X 1<br />
DC X 1 or DC X<br />
6 THREE Thread Over Lock Machine<br />
27<br />
DC X 1 or DC X<br />
7 FIVE thread Over Lock With Safety Stitch Machine<br />
27<br />
8 Button Hole Machine DP X 5<br />
9 Chain Stitch Button Stitch Machine TQ X 1 or TV X 7<br />
10 Lock Stitch Button Stitch Machine TQ X 1 or TV X 7<br />
11 Inter Lock/Flat Lock Machine UY X 1 or GAS<br />
12 Feed Of The Arm Machine For Denim TV X 1 or TV X 7<br />
13 One &Two Needle Chain Stitch Machine TV X 1 or TV X 7<br />
14 Blind Stitch Machine LW X 6T<br />
Page | 110
5. NEEDLE SIZE AND RELEVANCE OF TYPE OF THE MATERIAL TO BE STICHED<br />
S.No Needle Size Type Of Material<br />
1 #9 to #11 Light Weight Materials Like silk synthetic, knitwear<br />
2 #14 to #16 Medium Weight Materials Like Textile, natural fabrics etc..<br />
3 #18 to #20 Heavy weight materials like denim etc..<br />
4 #22& onwards Extra Heavy weight materials like leather etc..<br />
Classification of needle according to point<br />
1. Normal round point needle<br />
They are used for woven materials etc example; DB X 1<br />
2. Light ball point needles<br />
They are used for thin material, silk etc., & button hole <strong>sewing</strong>. Example: DP x Si<br />
3. Medium ball point needles<br />
They are used for hosiery material etc., Example: IJY 128 GAS<br />
4. Heavy ball point needles<br />
They are used for <strong>sewing</strong> heavy weight materials like rubber etc.<br />
5. Stub point needles<br />
They are used for <strong>sewing</strong> buttons.<br />
Feed dog Variations<br />
Very light weight materials<br />
Fine toothed feed dogs with a pitch of only 1.0 to 125 mm to be used to avoid feed<br />
damage (pitch = distance between two points in feed dog.)<br />
Light to medium weight material<br />
Tooth pitch of 1.3 to 11.6 mm and the peaks of the teeth slightly rounded off to avoid<br />
damage on fine material<br />
Heavy weight material<br />
To keep the both plies together while <strong>sewing</strong> coarser feed dog of 2.5mm tooth pitch is<br />
needed<br />
Page | 111
Delicate fabric<br />
Even after rounding of teeth tip damage may be caused to rubber coated feed dog with no<br />
sharp teeth at all may be used<br />
STANDARD ADJUSTMENTS:<br />
I) Lock stitch <strong>machine</strong>s<br />
A) Single Needle Lock Stitch<br />
1. Needle bar height<br />
2. hook timing and clearance<br />
3. Feed dog height and centering<br />
4. Feed timing.<br />
B) Double Needle Lock Stitch Machine<br />
1. Difference between split needle bar and non-split needle bar.<br />
2. Needle bar height<br />
3. Hook timing and clearance<br />
Page | 112
CHAPTER - VIII<br />
SEWING THREAD AND SELECTION CRITERIA<br />
Page | 113
Sewing thread is usually less than 1/1000th of the weight of apparel, but it carries more one<br />
half the responsibilities for its performance<br />
THREAD SELECTION<br />
FACTORES IN THREAD SELECTION<br />
Garment design, type, quality, end use, and life expectancy<br />
Desired strength and durability<br />
Fabric weight and type<br />
Stitch and seam type, number of stitches/inch, <strong>machine</strong> speed, and needle size<br />
Cost<br />
Thread Properties<br />
Threads are used to form the stitches that hold the fabric parts Together. They can be<br />
described <strong>by</strong> fiber type, constriction, and size<br />
Fiber Type<br />
Threads can be made from a single fiber type such as cotton, linen, silk, rayon, nylon,<br />
polyester, or rubber or from a combination of fibers such as cotton/polyester.<br />
Natural fiber threads<br />
The most common natural fiber used for threads, cotton threads, have excellent sewabllity<br />
with little kinking or skip stitching. They are rarely affected <strong>by</strong> hot needles - a common element of<br />
high-speed <strong>sewing</strong> <strong>machine</strong>s-and even sew well on poorly adjusted <strong>machine</strong>s.<br />
Cotton threads dye well, and since they mold to the fabric better than other fibers, they are<br />
particularly attractive for topstitched elements. Compared to synthetic threads, their strength and<br />
resistance to abrasion is inferior, and they shrink and mildew when wet.<br />
Cotton threads are produced with three finishes: soft, glace’ and mercerized.<br />
Soft finish threads receive no additional processing except bleaching and dyeing. Used on<br />
inexpensive garments, they are relatively inexpensive with good sewabllity but because they have a<br />
high shrinkage, seam pucker] fl g is frequently a problem after washing.<br />
Page | 114
Glace’ threads are treated with wax and special chemicals for a hard, glossy finish. They are stronger,<br />
more resistant to abrasion, and stiffer than other cotton threads. They are available in a limited<br />
color selection and used for gathering and for <strong>sewing</strong> heavy materials, leather, vinyl, and canvas.<br />
Mercerized threads are treated with a caustic solution to create a smooth, strong, lustrous<br />
thread. They are frequently used on cotton garments that will be dyed.<br />
Linen and silk threads are rarely used in production because of their high cost.<br />
Synthetic threads<br />
The most common synthetic threads, polyester and nylon, were developed to perform well<br />
on synthetic fabrics and withstand the chemicals and heat of durable press treatments. Compared to<br />
cotton threads of the same size, they are stronger, more resistant to abrasion, mildew and<br />
ultraviolet radiation, and have less shrinkage.<br />
Combination fibers<br />
One of the most common threads in use today is a combination of cotton and polyester, which<br />
combines the sew ability of cotton with polyester’s strength and resistance to abrasion.<br />
Thread construction<br />
Although there are a variety of thread constructions, most threads used in garments are twisted,<br />
core spun, monofilament, or textured.<br />
Twisted threads<br />
All natural fibers, with the exception of silk, begin with fibers - short lengths of staple, which<br />
are twisted together to make a single-ply thread. Then two or more plies are twisted together in the<br />
reverse direction to make a <strong>sewing</strong> thread with a balanced. Twist Without this balance, the thread<br />
could not be controlled.<br />
Twist Direct<br />
Z - Twist S - Twist<br />
Most threads are finished with a “Z” or left twist because the action of the lockstitch <strong>machine</strong> would<br />
cause threads with an “8” twist to unwind<br />
Page | 115
One exception is the double-needle lockstitch, which has two bobbins one revolving to the left and<br />
one to the right. This type of <strong>machine</strong> requires threads with both twists.<br />
In addition to the natural fibers, polyester, silk, and nylon filaments cut or broken Into staple lengths.<br />
Spun polyester thread is one of the most common.<br />
Core spun<br />
Core spun threads begin with a continuous filament of polyester, which is then wrapped with a<br />
cotton or polyester sheath to make a single-ply thread.<br />
Then the two to four plies are twisted together to make the <strong>sewing</strong> thread<br />
Cotton/poly threads have the advantage of better sew ability, while poly/poly<br />
Threads can be dyed in a one-step process.<br />
Monofilament Threads<br />
Monofilament is simply a single filament of nylon of polyester. It is stiff,<br />
wiry, and unravels easily. It is uncomfortable next to the skin and harsh on<br />
<strong>machine</strong>s. Available only in clear, light and dark gray, monofilament Threads are translucent and<br />
reflect the fabric’s color. Monofilament threads are used primarily for blind hemming and surging<br />
inexpensive garments and Household textiles.<br />
Textured Threads<br />
Made of multifilament that have been crimp textured or bulked <strong>by</strong> twisting, crimping, and<br />
untwisting, textured threads have a soft Land, good coverage, and elasticity. The most common use<br />
of textured threads is in the loopers of over edge and cover stitch <strong>machine</strong>s; however, very fine sizes<br />
can be used as needle threads on chain stitch and over edge <strong>machine</strong>s. They can also be used as<br />
bobbin threads to add moderate stretch to a lock stitched seam.<br />
Thread Size<br />
The thread size is dependent on many factors - such as the fabric weight and type, stitch and seam<br />
type, <strong>machine</strong> speed, needle size, end use,<br />
and seam strength.<br />
Most threads are sized using the Tex system or the cotton count system. The Tex system, which is<br />
generally used in manufacturing, is a direct system, arid the number increases with the thread size.<br />
The cotton system; and the number decrease with the thread size. Generally it is easier to<br />
comparing the Tex numbers when comparing threads with different constructions F example, a core<br />
spun thread ha size 100 is equivalent to spun polyester thread in size 70 (T-27); and it is larger than<br />
spun polyester in size 100 (T-21) and textured polyester in size 150 (T.-18).<br />
If your retailer does not stock threads with a Tex number designation, you can substitute other<br />
good quality threads. Long staple polyester, cotton- wrapped polyester, and mercerized cotton<br />
threads are suitable for general <strong>sewing</strong> on most fabrics. For very lightweight fabrics, use fine cotton<br />
embroidery thread (60/2) or fine cotton-wrapped polyester. For heavier fabrics, use topstitching<br />
thread or buttonhole twist.<br />
The Needle Size Chart from American & Efird, Inc. provides a useful guide for selecting compatible<br />
needles and threads. However, it Is important to remember that this is the minimum recommended<br />
needle size and that a larger needle may be required for the fabric or application.<br />
Page | 116
CHAPTER - IX<br />
TYPES OF STITCHES & SEAM<br />
Page | 117
1. STITCH CLASSIFICATIONS<br />
How a stitch is formed<br />
The formation of a stitch begins when the needle penetrates the fabric and descends to its<br />
lowest point.<br />
The bobbin hook then slides <strong>by</strong> the needle's scarf, catching the upper thread, and carries it<br />
around the bobbin and bobbin thread.<br />
The thread is then pulled up into the fabric, completing the stitch.<br />
Each category of <strong>sewing</strong> <strong>machine</strong> produces a specific type of stitch formation depending on the<br />
number of needles, looper, and threads which combine to construct the stitch. Each of these<br />
configurations is known as a stitch type and they are classified according to their main<br />
characterization.<br />
Page | 118
A. STITCH CLASSIFICATIONS<br />
Class 100 - Chain stitch<br />
One of the simplest stitch types, the chain stitch has one or more needle threads and is formed<br />
<strong>by</strong> Intra looping. This stitch is very Insecure and unravels easily if a stitch is broken or skipped or if<br />
the last loop is not fastened securely. This stitch is used for <strong>sewing</strong> buttons and buttonholes,<br />
hemming, basting and pad stitching.<br />
Class 200 - Rand Stitch<br />
Generally formed <strong>by</strong> hand, the hand stitch is made with a needle that is passed from one side of<br />
the material to the other as a single line of thread. The most important <strong>machine</strong> to duplicate this<br />
stitch is a pick stitching <strong>machine</strong>, which is used as a decorative detail on the other edges of jackets.<br />
Class 300 - Lockstitch<br />
The most common stitch type, the lockstitch has two or more groups of threads that interlace to<br />
form the stitch. One group is called the needle threads and the other the bobbin threads. These<br />
stitches do not unravel easily and always require a bobbin. Very versatile, they are used for seaming,<br />
hemming, and setting zippers and pockets.<br />
Class 400 - Multi Thread Chain stitch<br />
Sometimes called a double-locked stitch, the multithread chain stitch has two or more groups of<br />
threads that interlace and interloop with each other. One group is called the needle threads and the<br />
other the looper threads. This stitch is actually stronger than the lockstitch; however, if the threads<br />
are not properly secured on the finishing end, it will unravel. It is used for seaming and in<br />
combination with the over edge stitch on over lock <strong>machine</strong>s. When used for seaming, the needle<br />
thread determines the seam strength and the looper threads can be finer.<br />
Class 500 - Over edge Stitch<br />
The over edge stitch is formed with one or more groups of threads that interloop to form a<br />
thread sheath around the fabric edge. The most common stitches have one or two needle threads<br />
and one or two looper threads.<br />
Overedge stitches are v elastic and do not in unravel easily. They are for neatening edges<br />
trimming woven and low stretch knitted fabrics and decorative edgings. All of the stitches can be<br />
used for neatening; however, one and two-thread overedge stitches cannot be used for seaming<br />
because the stitch opens up when stressed transversely. And, since the stitches produce a closed<br />
seam that cannot be pressed open, it is not always acceptable on better garments. When used for<br />
seaming, the needle thread determines the seam strength.<br />
This stitch is frequently combined with a multithread. Chain stitch (401) to seam and finish the<br />
edges.<br />
Class 600 – Cover stitch<br />
The most complex stitch class, the cover stitch is generally formed with three or more<br />
groups of threads that cover the raw edges of both surfaces. Very elastic, It is used to create low -<br />
bulk and decorative seams on underwear and knitted casual garments. Threads should be strong<br />
with a soft hand.<br />
Page | 119
Chain stitch (class100) Hand stitch (class 200)<br />
Bobbin Thread Bobbin Thread<br />
Needle Thread Needle Thread<br />
Lock stitch (Class 300) Multi-thread Chain stitch (Class 400)<br />
Bobbin Thread Looper Thread<br />
Needle Thread Needle Thread<br />
Over edge Stitch (Class 500) Cover Stitch (Class 600)<br />
Lower Looper Thread Lower Looper Thread<br />
Upper Looper Thread Needle Thread<br />
Page | 120
2. SEAM TYPES AND CLASSIFICATIONS<br />
Seams are basic element of construction formed when two or more pieces of material are sewn<br />
together, they are used for joining garment sections In the production of sewn products.<br />
The success of every garment depends on the accuracy and skill with which the seams join the<br />
Individual components of the garment<br />
Factors in the selection of Seam Type and Application<br />
1. Garment design, type, quality, end use, and care.<br />
2. Fabric type, bulk, texture, weight transparency, and tendency to fray.<br />
3. Desired strength and durability.<br />
4. Difficulty of construction and skill of the operators.<br />
5. Equipment available.<br />
6. Cost of labor and materials.<br />
7. Retail price.<br />
8. Designer or manufacturer preference.<br />
9. Current fashion trends.<br />
Page | 121
SEAM CLASSIFICATION<br />
As per the British standard 3870, Part 1 - 1991 seams may classified Into eight types.<br />
Class 1 Super imposed Seam<br />
French Seam<br />
Piped Beam<br />
Class 2 Lapped Seam<br />
Lap felled Seam<br />
Welted Seam<br />
Class 3 Bound Seam<br />
Class 4 Flat Seam<br />
Class 5 Decorative Seam<br />
Class 6 Edge neatening<br />
Class 7 Addition of other Seams<br />
Class 8 Belt loops<br />
General Guide for Seam Allowances<br />
Generally the following seam allowances are used in apparel construction, but it must be<br />
remembered that this is only a guide and will not be appropriate for every design and fabric.<br />
1/8” to 3/8” Enclosed seams at edges that have separate facings, mach as necklines, collars,<br />
cuffs, and armholes, and on intricate curves. The narrowest (1/8”) seam allowances can be<br />
used on lightweight fabrics that do not fray, while the widest (3/8”) are used as loosely<br />
woven S fabrics and fabrics that ravel easily.<br />
3/8” to 1/2” Sleeves, yokes, waistlines, gores, style lines within the silhouette, center lines,<br />
top-stitched seams, cut-out darts, cuff/sleeve seams, band/skirt seams, inseams, and side<br />
seams on budget and moderately priced garments.<br />
3/4” to 1”: Vertical seams on better garments, zipper plackets, and darts.<br />
Page | 122
3. SEAMS & STITCHES OF MEN`S SHIRT<br />
Counterstich sleeve<br />
Attach sleeve<br />
Sew front fly to left front<br />
Sew button on front<br />
Sew pocket<br />
Sew buttonhole on front<br />
Sew button to top of front & cuff<br />
Sew side & under sleeve<br />
Sew buttonhole to top of front & cuff<br />
Sew yoke to back<br />
Runstitch cuff<br />
Page | 123
4. SEAMS & STITCHES OF MENS`S TROUSER<br />
Attach zipper to left fly<br />
Make belt loop<br />
Sew button to fly & hip pocket<br />
Serge front & back<br />
Sew eyelet buttonhole<br />
Bartack eyelet buttonhole end<br />
Sew belt loop to waist band<br />
Sew belt loop bottom<br />
Sew hip pocket welt to back<br />
Sew side<br />
Page | 124
5. SEAMS & STITCHES OF DENIM TROUSER<br />
Hem ticket pocket<br />
Sew eyelet buttonhole<br />
Topstitch waist band corner<br />
Sew waist band<br />
Serge side pocket facing<br />
Topstitch left front fly<br />
Sew inseam<br />
Hem bottom<br />
Sew side<br />
Bartack front fly<br />
Sew belt loop<br />
Make belt loop<br />
Sew leather label to waist band<br />
Decorative stitch to hip pocket<br />
Sew hip pocket to back<br />
Page | 125
6. SEAMS & STITCHES OF POLO T - SHIRT<br />
Sew buttonhole to front fly<br />
Sew button to front fly<br />
Serge pocket mouth<br />
Attach sleeve mouth rib to sleeve<br />
Sew under sleeve<br />
Sew side & under sleeve<br />
Sew pocket<br />
Sew sleeve<br />
Hem bottom<br />
Make slit<br />
Page | 126
7. SEAMS & STITCHES OF ROUND NECK T – SHIRT<br />
Join neck rib & attach neck<br />
rib to body<br />
Attach sleeve<br />
Hem sleeve<br />
Hem bottom<br />
Page | 127
CHAPTER - X<br />
DIFFERENT TYPES OF SEWING DEFECTS & REMIDIES<br />
Page | 128
1. DOUBLE NEEDLE LOCK STICH MACHINE<br />
S.No Sewing Defects Causes Remedies<br />
1 Thread Breakage<br />
2 Skip Stitching<br />
3 Loose stitch<br />
4<br />
Thread escapes<br />
from the needle eye<br />
after thread<br />
trimming<br />
Burns on the thread path,<br />
needle point and hook tip<br />
Needle thread tension is two<br />
high<br />
Bobbin case opening lever<br />
provides an excessive clearance<br />
at the bobbin case<br />
Hook set is not lubricated<br />
properly<br />
Remove burns <strong>by</strong> using a<br />
emery sheet ( fine)<br />
Adjust the needle thread<br />
tension<br />
Correct the clearance between<br />
bobbin case opening lever and<br />
bobbin case edge.<br />
Increase the oil circulation level<br />
Thread untwists Threading should be properly.<br />
Clearance between the needle<br />
and hook tip is more<br />
Presser foot pressure is not<br />
enough<br />
Correct hook timing and<br />
clearance<br />
Check the presser foot<br />
regulator level<br />
Synthetic thread or thin thread Wind the thread on the needle<br />
Bobbin thread does not pass<br />
through the forked end of<br />
tension spring on the bobbin<br />
case<br />
Thread the bobbin case<br />
correctly<br />
Bobbin does not spin smoothly Replace the bobbin<br />
Bobbin thread tension is too low Adjust the bobbin thread<br />
tension<br />
Bobbin is wound too tightly Adjust the tension device in<br />
bobbin winder assembly.<br />
Thread tension given <strong>by</strong> the<br />
tension post no. I is eye after<br />
thread too high<br />
Loosen tension post no.1<br />
slightly.<br />
Page | 129
2. BUTTON HOLING SEWING MACHINE<br />
S.No Sewing Defects Causes Remedies<br />
1 Needle thread is broken<br />
2 Thread slips out<br />
3<br />
Wobbling stitches are<br />
formed in the over edging<br />
seams<br />
4 Stitches float over cloth<br />
5 Skip stitching<br />
6<br />
The needle Thread at the<br />
first bar tacking comes out<br />
and lumps on the bottom<br />
of cloth<br />
The tension of the tension<br />
post No.2 is two tight<br />
The tension or stroke of the<br />
take up spring is more<br />
Blade point of <strong>sewing</strong> hook<br />
has burr or scratches<br />
Proper timing of the <strong>sewing</strong><br />
hook<br />
Decrease the tension of the<br />
tension post<br />
Decrease the tension of the<br />
take up spring<br />
Smoothen <strong>by</strong> the sand<br />
paper.<br />
Readjust the hook timing.<br />
Improper threading Cheek Threading<br />
Needle Thread Move back the needle<br />
thread trimmer driving plate<br />
B<br />
The whip stitch is not formed<br />
at the start of <strong>sewing</strong><br />
A the tension disc no.2, is too<br />
lose<br />
Bobbin thread tension is too<br />
high<br />
Bobbin thread tension is not<br />
enough<br />
Bobbin thread slips out of<br />
the thread path on the<br />
bobbin case<br />
The work clamp check is too<br />
large for button hole<br />
The cloth is made light<br />
weight materials<br />
Decrease the tension of the<br />
tension post No.1<br />
Increase the tension.<br />
Decrease the bobbin thread<br />
tension<br />
Readjust the tension<br />
Properly thread the bobbin<br />
case<br />
Change the work clamp<br />
check with a smaller one<br />
Delay the timing of the<br />
needle and <strong>sewing</strong> hook<br />
The tension no.1 is too loose Readjust the tension<br />
The bobbin thread tension is<br />
too high<br />
Decrease the bobbin thread<br />
tension<br />
Page | 130
3. BUTTON STITCH MACHINE<br />
S.No Sewing Defects Causes Remedies<br />
1 Thread breakage<br />
2 Button are not sewn tightly<br />
4<br />
3<br />
The first stitch trails<br />
reactively long thread from<br />
the right side of the button<br />
Thread trimming failure in<br />
the state of stop-motion<br />
The yoke slide does not move<br />
in the correct way<br />
The thread tension post no.2,<br />
fails to release the thread at<br />
correct timing<br />
The thread nipper catches the<br />
thread<br />
The needle does not enter the<br />
centre of the holes in the<br />
button<br />
The yoke slide does not move<br />
in the correct way<br />
The thread tension post no.2,<br />
fails to release the thread at<br />
correct timing<br />
The work pressing force is too<br />
height or too low<br />
The needle does not enter the<br />
centre of the holes in the<br />
button<br />
The thread pull off lever does<br />
not work properly<br />
The thread tension post Make<br />
the thread timing no.2 fails to<br />
release the thread at correct<br />
timing<br />
The needle hits the edge of<br />
the holes in the button<br />
The button clamp assembly<br />
does not rise to the necessary<br />
height<br />
The thread nipper fails to<br />
press the thread<br />
Adjust the timing of the<br />
motion of the yoke slide at<br />
each end.<br />
Make the thread release<br />
slightly easier<br />
Adjust the position of the<br />
nipper bar block<br />
Adjust the button clamp jaw<br />
lever holder.<br />
Adjust the timing of the<br />
motion of the yoke slide at<br />
each end<br />
Make the thread release<br />
slightly later<br />
Adjust the work pressing<br />
force properly<br />
Adjust the button clamp jaw<br />
lever holder<br />
Adjust the thread pull off<br />
lever <strong>by</strong> the nipper bar block<br />
Make the thread timing<br />
slightly later to give more<br />
tension to the stitches.<br />
Adjust the button clamp jaw<br />
lever holder<br />
Provide a 12mm clearance<br />
between the feed plate and<br />
button clamp jaw lever<br />
when raised<br />
Adjust the nipper bar block<br />
Page | 131
4. OVER LOCK MACHINE<br />
S.No Sewing Defects Causes Remedies<br />
Needle type is wrong Use a specified needle<br />
1 Needle breaking<br />
2 Cloth is not cut<br />
3 Skip stitch<br />
4 Thread Breakage<br />
5 Puckering<br />
Needle size is not correct Use a needle size suitable to the<br />
thread gauge and type of fabrics<br />
Needle is not installed Install the needle correctly<br />
Needle is bent Use good needle<br />
Needle to needle guard relation<br />
is bad<br />
Correct the relation<br />
Needle to looper relation is bad Correct the looper timing<br />
Position of the upper and lower<br />
knife is inadequate<br />
Adjust the knife position<br />
Knife blade has worn out Sharpen the lower knife or renew<br />
the upper knife<br />
Needle to looper relation is<br />
wrong<br />
Needle is thread with 's' twist<br />
thread<br />
Correct the needle-to-looper<br />
relation<br />
Use a ‘Z’ twist thread<br />
Thread tension is wrong Adjust the thread tension<br />
Quality of the thread is poor Use the thread of good quality<br />
Thread is too thick for needle<br />
size<br />
Needle is installed in wrong<br />
way<br />
Select a suitable needle or thread<br />
Threading properly<br />
Thread tension is too high Adjust the thread tension nut<br />
Feed dog comes up too much<br />
from the throat plate<br />
Differential feed mechanism is<br />
not set Correctly<br />
Pressure applied <strong>by</strong> the<br />
pressure foot is too high or too<br />
low<br />
Correct the feed dog height<br />
Correct the differential feed<br />
mechanism<br />
Correct the presser foot pressure<br />
Page | 132
CHAPTER - XI<br />
GARMENT MANUFACTURING<br />
PARTS AND ASSEMBLY PREPARATION OF A SHIRT<br />
Page | 133
1. Straight Long Seams with minimal bursts<br />
Machine: SNLS<br />
Exercise: Straight Long Seams with minimal bursts<br />
Starting Position:<br />
The apprentice should sit facing the Sewing Machine with both<br />
feet on the pedal and the right knee against the knee lift. Place<br />
Fabric close to the Operator.<br />
Methodology:<br />
Security<br />
The timekeeper starts the chronometer.<br />
Pick Up the 20”x5” plaid plies, align them and place<br />
them under needle. Take reference to any straight<br />
line on the plaid fabric.<br />
Start <strong>sewing</strong> <strong>by</strong> following the reference point and<br />
sew off at the end.<br />
Turn the fabric <strong>by</strong> 180 degrees and position it under<br />
the needle taking a new reference point.<br />
Continue the process 4 as many time as possible<br />
using the same fabric.<br />
First try to sew straight with any number of bursts<br />
applicable to you and once you achieve this<br />
objective try to reduce the number of bursts.<br />
At the end of this exercise you should be able to sew<br />
a long straight seam in a 1 or 2 bursts.<br />
The apprentice must be careful not to prick himself with the<br />
needle.<br />
Use Safety glasses.<br />
Avoid using loose clothing and/or long and loose hair.<br />
Quality<br />
Lines sewed must be straight.<br />
Goal:14Seconds Exercise Number<br />
Illustration:<br />
Fabric<br />
Page | 134
Ergonomics<br />
Chair and Machine at a comfortable height.<br />
Back Rest Facing Forward.<br />
Waste<br />
Try to use the fabric given to you optimally <strong>by</strong> <strong>sewing</strong> as many<br />
lines as possible. Keep the length of end threads low.<br />
Abilities Developed<br />
Ability to sew long seams straight<br />
Ability to sew long seams in min. no. of bursts.<br />
Necessary Materials<br />
SNLS<br />
2 Thread Cones.<br />
2 Bobbins<br />
20”x5” Fabric plies & Thread trimmer<br />
Page | 135
2. Attaching one piece to other using folder<br />
Machine: SNLS<br />
Exercise: Attaching One Piece to Other using Folder<br />
Starting Position:<br />
The apprentice should sit facing the Sewing Machine with both<br />
feet on the pedal and the right knee against the knee lift. Place<br />
Fabric close to the Operator.<br />
Methodology:<br />
Security<br />
The timekeeper starts the chronometer.<br />
Pick Up the body from the left side on the table and<br />
place under the needle.<br />
Pick the facing from lap align and place it on the<br />
body under the needle as shown in fig.<br />
Start <strong>sewing</strong> straight <strong>by</strong> holding and feeding the<br />
placket facing with right hand and body with left<br />
hand.<br />
While feeding ensures that the placket facing is fed<br />
normally while body is fed a bit tighter in proportion<br />
to placket facing.<br />
Sew off at the other end and dispose it in chain until<br />
the bundle or lot is completed.<br />
The apprentice must be careful not to prick himself with the<br />
needle.<br />
Use Safety glasses.<br />
Avoid using loose clothing and/or long and loose hair.<br />
Quality<br />
Checks matching along the placket should be consistent.<br />
Puckering must be avoided while placket attaching.<br />
Goal:<br />
Illustration:<br />
Fabric 20” X 5”<br />
Exercise Number<br />
22” X 2” (Placket Piece)<br />
Page | 136
Ergonomics<br />
Chair and Machine at a comfortable height.<br />
Back Rest Facing Forward.<br />
Waste<br />
If possible use the other edge of the fabric for placket facing<br />
attaching.<br />
Abilities Developed<br />
Ability to match checks while <strong>sewing</strong>.<br />
Ability to feed two plies at different rates while <strong>sewing</strong>.<br />
Necessary materials<br />
DNLS<br />
2 Thread Cones.<br />
3 Bobbins<br />
20”x5” & 22” x 2” Fabric plies & Thread trimmer<br />
Page | 137
3. Placket facing attach using folder<br />
Machine: DNLS<br />
Exercise: Placket Facing Attach Using Folder<br />
Starting Position:<br />
The apprentice should sit facing the Sewing Machine with both<br />
feet on the pedal and the right knee against the knee lift. Place<br />
Fabric close to the Operator.<br />
Methodology:<br />
Security<br />
The timekeeper starts the chronometer.<br />
Pick Up the body from the left side on the table and<br />
place under the needle.<br />
Pick the facing from lap and pass it through the<br />
folder. When placket facing reaches the other end of<br />
folder aligns it to the body, match the checks and<br />
position it under the needle.<br />
Start <strong>sewing</strong> straight <strong>by</strong> holding and feeding the<br />
placket facing with right hand and body with left<br />
hand.<br />
Sew off at the other end and dispose it in chain until<br />
the bundle or lot is completed.<br />
The apprentice must be careful not to prick himself with the<br />
needle.<br />
Use Safety glasses.<br />
Avoid using loose clothing and/or long and loose hair.<br />
Quality<br />
Checks matching along the placket should be consistent.<br />
Puckering must be avoided while placket attaching.<br />
Ergonomics<br />
Chair and Machine at a comfortable height.<br />
Back Rest Facing Forward.<br />
Waste<br />
If possible use the other edge of the fabric for placket facing<br />
attaching.<br />
Goal:<br />
Illustration:<br />
Fabric Ready Front Cuts<br />
22” X 2” For Placket<br />
Exercise Number<br />
Page | 138
Abilities Developed<br />
Ability to match checks while <strong>sewing</strong>.<br />
Ability to feed two plies at different rates while <strong>sewing</strong>.<br />
Ability to work with folder for attaching placket<br />
Necessary Materials<br />
DNLS<br />
2 Thread Cones.<br />
3 Bobbins<br />
20”x5” Fabric plies & Thread trimmer<br />
Folder<br />
Page | 139
4. Hemming <strong>operations</strong> using folder<br />
Machine: SNLS<br />
Exercise: Hemming Operations Using Folder<br />
Starting Position:<br />
The apprentice should sit facing the Sewing Machine<br />
with both feet on the pedal and the right knee against<br />
the knee lift. Place Fabric close to the Operator.<br />
Methodology:<br />
STEP 1.<br />
Security<br />
The timekeeper starts the chronometer.<br />
Pick Up the ply from left ext, fold it to 1”at one<br />
edge as shown in fig. and place it under the<br />
needle.<br />
Start <strong>sewing</strong> straight <strong>by</strong> folding the width with<br />
right hand and feeding the fabric forward with<br />
left hand.<br />
Sew off at the other end and dispose it in<br />
chain until the bundle or lot is completed.<br />
STEP 2.<br />
Move the above chain-disposed bundle to<br />
left side of you. Take the first piece in the<br />
bundle and feed it to the folder attached.<br />
Start Stitching straight <strong>by</strong> holding the fabric<br />
with right hand and feeding it into the folder.<br />
Sew off at the edge and dispose in chain.<br />
The apprentice must be careful not to prick himself with<br />
the needle.<br />
Use Safety glasses.<br />
Avoid using loose clothing and/or long and loose hair.<br />
Quality<br />
Maintain a margin of 1” throughout the seam. Avoid<br />
down stitches along the seam. If the fabric is plaid,<br />
checks to be matched where ever necessary.<br />
Ergonomics<br />
Chair and Machine at a comfortable height.<br />
Back Rest Facing Forward.<br />
Goal:18 Seconds Exercise Number<br />
Illustration:<br />
Fabric<br />
Step 1: One Edge Without Using Folder<br />
Step 2: Other Edge Using<br />
Folder<br />
Page | 140
Waste<br />
Use the fabric further for PLK01 Exercise.<br />
Abilities Developed<br />
Ability to do all hemming Operations<br />
Ability to work in single burst using folder.<br />
Necessary Materials<br />
SNLS<br />
2 Thread Cones.<br />
2 Bobbins<br />
20”x5” Fabric plies & Thread trimmer<br />
Folder<br />
Page | 141
5. Square pocket attach<br />
Machine: SNLS<br />
Exercise: Square Pocket Attach<br />
Starting Position:<br />
The apprentice should sit facing the Sewing Machine<br />
with both feet on the pedal and the right knee against<br />
the knee lift. Place Fabric close to the Operator.<br />
Methodology:<br />
Security<br />
The timekeeper starts the chronometer.<br />
Pickup the Front from Pickup bar and place it<br />
on Machine Bed. Now Pick the Creased Pocket<br />
from Right extension and align it to the<br />
marking on Front.<br />
After Setting the pocket to Front, position<br />
them under the needle at Point ‘A’ as Shown in<br />
Fig.<br />
Give a Back tack at A and start <strong>sewing</strong> towards<br />
B. At B stop with needle down position turn<br />
the Pc <strong>by</strong> 90 degrees and follow the seam as<br />
shown in Figure.<br />
Sew with precision stops at all corners with<br />
needle down position until Use reach the<br />
Position ‘C’.<br />
At ‘c’ give a Back tack, Trim the threads and<br />
dispose the front to center runner or Disposal<br />
Bar.<br />
The apprentice must be careful not to prick himself with<br />
the needle.<br />
Use Safety glasses.<br />
Avoid using loose clothing and/or long and loose hair.<br />
Quality<br />
Pocket edges must be sharp.<br />
Pocket Should be Properly balanced on Front.<br />
No Down Stitches allowed.<br />
Goal:<br />
Illustration:<br />
Fabric<br />
Ready Creased Pockets<br />
Ready Fronts<br />
Exercise Number<br />
Page | 142
Ergonomics<br />
Chair and Machine at a comfortable height.<br />
Back Rest Facing Forward.<br />
Waste<br />
Use the Fronts For Mock shoulder attach Operation.<br />
Abilities Developed<br />
Ability to do Pocket Attach Operation.<br />
Necessary Materials<br />
SNLS<br />
2 Thread Cones.<br />
2 Bobbins<br />
Ready Fronts & Pockets.<br />
Trimmer & 1/16” CL Foot<br />
Page | 143
6. Rounded bottom pocket attach<br />
Machine: SNLS<br />
Exercise: Rounded Bottom Pocket Attach<br />
Starting Position:<br />
The apprentice should sit facing the Sewing Machine<br />
with both feet on the pedal and the right knee against<br />
the knee lift. Place Fabric close to the Operator.<br />
Methodology:<br />
Security<br />
The timekeeper starts the chronometer.<br />
Pickup the Front from Pickup bar and place it<br />
on Machine Bed. Now Pick the Creased Pocket<br />
from Right extension and align it to the<br />
marking on Front.<br />
After Setting the pocket to Front, position<br />
them under the needle at Point ‘A’ as Shown in<br />
Fig.<br />
Give a Back tack at A and start <strong>sewing</strong> towards<br />
B. At B stop with needle down position turn<br />
the Pc <strong>by</strong> 90 degrees and follow the seam as<br />
shown in Figure.<br />
Sew with precision stops at all corners with<br />
needle down position until U reach the<br />
Position ‘C’.<br />
At ‘c’ give a Back tack, Trim the threads and<br />
dispose the front to center runner or Disposal<br />
Bar.<br />
The apprentice must be careful not to prick himself with<br />
the needle.<br />
Use Safety glasses.<br />
Avoid using loose clothing and/or long and loose hair.<br />
Quality<br />
Pocket edges must be sharp.<br />
Bottom Corners must be rounded precisely<br />
Pocket Should be Properly balanced on Front.<br />
No Down Stitches allowed.<br />
Ergonomics<br />
Chair and Machine at a comfortable height.<br />
Back Rest Facing Forward.<br />
Goal:<br />
Illustration:<br />
Fabric<br />
Ready Creased Pockets<br />
Ready Fronts<br />
Exercise Number<br />
Page | 144
Waste<br />
Use the Fronts For Mock Shoulder Attach Operation.<br />
Abilities Developed<br />
Ability to do Pocket Attach Operation.<br />
Necessary Materials<br />
SNLS<br />
2 Thread Cones.<br />
2 Bobbins<br />
Ready Fronts & Pockets.<br />
Trimmer & 1/16” CL Foot<br />
Page | 145
7. Bottom triangle pocket attach<br />
Machine: SNLS<br />
Exercise: Bottom Triangle Pocket Attach<br />
Starting Position:<br />
The apprentice should sit facing the Sewing Machine<br />
with both feet on the pedal and the right knee against<br />
the knee lift. Place Fabric close to the Operator.<br />
Methodology:<br />
Security<br />
The timekeeper starts the chronometer.<br />
Pickup the Front from Pickup bar and place it<br />
on Machine Bed. Now Pick the Creased Pocket<br />
from Right extension and align it to the<br />
marking on Front.<br />
After Setting the pocket to Front, position<br />
them under the needle at Point ‘A’ as Shown in<br />
Fig.<br />
Give a Back tack at A and start <strong>sewing</strong> towards<br />
B. At B stop with needle down position turn<br />
the Pc <strong>by</strong> 90 degrees and follow the seam as<br />
shown in Figure.<br />
Sew with precision stops at all corners with<br />
needle down position until U reach the<br />
Position ‘C’.<br />
At ‘c’ give a Back tack, Trim the threads and<br />
dispose the front to center runner or Disposal<br />
Bar.<br />
The apprentice must be careful not to prick himself with<br />
the needle.<br />
Use Safety glasses.<br />
Avoid using loose clothing and/or long and loose hair.<br />
Quality<br />
Pocket edges must be sharp.<br />
Pocket Should be Properly balanced on Front.<br />
No Down Stitches allowed.<br />
Ergonomics<br />
Chair and Machine at a comfortable height.<br />
Back Rest Facing Forward.<br />
Waste<br />
Use the Fronts For Mock shoulder attach Operation.<br />
Goal:<br />
Illustration:<br />
Fabric<br />
Exercise Number<br />
Ready Creased Pockets<br />
Ready Fronts<br />
Page | 146
Abilities Developed<br />
Ability to do Pocket Attach Operation.<br />
Necessary Materials<br />
SNLS<br />
2 Thread Cones.<br />
2 Bobbins<br />
Ready Fronts & Pockets.<br />
Trimmer & 1/16” CL Foot<br />
Page | 147
8. Diamond pocket attach<br />
Machine: SNLS<br />
Exercise: Diamond Pocket Attach<br />
Starting Position:<br />
The apprentice should sit facing the Sewing Machine<br />
with both feet on the pedal and the right knee against<br />
the knee lift. Place Fabric close to the Operator.<br />
Methodology:<br />
Security<br />
The timekeeper starts the chronometer.<br />
Pickup the Front from Pickup bar and place it<br />
on Machine Bed. Now Pick the Creased Pocket<br />
from Right extension and align it to the<br />
marking on Front.<br />
After Setting the pocket to Front, position<br />
them under the needle at Point ‘A’ as Shown in<br />
Fig.<br />
Give a Back tack at A and start <strong>sewing</strong> towards<br />
B. At B stop with needle down position turn<br />
the Pc <strong>by</strong> 90 degrees and follow the seam as<br />
shown in Figure.<br />
Sew with precision stops at all corners with<br />
needle down position until U reach the<br />
Position ‘C’.<br />
At ‘c’ give a Back tack, Trim the threads and<br />
dispose the front to center runner or Disposal<br />
Bar.<br />
The apprentice must be careful not to prick himself with<br />
the needle.<br />
Use Safety glasses.<br />
Avoid using loose clothing and/or long and loose hair.<br />
Quality<br />
Pocket edges must be sharp.<br />
Pocket Should be Properly balanced on Front.<br />
No Down Stitches allowed.<br />
Ergonomics<br />
Chair and Machine at a comfortable height.<br />
Back Rest Facing Forward.<br />
Goal:<br />
Illustration:<br />
Fabric<br />
Ready Creased Pockets<br />
Ready Fronts<br />
Exercise Number<br />
Page | 148
Waste<br />
Use the Fronts For Mock shoulder attach Operation.<br />
Abilities Developed<br />
Ability to do Pocket Attach Operation.<br />
Necessary Materials<br />
SNLS<br />
2 Thread Cones.<br />
2 Bobbins<br />
Ready Fronts & Pockets.<br />
Trimmer & 1/16” CL Foot<br />
Page | 149
9. Long & Short seams with needle down stoppages at corners<br />
Machine: SNLS<br />
Exercise: Long & Short Seams with needle<br />
Starting Position:<br />
Down Stoppages at Corners<br />
The apprentice should sit facing the Sewing Machine with<br />
both feet on the pedal and the right knee against the knee<br />
lift. Place Fabric close to the Operator.<br />
Methodology:<br />
Security<br />
The timekeeper starts the chronometer.<br />
Pick Up two 20” X 5” plies (One from right<br />
extension and other from lap ) simultaneously<br />
with both hands, align them on one side and<br />
position them under needle at ¼” from corner.<br />
Start Sewing Straight, holding and aligning plies<br />
using right hand and guiding the fabric forward<br />
with left hand.<br />
Continue stitching until you reach ¼ “ from<br />
opposite edge where you stop with the needle<br />
down position.<br />
With the needle down position turn the plies at<br />
90 degrees and continue stitching, holding the<br />
fabric with right hand and guiding it with left<br />
hand.<br />
Repeat the steps 4 & 5 until you reach the last<br />
edge where you sew off as shown in the<br />
diagram.<br />
With trimmer on right hand cut the sew off<br />
thread and dispose.<br />
The apprentice must be careful not to prick himself with<br />
the needle.<br />
Use Safety glasses.<br />
Avoid using loose clothing and/or long and loose hair.<br />
Quality<br />
Maintain a margin of ¼” throughout the seams. Needle<br />
must be in down position while stopped at corners.<br />
Ergonomics<br />
Chair and Machine at a comfortable height.<br />
Back Rest Facing Forward.<br />
Goal: 25 sec Exercise Number<br />
Illustration:<br />
Fabric 20” x 5”<br />
2 Plies; One<br />
Over another<br />
¼”<br />
Page | 150
Waste<br />
Try to use fabric optimally. Re-Use the Fabric in other<br />
exercises if possible.<br />
Abilities Developed<br />
Ability to hold and sew long seams straight.<br />
Ability to stop with needle down<br />
Ability to maintain equi-margin along edges.<br />
Necessary Materials<br />
SNLS<br />
2 Thread Cones.<br />
2 Bobbins<br />
20”x5” Fabric plies & Thread trimmer<br />
Page | 151
Machine: SNLS 10. Collar run stitch operation<br />
Starting Position:<br />
The apprentice should sit facing the Sewing Machine<br />
with both feet on the pedal and the right knee against<br />
Exercise: the knee lift. Mock Place Collar Fabric RunStitch close to the Operator.<br />
Methodology:<br />
Security<br />
The timekeeper starts the chronometer.<br />
Pick Up two Collar Plies (One from right<br />
extension and other from lap ) simultaneously<br />
with both hands, align them on one side and<br />
position them under needle at ¼” from corner.<br />
Start Sewing Straight, holding and aligning<br />
plies using right hand and guiding the fabric<br />
forward with left hand.<br />
Continue stitching until you reach ¼ “ from<br />
opposite edge where you stop with the needle<br />
down position.<br />
With the needle down position turn the plies<br />
at 90 degrees and continue stitching, holding<br />
the fabric with right hand and guiding it with<br />
left hand.<br />
Repeat the steps 4 & 5 until you reach the last<br />
edge where you sew off as shown in the<br />
diagram.<br />
With trimmer on right hand, cut the sew off<br />
thread and dispose.<br />
The apprentice must be careful not to prick himself with<br />
the needle.<br />
Use Safety glasses.<br />
Avoid using loose clothing and/or long and loose hair.<br />
Quality<br />
Maintain a margin of ¼” throughout the seams. Needle<br />
must be in down position while stopped at corners.<br />
Ergonomics<br />
Chair and Machine at a comfortable height.<br />
Back Rest Facing Forward.<br />
Waste<br />
Try to use fabric optimally. Re-Use the Fabric in other<br />
exercises if possible.<br />
Goal: 25 sec Exercise Number<br />
Illustration:<br />
Ready Cut Collar Plies<br />
CL 02<br />
2 Plies; One<br />
Over another<br />
Page | 152
Abilities Developed<br />
Ability to do Collar RunStitch Operation.<br />
Ability to stop with needle down<br />
Ability to maintain equi-margin along edges.<br />
Necessary Material<br />
SNLS<br />
2 Thread Cones.<br />
2 Bobbins<br />
Ready Cut Collar Plies<br />
Page | 153
Machine: SNLS<br />
11. Top stitch along edges<br />
Exercise: Top Stitch along Edges<br />
Starting Position:<br />
The apprentice should sit facing the Sewing Machine<br />
with both feet on the pedal and the right knee against<br />
the knee lift. Place Fabric close to the Operator.<br />
Methodology:<br />
Security<br />
The timekeeper starts the chronometer.<br />
Pick Up the piece from Machine bed and place<br />
it under the needle at a distance of ¼ “ from<br />
the edge.<br />
Start Sewing Straight maintaining a margin of<br />
¼” until you reach ¼ “ from opposite edge<br />
where you stop with the needle down<br />
position.<br />
With the needle down position turn the plies<br />
at 90 degrees and continue stitching.<br />
Repeat the steps 3 & 4 until you reach the last<br />
edge where you sew off as shown in the<br />
diagram.<br />
With trimmer on right hand, cut the sew off<br />
thread and dispose.<br />
The apprentice must be careful not to prick himself with<br />
the needle.<br />
Use Safety glasses.<br />
Avoid using loose clothing and/or long and loose hair.<br />
Quality<br />
Maintain a margin of ¼” throughout the seams. Needle<br />
must be in down position while stopped at corners.<br />
Ergonomics<br />
Chair and Machine at a comfortable height.<br />
Back Rest Facing Forward.<br />
Goal: 20 Sec Exercise Number CL 03<br />
Illustration:<br />
Pc’s From CL01 to be turned & Used for this<br />
Operation<br />
Page | 154
Waste<br />
Try to use fabric optimally. Re-Use the Fabric in other<br />
exercises if possible.<br />
Abilities developed<br />
Ability to do Collar RunStitch Operation.<br />
Ability to stop with needle down<br />
Ability to maintain equi-margin along edges.<br />
Necessary material<br />
SNLS<br />
2 Thread Cones.<br />
2 BobbinsReady<br />
Cut Collar Plies<br />
Page | 155
12. Hem along the contour<br />
Machine: SNLS<br />
Exercise: Hem along the Contour<br />
Starting Position:<br />
The apprentice should sit facing the Sewing Machine<br />
with both feet on the pedal and the right knee against<br />
the knee lift. Place Fabric close to the Operator.<br />
Methodology:<br />
Security<br />
The timekeeper starts the chronometer.<br />
Pick Up the fabric From Lap, fold it 3/8” at the<br />
corner and place it under the needle.<br />
Sew at ¼” margin from the edge carefully<br />
following the contour.<br />
Trim the thread and remove the fabric.<br />
Fold the fabric along the other edge at 3/8”<br />
width and place it under the needle.<br />
Hem stitch folding the margin with the right<br />
hand and guiding the fabric with the left hand<br />
<strong>by</strong> maintaining the ¼” width from the edge<br />
throughout the contour.<br />
Trim the thread and dispose the fabric.<br />
The apprentice must be careful not to prick himself with<br />
the needle.<br />
Use Safety glasses.<br />
Avoid using loose clothing and/or long and loose hair.<br />
Quality<br />
Maintain a margin of ¼” throughout the seams. No<br />
down or dropped stitch allowed during hemming. Keep<br />
the puckering minimal along round edges.<br />
Goal: 24 seconds Exercise Number<br />
Illustration:<br />
Fabric<br />
CL 05<br />
Page | 156
Ergonomics<br />
Chair and Machine at a comfortable height.<br />
Back Rest Facing Forward.<br />
Waste<br />
Try to use fabric optimally. Re-Use the Fabric in Pick<br />
attach Operation.<br />
Abilities Developed<br />
Ability to fold and hem stitch along the curve.<br />
Ability to maintain equal-margin along edges.<br />
Necessary Materials<br />
SNLS<br />
2 Thread Cones.<br />
2 Bobbins<br />
Ply as Shown in Figure & Thread trimmer<br />
Page | 157
13. Mock neck band hem<br />
Machine: SNLS<br />
Exercise: Mock Neck Band Hem<br />
Starting Position:<br />
The apprentice should sit facing the Sewing Machine<br />
with both feet on the pedal and the right knee against<br />
the knee lift. Place Fabric close to the Operator.<br />
Methodology:<br />
Security<br />
The timekeeper starts the chronometer.<br />
Pick Up the fabric From Machine bed fold it at<br />
3/8” width at bottom end and place this end<br />
under the needle.<br />
Now start Sewing at a margin of ¼” from the<br />
folded edge along the required contour.<br />
When <strong>sewing</strong> make sure that the folding is<br />
done precisely with right hand and the fabric is<br />
guided <strong>by</strong> right hand.<br />
Sew off at the other end and dispose in chain.<br />
The apprentice must be careful not to prick himself with<br />
the needle.<br />
Use Safety glasses.<br />
Avoid using loose clothing and/or long and loose hair.<br />
Quality<br />
Maintain the stitch margin of ¼” throughout the folded<br />
edge. No down or dropped stitch allowed during<br />
hemming. Keep the puckering minimal along rounded<br />
edges.<br />
Ergonomics<br />
Chair and Machine at a comfortable height.<br />
Back Rest Facing Forward.<br />
Goal: 16 seconds Exercise Number<br />
Illustration:<br />
Fabric 20” X 3”<br />
CL 06<br />
Page | 158
Waste<br />
Re-Use the Fabric in Pick attach Operation.<br />
Abilities Developed<br />
Ability to do Neck Band Hemming.<br />
Ability to maintain equal-margin along edges.<br />
Necessary Materials<br />
SNLS<br />
2 Thread Cones.<br />
2 Bobbins<br />
Ply as Shown in Figure & Thread trimmer<br />
Page | 159
14. Sewing with template<br />
Machine: SNLS<br />
Exercise: Sewing with Template<br />
Starting Position:<br />
The apprentice should sit facing the Sewing Machine<br />
with both feet on the pedal and the right knee against<br />
the knee lift. Place Fabric close to the Operator.<br />
Methodology:<br />
Security<br />
The timekeeper starts the chronometer.<br />
Pick Up the fabric and place it under the<br />
needle and place the template above the<br />
fabric.<br />
Sew Straight along the template<br />
Continue stitching until you reach the other<br />
end of the template where you sew off, cut<br />
the threads.<br />
Now position the fabric such that the other<br />
edge of the template is under the needle and<br />
sew holding the template as shown in figure.<br />
Sew Off at the other end, Trim the thread and<br />
dispose the Fabric.<br />
The apprentice must be careful not to prick himself with<br />
the needle.<br />
Use Safety glasses.<br />
Avoid using loose clothing and/or long and loose hair.<br />
Quality<br />
Sew Straight. Avoid moving the template while <strong>sewing</strong>.<br />
Goal: 23 Seconds Exercise Number<br />
Illustration:<br />
Fabric 20” X 5”<br />
CL 07<br />
Page | 160
Ergonomics<br />
Chair and Machine at a comfortable height.<br />
Back Rest Facing Forward.<br />
Waste<br />
Try to use fabric optimally. Re-Use the Fabric in other<br />
exercises if possible.<br />
Abilities Developed<br />
Ability to hold template and sew as required.<br />
Necessary Materials<br />
SNLS<br />
2 Thread Cones.<br />
2 Bobbins<br />
20”x5” Fabric plies & Thread trimmer<br />
Template 10” X 3”<br />
Page | 161
15. Mock pick stitching<br />
Machine: SNLS<br />
Exercise: Mock Pick Stitching.<br />
Starting Position:<br />
The apprentice should sit facing the Sewing Machine<br />
with both feet on the pedal and the right knee against<br />
the knee lift. Place Fabric close to the Operator.<br />
Methodology:<br />
Security<br />
The timekeeper starts the chronometer.<br />
Open the bundle; Place collars and Inside<br />
Collar band ply on Lap, Top C/B on the right<br />
extension.<br />
Pick collar and ply on right extension<br />
simultaneously, align and place on the table.<br />
Pick up second ply on the lap and align with<br />
other two. Now place the template on the top<br />
ply align it with the shape of the collar and<br />
position all the three under the needle.<br />
Start <strong>sewing</strong> along the contour of the<br />
template.<br />
Sew off at the other end, trim the thread and<br />
dispose the collar.<br />
The apprentice must be careful not to prick himself with<br />
the needle.<br />
Use Safety glasses.<br />
Avoid using loose clothing and/or long and loose hair.<br />
Quality<br />
Collar and template should be aligned properly at the<br />
collar corners. Pattern should not be displaced while<br />
<strong>sewing</strong>. Stitches should be made exactly along the<br />
contour of the template.<br />
Goal:45 Seconds Exercise Number<br />
Illustration:<br />
CL 08<br />
Fabric Collars From CL04<br />
Hemmed N/B ply from CL06<br />
20” X 3” for Bottom N/B Ply<br />
PATTERN<br />
Page | 162
Ergonomics<br />
Chair and Machine at a comfortable height.<br />
Back Rest Facing Forward.<br />
Waste<br />
Use the end pieces for the mock exercises of center<br />
stitch finish collars.<br />
Abilities Developed<br />
Ability to sew along the curves.<br />
Ability to handle three plies at a time.<br />
Ability to sew using the template.<br />
Necessary Materials<br />
SNLS<br />
2 Thread Cones.<br />
2 Bobbins<br />
Neckband plies and ready collar.<br />
Thread trimmer<br />
Template<br />
Page | 163
16. Top stitch handling tree piles<br />
Machine: SNLS<br />
Exercise: Top Stitch Handling Three Plies<br />
Starting Position:<br />
The apprentice should sit facing the Sewing Machine<br />
with both feet on the pedal and the right knee against<br />
the knee lift. Place Fabric close to the Operator.<br />
Methodology:<br />
Security<br />
The timekeeper starts the chronometer.<br />
Pick Up three plies from lap, align and position<br />
under the needle.<br />
Sew straight at a margin of ¼”and sew off at<br />
the other edge.<br />
Turn the top and bottom plies downwards at<br />
the joint and crease it along the edge.<br />
Do Top stitch along the joint edge and sew off<br />
at the other end.<br />
Sew at a margin of ¼” from one the edge of<br />
the fabric.<br />
Trim the thread and remove the fabric.<br />
The apprentice must be careful not to prick himself with<br />
the needle.<br />
Use Safety glasses.<br />
Avoid using loose clothing and/or long and loose hair.<br />
Quality<br />
Maintain a margin of ¼” throughout the seam for the<br />
step 1 exercise. Avoid down stitches for the step 2<br />
exercises.<br />
Goal:13 Seconds Exercise Number<br />
Illustration:<br />
Fabric<br />
STEP 1<br />
STEP 2<br />
CL 09<br />
Page | 164
Ergonomics<br />
Chair and Machine at a comfortable height.<br />
Back Rest Facing Forward.<br />
Waste<br />
Use the fabric further for PLK01 Exercise.<br />
Abilities Developed<br />
Ability to hold and sew long seams straight.<br />
Ability to sew top edge stitch using two or more<br />
plies.<br />
Necessary Materials<br />
SNLS<br />
2 Thread Cones.<br />
2 Bobbins<br />
20”x5” Fabric plies & Thread trimmer<br />
1/16” CR Foot.<br />
Page | 165
17. Mock centre stitch collar<br />
Machine: SNLS<br />
Exercise: Mock Centre Stitch Collar<br />
Starting Position:<br />
The apprentice should sit facing the Sewing Machine<br />
with both feet on the pedal and the right knee against<br />
the knee lift. Place Fabric close to the Operator.<br />
Methodology:<br />
Security<br />
The timekeeper starts the chronometer.<br />
Pick Up the Collar from Table and position the<br />
start point from where the center stitch<br />
begins, under the needle.<br />
Sew straight at a margin of 1/16” from the<br />
joint edge along the seam.<br />
Stop at required point at the other end, trim<br />
the threads and dispose off.<br />
The apprentice must be careful not to prick himself with<br />
the needle.<br />
Use Safety glasses.<br />
Avoid using loose clothing and/or long and loose hair.<br />
Quality<br />
Down Stitches not allowed. Edge stitch must be<br />
uniformly at a margin of 1/16” from the Joint.<br />
Ergonomics<br />
Chair and Machine at a comfortable height.<br />
Back Rest Facing Forward.<br />
Waste<br />
Use the collars for Collar attaches Later. Minimize thread<br />
end wastage.<br />
Abilities developed<br />
Ability to Do Center stitch on Collar.<br />
Goal:15 Seconds Exercise Number<br />
Illustration:<br />
Fabric<br />
CL 10<br />
Page | 166
Necessary Materials<br />
SNLS<br />
2 Thread Cones.<br />
2 Bobbins<br />
Ready Collars & Thread trimmer<br />
1/16” CR Foot.<br />
Page | 167
18. Mock topstitch collar<br />
Machine: SNLS<br />
Exercise: Mock Topstitch Collar<br />
Starting Position:<br />
The apprentice should sit facing the Sewing Machine<br />
with both feet on the pedal and the right knee against<br />
the knee lift. Place Fabric close to the Operator.<br />
Methodology:<br />
Security<br />
The timekeeper starts the chronometer.<br />
Pick Up the ready collar from Machine bed and<br />
place it under the needle at a distance of ¼ “<br />
from the edge.<br />
Start Sewing Straight maintaining a margin of<br />
¼” until you reach ¼ “ from opposite edge<br />
where you stop with the needle down<br />
position.<br />
With the needle down position turn the collar<br />
at ¼” w.r.t the other edge and continue<br />
stitching.<br />
Repeat the steps 3 & 4 until you reach the last<br />
edge where you sew off as shown in the<br />
diagram.<br />
With trimmer on right hand, cut the sew off<br />
thread and dispose.<br />
The apprentice must be careful not to prick himself with<br />
the needle.<br />
Use Safety glasses.<br />
Avoid using loose clothing and/or long and loose hair.<br />
Quality<br />
Maintain a margin of ¼” throughout the seams. Needle<br />
must be in down position while stopped at corners.<br />
Goal:22 Seconds Exercise Number<br />
Illustration:<br />
CL 04<br />
Pcs from Collar Run stitch <strong>operations</strong> to be turned<br />
and used in this exercise.<br />
Page | 168
Ergonomics<br />
Chair and Machine at a comfortable height.<br />
Back Rest Facing Forward.<br />
Waste<br />
Try to use fabric optimally. Re-Use the Fabric in mock<br />
Pick attach Exercise.<br />
Abilities Developed<br />
Ability to do Topstitch Collar Operation.<br />
Ability to stop with needle down<br />
Ability to maintain equi-margin along edges.<br />
Necessary Materials<br />
SNLS<br />
2 Thread Cones.<br />
2 Bobbins<br />
Ready Collars & Trimmer<br />
Page | 169
19. Cuff hem<br />
Machine: SNLS<br />
Exercise: Cuff Hem<br />
Starting Position:<br />
The apprentice should sit facing the Sewing Machine<br />
with both feet on the pedal and the right knee against<br />
the knee lift. Place Fabric close to the Operator.<br />
Methodology:<br />
Security<br />
The timekeeper starts the chronometer.<br />
Pick Up 11” x 3.5” ply from <strong>machine</strong> bed, fold<br />
it <strong>by</strong> 3/8” and position it under the needle at<br />
¼” from the edge.<br />
Now Start <strong>sewing</strong> Straight <strong>by</strong> folding the width<br />
with the right hand and feeding the fabric<br />
forward with left hand.<br />
Sew off at the other end and dispose in chain.<br />
The apprentice must be careful not to prick himself with<br />
the needle.<br />
Use Safety glasses.<br />
Avoid using loose clothing and/or long and loose hair.<br />
Quality<br />
Maintain a margin of ¼” throughout the seams. No<br />
Down stitches allowed.<br />
Ergonomics<br />
Chair and Machine at a comfortable height.<br />
Back Rest Facing Forward.<br />
Goal:<br />
Illustration:<br />
Fabric 11” x 3.5” Ply<br />
Exercise Number<br />
CF 01<br />
Page | 170
Waste<br />
Ability<br />
Ability to do Cuff Hem Operation.<br />
Necessary material<br />
SNLS<br />
2 Thread Cones.<br />
2 Bobbins<br />
11”x 3.5” Fabric plies & Thread trimmer<br />
Page | 171
20. Mock run stitch cuffs<br />
Machine: SNLS<br />
Exercise: Mock Run Stitch Cuffs<br />
Starting Position:<br />
The apprentice should sit facing the Sewing Machine<br />
with both feet on the pedal and the right knee against<br />
the knee lift. Place Fabric close to the Operator.<br />
Methodology:<br />
Security<br />
The timekeeper starts the chronometer.<br />
Pick Up 11” x 3.5” ply from <strong>machine</strong> bed and<br />
another ply from the lap, align and position<br />
them under the needle at ¼” from the edge.<br />
Now Place the template over the plies and<br />
start <strong>sewing</strong> with a back tack, along the<br />
contour of the template.<br />
While <strong>sewing</strong> hold the Template with Left<br />
hand and handle the plies using right hand.<br />
At the other end sew off with a back tack and<br />
dispose in chain.<br />
The apprentice must be careful not to prick himself with<br />
the needle.<br />
Use Safety glasses.<br />
Avoid using loose clothing and/or long and loose hair.<br />
Quality<br />
Maintain a margin of ¼” throughout the seams. Follow<br />
the template precisely at the rounded corners.<br />
Ergonomics<br />
Chair and Machine at a comfortable height.<br />
Back Rest Facing Forward.<br />
Goal:<br />
Illustration:<br />
Fabric 11” x 3.5” Ply<br />
Ready Hemmed Ply<br />
Template<br />
Exercise Number<br />
CF 02<br />
Page | 172
Waste<br />
Use these cuffs for Cuff attach Operation.<br />
Abilities Developed<br />
Ability to do Cuff Run stitch Operation<br />
Necessary Materials<br />
SNLS<br />
2 Thread Cones.<br />
2 Bobbins<br />
11”x 3.5” Fabric plies & Thread trimmer<br />
Page | 173
21. Binding operation<br />
Machine: SNLS<br />
Exercise: Binding Operation.<br />
Starting Position:<br />
The apprentice should sit facing the Sewing Machine<br />
with both feet on the pedal and the right knee against<br />
the knee lift. Place Fabric close to the Operator.<br />
Methodology:<br />
STEP 1.<br />
STEP 2.<br />
Security<br />
The timekeeper starts the chronometer.<br />
Pickup plane ply with left hand from <strong>machine</strong><br />
bed and u-ply from right extension<br />
simultaneously.<br />
Align both plies along seam edge and place<br />
them under needle.<br />
Sew off at the other end and dispose in chain.<br />
Pick up the end piece from above, turn and<br />
place the end of folded edge other side under<br />
the needle.<br />
Start <strong>sewing</strong> straight at an equi-margin from<br />
the folded edge.<br />
Sew off at the other end and dispose in chain.<br />
The apprentice must be careful not to prick himself with<br />
the needle.<br />
Use Safety glasses.<br />
Avoid using loose clothing and/or long and loose hair.<br />
Goal:<br />
Illustration:<br />
Fabric 20” x 5”<br />
STEP 1.<br />
STEP 2.<br />
Exercise Number<br />
SL 01<br />
22” x 2” (Creased)<br />
Page | 174
Quality<br />
Avoid the visibility of attach stitches.<br />
Avoid down stitches on both faces.<br />
Ergonomics<br />
Chair and Machine at a comfortable height.<br />
Back Rest Facing Forward.<br />
Waste<br />
Abilities Developed<br />
Ability to attach two plies.<br />
Ability to turn and topstitch a fold.<br />
(Binding stitch)<br />
Necessary Materials<br />
SNLS<br />
2 Thread Cones.<br />
2 Bobbins<br />
2 Fabric plies & Trimmer<br />
T – Guide<br />
Page | 175
22. Binding operation using a folder<br />
Machine: SNLS<br />
Exercise: Binding Operation Using a Folder<br />
Starting Position:<br />
The apprentice should sit facing the Sewing Machine<br />
with both feet on the pedal and the right knee against<br />
the knee lift. Place Fabric close to the Operator.<br />
Methodology:<br />
Security<br />
The timekeeper starts the chronometer.<br />
Pickup the facing 22” x 3” from the lap and<br />
feed it into the Folder, eject it out from the<br />
other end and position the fold under the<br />
needle.<br />
Now take 20” x 5” from the pick up bar and<br />
position it in between the facing ply U – Fold,<br />
under the needle.<br />
Now start <strong>sewing</strong> <strong>by</strong> feeding the Facing<br />
through the folder with right hand and 20” x 5”<br />
with the left hand.<br />
Sew off at the other end and dispose in chain.<br />
The apprentice must be careful not to prick himself with<br />
the needle.<br />
Use Safety glasses.<br />
Avoid using loose clothing and/or long and loose hair.<br />
Quality<br />
No Roping allowed.<br />
No Down Stitches allowed.<br />
Goal:<br />
Illustration:<br />
Fabric 20” x 5”<br />
22” x 3”<br />
Using a Folder F205<br />
Exercise Number<br />
SL 02<br />
Page | 176
Ergonomics<br />
Chair and Machine at a comfortable height.<br />
Back Rest Facing Forward.<br />
Waste<br />
Use the other edge also for binding Attaches.<br />
Abilities Developed<br />
Ability to do Binding Seams Using a Folder.<br />
Necessary Materials<br />
SNLS<br />
2 Thread Cones.<br />
2 Bobbins<br />
2 Fabric plies (20” x 5”, 22” x 3”)<br />
Trimmer<br />
Folder F205<br />
Page | 177
23. Mock continuous slv placket attach using a folder<br />
Machine: SNLS<br />
Exercise: Mock Continuous Slv Placket Attach Using a<br />
Folder<br />
Starting Position:<br />
The apprentice should sit facing the Sewing Machine<br />
with both feet on the pedal and the right knee against<br />
the knee lift. Place Fabric close to the Operator.<br />
Methodology:<br />
Security<br />
The timekeeper starts the chronometer.<br />
Pickup the facing 14” x 3” from the lap and<br />
feed it into the Folder, eject it out from the<br />
other end and position the fold under the<br />
needle.<br />
Now pick the ready full Sleeve from Pick Up<br />
stand and position cut edge between the<br />
facing ply U – Fold, under the needle.<br />
Now start <strong>sewing</strong> <strong>by</strong> feeding the Facing<br />
through the folder with right hand and Sleeve<br />
with the left hand.<br />
Sew off at the other end and dispose in chain.<br />
The apprentice must be careful not to prick himself with<br />
the needle.<br />
Use Safety glasses.<br />
Avoid using loose clothing and/or long and loose hair.<br />
Quality<br />
No Roping allowed.<br />
No Down Stitches allowed.<br />
Goal:<br />
Illustration:<br />
Exercise Number<br />
SL 03<br />
Fabric Full Sleeve Ready Cut<br />
14” x 3” Ply Cuts<br />
Using a Folder F205<br />
Page | 178
Ergonomics<br />
Chair and Machine at a comfortable height.<br />
Back Rest Facing Forward.<br />
Waste<br />
Use these Sleeves for Sleeve Attach Exercises.<br />
Abilities Developed<br />
Ability to Attach Continuous Sleeve Placket Using a<br />
Folder.<br />
Necessary Materials<br />
SNLS<br />
2 Thread Cones.<br />
2 Bobbins<br />
Ready Sleeves & 14” x 3” Plies<br />
Folder F205<br />
Page | 179
24. Mock split edge placket attach operation using folder<br />
Machine: SNLS<br />
Exercise: Mock Split Edge Placket Attach Operation Using<br />
Folder<br />
Starting Position:<br />
The apprentice should sit facing the Sewing Machine<br />
with both feet on the pedal and the right knee against<br />
the knee lift. Place Fabric close to the Operator.<br />
Methodology:<br />
Security<br />
The timekeeper starts the chronometer.<br />
Pickup the facing 7” x 1.5” from a box under<br />
the Machine and feed it into the Folder, eject it<br />
out from the other end and position the fold<br />
under the needle.<br />
Now pick the Ready full Sleeve from Pick Up<br />
stand and position cut edge between the<br />
facing ply U – Fold, under the needle.<br />
Now start <strong>sewing</strong> <strong>by</strong> feeding the Facing<br />
through the folder with right hand and Sleeve<br />
with the left hand.<br />
Sew off at the other end and dispose in chain.<br />
The apprentice must be careful not to prick himself with<br />
the needle.<br />
Use Safety glasses.<br />
Avoid using loose clothing and/or long and loose hair.<br />
Quality<br />
No Roping allowed.<br />
No Down Stitches allowed.<br />
Goal:<br />
Illustration:<br />
Exercise Number<br />
SL 04<br />
Fabric Full Sleeve Ready Cut<br />
7” x 1.5” Ply Cuts<br />
Using a Folder<br />
Page | 180
Ergonomics<br />
Chair and Machine at a comfortable height.<br />
Back Rest Facing Forward.<br />
Waste<br />
Use these Sleeves for Sleeve Attach Exercises.<br />
Abilities Developed<br />
Ability to Attach Split Sleeve Placket to Sleeve Using<br />
a Folder.<br />
Necessary Materials<br />
SNLS<br />
2 Thread Cones.<br />
2 Bobbins<br />
Ready Sleeves & 7” x 1.5” Plies<br />
Folder<br />
Page | 181
25. Attach two plies using folder<br />
Machine: DNLS<br />
Exercise: Attach Two plies Using Folder.<br />
Starting Position:<br />
The apprentice should sit facing the Sewing Machine<br />
with both feet on the pedal and the right knee against<br />
the knee lift. Place Fabric close to the Operator.<br />
Methodology:<br />
Security<br />
The timekeeper starts the chronometer.<br />
Pick Up one ply from left side of the table and<br />
place it under the needle.<br />
Pick up the second ply from right extension<br />
and feed it into the folder.<br />
Align the two plies and position them under<br />
the needle.<br />
Start <strong>sewing</strong> <strong>by</strong> feeding the top ply through<br />
folder with right hand and holding the bottom<br />
ply with left hand. Align both plies while<br />
feeding for stitches.<br />
Sew off at the other end and dispose in chain.<br />
If it is plaid fabric maintain the checks<br />
symmetrically throughout the seam length.<br />
The apprentice must be careful not to prick himself with<br />
the needle.<br />
Use Safety glasses.<br />
Avoid using loose clothing and/or long and loose hair.<br />
Goal:<br />
Illustration:<br />
Body Ply<br />
Exercise Number<br />
BK 02<br />
Yoke Ply<br />
Page | 182
Quality<br />
Maintain the checks symmetrically throughout the seam<br />
length. Avoid down stitch while <strong>sewing</strong>.<br />
Ergonomics<br />
Chair and Machine at a comfortable height.<br />
Back Rest Facing Forward.<br />
Waste<br />
Abilities Developed<br />
Ability to work with folder.<br />
Ability to stitch the straight seams.<br />
Necessary Materials<br />
DNLS<br />
3 Thread Cones.<br />
3 Bobbins<br />
Fabric plies & Thread trimmer<br />
Folder & ¼ “ CL Foot<br />
Page | 183
26. Pleats<br />
Machine: SNLS<br />
Exercise: Pleats<br />
Starting Position:<br />
The apprentice should sit facing the Sewing Machine<br />
with both feet on the pedal and the right knee against<br />
the knee lift. Place Fabric close to the Operator.<br />
Methodology:<br />
Security<br />
The timekeeper starts the chronometer.<br />
Pick Up the ply from lap and place it on<br />
Machine bed.<br />
Match the first 2 notches with fingers, lift the<br />
presser foot and rest it on the pleat fold with<br />
needle position at desired point of stitch.<br />
Sew the pleat. Match the next notch and<br />
repeat the steps 3 & 4 as many pleats are<br />
there.<br />
Dispose the fabric once all the pleats are sewn.<br />
The apprentice must be careful not to prick himself with<br />
the needle.<br />
Use Safety glasses.<br />
Avoid using loose clothing and/or long and loose hair.<br />
Quality<br />
Maintain pleat depth as required. Sew the pleat within<br />
seam allowance.<br />
Goal:17 Seconds Exercise Number<br />
Illustration:<br />
Target For 5 Pleats.<br />
BK 01<br />
Fabric 20” x 5” (Notched)<br />
Page | 184
Ergonomics<br />
Chair and Machine at a comfortable height.<br />
Back Rest Facing Forward.<br />
Waste<br />
Use The Fabric For PLK01 Later.<br />
Abilities Developed<br />
Ability to make Pleats.<br />
Necessary Materials<br />
SNLS<br />
2 Thread Cones.<br />
2 Bobbins<br />
20”x5” Fabric plies & Thread trimmer<br />
Page | 185
27. Mock yoke attach with folder<br />
Machine: DNLS<br />
Exercise: Mock yoke Attach with Folder.<br />
Starting Position:<br />
The apprentice should sit facing the Sewing Machine<br />
with both feet on the pedal and the right knee against<br />
the knee lift. Place Fabric close to the Operator.<br />
Methodology:<br />
Security<br />
The timekeeper starts the chronometer.<br />
Pick Up one ply from left side of the table and<br />
second ply from right extension, align and<br />
position under the needle.<br />
Pick up the third ply from the lap and feed it<br />
into the folder.<br />
Align the third ply with other two plies and<br />
position them under the needle.<br />
Start <strong>sewing</strong> <strong>by</strong> feeding the top ply through<br />
folder with right hand and holding the bottom<br />
ply with left hand. Align both plies while<br />
feeding for stitches.<br />
Sew off at the other end and dispose in chain.<br />
If it is plaid fabric maintain the checks<br />
symmetrically through out the seam length.<br />
The apprentice must be careful not to prick himself with<br />
the needle.<br />
Use Safety glasses.<br />
Avoid using loose clothing and/or long and loose hair.<br />
Quality<br />
Maintain the checks symmetrically through out the<br />
seam length. Avoid down stitch while <strong>sewing</strong>.<br />
Goal:<br />
Illustration:<br />
Fabric<br />
Exercise Number<br />
BK 03<br />
Backs & Yokes Ready Cutting<br />
Body & Yoke 1<br />
Yoke 2<br />
Page | 186
Ergonomics<br />
Chair and Machine at a comfortable height.<br />
Back Rest Facing Forward.<br />
Waste<br />
Abilities Developed<br />
Ability to do yoke attaches using Folder.<br />
Ability to stitch the straight seams.<br />
Ability to handle 3 plies simultaneously while<br />
<strong>sewing</strong><br />
Necessary Materials<br />
DNLS<br />
3 Thread Cones.<br />
3 Bobbins<br />
Fabric plies & Thread trimmer<br />
Folder & 1/ 4” CL Presser Foot<br />
Page | 187
28. Shoulder attach without folder<br />
Machine: SNLS<br />
Exercise: Shoulder Attach Without Folder<br />
Starting Position:<br />
The apprentice should sit facing the Sewing Machine<br />
with both feet on the pedal and the right knee against<br />
the knee lift. Place Fabric close to the Operator.<br />
Methodology:<br />
STEP 1.<br />
STEP 2.<br />
Security<br />
The timekeeper starts the chronometer.<br />
Open the bundle and clamp the pieces to the<br />
sloping table.<br />
Pick Up backs from clamp table and position<br />
top Yoke piece under the needle. Take front<br />
piece from pick up bar right to operator, align<br />
it with yoke edge and place it under needle.<br />
Sew straight and trim threads at the end of<br />
seam (UBT).<br />
Pick up the other front, align with second half<br />
of yoke and position them under Needle.<br />
Sew straight and trim threads at the end of<br />
seam (UBT).<br />
Now take the Piece out turn the bottom yoke<br />
over the above seam, align the edges and<br />
position under the needle.<br />
Sew straight and trim threads at the end of<br />
seam (UBT).<br />
Repeat steps 6 & 7 for the other front.<br />
Flip over and dispose the garment.<br />
The apprentice must be careful not to prick himself with<br />
the needle.<br />
Use Safety glasses.<br />
Avoid using loose clothing and/or long and loose hair.<br />
Quality<br />
Avoid Collar center off due to uneven seam width at<br />
shoulder.<br />
Ergonomics<br />
Chair and Machine at a comfortable height.<br />
Back Rest Facing Forward.<br />
Goal:60 Seconds Exercise Number<br />
Illustration:<br />
AS 01<br />
Backs From Yoke Attach & Fronts From Cutting<br />
STEP 1.<br />
STEP 2.<br />
Page | 188
Waste<br />
Use the same fabric for other assembly exercises.<br />
Abilities Developed<br />
Ability to do shoulder attach operation in real time.<br />
Ability to handle 3 plies simultaneously.<br />
Page | 189
Necessary Materials<br />
SNLS<br />
2 Thread Cones.<br />
2 Bobbins<br />
Ready Backs & Fronts cuttings<br />
Trimmer<br />
Page | 190
Machine: DNLS<br />
Exercise: 29. Topstitch shoulder<br />
Starting Position:<br />
The apprentice should sit facing the Sewing Machine<br />
with both feet on the pedal and the right knee against<br />
the knee lift. Place Fabric close to the Operator.<br />
Methodology:<br />
Security<br />
The timekeeper starts the chronometer.<br />
Open the bundle and pick the piece with right<br />
hand from center runner and position the<br />
shoulder joint to be topstitched under needle.<br />
The fronts should lie to the right of the seam<br />
and backs to the left on <strong>machine</strong> bed as shown<br />
in figure.<br />
Hold and feed the garment with the palms of<br />
both hands resting and then moving parallel<br />
on either side of seam.<br />
Sew off and trim threads at the shoulder end<br />
(UBT) and position the next shoulder under<br />
the needle.<br />
Repeat step 4 and dispose to left of<br />
workstation.<br />
The apprentice must be careful not to prick himself with<br />
the needle.<br />
Use Safety glasses.<br />
Avoid using loose clothing and/or long and loose hair.<br />
Quality<br />
No Down Stitches while <strong>sewing</strong>.<br />
Ergonomics<br />
Chair and Machine at a comfortable height.<br />
Back Rest Facing Forward.<br />
Goal:19 Seconds Exercise Number<br />
Illustration:<br />
AS 02<br />
Fabric from AS01 Exercise<br />
Page | 191
WASTE<br />
Use the same fabric for other assembly exercises.<br />
Abilities Developed<br />
Ability to topstitch shoulder on DNLS.<br />
Ability to handle larger parts.<br />
Necessary Materials<br />
DNLS<br />
3 Thread Cones.<br />
3 Bobbins<br />
Front & Back attached pieces.<br />
Page | 192
30. Shoulder attach using folder<br />
Machine: DNLS<br />
Exercise: Shoulder Attach Using Folder<br />
Starting Position:<br />
The apprentice should sit facing the Sewing Machine<br />
with both feet on the pedal and the right knee against<br />
the knee lift. Place Fabric close to the Operator.<br />
Methodology:<br />
STEP 1.<br />
Security<br />
The timekeeper starts the chronometer.<br />
Open the bundle and clamp the backs to the<br />
sloping table. Place left front on pick up bar<br />
and right fronts on the lap.<br />
Pick Up back from clamp table, left front from<br />
the pickup bar simultaneously.<br />
Feed the bottom yoke into the folder and<br />
then place left front over it.<br />
Feed the top Yoke into the folder align the<br />
three plies along the seam edge and position<br />
then Under presser foot.<br />
Sew straight <strong>by</strong> feeding bottom yoke and front<br />
with right hand and top yoke with the left<br />
hand.<br />
Sew off and trim at the shoulder end (UBT).<br />
Now Pick up the right front from the lap and<br />
repeat the steps 4, 5, 6 & 7.<br />
Flip over for waterfall disposal.<br />
The apprentice must be careful not to prick himself with<br />
the needle.<br />
Use Safety glasses.<br />
Avoid using loose clothing and/or long and loose hair.<br />
Quality<br />
Avoid Collar center off due to uneven seam width at<br />
shoulder.<br />
No down stitches while <strong>sewing</strong>.<br />
Ergonomics<br />
Chair and Machine at a comfortable height.<br />
Back Rest Facing Forward.<br />
Goal:<br />
Illustration:<br />
Exercise Number<br />
AS 03<br />
Page | 193
Waste<br />
Use the same fabric for other assembly exercises.<br />
Abilities Developed<br />
Ability to do shoulder attach operation in real time.<br />
Ability to handle 3 plies simultaneously.<br />
Ability to work with Folder.<br />
Necessary Materials<br />
DNLS<br />
3 Thread Cones.<br />
3 Bobbins<br />
Ready Backs & Fronts cuttings<br />
Folder & ¼” CL Presser foot.<br />
Clamped Sloping Table<br />
Page | 194
31. Sew contour fabric to straight fabric<br />
Machine: SNLS<br />
Exercise: Sew Contour Fabric to straight Fabric.<br />
Starting Position:<br />
The apprentice should sit facing the Sewing Machine<br />
with both feet on the pedal and the right knee against<br />
the knee lift. Place Fabric close to the Operator.<br />
Methodology:<br />
Security<br />
The timekeeper starts the chronometer.<br />
Pickup Contour fabric with left hand from<br />
<strong>machine</strong> bed and straight ply with right hand<br />
from right extension simultaneously.<br />
Align the ends of both plies and position them<br />
under needle.<br />
Match and hold the first notch and sew along<br />
the contour <strong>by</strong> aligning them.<br />
Stop the needle and repeat the step 4 until<br />
you reach the other end.<br />
Sew off at the other end and dispose in chain.<br />
The apprentice must be careful not to prick himself with<br />
the needle.<br />
Use Safety glasses.<br />
Avoid using loose clothing and/or long and loose hair.<br />
Quality<br />
Notches must be matched and plies to be aligned<br />
correctly along the edge.<br />
Ergonomics<br />
Chair and Machine at a comfortable height.<br />
Back Rest Facing Forward.<br />
Goal:<br />
Illustration:<br />
Exercise Number<br />
AS 04<br />
Use Prepared Fabric & Contour Cut fabric for this<br />
Exercise<br />
Page | 195
Waste<br />
Use the same fabric for Collar closing operation.<br />
Abilities Developed<br />
Ability to Sew along contour without stretch.<br />
Ability to sew in 2-3 bursts.<br />
Necessary Materials<br />
SNLS<br />
2 Thread Cones.<br />
2 Bobbins<br />
Page | 196
32. Mock collar attach<br />
Machine: SNLS / UBT<br />
Exercise: Mock Collar Attach<br />
Starting Position:<br />
The apprentice should sit facing the Sewing Machine<br />
with both feet on the pedal and the right knee against<br />
the knee lift. Place Fabric close to the Operator.<br />
Methodology:<br />
Security<br />
The timekeeper starts the chronometer.<br />
Pickup the body from left and collar from right<br />
extension simultaneously.<br />
Position neck of body under needle and then<br />
place and align collar over neck of body under<br />
the needle.<br />
Match and hold the first notch and sew along<br />
the contour <strong>by</strong> aligning them.<br />
Stop the needle and repeat the step 4 until<br />
you reach the other end.<br />
Sew off at the other end, trim threads (UBT)<br />
and dispose over center runner to the right.<br />
The apprentice must be careful not to prick himself with<br />
the needle.<br />
Use Safety glasses.<br />
Avoid using loose clothing and/or long and loose hair.<br />
Quality<br />
Notches must be matched and plies to be aligned<br />
correctly along the edge.<br />
Goal:45 Seconds Exercise Number<br />
Illustration:<br />
Ready Collar<br />
Ready Body<br />
AS 05<br />
Page | 197
Ergonomics<br />
Chair and Machine at a comfortable height.<br />
Back Rest Facing Forward.<br />
Waste<br />
Use the same fabric for other assembly exercises.<br />
Abilities Developed<br />
Ability to do Collar attach Operation.<br />
Ability to handle one each of small and larger parts.<br />
Necessary Materials<br />
SNLS<br />
2 Thread Cones.<br />
2 Bobbins<br />
Ready Collars and bodies.<br />
Page | 198
33. Binding <strong>operations</strong><br />
Machine: SNLS<br />
Exercise: Binding Operations.<br />
Starting Position:<br />
The apprentice should sit facing the Sewing Machine<br />
with both feet on the pedal and the right knee against<br />
the knee lift. Place Fabric close to the Operator.<br />
Methodology:<br />
STEP 1.<br />
Security<br />
The timekeeper starts the chronometer.<br />
Pickup plane ply with left hand from <strong>machine</strong><br />
bed and u-ply from right extension<br />
simultaneously.<br />
Align both plies along seam edge and place<br />
them under needle.<br />
Sew off at the other end and dispose in chain.<br />
STEP 2.<br />
Pick up the end piece from above, turn and<br />
place the end of folded edge other side under<br />
the needle.<br />
Start <strong>sewing</strong> straight at an equi-margin from<br />
the folded edge.<br />
Sew off at the other end and dispose in chain.<br />
The apprentice must be careful not to prick himself with<br />
the needle.<br />
Use Safety glasses.<br />
Avoid using loose clothing and/or long and loose hair.<br />
Goal:30 Seconds Exercise Number<br />
Illustration:<br />
AS 06<br />
Page | 199
Quality<br />
Avoid the visibility of attach stitches.<br />
Avoid down stitches on both faces.<br />
Ergonomics<br />
Chair and Machine at a comfortable height.<br />
Back Rest Facing Forward.<br />
Waste<br />
Abilities Developed<br />
Ability to attach two plies.<br />
Ability to turn and topstitch a fold.<br />
Necessary Materials<br />
SNLS<br />
2 Thread Cones.<br />
2 Bobbins<br />
2 Fabric plies.<br />
Page | 200
34. Mock collar finish<br />
Machine: SNLS<br />
Exercise: Mock Collar Finish<br />
Starting Position:<br />
The apprentice should sit facing the Sewing Machine<br />
with both feet on the pedal and the right knee against<br />
the knee lift. Place Fabric close to the Operator.<br />
Methodology:<br />
Security<br />
The timekeeper starts the chronometer.<br />
Pickup the body from center runner to right of<br />
workstation and position the Pick area under<br />
needle.<br />
Start Sewing along the pick edge and at the<br />
corner stop the needle insert body correctly<br />
and start <strong>sewing</strong> to other pick end.<br />
While <strong>sewing</strong> hold the collar pick fold with<br />
right hand and feed the body with left hand.<br />
Before reaching the other end of pick stop the<br />
needle align collar and body and then sew<br />
along pick edge.<br />
Trim threads at the end (UBT) and dispose on<br />
Left bar.<br />
The apprentice must be careful not to prick himself with<br />
the needle.<br />
Use Safety glasses.<br />
Avoid using loose clothing and/or long and loose hair.<br />
Quality<br />
Collar stay stitch should not be visible.<br />
Avoid down stitches.<br />
Goal:50 Seconds Exercise Number<br />
Illustration:<br />
Ply 1<br />
AS 07<br />
Pcs From Mock Collar Attach<br />
Stitches<br />
Ply 2<br />
Page | 201
Ergonomics<br />
Chair and Machine at a comfortable height.<br />
Back Rest Facing Forward.<br />
Waste<br />
Use the same fabric for other assembly exercises.<br />
Abilities<br />
Ability to do topstitch collar operation.<br />
Ability to handle larger parts.<br />
Necessary Materials<br />
SNLS<br />
2 Thread Cones.<br />
2 Bobbins<br />
Ready Body with collar attached.<br />
Page | 202
35. Lap seam along contour<br />
Machine: SNLS<br />
Exercise: Lap Seam along Contour<br />
Starting Position:<br />
The apprentice should sit facing the Sewing Machine<br />
with both feet on the pedal and the right knee against<br />
the knee lift. Place Fabric close to the Operator.<br />
Methodology:<br />
Security<br />
The timekeeper starts the chronometer.<br />
Pickup armhole contoured ply from <strong>machine</strong><br />
bed with left hand and the sleeve ply from<br />
right extension simultaneously.<br />
Place the body ply under the presser foot.<br />
Take the sleeve ply and place it at a distance<br />
3/8” margin from the body ply seam edge.<br />
Now fold the bigger ply edge over the smaller<br />
ply and position under the needle.<br />
Match the notches on both plies, align the<br />
plies and Start <strong>sewing</strong> straight while folding<br />
the body ply edge with left hand and feeding<br />
the sleeve ply with right hand. Continue this<br />
step until you finish stitching at the other end.<br />
Sew off at the end and dispose in chain.<br />
The apprentice must be careful not to prick himself with<br />
the needle.<br />
Use Safety glasses.<br />
Avoid using loose clothing and/or long and loose hair.<br />
Goal:35 Seconds Exercise Number<br />
Illustration:<br />
AS 08<br />
Mock Fabric Cuts As Shown in Fig.<br />
Page | 203
Quality<br />
Maintain the equal fold edge throughout seam. Avoid<br />
drop stitches.<br />
Match the notches exactly.<br />
Ergonomics<br />
Chair and Machine at a comfortable height.<br />
Back Rest Facing Forward.<br />
Waste<br />
Uses the same fabrics for topstitch sleeve operation<br />
exercise.<br />
Abilities Developed<br />
Ability to do lap seam along the contour. Useful<br />
while doing sleeve attach <strong>operations</strong>.<br />
Necessary Materials<br />
SNLS<br />
2 Thread Cones.<br />
2 Bobbins<br />
Mock plies as shown in figure.<br />
Page | 204
36. Mock sleeve attach operation (Lap Seam)<br />
Machine: SNLS<br />
Exercise: Mock Sleeve Attach Operation<br />
(Lap Seam)<br />
Starting Position:<br />
The apprentice should sit facing the Sewing Machine<br />
with both feet on the pedal and the right knee against<br />
the knee lift. Place Fabric close to the Operator.<br />
Methodology:<br />
Security<br />
The timekeeper starts the chronometer.<br />
Pickup body from rack to left of WS and<br />
position the armhole end under the presser<br />
foot.<br />
Now pickup the sleeve from the rack also with<br />
left hand and align with the armhole and<br />
position at a distance of 3/8” from the edge of<br />
armhole.<br />
Now fold the armhole edge over the sleeve<br />
and position under the needle.<br />
Match the notches on both armhole and<br />
sleeve, align them and Start <strong>sewing</strong> straight<br />
while folding the body edge with left hand and<br />
feeding the sleeve with right hand. Continue<br />
this step until you finish stitching at the other<br />
end.<br />
Sew off and trim the threads at the end (UBT)<br />
and dispose to bar on right.<br />
The apprentice must be careful not to prick himself with<br />
the needle.<br />
Use Safety glasses.<br />
Avoid using loose clothing and/or long and loose hair.<br />
Quality<br />
Avoid drop stitches. Match the notches while <strong>sewing</strong>.<br />
Goal:45 Seconds Exercise Number<br />
Illustration:<br />
Sleeves ready cut<br />
AS 09<br />
Body from Collar attach Operation<br />
Page | 205
Ergonomics<br />
Chair and Machine at a comfortable height.<br />
Back Rest Facing Forward.<br />
Waste<br />
Use the same fabric for other assembly exercises.<br />
Abilities Developed<br />
Ability to attach sleeves to body.<br />
Ability to handle bigger parts.<br />
Necessary Materials<br />
SNLS<br />
2 Thread Cones.<br />
2 Bobbins<br />
Ready bodies & Sleeves.<br />
Page | 206
37. Lap seam along contour using folder<br />
Machine: SNLS<br />
Exercise: Lap Seam along Contour using folder<br />
Starting Position:<br />
The apprentice should sit facing the Sewing Machine<br />
with both feet on the pedal and the right knee against<br />
the knee lift. Place Fabric close to the Operator.<br />
Methodology:<br />
Security<br />
The timekeeper starts the chronometer.<br />
Pickup armhole contoured ply from <strong>machine</strong><br />
bed with left hand and the sleeve ply from<br />
right extension simultaneously.<br />
Place the body ply through folder and position<br />
under the presser foot. Take the sleeve ply and<br />
place it on the body ply through the lap fold.<br />
Match the notches on both plies, align the<br />
plies and Start <strong>sewing</strong> straight while holding<br />
the body ply edge with left hand and feeding<br />
the sleeve ply with right hand.<br />
Continue the above step until you finish<br />
stitching at the other end.<br />
Sew off at the end and dispose in chain.<br />
The apprentice must be careful not to prick himself with<br />
the needle.<br />
Use Safety glasses.<br />
Avoid using loose clothing and/or long and loose hair.<br />
Quality<br />
Maintain the equal fold edge throughout seam. Avoid<br />
drop stitches.<br />
Match the notches exactly.<br />
Goal:<br />
Illustration:<br />
USING FOLDER<br />
Exercise Number<br />
AS 10<br />
Page | 207
Ergonomics<br />
Chair and Machine at a comfortable height.<br />
Back Rest Facing Forward.<br />
Waste<br />
Uses the same fabrics for topstitch sleeve operation<br />
exercise.<br />
Abilities Developed<br />
Ability to do lap seam along the contour. Useful<br />
while doing sleeve attach <strong>operations</strong>.<br />
Necessary Materials<br />
SNLS<br />
2 Thread Cones.<br />
2 Bobbins<br />
2 plies as shown in figure.<br />
Folder<br />
Page | 208
38. Mock sleeve attach operation (Lap seam) with folder<br />
Machine: SNLS<br />
Exercise: Mock Sleeve Attach Operation<br />
Starting Position:<br />
(Lap Seam) with Folder<br />
The apprentice should sit facing the Sewing Machine<br />
with both feet on the pedal and the right knee against<br />
the knee lift. Place Fabric close to the Operator.<br />
Methodology:<br />
Security<br />
The timekeeper starts the chronometer.<br />
Pickup body from rack to left of WS, pass it<br />
through folder and position the armhole end<br />
under the presser foot.<br />
Now pickup the sleeve from the rack also with<br />
left hand and place it on armhole inside the<br />
fold.<br />
Match the notches on both armhole and<br />
sleeve, align them and Start <strong>sewing</strong> straight<br />
while holding the body edge with left hand<br />
and feeding the sleeve with right hand.<br />
Continue this step until you finish stitching at<br />
the other end.<br />
Sew off and trim the threads at the end (UBT)<br />
and dispose to bar on right.<br />
The apprentice must be careful not to prick himself with<br />
the needle.<br />
Use Safety glasses.<br />
Avoid using loose clothing and/or long and loose hair.<br />
Quality<br />
Avoid drop stitches. Match the notches while <strong>sewing</strong>.<br />
Goal:<br />
Illustration:<br />
Exercise Number<br />
AS 11<br />
Page | 209
Ergonomics<br />
Chair and Machine at a comfortable height.<br />
Back Rest Facing Forward.<br />
Waste<br />
Use the same fabric for other assembly exercises.<br />
Abilities Developed<br />
Ability to attach sleeves to body.<br />
Ability to handle bigger parts.<br />
Necessary Materials<br />
SNLS<br />
2 Thread Cones.<br />
2 Bobbins<br />
Ready bodies & Sleeves.<br />
Folder<br />
Page | 210
39. Topstitch along contour over lap seam<br />
Machine: DNLS<br />
Exercise: Topstitch along contour over lap seam.<br />
Starting Position:<br />
The apprentice should sit facing the Sewing Machine<br />
with both feet on the pedal and the right knee against<br />
the knee lift. Place Fabric close to the Operator.<br />
Methodology:<br />
Security<br />
The timekeeper starts the chronometer.<br />
Pickup the piece from the pickup bar left to<br />
WS and position the end of armhole joint<br />
under the needle.<br />
Start <strong>sewing</strong> along the contour following the<br />
margin with both the palms on either side<br />
guiding the stitch.<br />
Sew off at the end and dispose in chain.<br />
The apprentice must be careful not to prick himself with<br />
the needle.<br />
Use Safety glasses.<br />
Avoid using loose clothing and/or long and loose hair.<br />
Quality<br />
Avoid down stitches. Maintain topstitch at consistent<br />
margin from the edge.<br />
Ergonomics<br />
Chair and Machine at a comfortable height.<br />
Back Rest Facing Forward.<br />
Waste<br />
Goal:<br />
15 Sec<br />
Illustration:<br />
Exercise Number<br />
AS 12<br />
Page | 211
Abilities Developed<br />
Ability to do topstitches along contour with DNLS.<br />
Necessary Materials<br />
DNLS<br />
3 Thread Cones.<br />
3 Bobbins<br />
Ready piece as shown in figure.<br />
Page | 212
40. Topstitch along contour over lap seam using folder<br />
Machine: DNLS<br />
Exercise: Topstitch along contour over lap seam using<br />
Folder.<br />
Starting Position:<br />
The apprentice should sit facing the Sewing Machine<br />
with both feet on the pedal and the right knee against<br />
the knee lift. Place Fabric close to the Operator.<br />
Methodology:<br />
Security<br />
The timekeeper starts the chronometer.<br />
Pickup the piece from the pickup bar left to<br />
WS and pass the end of armhole joint through<br />
folder and position the end under the needle.<br />
Start <strong>sewing</strong> along the contour following the<br />
margin with both the palms on either side<br />
guiding the stitch.<br />
Sew off at the end and dispose in chain.<br />
The apprentice must be careful not to prick himself with<br />
the needle.<br />
Use Safety glasses.<br />
Avoid using loose clothing and/or long and loose hair.<br />
Quality<br />
Avoid down stitches. Maintain topstitch at consistent<br />
margin from the edge.<br />
Ergonomics<br />
Chair and Machine at a comfortable height.<br />
Back Rest Facing Forward.<br />
Goal:<br />
Illustration:<br />
Exercise Number<br />
AS 13<br />
Page | 213
Waste<br />
Abilities developed<br />
Ability to do topstitches along contour with DNLS.<br />
Necessary Materials<br />
DNLS<br />
3 Thread Cones.<br />
3 Bobbins<br />
Ready piece as shown in figure.<br />
Folder & ¼” CR presser foot.<br />
Page | 214
41. Topstitch sleeve attach<br />
Machine: DNLS<br />
Exercise: Topstitch Sleeve attach<br />
Starting Position:<br />
The apprentice should sit facing the Sewing Machine<br />
with both feet on the pedal and the right knee against<br />
the knee lift. Place Fabric close to the Operator.<br />
Methodology:<br />
Security<br />
The timekeeper starts the chronometer.<br />
Pick up the piece from pickup bar or haunch<br />
back to the left of operator and position the<br />
area to be topstitched under the needle with<br />
sleeve extending to right as shown in figure.<br />
Start <strong>sewing</strong> along the sleeve edge following<br />
the margin with both palms on either side<br />
guiding the stitch.<br />
At the end of the seam cut the threads (UBT).<br />
Remove the piece and position the other<br />
armhole area under the needle as explained in<br />
step 2.<br />
Repeat the step 3 and 4 and dispose the piece<br />
to the center runner.<br />
The apprentice must be careful not to prick himself with<br />
the needle.<br />
Use Safety glasses.<br />
Avoid using loose clothing and/or long and loose hair.<br />
Quality<br />
Avoid down stitches. Maintain topstitch at consistent<br />
margin from the edge. Follow line balancing if any.<br />
Goal:45 Seconds Exercise Number AS 14<br />
Illustration:<br />
Page | 215
Ergonomics<br />
Chair and Machine at a comfortable height.<br />
Back Rest Facing Forward.<br />
Waste<br />
Use the same fabric for other assembly exercises.<br />
Abilities developed<br />
Ability to do Topstitches with DNLS.<br />
Ability to handle whole garment.<br />
Necessary Materials<br />
DNLS<br />
3 Thread Cones.<br />
3 Bobbins<br />
Ready Body with collar and sleeve attached.<br />
Page | 216
42. Topstitch sleeve attach using folder<br />
Machine: DNLS<br />
Exercise: Topstitch Sleeve attach using Folder<br />
Starting Position:<br />
The apprentice should sit facing the Sewing Machine<br />
with both feet on the pedal and the right knee against<br />
the knee lift. Place Fabric close to the Operator.<br />
Methodology:<br />
Security<br />
The timekeeper starts the chronometer.<br />
Pick up the piece from pickup bar or haunch<br />
back to the left of operator and pass the area<br />
to be topstitched through the folder and<br />
position the end under the needle with sleeve<br />
extending to right as shown in figure.<br />
Start <strong>sewing</strong> along the sleeve edge following<br />
the margin with both palms on either side<br />
guiding the stitch.<br />
At the end of the seam cut the threads (UBT).<br />
Remove the piece and position the other<br />
armhole area under the needle as explained in<br />
step 2.<br />
Repeat the step 3 and 4 and dispose the piece<br />
to the center runner.<br />
The apprentice must be careful not to prick himself with<br />
the needle.<br />
Use Safety glasses.<br />
Avoid using loose clothing and/or long and loose hair.<br />
Quality<br />
Avoid down stitches. Maintain topstitch at consistent<br />
margin from the edge. Follow line balancing if any.<br />
Goal:<br />
Illustration:<br />
Using folder<br />
Exercise Number AS 15<br />
Page | 217
Ergonomics<br />
Chair and Machine at a comfortable height.<br />
Back Rest Facing Forward.<br />
Waste<br />
Use the same fabric for other assembly exercises.<br />
Abilities Developed<br />
Ability to do Topstitches with DNLS.<br />
Ability to handle whole garment.<br />
Necessary Materials<br />
DNLS<br />
3 Thread Cones.<br />
3 Bobbins<br />
Ready Body with collar and sleeve attached.<br />
Folder & ¼” CR foot.<br />
Page | 218
43. Hemming long contours (Curved)<br />
Machine: SNLS<br />
Exercise: Hemming Long Contours. (Curved)<br />
Starting Position:<br />
The apprentice should sit facing the Sewing Machine<br />
with both feet on the pedal and the right knee against<br />
the knee lift. Place Fabric close to the Operator.<br />
Methodology<br />
Security<br />
The timekeeper starts the chronometer.<br />
Pick the piece from haunch back or Stand left<br />
to the Operator and place it on table. Fold<br />
3/8”at the rounded Corner (Turn & Turn) and<br />
position it under needle.<br />
Back Tack at the end; Turn the fold <strong>by</strong> 90<br />
degrees with needle down Position and Start<br />
Sewing along the contour <strong>by</strong> folding the width<br />
with the right hand and guiding the piece<br />
along using left hand.<br />
At the other end turn the fabric again <strong>by</strong> 90<br />
degrees and back tack.<br />
Cut the threads and dispose to the disposal<br />
bar or center runner.<br />
The apprentice must be careful not to prick himself with<br />
the needle.<br />
Use Safety glasses.<br />
Avoid using loose clothing and/or long and loose hair.<br />
Quality<br />
Maintain the uniform folded width of 3/8” along the<br />
contour. “ Roping “ must not be there along the seam.<br />
No Down stitches allowed.<br />
Goal:<br />
Illustration:<br />
Exercise Number<br />
AS 19<br />
Fabric Cuts As Shown in Fig.<br />
Page | 219
Ergonomics<br />
Chair and Machine at a comfortable height.<br />
Back Rest Facing Forward.<br />
Waste<br />
Use the same fabric for Straight Bottom Hem.<br />
Abilities Developed<br />
Ability to hem Rounded edges.<br />
Ability to handle large garments while<br />
manually folding the hem.<br />
Necessary Materials<br />
SNLS<br />
2 Thread Cones.<br />
2 Bobbins<br />
Mock Pcs as Shown in fig. & Trimmer<br />
Page | 220
44. Long straight hemming<br />
Machine: SNLS<br />
Exercise: Long Straight Hemming<br />
Starting Position:<br />
The apprentice should sit facing the Sewing Machine<br />
with both feet on the pedal and the right knee against<br />
the knee lift. Place Fabric close to the Operator.<br />
Methodology<br />
Security<br />
The timekeeper starts the chronometer.<br />
Pick the piece from haunch back or Stand left<br />
to the Operator and place it on table. Fold 1”at<br />
the (Turn & Turn) and position it under<br />
needle.<br />
Back Tack at the end; Turn the fold <strong>by</strong> 90<br />
degrees with needle down Position and Start<br />
Sewing along the edge <strong>by</strong> folding the width<br />
with the right hand and guiding the piece<br />
along using left hand.<br />
At the other end turn the fabric again <strong>by</strong> 90<br />
degrees and back tack.<br />
Cut the threads and dispose to the Disposal<br />
Bar or Center runner.<br />
The apprentice must be careful not to prick himself with<br />
the needle.<br />
Use Safety glasses.<br />
Avoid using loose clothing and/or long and loose hair.<br />
Quality<br />
Maintain the uniform folded width of 1” along the<br />
contour. “ Roping “ must not be there along the seam.<br />
No Down stitches allowed.<br />
Goal:<br />
Illustration:<br />
Exercise Number<br />
AS 20<br />
Fabric Cuts As Shown in Fig.<br />
Page | 221
Ergonomics<br />
Chair and Machine at a comfortable height.<br />
Back Rest Facing Forward.<br />
Waste<br />
Use the same fabric for Curved Bottom Hem at the<br />
opposite edge if not done.<br />
Abilities Developed<br />
Ability to Fold (Turn & Turn) and hem for<br />
longer seams.<br />
Ability to handle large garments while<br />
manually folding the hem.<br />
Necessary Materials<br />
SNLS<br />
2 Thread Cones.<br />
2 Bobbins<br />
Mock Pcs as Shown in fig. & Trimmer<br />
T- Guide & 1/16” CL Presser Foot<br />
Page | 222
45. Hemming long contours (Curved) using folder<br />
Machine: SNLS<br />
Exercise: Hemming Long Contours. (Curved) Using<br />
Folder<br />
Starting Position:<br />
The apprentice should sit facing the Sewing Machine<br />
with both feet on the pedal and the right knee against<br />
the knee lift. Place Fabric close to the Operator.<br />
Methodology<br />
Security<br />
The timekeeper starts the chronometer.<br />
Pick the piece from haunch back or Stand left<br />
to the Operator and place it on table. Fold<br />
3/8”at the rounded Corner (Turn & Turn) and<br />
position it under needle.<br />
Back Tack at the end; Turn the fold <strong>by</strong> 90<br />
degrees with needle down Position, Set the<br />
folder and feed the edge to be bottom folded<br />
into it.<br />
Start Sewing along the contour <strong>by</strong> feeding the<br />
folded width with the right hand and guiding<br />
the piece along using left hand.<br />
At the other end, remove the folder, turn the<br />
fabric again <strong>by</strong> 90 degrees and back tack.<br />
Cut the threads and dispose to the disposal<br />
bar or center runner.<br />
The apprentice must be careful not to prick himself with<br />
the needle.<br />
Use Safety glasses.<br />
Avoid using loose clothing and/or long and loose hair.<br />
Quality<br />
Maintain the uniform folded width of 3/8” along the<br />
contour. “ Roping “ must not be there along the seam.<br />
No Down stitches allowed.<br />
Ergonomics<br />
Chair and Machine at a comfortable height.<br />
Back Rest Facing Forward.<br />
Waste<br />
Use the same fabric for Straight Bottom Hem.<br />
Goal:<br />
Illustration:<br />
Exercise Number AS 21<br />
Using Folder<br />
Fabric Cuts As Shown in Fig.<br />
Page | 223
Abilities Developed<br />
Ability to hem Rounded edges.<br />
Ability to handle large garments while<br />
manually folding the hem.<br />
Necessary Materials<br />
SNLS<br />
2 Thread Cones.<br />
2 Bobbins<br />
Mock Pcs as Shown in fig. & Trimmer<br />
1/16” CL Foot & Folder F503<br />
Magnetic guide<br />
Page | 224
46. Long straight hemming using folder<br />
Machine: SNLS<br />
Exercise: Long Straight Hemming using Folder<br />
Starting Position:<br />
The apprentice should sit facing the Sewing Machine<br />
with both feet on the pedal and the right knee against<br />
the knee lift. Place Fabric close to the Operator.<br />
Methodology<br />
Security<br />
The timekeeper starts the chronometer.<br />
Pick the piece from haunch back or Stand left<br />
to the Operator and place it on table. Fold 1”at<br />
the (Turn & Turn) and position it under<br />
needle.<br />
Back Tack at the end; Turn the fold <strong>by</strong> 90<br />
degrees with needle down Position, set the<br />
folder and feed the edge to be bottom folded<br />
into it.<br />
Start Sewing along the edge <strong>by</strong> feeding the<br />
folded width with the right hand and guiding<br />
the piece along using left hand.<br />
At the other end, Remove the Folder, turn the<br />
fabric again <strong>by</strong> 90 degrees and back tack.<br />
Cut the threads and dispose to the Disposal<br />
Bar or Center runner.<br />
The apprentice must be careful not to prick himself with<br />
the needle.<br />
Use Safety glasses.<br />
Avoid using loose clothing and/or long and loose hair.<br />
Quality<br />
Maintain the uniform folded width of 1” along the<br />
contour. “ Roping “ must not be there along the seam.<br />
No Down stitches allowed.<br />
Ergonomics<br />
Chair and Machine at a comfortable height.<br />
Back Rest Facing Forward.<br />
Waste<br />
Use the same fabric for Curved Bottom Hem at the<br />
opposite edge if not done.<br />
Goal:<br />
Illustration:<br />
Exercise Number<br />
AS 22<br />
Operation Using Folder<br />
Mock Fabric Cuts As Shown in Fig.<br />
Page | 225
Abilities Developed<br />
Ability to Fold (Turn & Turn) and hem for<br />
longer seams.<br />
Ability to handle large garments while<br />
manually folding the hem.<br />
Necessary Materials<br />
SNLS<br />
2 Thread Cones.<br />
2 Bobbins<br />
Mock Pcs as Shown in fig. & Trimmer<br />
T- Guide & 1/16” CL Presser Foot<br />
Folder F505<br />
Page | 226
CHAPTER - XII<br />
DIFFERENT TYPES OF SEWING ATTACHMENTS AND USE ON MACHINE<br />
Page | 227
Type of Attachments<br />
1. Various Collar Operations<br />
Hems the collar band before it is attached to the<br />
collar Please specify hem size and stitch margin.<br />
We recommend an edge guide foot to maintain<br />
proper margins<br />
Foot and Guide assist in turning and top<br />
stitching front and back collar bands after they<br />
have been sewn to the collar.<br />
Produces a consistent stitch margin along the<br />
bead.<br />
Page | 228
2. Yoking and Shoulder Joining:<br />
This folder turn down the top ply and joins it<br />
to two additional plys. The bottom ply is then<br />
turned back to form the yoke. Special foot is<br />
recommended.<br />
Used to attach the yoke to the front and back panels of the shirt.<br />
Both folders can be made left or right.<br />
Foot and Guide assist in turning and top<br />
stitching front and back collar bands after they<br />
have been sewn to the collar. Produces a<br />
consistent stitch margin along the bead.<br />
Page | 229
3. Pocket Hemming<br />
This attachment is used to hem the tops of pockets. Many different folder styles are available to suit<br />
your particular need.<br />
Please specify finished size, stitch margin, and the amount of in tuck required.<br />
Special presser foot recommended.<br />
Page | 230
4. Cuff Hemming - Short Sleeve<br />
In addition to the plain hemmer, a variety of folders are available for finishing short sleeves. Two of<br />
the most popular are illustrated below.<br />
These folders may also be used to hem the tops of pockets<br />
Produces tailored cuff on knit and dress shirts.<br />
May be used on lockstitch or chainstitch<br />
<strong>machine</strong>s. Stripes and plaids are easily matched.<br />
Piping and other types of trim may also be<br />
added.<br />
Special edge guide foot is recommended.<br />
5. Tail Hemming<br />
Produces a tailored cuff on knit and dress shirts.<br />
Must be used on lockstitch <strong>machine</strong>s.<br />
Special foot is recommended.<br />
No. 209 The #209 hinged foot hemmer is available in a 3/16" finish. The hinged<br />
feature allows for some give as you cross over the side seam.<br />
No. 209A Foot Hemmer is also available with AIR JET, which helps eliminate loose<br />
thread strands.<br />
No. 210 The swing hemmer is used for straighter runs and is available with a spring<br />
for side seams. The swing out bracket is recommended for easy finishing.<br />
Special presser foot recommended.<br />
Page | 231
Page | 232
6. Button Stay Hemming<br />
No. 211 Upturned hemmer with lining for use on lockstitch <strong>machine</strong>s. Various<br />
styles are available with or without lining. Special presser foot<br />
recommended.<br />
No. 211A Downturned hemmer for use on chainstitch <strong>machine</strong>s. Special presser<br />
foot recommended.<br />
No. 211B This picture illustrates a button stay hemmer with a separate strip added<br />
underneath. Bottom stripper available with or without lining. Used on<br />
double needle chainstitch <strong>machine</strong>s.<br />
Page | 233
7. Cuff Hemming - Long Sleeve<br />
For use on lockstitch <strong>machine</strong>s with lining and<br />
face goods in short pieces.<br />
Hemmer is adjustable to allow for different size<br />
lining and face goods.<br />
Please specify hem size and stitch margin.<br />
Special presser foot is recommended.<br />
For use on chainstitch <strong>machine</strong>s with lining in rolls<br />
and face goods in pieces or rolls.<br />
Hemmer is adjustable to accommodate different size<br />
lining and face goods.<br />
Please specify hem size and stitch margin. Special<br />
presser is recommended.<br />
Page | 234
8. Setting Sleeve Plackets<br />
Used to sew a continuous facing around the<br />
sleeve opening.<br />
Folder is designed for easy loading of short<br />
pieces. Edge guide foot is recommended.<br />
9. Closing Side Seams<br />
Lap Seam Folders<br />
Lap seam folders are used to close side seams.<br />
Designed for <strong>sewing</strong> short pieces in straight runs on<br />
the sleeve opening.<br />
Folders are available in top and bottom sets when cut<br />
sizes of top and bottom placket strips are different.<br />
Edge guide foot is recommended.<br />
Folder available with separate width adjustment. Lap seam folder can also be made with a spring<br />
release which will allow sleeve seam to pass through freely.<br />
Please specify make and gauge of <strong>machine</strong> and send material with a sample of the sleeve seams.<br />
Page | 235
10. Sleeve Setting<br />
There are two types of variations for the Sleeve Setting<br />
Single Needle Sleeving<br />
Set of guides for joining the armhole to the sleeve<br />
on high quality shirts.<br />
Adjustable margin settings. Special presser foot is<br />
recommended.<br />
Turns the sleeve up as the body is pulled over and stitched<br />
down.<br />
Produces a quality finish and appearance. Special presser<br />
foot is recommended.<br />
Page | 236
Imitation Single Needle Sleeving<br />
Folder hems the sleeve and joins it to the body, using a double needle <strong>machine</strong>.<br />
Compensating Foot is used on second top stitching operation.<br />
11. Attach Center Placket<br />
Top Center Folder<br />
Attaches the center plait to the shirt body. Folder features a separate concave lining track which<br />
allows easier starts for all types of fabrics and a tight finish around the lining.<br />
Bed plate mount or swing bracket mount is available. Body hemmer provided with folder.<br />
Please specify: men or ladies' shirt-lining from right or left.<br />
Page | 237
Used to make a one piece shirt front <strong>by</strong> hemming the shirt body itself.<br />
Folder features a separate concave lining track which helps produce a tight finish.<br />
Available in left hand (ladies'-neck start) and right hand (men's-neck start) models.<br />
Used to eliminate shading problems and to match stripes and plaids.<br />
Please Specify: man's or ladies' shirt-lining from right or left.<br />
A variation of the imitation Center Front Folder for use on Men's and ladies' sport shirts.<br />
The top of the front conceals the button hole which is sewn on the bottom tuck.<br />
Page | 238
Attach Center Placket<br />
(Horn Style Placket Folder)<br />
Sometimes referred to as "Horn Type Top Center" or "Wrap Folder".<br />
Used to sew a front, primarily on ladies' dress shirts and "pullover" type sport shirts.<br />
Available with or without lining. Material generally cut in short pieces, but can also be cut in rolls.<br />
Page | 239
Attach Center Placket<br />
(French Front Folder)<br />
Generally used on first quality men's shirts. Available for single and double needle <strong>machine</strong>s.<br />
Available with or without lining.<br />
Attach Center Placket<br />
Plastic Presser Foot<br />
Clear plastic feet are used in conjunction<br />
with the center front operation.<br />
The transparent feature allows the<br />
operator to match stripes and plaids<br />
more easily. Available for most multineedle<br />
<strong>machine</strong>s.<br />
Page | 240
Attach Center Placket<br />
Top Center with Double Lining Track<br />
Allows use of either single ply or full wrap lining.<br />
Available for bed plate mount or swing up mount.<br />
12. Pleat Gauge<br />
Pleat Gauge<br />
Used for decorative trim on shirt pockets, as wella s back and front body pleats.<br />
Made for most double needle <strong>machine</strong>s.<br />
Face goods may be in pieces or rolls - lining must be in rolls. Several pleat styles are available.<br />
Page | 241
CHAPTER – XIII<br />
MONTHLY SCHEDULE FOR SEWING MACHINE OPERATOR TRAINING PROGRAMME<br />
Page | 242
Name: Starting Date:<br />
Prior experience (Operations): Ending Date:<br />
Trainer’s Name:<br />
Sl.<br />
No.<br />
Target<br />
Day<br />
Name<br />
Start<br />
Date<br />
End<br />
Date<br />
Target<br />
1 Simult- Pin Board (RH) 45 sec<br />
2 aneous Pin Board (LH) 90 sec<br />
3<br />
4<br />
2<br />
Pedal control at max speed (Pe1)<br />
Precise stops at max speed (Pe2)<br />
6 sec<br />
5 sec<br />
5 3 Straight stitches at max speed (Pe3) 10 sec<br />
6 4 Change direction with needle down (Pe4) 8 sec<br />
7 5 Judging changes of direction (Pe5) 16 sec<br />
8 5.5 Swing curve with one hand (Pe6) 6 sec<br />
9 6.5 Swing in circles (Pe7) 34 sec<br />
10 7 Swing curves (Pe8) 5 sec<br />
11<br />
OL – Swing straight line (Pe9) 10 sec<br />
12 8.5 OL – exact stop (Pe10) 20 sec<br />
13 OL – Straight lines and curves (Pe11) 15 sec<br />
14<br />
Cleaning <strong>machine</strong> (Me0) 35 sec<br />
15 Threading <strong>machine</strong> (Me1) 40 sec<br />
16 Re threading <strong>machine</strong> (Me2) 8 sec<br />
17 Changing bobbin (Me3) 12 sec<br />
18 Changing needle (Me4) 8 sec<br />
19 Changing colour of thread (Me5) 25 sec<br />
20 10 Sew endless loop (Fe0)<br />
21 Sew 6” x 6”, <strong>sewing</strong> off (Fe1) 15 sec<br />
22 11 Sew 6” x 6”, Staying within (Fe2) 18 sec<br />
23 Sew 6” x 6”, Back tack (Fe3) 21 sec<br />
24 12 Sew 3 sides 6” x 12” (Fe4) 21 sec<br />
25 12” x 6”, Top stitch (Fe5) 14 sec<br />
26 13 Back tack 12” x 12”, (Fe6) 20 sec<br />
27 14 Hemming 6”x6” in chain (5 pcs)(Fe7) 30 sec<br />
28 15 Attach Pocket (Fe8) 45 sec<br />
29 16 Cuff Run stitch 45 sec<br />
30 16 Cuff top stitch 33 sec<br />
31 17 Collar Run stitch 35 sec<br />
32 18 Collar top stitch 29 sec<br />
33 19 Collar pick ready 60 sec<br />
34 20 Sleeve Plackets attach 51 sec<br />
35 21 Sleeve Plackets finishing 120 sec<br />
36 23 Back yoke attach & Edge stitch 60 sec<br />
37 24 Shoulder attach &Edge stitch 60 sec<br />
38 25 Collar attaching & finishing 81 sec<br />
39 27 Side seam attach 120 sec<br />
40 28 Bottom hemming 50 sec<br />
41 29 Sleeve attaching 39 sec<br />
42 30 Sleeve Finishing 45 sec<br />
Parallel with FE<br />
Exercise<br />
2 nd best<br />
time<br />
Page | 243<br />
Remarks