C460 - CITIZEN WATCH Global Network
C460 - CITIZEN WATCH Global Network
C460 - CITIZEN WATCH Global Network

Create successful ePaper yourself
Turn your PDF publications into a flip-book with our unique Google optimized e-Paper software.
INDEX<br />
1. Features ................................................................................................ 3<br />
2. Name of Parts ....................................................................................... 4<br />
3. Switching Modes (Functions)................................................................ 6<br />
4. Displaying the Time and Calendar of Cities Worldwide ........................ 7<br />
5. EL Illumination Function ..................................................................... 10<br />
6. Setting the Analog Time ...................................................................... 11<br />
7. Setting the Digital Time .......................................................... 12<br />
8. Using the Calendar ................................................................. 14<br />
9. Using the Alarm ............................................................... 16<br />
10. Using the Chronograph .......................................................... 18<br />
11. Using the Timer ...................................................................... 21<br />
12. Using the Zone Setting ........................................................... 23<br />
13. When These Problems Occur ... ......................................................... 25<br />
14. All-Reset Operation ............................................................................ 26<br />
15. How to Handle the Calculating Functions ........................................... 27<br />
16. Precautions ......................................................................................... 34<br />
17. Specifications ...................................................................................... 41<br />
2<br />
1. Features<br />
This watch allows you to display the time in 30 cities and UTC ( universal time<br />
coordinated ) time worldwide by a simple button operation. The watch is also<br />
equipped with an internal EL (electroluminescence) lamp function that allows you<br />
to read the display even in the dark.<br />
3
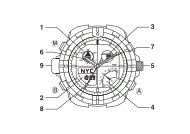
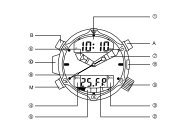
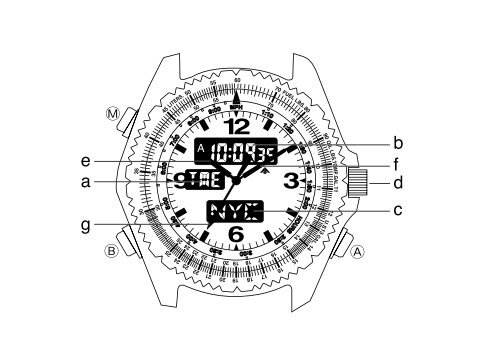
2. Name of Parts<br />
Please fold out and refer to the watch diagram at the beginning of this manual.<br />
See the attached.<br />
Name<br />
Time Mode<br />
Calendar Mode<br />
A:Button A<br />
Press once<br />
Press for 2 seconds or more<br />
EL lamp turns on<br />
B:Button B<br />
Press once<br />
Switch the displayed city Switch the displayed city<br />
Press for 2 seconds or more To time adjustment mode To calendar adjustment mode<br />
M:Button M<br />
Press<br />
To mode To mode<br />
a : Mode display<br />
TME<br />
CAL<br />
b : Digital display [1]<br />
Hours, minutes, seconds Month, date<br />
c : Digital display [2]<br />
d : Crown<br />
e : Hour hand<br />
f : Minute hand<br />
g : Second hand<br />
City name Day or name of cities<br />
4<br />
Alarm 1/2 Mode Chronograph Mode Timer Mode Zone Setting Mode<br />
ON/OFF switch<br />
Alarm sound monitor<br />
Sart/stop<br />
—<br />
Start/stop<br />
—<br />
EL lamp turns on<br />
Switch the displayed city Split/reset Set time adjustment Switch the displayed city<br />
To alarm setting mode<br />
—<br />
Set time quick adjustment To zone setting mode<br />
To mode To mode To mode To mode<br />
AL1/AL2<br />
CHR<br />
TMR<br />
SET<br />
Hours, minutes or OFF Minutes, seconds, 1/100 seconds Remaining time (Minutes, seconds) Hours, minutes, seconds<br />
City name<br />
Hours<br />
Set time (minutes)<br />
City name<br />
Used for analog time setting<br />
Always time (hours) display<br />
Always time (minutes) display<br />
Always time (seconds) display<br />
5
3. Switching Modes (Functions)<br />
In addition to the time mode, this watch has six other modes (functions): Calendar,<br />
Alarm 1, Alarm 2, Chronograph, Timer, and Zone Setting. Each press of the M button<br />
switches the mode in the following sequence.<br />
Display Mode<br />
TME Time<br />
CAL Calender<br />
Mode<br />
display<br />
* If the watch is left in the Alarm 1, Alarm 2, or Zone Setting mode for approximately 2<br />
minutes, it automatically returns to the time mode .<br />
6<br />
S.T.<br />
AL1 Alarm 1<br />
AL2 Alarm 2<br />
CHR Chronograph<br />
TMR Timer<br />
SET Zone Setting<br />
4. Displaying the Time and Calendar of Cities Worldwide<br />
S.T.<br />
Time<br />
City<br />
name<br />
(1) Press the M button to select the<br />
mode or mode.<br />
(2) Each time the B button is pressed, a<br />
city's name and its time (calendar) are<br />
displayed sequentially.<br />
Cities can be displayed in the order No.<br />
2 → 3 ...31 → 1 → 2 (e.g., LON →<br />
PAR...BUE → UTC → LON), as shown<br />
in the table on the following page, or in<br />
the opposite order, i.e., No. 2 → 1 → 31<br />
... 3 → 2 (e.g., LON → UTC →<br />
BUE...PAR → LON).<br />
To switch to the opposite display sequence,<br />
press the A button and the B<br />
button simultaneously.<br />
7
The Time Difference Between the Cities and UTC Time<br />
No. Indication City<br />
1 UTC Universal time coordinated<br />
2 LON London<br />
3 PAR Paris<br />
4 ROM Rome<br />
5 CAI<br />
Cairo<br />
6 IST Istanbul<br />
7 MOW Moscow<br />
8 KWI Kuwait<br />
9 DXB Dubai<br />
10 KHI Karachi<br />
11 DEL New Delhi<br />
12 DAC Dacca<br />
13 BKK Bangkok<br />
14 SIN Singapore<br />
15 HKG Hong Kong<br />
16 PEK Beijing<br />
8<br />
Time<br />
differnce Summertime<br />
No. Indication City<br />
±0<br />
±0<br />
+1<br />
+1<br />
+2<br />
+2<br />
+3<br />
+3<br />
+4<br />
+5<br />
+5.5<br />
+6<br />
+7<br />
+8<br />
+8<br />
+8<br />
17 TYO<br />
18 SYD<br />
19 NOU<br />
20 AKL<br />
21 HNL<br />
22 ANC<br />
23 LAX<br />
24 DEN<br />
25 CHI<br />
26 MEX<br />
27 NYC<br />
28 YUL<br />
29 CCS<br />
30 RIO<br />
31 BUE<br />
Tokyo<br />
Sydney<br />
Nouméa<br />
Auckland<br />
Honolulu<br />
Anchorage<br />
Los Angeles<br />
Denver<br />
Chicago<br />
Mexico City<br />
New York<br />
Montreal<br />
Caracas<br />
Río de Janeiro<br />
Buenos Aires<br />
Time<br />
differnce Summertime<br />
+9<br />
+10<br />
+11<br />
+12<br />
-10<br />
-9<br />
-8<br />
-7<br />
-6<br />
-6<br />
-5<br />
-5<br />
-4<br />
-3<br />
-3<br />
As of 1997<br />
-10 -9 -8 -7 -6 -5 -4 -3 -2 -1 0 +1 +2+3+4+5+6+7+8+9+10+11+12+13<br />
HNL<br />
ANC LAX<br />
DEN<br />
CHI NYC<br />
MEX YUL<br />
CCS<br />
RIO<br />
BUE<br />
DXB<br />
LON<br />
KHI DAC UTC PAR CAI MOW<br />
SIN<br />
BKK HKG TYO SYD NOU AKL<br />
ROM IST KWI<br />
DEL<br />
PEK<br />
* Cities (regions) with summertime are indicated by the O symbol, and cities (regions)<br />
with no summertime system are indicated by the X symbol.<br />
* Please note that time difference and summertime for cities are subject to change.<br />
International Date Line<br />
9
5. EL Illumination Function<br />
<br />
Electroluminescence is a physical phenomenon whereby electrical voltage is directly<br />
converted into light in a thin film solid. This watch utilizes an EL panel for the<br />
illuminating function.<br />
<br />
The EL illumination comes on in the following situations.<br />
(1) When the A button is pressed during the normal mode, mode, or<br />
mode displays.<br />
(2) During split time display or stop in the mode.<br />
10<br />
6. Setting the Analog Time<br />
In the case of watches where the crown is a screw type, perform the operation<br />
after loosening the screw. Make sure to tighten the screw firmly when the operation<br />
has been completed.<br />
Normal position<br />
Position for time adjustment<br />
(1) When the second hand comes to the<br />
0-second position, pull the crown out<br />
to the position for time adjustment.<br />
(2) Turn the crown to align with the correct<br />
time.<br />
(3) Return the crown to its normal position.<br />
11
7. Setting the Digital Time <br />
When the time is set for one of the 30 cities and UTC ( Universal time coordinated)<br />
time, the time is automatically set for the cities.<br />
<br />
12<br />
S.T.<br />
Time<br />
City<br />
name<br />
What is summertime?<br />
Summertime or "daylight saving time:<br />
DST" has been inaugurated in many<br />
countries in order to efficiently utilize<br />
daylight by advancing the clock a certain<br />
amount of time, in relation to the<br />
normal time, during the summer. (This<br />
watch advances the time by 1 hour.)<br />
(1) Press the M button to select the mode.<br />
(2) Press the B button to display the city whose time you want to adjust.<br />
(3) Press and hold the B button for 2 seconds or more. "S.T. (summertime abbreviation)"<br />
and "ON" or "OF" flashes. Press the A button to select summertime (ON) or<br />
(OF) for the city.<br />
(4) Each time the B button is pressed, the flashing figures change in this sequence<br />
[Summertime → Seconds → Minutes → Hour → 12 hours/24 hours] sequence. Make<br />
the figures that you want to adjust, flash.<br />
(5) Press the A button to adjust. (The flashing figures can be adjusted.)<br />
If the A button is kept pressed, the setting changes quickly.<br />
(6) Press the M button to return to the normal time display.<br />
* When running in the 12-hour system, pay attention to the morning (A) and afternoon<br />
(P) indicators.<br />
* The set mode (flashing display) will automatically revert to the normal display if left<br />
for two minutes with no input.<br />
* Summertime can be set for any city. The Summertime setting is interlocked with all<br />
modes so that the , and modes of a city for which Summertime<br />
is selected, will also indicate the time according to the Summertime.<br />
13
8. Using the Calendar <br />
Adjusting the calendar for one of the 30 cities and UTC time will automatically<br />
adjust the calendar for the remaining cities.<br />
<br />
14<br />
S.T.<br />
Month,<br />
date<br />
City name<br />
or day<br />
<br />
(1) Press the M button to move to the <br />
mode.<br />
(2) Press the B button to display the city<br />
whose calendar you want to adjust.<br />
(3) Press and hold the B button for 2seconds<br />
or more, the "month" starts flashing.<br />
Press the A button to adjust the "month".<br />
(The flashing figures can be adjusted)<br />
(4) Each time the B button is pressed, the<br />
flashing figures change in this sequence<br />
[Month → Day → Year] sequence. Make the<br />
item that you want to adjust, flash.<br />
(5) Press the A button covers adjust. (If the<br />
A button is kept pressed, the setting<br />
changes quickly.)<br />
(6) Press the M button to return to the normal<br />
calendar display.<br />
* The calendar covers the years 1995 thru 2099.<br />
* The automatic calendar eliminates any need to adjust the watch at the end of the<br />
month or for leap years.<br />
* The day is automatically adjusted when the month, date and year are adjusted.<br />
* The calendar adjustment mode (flashing display) will automatically return to the normal<br />
display if left for about two minutes with no input.<br />
* If a nonexisting date (e.g., February 30) is set, the date will automatically reset to the<br />
first of the next month once display returns to normal.<br />
<br />
Press the A button for more than 2 seconds<br />
to switch between city display and day display.<br />
[ City name ] [ Day ]<br />
15
9. Using the Alarm <br />
Setting and operation of the Alarm 1 and Alarm 2 are the same, only the sound of<br />
the alarm is different.<br />
Once you turn the alarm on, it will sound for 20 seconds at the same time each day.<br />
<br />
(1) Press the M button to select the <br />
16<br />
Alarm<br />
set time<br />
City<br />
name<br />
or mode.<br />
(2) Press the B button to display the time<br />
of the city for which you want to set the<br />
alarm.<br />
(3) Press and hold the B button for 2 seconds<br />
or more, the "hour" display will<br />
start flashing. The flashing item can be<br />
adjusted. Press the A button to adjust<br />
the "hour". (If the A button is kept<br />
pressed, the setting changes quickly.)<br />
(4) Press the B button while the "hour" is<br />
flashing to make the "minute" display<br />
flash instead. Press the A button to<br />
adjust.<br />
(5) Press the M button to return to the normal<br />
alarm display.<br />
* While in the alarm mode you can sound the alarm continuously for as long as you<br />
keep the A button pressed. (Alarm sound monitor function)<br />
* When you are using the 12-hour system, the alarm time will also run according to the<br />
12-hour system. Watch the AM/PM indicator to confirm that you have made the setting<br />
you want.<br />
* The alarm mode will automatically return to the normal display if left for about two<br />
minutes with no input.<br />
<br />
Press the A button while in the alarm mode to switch the alarm between on and off.<br />
[ ON ] [ OFF ]<br />
A<br />
<br />
Press any button to stop the alarm while sounding.<br />
17
10. Using the Chronograph <br />
This chronograph measures times of up to 23 hours 59 minutes 59 seconds and<br />
99/100 seconds in units of 1/100 second. On reaching 24 hours of elapsed time, it<br />
resets to zero (0:00' 00") and stops. It can also measure split times (intermediate<br />
elapsed times).<br />
<br />
18<br />
Measured time<br />
( minutes, seconds,<br />
1/100 seconds)<br />
Measured time<br />
(hour)<br />
• About the confirmation sound<br />
A confirmation sound will be heard when<br />
the chronograph is started, stopped, and<br />
at the time of split and reset operations.<br />
<br />
(1) Each time the A button is pressed, the chronograph is switched between start and<br />
stop.<br />
(2) Press the B button to reset while the chronograph is stopped.<br />
B<br />
A<br />
A<br />
RESET MEASURE STOP<br />
A<br />
<br />
(1) Each time the A button is pressed, the chronograph is switched between start and<br />
stop.<br />
(2) Press the B button while the chronograph is measuring to display the split time for<br />
about ten seconds. (The "SPL" indicator will flash while the split time is displayed.)<br />
Each time the B button is pressed, the newest split time is displayed.<br />
(3) Press the B button to reset while the chronograph is stopped.<br />
B<br />
A A<br />
RESET MEASURE<br />
STOP<br />
B B<br />
1<br />
SPLIT TIME<br />
1 : After 10 seconds, automatically returns to the measuring display.<br />
19
Even if the M button is pressed and the mode is switched while the chronograph is<br />
measuring, the measurement will continue. When you return to the mode, the<br />
measured time is again displayed.<br />
20<br />
split time<br />
split time<br />
start goal<br />
What is split time: Intermediate elapsed times from the start.<br />
11. Using the Timer <br />
You can set the timer for a number of whole minutes up to 99 in one minute increments.<br />
At "time up" (when the set time has elapsed), the time-up alarm sounds for<br />
five seconds and the watch returns to the timer set time.<br />
<br />
Remaining time<br />
( minutes, seconds)<br />
Set time<br />
(minutes)<br />
<br />
(1) Press the M button to move to the<br />
mode.<br />
(2) Each time you press the B button, the<br />
set time will increase by one minute. (If<br />
the B button is kept pressed, the setting<br />
changes quickly.)<br />
21
(1) Each time the A button is pressed, the timer is switched between start and stop.<br />
(2) Press the B button to reverts to set time while the timer is stopped.<br />
If you press the B button while the timer is running, the time is reset to the set time and<br />
the timer is automatically restarted. (Timer restart function)<br />
•About the confirmation sound<br />
While in the timer mode, a confirmation sound will be heard when the timer is started,<br />
stopped, and restart operations.<br />
<br />
Even if the M button is pressed and the mode is changed while the timer is running, the<br />
timer countdown will continue. When you return to the mode, the countdown time<br />
is again displayed.<br />
22<br />
To be automatically returned to Reset Display.<br />
RESET<br />
A<br />
TIMING<br />
B 1<br />
B<br />
A<br />
STOP<br />
TIME UP<br />
1 Timer restart function<br />
12. Using the Zone Setting <br />
In the zone setting mode, you can select the cities that you want to display from<br />
among the 30 cities and UTC time that this watch is capable of displaying, and you<br />
can set Summertime for each of these cities.<br />
This allows you to easily recall and display only the cities that have been set (to<br />
ON) in any mode.<br />
<br />
S.T.<br />
Normal Time<br />
(TME mode time)<br />
City<br />
name<br />
23
(1) Press the M button to move to the mode.<br />
(2) Press the B button to recall the city that you want to set.<br />
(3) When the B button is pressed for more than 2 seconds, the "ON" or "OFF" and the<br />
"city name" will flash.<br />
Press the A button to select whether the city should be displayed (ON) or not (OFF).<br />
(4) When the B button is pressed while the "city name" and "ON", or "OFF", are flashing,<br />
the "S.T. (Summertime symbol)" and "ON", or "OFF", will start flashing. Press the A<br />
button to select whether Summertime should be set (ON) or canceled (OFF).<br />
* To set other cities, press the B button again to move to the adjustment mode for the<br />
next city. Follow the same procedure in sequence to set each of the desired cities.<br />
(5) When all the desired cities have been set, press the M button again to return to the<br />
normal zone setting display.<br />
* The zone setting adjustment mode (flashing display) will automatically return to the<br />
normal display if left for more than two minutes with no input.<br />
24<br />
13. When These Problems Occur ...<br />
<br />
When the battery life is close to expiring, the display or functions may become abnormal.<br />
When these problems occur, replace the battery as soon as possible.<br />
In rare cases, a strong impact, etc. may cause the display or functions to become abnormal<br />
(no display, alarm sounds incessantly, etc.). In this case, perform the all-reset operation<br />
by referring to "14. All-Reset Operation".<br />
<br />
After the battery has been replaced, perform the all-reset operation by referring to "14.<br />
All-Reset Operation".<br />
25
14. All-Reset Operation<br />
(1) Pull the crown out.<br />
(2) Press the three buttons A, B and M simultaneously. (While pressed, there will be<br />
no display.)<br />
(3) Release the buttons. (All the display segments will appear.)<br />
(4) Push the crown in. (At this point, a monitor sound is heard.)<br />
26<br />
S.T.<br />
This completes the all-reset operation. Set<br />
each mode correctly before using the watch.<br />
15. How to Handle the Calculating Functions<br />
Some are not equipped with this function depending on the model.<br />
Note the points below when using this function.<br />
• Use the calculating functions of this watch as a guideline only.<br />
• This scale cannot be used for position of the decimal point.<br />
Name of Scale • Marking<br />
Speed Index<br />
Distance Conversion<br />
(Kilometers/miles/nautical miles)<br />
▲<br />
LITERS.<br />
▲<br />
FUEL LBS.<br />
▲<br />
▲<br />
U.S GAL.<br />
▲<br />
▲<br />
▲<br />
OIL LBS. IMP.GAL.<br />
▲<br />
Volume-weight Conversion<br />
(Liters/U.S. gallons/IMP.(imperial)<br />
gallons/fuel pound/oil pound)<br />
Fuel conversion<br />
(Liters/U.S. gallon/ IMP. gallons)<br />
Inner scale<br />
outer scale<br />
27
A. Navigational calculation<br />
1) Time required<br />
Example : Obtain the time required for the flight of an aircraft at 180 knots for 450 nautical<br />
miles.<br />
Answer : Align "18" on the outer scale with the SPEED INDEX (▲) on the inner scale.<br />
Then, "45" on the outer scale corresponds to "2:30" on the inner scale (time<br />
scale) . Thus, the time required for the flight is 2 hours and 30 minutes.<br />
2) Knots (air speed)<br />
Example : Obtain the knots (air speed) for 240 nautical miles with a flight time of 1 hour<br />
and 20 minutes.<br />
Answer : Align "24" on the outer scale with "1:20" on the inner scale (time scale) .<br />
Then, the SPEED INDEX (▲) on the inner scale corresponds to "18" on the<br />
outer scale. Thus, the air speed for the flight is 180 knots.<br />
3) Flight distance<br />
Example : Obtain the air distance when the air speed is 210 knots and the flight time is<br />
40 minutes.<br />
Answer : Align "21" on the outer scale with the SPEED INDEX (▲) on the inner scale.<br />
Then, "40" on the inner scale corresponds to "14" on the outer scale. Thus,<br />
the air distance of the flight is 140 nautical miles.<br />
28<br />
4) Rate of fuel consumption<br />
Example : Obtain the rate of fuel consumption (gallons/hour) when the flight time is 30<br />
minutes and the fuel consumption is 120 gallons.<br />
Answer : Align "12" on the outer scale with "30" on the inner scale. Then, the SPEED<br />
INDEX (▲) on the inner scale corresponds to "24" on the outer scale. Thus,<br />
the fuel consumption is 240 gallons per hour.<br />
5) Fuel consumption<br />
Example : Obtain the fuel consumption required for a flight when the fuel consumption is<br />
250 gallons per hour and the flight time is 6 hours.<br />
Answer : Align "25" on the outer scale with the SPEED INDEX (▲) on the inner scale.<br />
Then, "6:00" on the inner scale (time scale) corresponds to "15" on the outer<br />
scale. Thus, the fuel consumption is 1,500 gallons.<br />
6) Estimated flight time<br />
Example : Obtain the estimated flight time when the fuel consumption is 220 gallons per<br />
hour and the aircraft has 550 gallons of fuel.<br />
Answer : Align "22" on the outer scale with the SPEED INDEX (▲) on the inner scale.<br />
Then, "55" on the outer scale corresponds to "2:30" on the inner scale (time<br />
scale) . Thus, the estimated flight time is 2 hours and 30 minutes.<br />
29
7) Difference in altitude<br />
The difference in altitude can be obtained from the descent rate and the descent time.<br />
Example : Obtain the difference in altitude when an aircraft continues descending for 23<br />
minutes at a rate of 250 feet per minute.<br />
Answer : Align "25" on the outer scale with "10" on the inner scale. Then, "23" on the inner scale<br />
corresponds to "57.5" on the outer scale. Thus, the difference in altitude is 5,750 feet.<br />
8) Rate of climb (or descent)<br />
The rate of climb (or descent) can be obtained from the time required to reach an altitude.<br />
Example : Obtain the rate of climb when an aircraft reaches an altitude of 7,500 feet<br />
after climbing for 16 minutes.<br />
Answer : Align "75" on the outer scale with "16" on the inner scale. Then, "10" on the<br />
inner scale corresponds to "47" on the outer scale. Thus, the rate of climb is<br />
470 feet per minute.<br />
9) Time of climb (or descent)<br />
The time required for climb can be obtained from the altitude to be reached and the rate<br />
of climb (or descent) .<br />
Example : Obtain the time of climb when an aircraft is to climb to 6,300 feet at a rate of<br />
550 feet per minute.<br />
Answer : Align "55" on the outer scale with "10" on the inner scale. Then, "63" on the<br />
outer scale corresponds to "11.5" on the inner scale. Thus, the time of climb is<br />
11 minutes and 30 seconds.<br />
30<br />
10) Conversion<br />
Example : Convert 30 statute miles into nautical miles and kilometers.<br />
Operation : Align "30" on the outer scale with STAT (▲) on the inner scale. Then, NAUT<br />
(▲) on the inner scale corresponds to "26" nautical miles on the outer scale,<br />
and km (s) on the inner scale corresponds to "48.2" km on the outer scale.<br />
11) Fuel conversion<br />
Example : Convert 16.8 U.S.gallons into liters.<br />
Operation : Align"16.8"on the inner scale with U.S GAL.(▲)on the outer scale. Then,<br />
LITERS.(▲)on the outer scale corresponds to "63.5" liters on the inner<br />
scale.(1 U.S.gallon=3.78541 liters)<br />
The same method can be applied to the conversions of U.S. gallons → IMP.<br />
gallons / liters → U.S. gallons / liters→IMP. gallons / IMP. gallons → U.S.<br />
gallons / IMP. gallons to liters.<br />
12) Volume - weight conversions (fuel pounds to U.S. gallons, U.K. gallons and liters)<br />
Example : Convert 13. 1 fuel pounds into U. S. gallon, IMP. (imperial)gallons and liters.<br />
(1 fuel pound=0. 167 U. S. gallon=0. 139 IMP. gallon=0. 632 liters)<br />
Operation : Align"13. 4"on the inner scale with FUEL LBS. (▲)on the outer scale. Then,<br />
U. S. GAL. (▲)on the outer scale corresponds to"21. 8(2. 18 U. S. gallons)"on<br />
the inner scale. Then, IMP. GAL. (▲)on the outer scale corresponds to "18.<br />
2(1. 82 IMP. gallons)"on the inner scale, and LITERS. (▲)on the outer scale<br />
corresponds to"82. 7(8. 17 liters)"on the inner scale.<br />
31
32<br />
The same method can be applied to the conversions of U.S. gallons→fuel<br />
pound, IMP. gallons, liters / IMP. gallons→fuel pound, U.S. gallons, liters /<br />
liters→fuel pound, IMP. gallons, U.S. gallons.<br />
13) Volume - weight conversions (oil pounds to U.S. gallons, IMP gallons and liters)<br />
Example : Convert 16. 4 oil pounds into U. S. gallons, IMP. gallons and liters. (1 oil<br />
pound=0. 133 U. S. gallons, =0. 111IMP. gallons, =0. 503 liters)<br />
Answer : Align"16. 4"on the inner scale with U. S. GAL. (▲)on the outer scale. Then,<br />
U. S. GAL. (▲)on the outer scale corresponds to "21. 8(2. 18 U. S. gallons)"on<br />
the inner scale. Then, IMP. GAL. (▲)on the outer scale corresponds to"18.<br />
2(1. 82 IMP. gallon)"on the inner scale, and LITERS. (▲)on the outer scale<br />
corresponds to "82. 7(8. 27 liters)"on the inner scale.<br />
The same method can be applied to the conversions of U.S. gallons→oil<br />
pound, IMP. gallons, liters / IMP. gallons→oil pound, U.S. gallons, liters /<br />
liters→oil pound, IMP. gallons, U.S. gallons.<br />
B.General Calculation Functions<br />
1) Multiplication<br />
Example : 20 x 15<br />
Operation : Align "20" on the outer scale with "10" on the inner scale. Then, "15" on the<br />
inner scale corresponds to "30" on the outer scale. Take into account the<br />
position of the decimal point and add one zero to obtain 300. Note that with<br />
the scales of this watch, the position of the decimal point cannot be obtained.<br />
2) Division<br />
Example : 250 / 20<br />
Operation : Align "25" on the outer scale with "20" on the inner scale. Then, "10" on the<br />
inner scale corresponds to "12.5" on the outer scale. Take into account the<br />
position of the decimal point to obtain 12.5.<br />
3) Proportion<br />
Example : 30/20 = 60/x<br />
Operation : Align "30" on the outer scale with "20" on the inner scale. Then, "60" on the<br />
outer scale corresponds to "40" on the inner scale. At this point, the proportion<br />
for every value on the inner and outer scales is 30 :20.<br />
33
16. Precautions<br />
The unit "bar" is roughly equal to 1 atmosphere<br />
34<br />
Dial<br />
WATER RESIST or<br />
no indication<br />
WR 50 or<br />
WATER RESIST 50<br />
WR 100/200 or<br />
WATER RESIST 100/200<br />
Indication<br />
Case<br />
(case back)<br />
WATER<br />
RESIST (ANT)<br />
WATER RESIST (ANT) 5 bar<br />
or WATER RESIST (ANT)<br />
WATER RESIST (ANT) 10/20 bar<br />
or WATER RESIST (ANT)<br />
Specifications<br />
Water-resistant to 3<br />
atmospheres<br />
Water-resistant to 5<br />
atmospheres<br />
Water-resistant to<br />
10/20 atmospheres<br />
Minor exposure to water<br />
(washing face, rain, etc)<br />
OK<br />
OK<br />
Moderate exposure to<br />
water (washing, kitchen<br />
work, swimming, etc)<br />
Examples of use<br />
Marine sports<br />
(Skin diving)<br />
Scuba diving<br />
(with air tank)<br />
Operation of the crown or<br />
botton with monisture<br />
visible<br />
NO NO NO NO<br />
OK NO NO NO<br />
OK OK<br />
OK NO NO<br />
* WATER RESIST (ANT) xx bar may also be indicated as W.R. xx bar.<br />
35
CAUTION: Water-resistance performance<br />
There are several types of water-resistant watches, as shown in the following table. For<br />
correct use within the design limits of the watch, confirm the level of water-resistance of<br />
your watch, as indicated on the dial and case, and consult the table.<br />
• Water-resistance for daily use (to 3 atmospheres): This type of watch is water-resistant<br />
to minor exposure to water. For example, you may wear the watch while washing<br />
your face; however, it is not designed for use underwater.<br />
• Upgraded water-resistance for daily use (to 5 atmospheres): This type of watch is<br />
water-resistant to moderate exposure to water. You may wear the watch while swimming;<br />
however, it is not designed for use while skin diving.<br />
• Upgraded water-resistance for daily use (to 10/20 atmospheres): This type of watch<br />
may be used for skin diving; however, it is not designed for scuba or saturated diving<br />
using helium gas.<br />
36<br />
CAUTION<br />
• Be sure to use the watch with the crown pressed in (normal position). If your watch<br />
has a screw-type crown, be sure to tighten the crown completely.<br />
• Do NOT operate the crown or buttons with wet fingers or when the watch is wet.<br />
Water may enter the watch and compromise water-resistance.<br />
• If the watch is used in seawater, rinse with fresh water afterward and wipe with a dry<br />
cloth.<br />
• If moisture has entered the watch, or if the inside of the crystal is fogged up and does<br />
not become clear within a day, immediately take the watch to your dealer or Citizen<br />
Service Center for repair. Leaving the watch in such a state will allow corrosion to<br />
form inside.<br />
• If seawater enters the watch, place the watch in a box or plastic bag and immediately<br />
take it in for repair. Otherwise, pressure inside the watch will increase, and parts<br />
(crystal, crown, buttons, etc.) may come off.<br />
CAUTION: Keep your watch clean.<br />
• Leaving dust and dirt deposited between the case and crown may result in difficulty in<br />
pulling the crown out. Rotate the crown while in its normal position, from time to time,<br />
to loosen dust and dirt and then brush it off.<br />
• Dust and dirt tend to be deposited in gaps in the back of the case or band. Deposited<br />
dust and dirt may cause corrosion and soil your clothing. Clean the watch occasionally.<br />
37
Cleaning the Watch<br />
• Use a soft cloth to wipe off dirt, perspiration and water from the case and crystal.<br />
• Use a soft, dry cloth to wipe off perspiration and dirt from the leather band.<br />
• To clean a metal, plastic, or rubber watchband, wash away dirt with mild soap and<br />
water. Use a soft brush to remove dust and dirt jammed in the gaps in the metal band.<br />
If your watch is not water-resistant, take it to your dealer.<br />
NOTE: Avoid using solvents (thinner, benzine, etc.), as they may mar the finish.<br />
WARNING: Handling of the battery<br />
• Keep the battery out of the reach of small children. If a child swallows the battery,<br />
contact a physician immediately.<br />
CAUTION: Replacing the battery<br />
• For replacement of the battery, take your watch to your dealer or Citizen Service<br />
Center.<br />
• Replace the battery as soon as possible if the service life of the battery has expired.<br />
Leaving a depleted battery in the watch may result in leakage, which can damage the<br />
watch severely.<br />
38<br />
CAUTION: Operating environment<br />
• Use the watch within the operating-temperature range specified in the instruction<br />
manual.<br />
Using the watch where temperatures are outside the specified range, may result in<br />
deterioration of functions or even stoppage of the watch.<br />
• Do NOT use the watch in places where it is exposed to high temperature, such as in<br />
a sauna.<br />
Doing so may result in a skin burn.<br />
• Do NOT leave the watch in a place where it is exposed to high temperature, such as<br />
the glove compartment or dash-board of a car.<br />
Doing so may result in deterioration of the watch, such as deformation of plastic parts.<br />
• Do NOT place the watch close to a magnet.<br />
Timekeeping will become inaccurate if you place the watch close to magnetic health<br />
equipment such as a magnetic necklace or a magnetic latch of a refrigerator door or<br />
handbag clasp or the earphone of a mobile phone. If this has occurred, move the<br />
watch away from the magnet and reset the time.<br />
• Do NOT place the watch close to household appliances that generate static electricity.<br />
Timekeeping may become inaccurate if the watch is exposed to strong static electricity,<br />
such as is emitted from a TV screen.<br />
39
• Do NOT subject the watch to a strong shock such as dropping it onto a hard floor.<br />
• Avoid using the watch in an environment where it may be exposed to chemicals or<br />
corrosive gases.<br />
If solvents, such as thinner and benzine, or substances containing such solvents come<br />
in contact with the watch, discoloration, melting, cracking, etc. may result. If the watch<br />
comes in contact with mercury used in thermometers, the case, band or other parts<br />
may become discolored.<br />
40<br />
17. Specifications<br />
1. Caliber No. : <strong>C460</strong><br />
2. Type : Combination (Analog + Digital) quartz watch<br />
3. Accuracy : whithin ± 20 sec/month (at a normal temperature of 5˚C/41°F ~ 35˚C/95°F)<br />
4. Operation temperature range : 0˚C/32°F ~ 55˚C/131°F<br />
5. Functions : •Time: Hours, minutes, seconds, city name, Summertime switch function<br />
• Calendar : Month, date, day, city name<br />
• Alarm 1/Alarm 2<br />
• Chronograph : 24-hour measurement (1/100 seconds unit), split time measurement<br />
• Timer : 99 minutes system (1 minute unit)<br />
• Zone setting<br />
6. Additional function : EL lamp function<br />
7. Applicable battery : Battery no. 280-44. Battery code: SR927W<br />
8. Battery life : Approx. 2 years (conditions: 40-second alarm sound/day, 5-second timer<br />
time-up sound/day, 3-second EL lamp function/day)<br />
• A new battery should be able to support stable accuracy for approximately 2 years<br />
when used under normal circumstances (conditions described above). However, battery<br />
life will differ with the conditions of use of the alarm, chronograph, EL lamp, etc.<br />
• Specifications are subject to change without notice.<br />
41