

Cornice Installation Guide - Prefix Systems
Cornice Installation Guide - Prefix Systems
Cornice Installation Guide - Prefix Systems

You also want an ePaper? Increase the reach of your titles
YUMPU automatically turns print PDFs into web optimized ePapers that Google loves.
2<br />
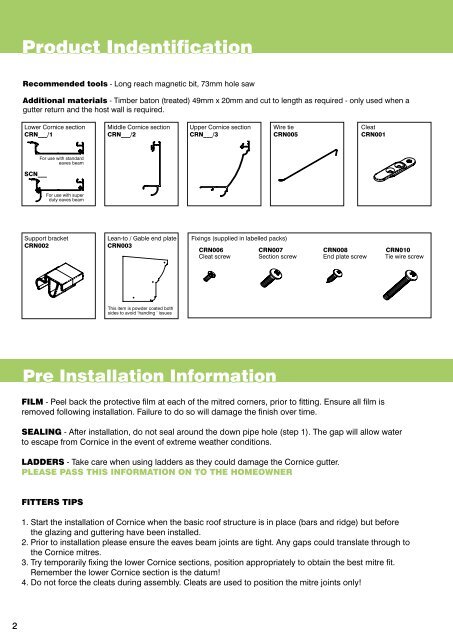
Product Indentification<br />
Recommended tools - Long reach magnetic bit, 73mm hole saw<br />
Additional materials - Timber baton (treated) 49mm x 20mm and cut to length as required - only used when a<br />
gutter return and the host wall is required.<br />
Lower <strong>Cornice</strong> section<br />
CRN___/1<br />
SCN___<br />
For use with standard<br />
eaves beam<br />
For use with super<br />
duty eaves beam<br />
Support bracket<br />
CRN002<br />
Middle <strong>Cornice</strong> section<br />
CRN___/2<br />
Lean-to / Gable end plate<br />
CRN003<br />
Upper <strong>Cornice</strong> section<br />
CRN___/3<br />
Wire tie<br />
CRN005<br />
Fixings (supplied in labelled packs)<br />
Pre <strong>Installation</strong> Information<br />
Cleat<br />
CRN001<br />
CRN006 CRN007 CRN008 CRN010<br />
Cleat screw Section screw End plate screw Tie wire screw<br />
FILM - Peel back the protective film at each of the mitred corners, prior to fitting. Ensure all film is<br />
removed following installation. Failure to do so will damage the finish over time.<br />
SEALING - After installation, do not seal around the down pipe hole (step 1). The gap will allow water<br />
to escape from <strong>Cornice</strong> in the event of extreme weather conditions.<br />
LADDERS - Take care when using ladders as they could damage the <strong>Cornice</strong> gutter.<br />
PLEASE PASS THIS INFORMATION ON TO THE HOMEOWNER<br />
FITTERS TIPS<br />
This item is powder coated both<br />
sides to avoid ‘handing ‘ issues<br />
1. Start the installation of <strong>Cornice</strong> when the basic roof structure is in place (bars and ridge) but before<br />
the glazing and guttering have been installed.<br />
2. Prior to installation please ensure the eaves beam joints are tight. Any gaps could translate through to<br />
the <strong>Cornice</strong> mitres.<br />
3. Try temporarily fixing the lower <strong>Cornice</strong> sections, position appropriately to obtain the best mitre fit.<br />
Remember the lower <strong>Cornice</strong> section is the datum!<br />
4. Do not force the cleats during assembly. Cleats are used to position the mitre joints only!