Altro Mondo Sportflex
Altro Mondo Sportflex
Altro Mondo Sportflex

Create successful ePaper yourself
Turn your PDF publications into a flip-book with our unique Google optimized e-Paper software.
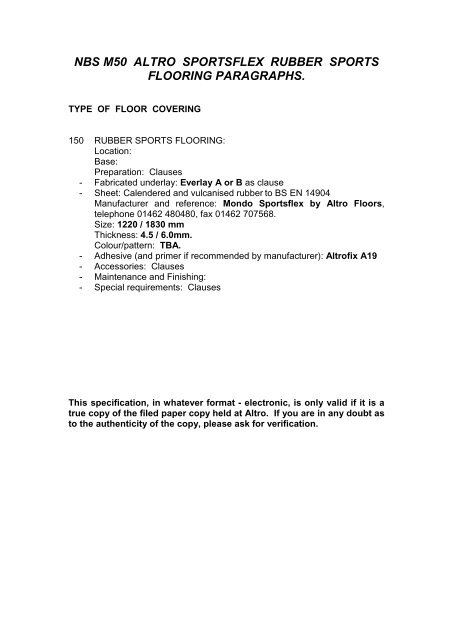
NBS M50 ALTRO SPORTSFLEX RUBBER SPORTS<br />
FLOORING PARAGRAPHS.<br />
TYPE OF FLOOR COVERING<br />
150 RUBBER SPORTS FLOORING:<br />
Location:<br />
Base:<br />
Preparation: Clauses<br />
- Fabricated underlay: Everlay A or B as clause<br />
- Sheet: Calendered and vulcanised rubber to BS EN 14904<br />
Manufacturer and reference: <strong>Mondo</strong> Sportsflex by <strong>Altro</strong> Floors,<br />
telephone 01462 480480, fax 01462 707568.<br />
Size: 1220 / 1830 mm<br />
Thickness: 4.5 / 6.0mm.<br />
Colour/pattern: TBA.<br />
- Adhesive (and primer if recommended by manufacturer): <strong>Altro</strong>fix A19<br />
- Accessories: Clauses<br />
- Maintenance and Finishing:<br />
- Special requirements: Clauses<br />
This specification, in whatever format - electronic, is only valid if it is a<br />
true copy of the filed paper copy held at <strong>Altro</strong>. If you are in any doubt as<br />
to the authenticity of the copy, please ask for verification.
GENERALLY<br />
210 WORKMANSHIP GENERALLY:<br />
- All bases must be rigid, dry, sound, smooth and free from grease, dirt<br />
and other contaminants before coverings are applied.<br />
- Finished coverings must be accurately fitted, tightly jointed, securely<br />
bonded, smooth and free from air bubbles, rippling, adhesive marks<br />
and stains.<br />
220 SAMPLES: Before placing orders, submit for approval a representative<br />
sample of each type of covering. Ensure that delivered materials match<br />
samples.<br />
250 LAYOUT: Agree setting out of seams before ordering roll materials for<br />
sheeting type(s) M50/110B.<br />
270 EXTRA MATERIAL: Provide 5% extra of each type of covering to be<br />
handed over to the Employer at completion.<br />
310 MARKING: Ensure that materials are delivered to site in original<br />
packing, clearly marked with batch number.<br />
320 STORAGE: Store materials in a clean, warm, dry, well ventilated place.<br />
Keep in original packing until conditioning commences.<br />
330 COMMENCEMENT: Do not lay materials until building is weathertight,<br />
wet trades have finished their work, the building is well dried out, all<br />
paintwork is finished and dry, conflicting overhead work completed, and<br />
floor service outlets, duct covers and other fixtures around which the<br />
materials are to be cut have been fixed. Inform CA not less than 48<br />
hours before commencing laying.<br />
340 CONDITIONING: Before laying commences thoroughly condition<br />
materials by unpacking and separating in the spaces where they are to<br />
be laid. Maintain resilient flooring rolls in an upright position, unroll<br />
carpet and keep flat on a supporting surface. Minimum conditioning<br />
time and temperature to be as recommended by manufacturer. Extend<br />
period by a factor of 2 for materials stored or transported at a<br />
temperature of less than 10°C immediately prior to laying.<br />
350 ENVIRONMENT: Before, during and after laying, provide adequate<br />
ventilation and maintain temperature and humidity approximately at<br />
levels which will prevail after the building is occupied.<br />
360 UNDERFLOOR HEATING: Do not commence laying on floors with<br />
underfloor heating for a period of 48 hours after the heating has been<br />
turned off. Slowly return heating to its operative temperature not less<br />
than 48 hours after completing laying.
PREPARING BASES<br />
410 SUITABILITY OF NEW BASES AND CONDITIONS: Laying of<br />
coverings will be taken as joint acceptance by the Main Contractor and<br />
Subcontractor of the suitability of the bases and conditions within any<br />
given area.<br />
420 SUITABILITY OF EXISTING BASES AND CONDITIONS:<br />
- Before commencing work the subcontractor must confirm (through the<br />
Main Contractor) that existing bases will, after the specified preparation,<br />
be suitable to receive the specified coverings.<br />
- Laying of coverings will be taken as further acceptance of the suitability<br />
of the bases and also of the conditions within any given area.<br />
430 DAMPNESS:<br />
- Where coverings are to be laid on new wet-laid bases:<br />
- Ensure that drying aids have been turned off for not less than 4 days,<br />
then<br />
- Test for moisture content using an accurately calibrated hygrometer in<br />
accordance with BS 5325, Annexe A or BS 8203, Annexe A.<br />
- Take readings in all corners, along edges, and at various points over<br />
the area being tested.<br />
- Do not lay coverings until all readings show 75% relative humidity or<br />
less.<br />
440 SUBSTRATES: The specifications for trowelled finishes to receive thin<br />
floor coverings require:<br />
- A uniform, smooth surface free from trowel marks and other blemishes,<br />
and suitable to receive the specified floor finish material.<br />
- Adequate protection from construction traffic.<br />
- Allowance for making good by application of a smoothing compound by<br />
and to the satisfaction of the flooring subcontractor in the event of the<br />
surface being unsuitable due to inadequate finishing or protection.<br />
462A SMOOTHING UNDERLAYMENT COMPOUND:<br />
- Manufacturer and reference: Ardex UK Ltd, Arditex ‘NA’ smoothing<br />
compound.<br />
- Apply to base at a minimum thickness of 3mm in accordance with<br />
manufacturer’s product data sheet incorporating aggregate for<br />
applications more than 12mm thick.<br />
- Allow to dry before laying floor tiling/sheeting.<br />
470 EXISTING FLOOR COVERING TO BE REMOVED: Completely<br />
remove covering and as much adhesive as possible. Skim with<br />
smoothing underlayment compound to give a smooth, even surface.
480 EXISTING FLOOR COVERING TO BE OVERLAID: Make good by<br />
local resticking and patching or filling with smoothing underlayment<br />
compound to give a smooth, even surface.<br />
531A SURFACE DAMP PROOF MEMBRANE:<br />
- Manufacturer and reference: <strong>Altro</strong>Proof epoxy surface damp proof<br />
membrane by <strong>Altro</strong> Floors.<br />
At readings between: 75 - 95% R.H. <strong>Altro</strong>proof Solo 1 coat<br />
95 - 97% R.H. <strong>Altro</strong>proof Duo 2 coat<br />
- Apply in accordance with manufacturer’s instructions.<br />
- NB: Do not use if subfloor contains underfloor heating.<br />
541A SHEET UNDERLAY:<br />
- Manufacturer and reference: <strong>Altro</strong> Everlay A by <strong>Altro</strong> Floors.<br />
Width: 2000 mm.<br />
Thickness: 1.2 mm.<br />
- Set out in same direction as that planned for the sheet floorcovering,<br />
with butt joints staggered to avoid seems in floorcovering. Lay loose<br />
and flat with no distorting bumps, and cut into perimeter.<br />
541B SHEET UNDERLAY:<br />
- Manufacturer and reference: <strong>Altro</strong> Everlay B by <strong>Altro</strong> Floors.<br />
Width: 2000 mm<br />
Thickness: 4.0 mm<br />
- Set out in same direction as that planned for the sheet floorcovering,<br />
with butt joints staggered to avoid seems in floorcovering. Lay loose<br />
and flat with no distorting bumps, and cut into perimeter.<br />
541C RESILIENT SHEET UNDERLAY:<br />
- Manufacturer and reference: Baselast sports flooring underlayment<br />
by <strong>Altro</strong> Floors.<br />
Thickness: 6mm, 8mm, 10mm, 12mm, 14mm or 16mm.<br />
- Place material in position on floor with close butting joints, allowing at<br />
least 25 mm around perimeter for trimming.<br />
- Roll back the first piece of material along half its length, spread<br />
<strong>Altro</strong>fix 19 adhesive using the correct notched trowel, and unroll<br />
material back into adhesive. Fix the second half in the same way, then<br />
repeat for remaining pieces.<br />
- Trim to perimeter.<br />
- Lightly sand surface of underlay using mechanical floor sander prior to<br />
fixing flooring material.<br />
560 PLYWOOD UNDERLAY:<br />
- To an approved national standard.<br />
Bonding quality to BS EN 314:Part 2: Class 3<br />
Finish: _________<br />
Thickness: ______ mm.<br />
Sheet size: ______ x ______ mm.
- Ensure that existing floor boards are securely fixed and acceptably<br />
level. Remove or fill any gross irregularities. Punch in any protruding<br />
fasteners.<br />
- Lay sheets with cross joints staggered such that no joint within the base<br />
and underlay is coincident and with a 0.5-1 mm gap between sheets.<br />
- Fix with 25 mm ring shanked or twisted shank nails or divergent<br />
staples, commencing at the centre of one side of each sheet, at 150<br />
mm grid centres over the area of each sheet and at 100 mm centres<br />
along perimeter, set in 12 mm from edge.<br />
- Ensure that fasteners are driven well in, with heads set flush with<br />
surface, and do not project through underside of base. Remove and<br />
replace fasteners that deform while being driven.<br />
LAYING COVERINGS<br />
620 COLOUR CONSISTENCY: In any one area/room use only coverings<br />
from the same production batch to prevent banding or patchiness<br />
resulting from colour/flash variation.<br />
640 ADHESIVE FIXING GENERALLY:<br />
- Adhesive: when not specified otherwise, type to be as recommended<br />
by covering/underlay manufacturer as appropriate or, in the absence of<br />
such recommendation, type to be approved.<br />
- Use a primer where recommended by adhesive manufacturer. Allow to<br />
dry thoroughly before applying adhesive.<br />
- Spread adhesive evenly and lay covering, pressing down firmly and<br />
rolling laterally and transversely (if recommended) to ensure full contact<br />
and a good bond overall. Reroll (if recommended) within 30 minutes.<br />
- Remove all surplus adhesive from exposed faces of coverings as the<br />
work proceeds.<br />
- Trowel ridges and high spots caused by particles on the substrate will<br />
not be accepted.<br />
641D ADHESIVE FIXING:<br />
- Place tiles in position on floor, allowing at least 25 mm around<br />
perimeter for trimming. Stagger joints when laying onto <strong>Altro</strong> Everlay<br />
underlayment.<br />
- Lift out an area of tiles, spread adhesive using the correct notched<br />
trowel, and place tiles back into adhesive forming neat tight joints.<br />
Repeat until all tiles have been fixed.<br />
- Trim to perimeter.<br />
- Consult data sheet on rolling requirements..<br />
660 SEAMS to be cut in to ensure a tight joint, without gaps.<br />
670 BORDERS/FEATURE STRIPS of sheet material:<br />
- Cut strips along the length of the sheet to prevent curl.
- Mitre joints at corners.<br />
720 DOORWAYS: Make joint on centre line of door leaf unless specified<br />
otherwise.<br />
731A SEALANT:<br />
- Manufacturer and reference: <strong>Altro</strong>mastic 100 by <strong>Altro</strong> Floors.<br />
- Location: To all exposed edges of flooring material around all<br />
protrusions through floor and pipework as necessary.<br />
740 EDGINGS/COVER STRIPS:<br />
- Manufacturer and reference(s): Gradus.<br />
Material/finish: Aluminium / PVC.<br />
- Fix securely in accordance with manufacturers instructions.<br />
770E SIT-ON COVED SKIRTINGS:<br />
- Manufacturer and reference(s): <strong>Altro</strong> SOC by <strong>Altro</strong> Floors.<br />
Height: 100 mm.<br />
Colour: Black.<br />
- Seal between wall and floor perimeter with <strong>Altro</strong>seal prior to fixing<br />
skirting.<br />
- Securely bond with top edge straight and parallel with floor. Accurately<br />
mitre at corners.<br />
Adhesive: <strong>Altro</strong>fix 25NF.<br />
780A TRAFFIC: After laying, keep floor covering type(s) M50/150D free from<br />
traffic until adhesive is set.<br />
COMPLETION<br />
810 CLEANING GENERALLY: Remove all scrap, dust and dirt. Carefully<br />
remove adhesive and other marks from coverings and adjacent<br />
surfaces, using approved cleaning agents and methods.<br />
821C FINISHING SPORTS FLOORING:<br />
- Wash floor using mops, or machine scrub with warm water containing<br />
neutral detergent.<br />
- Thoroughly rinse with clean water, removing surplus to ensure no<br />
damage to adhesive, and allow to dry.<br />
821D “LINING” THE FLOOR:<br />
On completion of the installation of <strong>Mondo</strong>flex sports flooring, the<br />
Flooring Contractor is to arrange for the floor to be “lined” in accordance<br />
with the Client’s instructions.<br />
Prices for this operation can be obtained from the following Specialist<br />
Sub – Contractors:
Biddle Sports Ltd.,<br />
Willow Hill,<br />
Holt Heath,<br />
WORCESTER.<br />
WR6 6TA Tel: 01905 622113<br />
Colour Court Sports Surfaces,<br />
Pheasant Walk,<br />
Templars Way,<br />
Sharnbrook,<br />
BEDFORD.<br />
MK44 1PY Tel: 01234 782278<br />
White Line Services International Ltd.,<br />
St. Francis,<br />
Mill Hill,<br />
EDENBRIDGE,<br />
Kent.<br />
TN8 5SF Tel: 01732 865580<br />
870 PROTECTION: Cover flooring with clean dust sheets, or other<br />
nonstaining suitable material to prevent damage from dirt and traffic<br />
prior to Practical Completion. Ensure any material with printed<br />
information on one face is laid with printed face uppermost.<br />
880 WASTE: Retain spare covering material suitable for patching. On<br />
completion hand over to Employer pieces selected by CA.<br />
821D “LINING” THE FLOOR:<br />
On completion of the installation of Sportsflex sports flooring, the<br />
Flooring Contractor is to arrange for the floor to be “lined” in accordance<br />
with the Client’s instructions.<br />
Prices for this operation can be obtained from the following Specialist<br />
Sub – Contractors:<br />
Biddle Sports Ltd.,<br />
Willow Hill,<br />
Holt Heath,<br />
WORCESTER.<br />
WR6 6TA Tel: 01905 622113<br />
Colour Court Sports Surfaces,<br />
Pheasant Walk,<br />
Templars Way,<br />
Sharnbrook,<br />
BEDFORD.<br />
MK44 1PY Tel: 01234 782278<br />
White Line Services International Ltd.,
St. Francis,<br />
Mill Hill,<br />
EDENBRIDGE,<br />
Kent.<br />
TN8 5SF Tel: 01732 865580