Vistafix one-stage surgery quick guide for auricular ... - Cochlear
Vistafix one-stage surgery quick guide for auricular ... - Cochlear
Vistafix one-stage surgery quick guide for auricular ... - Cochlear

Create successful ePaper yourself
Turn your PDF publications into a flip-book with our unique Google optimized e-Paper software.
<strong>Cochlear</strong> <strong>Vistafix</strong> ® System *<br />
<strong>Vistafix</strong> <strong>one</strong>-<strong>stage</strong> <strong>surgery</strong> <strong>quick</strong> <strong>guide</strong> <strong>for</strong> <strong>auricular</strong> procedures<br />
For detailed instructions, please see the <strong>Cochlear</strong> <strong>Vistafix</strong> Treatment and Surgery Guide.<br />
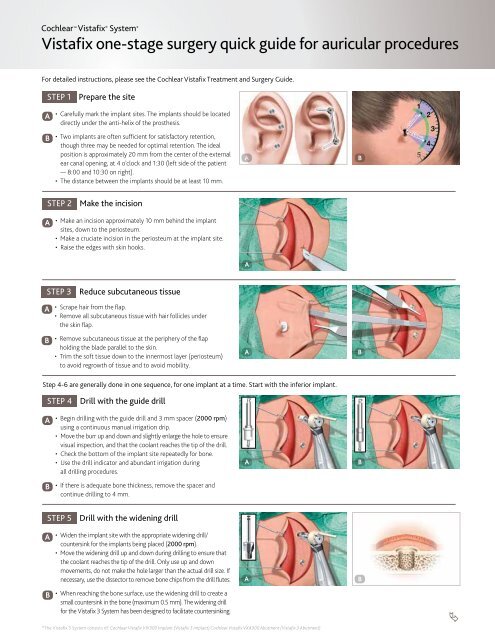
STEP 1 Prepare the site<br />
A<br />
B<br />
A<br />
• Carefully mark the implant sites. The implants should be located<br />
directly under the anti-helix of the prosthesis.<br />
• Two implants are often sufficient <strong>for</strong> satisfactory retention,<br />
though three may be needed <strong>for</strong> optimal retention. The ideal<br />
position is approximately 20 mm from the center of the external<br />
ear canal opening, at 4 o’clock and 1:30 (left side of the patient<br />
— 8:00 and 10:30 on right).<br />
• The distance between the implants should be at least 10 mm.<br />
STEP 2 Make the incision<br />
• Make an incision approximately 10 mm behind the implant<br />
sites, down to the periosteum.<br />
• Make a cruciate incision in the periosteum at the implant site.<br />
• Raise the edges with skin hooks.<br />
STEP 3 Reduce subcutaneous tissue<br />
A<br />
B<br />
Step 4-6 are generally d<strong>one</strong> in <strong>one</strong> sequence, <strong>for</strong> <strong>one</strong> implant at a time. Start with the inferior implant.<br />
STEP 4 Drill with the <strong>guide</strong> drill<br />
A<br />
B<br />
A<br />
• Begin drilling with the <strong>guide</strong> drill and 3 mm spacer (2000 rpm)<br />
using a continuous manual irrigation drip.<br />
• Move the burr up and down and slightly enlarge the hole to ensure<br />
visual inspection, and that the coolant reaches the tip of the drill.<br />
• Check the bottom of the implant site repeatedly <strong>for</strong> b<strong>one</strong>.<br />
• Use the drill indicator and abundant irrigation during<br />
all drilling procedures.<br />
• If there is adequate b<strong>one</strong> thickness, remove the spacer and<br />
continue drilling to 4 mm.<br />
STEP 5 Drill with the widening drill<br />
B<br />
• Scrape hair from the flap.<br />
• Remove all subcutaneous tissue with hair follicles under<br />
the skin flap.<br />
• Remove subcutaneous tissue at the periphery of the flap<br />
holding the blade parallel to the skin.<br />
• Trim the soft tissue down to the innermost layer (periosteum)<br />
to avoid regrowth of tissue and to avoid mobility.<br />
• Widen the implant site with the appropriate widening drill/<br />
countersink <strong>for</strong> the implants being placed (2000 rpm).<br />
• Move the widening drill up and down during drilling to ensure that<br />
the coolant reaches the tip of the drill. Only use up and down<br />
movements, do not make the hole larger than the actual drill size. If<br />
necessary, use the dissector to remove b<strong>one</strong> chips from the drill flutes.<br />
• When reaching the b<strong>one</strong> surface, use the widening drill to create a<br />
small countersink in the b<strong>one</strong> (maximum 0.5 mm). The widening drill<br />
<strong>for</strong> the <strong>Vistafix</strong> 3 System has been designed to facilitate countersinking.<br />
A<br />
A B<br />
*The <strong>Vistafix</strong> 3 System consists of: <strong>Cochlear</strong> <strong>Vistafix</strong> VXI300 Implant (<strong>Vistafix</strong> 3 Implant) <strong>Cochlear</strong> <strong>Vistafix</strong> VXA300 Abutment (<strong>Vistafix</strong> 3 Abutment)<br />
A<br />
A B<br />
A<br />
B<br />
B
A<br />
B<br />
A<br />
B<br />
A<br />
B<br />
C<br />
D<br />
A<br />
B<br />
STEP 6 Place the implant<br />
• Pick up the implant with the implant inserter. If using the prior<br />
generation <strong>Vistafix</strong> Implant, use the connection to handpiece<br />
to pick up the implant.<br />
• Place the implant in the b<strong>one</strong> without irrigation until two<br />
complete rotations are achieved in the b<strong>one</strong>. Once two<br />
complete rotations of the implant have occurred, continue<br />
implant placement with drip irrigation.<br />
STEP 7 Close and suture<br />
• Suture the edges around the flap down to the periosteum<br />
in order to hold the tissue in place.<br />
• Lay the flap back and suture it down.<br />
STEP 8 Connect healing abutments or abutments<br />
Healing abutments are recommended <strong>for</strong> use <strong>for</strong> all cases at<br />
the initial <strong>surgery</strong> to facilitate proper healing, with permanent<br />
abutments placed at a later date at the clinic.<br />
• Using a 4 mm biopsy punch, make incisions through the skin<br />
over the implants.<br />
• Pick up the healing abutment or abutment with the abutment<br />
holder and place it into the implant.<br />
• Hand-tighten the screw partially with the abutment holder.<br />
• Snap the abutment holder off the abutment.<br />
• Finalize the tightening of the abutment screw to 25 Ncm<br />
with the machine screwdriver abutment and the counter<br />
torque wrench (low speed setting).<br />
• In case of manual tightening, tighten the abutment screw<br />
to 25 Ncm using the multi wrench (“IN” facing upwards)<br />
with the machine screwdriver abutment. Use the counter<br />
torque wrench to counter torque <strong>for</strong> <strong>Vistafix</strong> 3, or the<br />
abutment clamp <strong>for</strong> prior generation <strong>Vistafix</strong>.<br />
STEP 9 Place the dressing and healing caps<br />
• Healing abutments — Place a dressing around the healing<br />
abutments. Place a mastoid dressing.<br />
• Abutments — Place the healing cap on the abutment<br />
and hand-tighten the screw using the Unigrip screwdriver.<br />
Place the healing cap either be<strong>for</strong>e or after the dressing.<br />
Place a mastoid dressing.<br />
www.<strong>Cochlear</strong>Americas.com<br />
<strong>Cochlear</strong>, Hear now And always and the elliptical logo are trademarks of <strong>Cochlear</strong> Limited. Baha and <strong>Vistafix</strong> are<br />
registered trademarks of <strong>Cochlear</strong> B<strong>one</strong> Anchored Solutions AB. © <strong>Cochlear</strong> B<strong>one</strong> Anchored Solutions 2012.<br />
VFX003 ISS1 JUN12<br />
BONE QUALITY SUGGESTED TORQUE<br />
Compact b<strong>one</strong> 40-50 Ncm<br />
Compromised or soft b<strong>one</strong> 20-30 Ncm<br />
A<br />
A<br />
A B<br />
C<br />
25 Ncm<br />
A B<br />
B<br />
B<br />
D<br />
25 Ncm