Experiment no 10-setting up the theodolite
Experiment no 10-setting up the theodolite Experiment no 10-setting up the theodolite
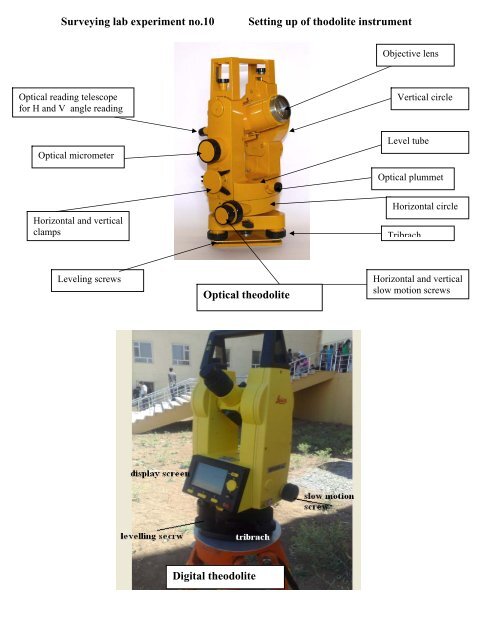
Surveying lab experiment no.10 Setting up of thodolite instrument Optical reading telescope for H and V angle reading Optical micrometer Horizontal and vertical clamps Leveling screws Optical theodolite Digital theodolite Objective lens Vertical circle Level tube Optical plummet Horizontal circle Tribrach Horizontal and vertical slow motion screws
- Page 2 and 3: Setting up the theodolite 1- Fix a
- Page 4: Levelling the electronic level of t
Surveying lab experiment <strong>no</strong>.<strong>10</strong> Setting <strong>up</strong> of thodolite instrument<br />
Optical reading telescope<br />
for H and V angle reading<br />
Optical micrometer<br />
Horizontal and vertical<br />
clamps<br />
Leveling screws<br />
Optical <strong>the</strong>odolite<br />
Digital <strong>the</strong>odolite<br />
Objective lens<br />
Vertical circle<br />
Level tube<br />
Optical plummet<br />
Horizontal circle<br />
Tribrach<br />
Horizontal and vertical<br />
slow motion screws
Setting <strong>up</strong> <strong>the</strong> <strong>the</strong>odolite<br />
1- Fix a clearly defined point on <strong>the</strong> ground (X mark)<br />
2 Extend <strong>the</strong> tripod legs to a proper length (around shoulder height), and set <strong>the</strong><br />
tripod approximately over <strong>the</strong> marked survey point<br />
3 The tripod head should be leveled.<br />
4 Carefully take <strong>the</strong> <strong>the</strong>odolite out of <strong>the</strong> carrying case, and remember how it was<br />
fitted in <strong>the</strong> box so that you k<strong>no</strong>w how to put it back later<br />
5 Mount it on <strong>the</strong> tripod, and fasten <strong>the</strong> tripod screw<br />
6 Fix <strong>the</strong> front tripod leg. Hold and move <strong>the</strong> two o<strong>the</strong>r legs to roughly center <strong>the</strong><br />
<strong>the</strong>odolite by locating <strong>the</strong> ground mark via <strong>the</strong> optical plummet (or laser spot)
7 -Rough Levelling : (use <strong>the</strong> circular bubble as <strong>the</strong> guide): By adjusting <strong>the</strong><br />
length of one tripod leg at a time while keeping <strong>the</strong> o<strong>the</strong>r two still, <strong>the</strong> circular<br />
bubble can be levelled without causing disturbance to <strong>the</strong> previously<br />
accomplished centering (check <strong>the</strong> optical plummet or laser spot to see this is<br />
true).<br />
8 - Precise Levelling (optical <strong>the</strong>odolite)<br />
Rotate <strong>the</strong> <strong>the</strong>odolite until its plate bubble is parallel to any two leveling screws (A<br />
and B), <strong>the</strong>n adjust screws A and B to center <strong>the</strong> bubble. The left thumb rule<br />
applies as usual (bubble will travel in direction of left thumb). Now rotate <strong>the</strong><br />
<strong>the</strong>odolite body by 90°, and center <strong>the</strong> bubble with <strong>the</strong> third leveling screw (C)<br />
only. Repeat this procedure for each 90° revolution of <strong>the</strong> instrument until <strong>the</strong><br />
bubble is centered for all four positions. Now check <strong>the</strong> optical plummet(or laser<br />
spot) if <strong>the</strong> adjustment of <strong>the</strong> leveling screws has probably disturbed <strong>the</strong> centering.
Levelling <strong>the</strong> electronic level of <strong>the</strong> digital <strong>the</strong>odolite<br />
9 - Precise Centering<br />
Loosen <strong>the</strong> tripod screw, and slowly translate (do <strong>no</strong>t rotate) <strong>the</strong> <strong>the</strong>odolite<br />
around until it is exactly centered over <strong>the</strong> survey point, <strong>the</strong>n tighten <strong>the</strong> screw.<br />
<strong>10</strong> - Repeat centering and leveling.<br />
The Display screen of <strong>the</strong> digital <strong>the</strong>odolite<br />
1-configuration screen 2- <strong>the</strong>odolite screen


