A268 Byron Flashing Doorbell - Action On Hearing Loss
A268 Byron Flashing Doorbell - Action On Hearing Loss
A268 Byron Flashing Doorbell - Action On Hearing Loss

Create successful ePaper yourself
Turn your PDF publications into a flip-book with our unique Google optimized e-Paper software.
BY301<br />
1<br />
2<br />
4:<br />
1:<br />
2:<br />
<br />
Extra Loud<br />
Wire Free Chime Kit<br />
:3<br />
5:<br />
6:<br />
7:<br />
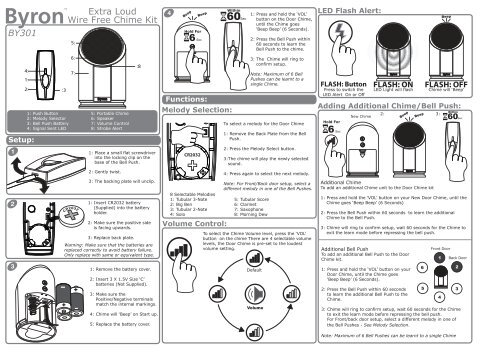
1: Push Button 5: Portable Chime<br />
2: Melody Selector 6: Speaker<br />
3: Bell Push Battery 7: Volume Control<br />
4: Signal Sent LED 8: Strobe Alert<br />
:8<br />
1: Place a small flat screwdriver<br />
into the locking clip on the<br />
base of the Bell Push.<br />
2: Gently twist.<br />
3: The backing plate will unclip.<br />
1: Insert CR2032 battery<br />
(Supplied) into the battery<br />
holder.<br />
2: Make sure the positive side<br />
is facing upwards.<br />
3: Replace back plate.<br />
Warning: Make sure that the batteries are<br />
replaced correctly to avoid battery failure.<br />
<strong>On</strong>ly replace with same or equivalent type.<br />
3 1: Remove the battery cover.<br />
2: Insert 3 X 1.5V Size ‘C’<br />
batteries (Not Supplied).<br />
3: Make sure the<br />
Positive/Negative terminals<br />
match the internal markings.<br />
4: Chime will ‘Beep’ on Start up.<br />
5: Replace the battery cover.<br />
4<br />
Beep<br />
Beep<br />
Functions:<br />
CR2032<br />
1: Press and hold the ‘VOL’<br />
button on the Door Chime,<br />
until the Chime goes<br />
‘Beep Beep’ (6 Seconds).<br />
2: Press the Bell Push within<br />
60 seconds to learn the<br />
Bell Push to the chime.<br />
3: The Chime will ring to<br />
confirm setup.<br />
Note: Maximum of 6 Bell<br />
Pushes can be learnt to a<br />
single Chime.<br />
To select a melody for the Door Chime<br />
1: Remove the Back Plate from the Bell<br />
Push.<br />
2: Press the Melody Select button.<br />
3:The chime will play the newly selected<br />
sound.<br />
4: Press again to select the next melody.<br />
Note: For Front/Back door setup, select a<br />
different melody in one of the Bell Pushes.<br />
8 Selectable Melodies<br />
1: Tubular 3-Note 5: Tubular Score<br />
2: Big Ben 6: Clarinet<br />
3: Tubular 2-Note 7: Saxophone<br />
4: Solo 8: Morning Dew<br />
To select the Chime Volume level, press the ‘VOL’<br />
button on the chime There are 4 selectable volume<br />
levels, the Door Chime is pre-set to the loudest<br />
volume setting.<br />
Default<br />
Volume<br />
LED Flash Alert:<br />
Press to switch the<br />
LED Alert <strong>On</strong> or Off<br />
New Chime<br />
LED Light will flash<br />
Additional Chime<br />
To add an additional Chime unit to the Door Chime kit<br />
Beep<br />
Chime will ‘Beep’<br />
Adding Additional Chime/Bell Push:<br />
Beep<br />
1: Press and hold the ‘VOL’ button on your New Door Chime, until the<br />
Chime goes ‘Beep Beep’ (6 Seconds)<br />
2: Press the Bell Push within 60 seconds to learn the additional<br />
Chime to the Bell Push.<br />
3: Chime will ring to confirm setup, wait 60 seconds for the Chime to<br />
exit the learn mode before repressing the bell push.<br />
Additional Bell Push<br />
To add an additional Bell Push to the Door<br />
Chime kit.<br />
1: Press and hold the ‘VOL’ button on your<br />
Door Chime, until the Chime goes<br />
‘Beep Beep’ (6 Seconds).<br />
2: Press the Bell Push within 60 seconds<br />
to learn the additional Bell Push to the<br />
Chime.<br />
Beep<br />
Front Door<br />
3: Chime will ring to confirm setup, wait 60 seconds for the Chime<br />
to exit the learn mode before repressing the bell push.<br />
For Front/back door setup, select a different melody in one of<br />
the Bell Pushes - See Melody Selection.<br />
Note: Maximum of 6 Bell Pushes can be learnt to a single Chime<br />
Back Door
Installation Guide:<br />
1<br />
Avoid locating the Bell Push/Chime on or directly<br />
near metallic surfaces as this may reduce the<br />
operation range.<br />
UPVC Door Frames:<br />
When locating the bell push onto a UPVC door,<br />
always check the operating performance before final<br />
installation, internal metal frame may affect<br />
performance.<br />
Tip: Try adjusting the location of the Bell Push to the Left/Right<br />
or place on external wall.<br />
Installation Guide: Bell Push<br />
2<br />
‘CLICK’<br />
Installation Guide: Chime<br />
1: Using back plate as a<br />
template.<br />
2: Making sure UP arrows<br />
points UP.<br />
2: Mark and drill holes.<br />
3: Insert wall plugs and attach<br />
to wall using screws<br />
provided.<br />
4: Clip the Bell Push on to the<br />
back plate making sure the<br />
Bell Push ‘Clicks’ in to<br />
place.<br />
Tip: The Bell Push can be<br />
installed using a suitable<br />
double sided adhesive tab or<br />
tape when drilling is not<br />
sutiable.<br />
Changing Batteries:<br />
3 Place the door Chime within the operating range,<br />
transmission of the wire free signal through<br />
Range Guide<br />
Type R2 Device - device where the the sound output is created created by the the initial operation<br />
of the the control and and where where the period of of sound output continues for the<br />
Walls, Doors and Ceilings etc, may reduce the operating<br />
designed duration irrespective of condition of the control.<br />
range. Chime unit for INDOOR use only.<br />
IMPORTANT: There are no serviceable parts, do not repair.<br />
Diagram for illustration purposes only<br />
Bell Push:<br />
1: Remove back plate from the<br />
Bell Push.<br />
2: Remove old battery from the<br />
holder.<br />
3: Replace with new ‘CR2032’ 3V<br />
battery.<br />
4: Insert into holder making sure<br />
‘+’ is facing up.<br />
5: Test Chime Kit.<br />
Chime Unit<br />
1: Remove Batteries.<br />
2: Insert new batteries, 3 X 1.5V<br />
size ‘C’.<br />
3: Make sure Positive/Negative<br />
match the internal markings.<br />
4: Chime will ‘Beep’ on start up.<br />
5: Test Chime Kit.<br />
Always dispose of old batteries in an<br />
environmentally friendly way.<br />
Specification<br />
Bell Push: BYT<br />
Power: 1 x CR2032 3V DC Battery<br />
(Included)<br />
IP44 Weather Resistant<br />
Resetting Chime:<br />
Vol Vol<br />
Beep<br />
Reset Chime unit to factory settings.<br />
1: Press and hold the ‘VOL’ button on your Door Chime,<br />
until the Chime goes ‘Beep Beep’ (6 Seconds)<br />
2: Release the ‘VOL’ button<br />
3: Re-press and hold the ‘VOL’ button on your Door Chime,<br />
until the Chime goes ‘Beep’ (6 Seconds)<br />
4: The Chime is now reset.<br />
User Hints:<br />
In case of the door chime does not sound, please check the<br />
followings:<br />
a) Flat batteries in either Push Button or Door Chime.<br />
b) Wrong battery polarity in either Push Button or Door Chime.<br />
c) For Plug-in Door Chimes make sure the socket is switched on.<br />
d) Bell Push and Door Chime are not paired together, see setup<br />
guide.<br />
e) Materials in between the Bell Push & Chime will reduce the<br />
operating range, move the Door Chime closer to the Bell Push<br />
f) Wire free devices can be affected by external sources e.g. wire<br />
free home alarms or power transformers/adapter<br />
Tel: 0845 2301231 (UK)<br />
9-5 Mon-Fri, Local call charges apply<br />
support@chbyron.com<br />
www.chbyron.com<br />
GB: CH <strong>Byron</strong><br />
<strong>Byron</strong> House, Sherwood Rd<br />
Astonfields, Bromsgrove<br />
B60 3DR<br />
UK<br />
Beep<br />
Beep<br />
Portable Door Chime: BY301<br />
Power: 3 x ‘C’/LR14 1.5V Batteries<br />
(Not supplied)<br />
Range: 100 Metres<br />
Indoor Use <strong>On</strong>ly<br />
433.92MHz<br />
433.92MHz<br />
R&TTE<br />
APPROVED APPROVED<br />
A IRL UK M<br />
B I BG N<br />
DK L CZ CZ SK<br />
FIN NL EST SLO<br />
F PES H CH<br />
D<br />
IS IS PL<br />
GR<br />
LV RO<br />
LT<br />
CH CH <strong>Byron</strong> <strong>Byron</strong> Electrical United Kingdom. www.chbyron.com<br />
V1.0<br />
Project Manager<br />
Mr G G Hunter