You also want an ePaper? Increase the reach of your titles
YUMPU automatically turns print PDFs into web optimized ePapers that Google loves.
2<br />
DIABLO/SUPERSONIC USER MANUAL - ENGLISH<br />
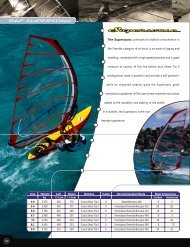
This manual contains all the information necessary to properly rig the<br />
<strong>Neil</strong> <strong>Pryde</strong> <strong>Diablo</strong> and <strong>Supersonic</strong> sails. Careful attention to the instructions<br />
and suggestions presented here will help to ensure that you get the most fun<br />
and best possible service from your sails.<br />
TECHNICAL FEATURES<br />
1. Microlite Batcam with Power Snap System<br />
2. Shear Tip II Rotating Head Fitting<br />
3. Two and Three Position Clew<br />
4. Low Friction Tack Fitting<br />
5. Tube/Rod battens with exclusive CNC tapering<br />
Please see the specific instructions which apply to each of these features before<br />
you rig your sail for the first time.<br />
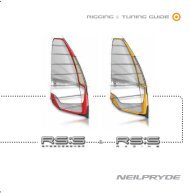
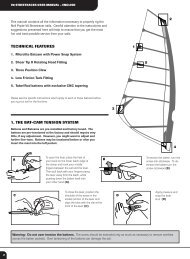
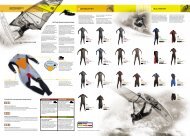
1. THE BAT-CAM TENSION SYSTEM<br />
Battens and Batcams are pre-installed and factory tuned. The<br />
battens are pre-tensioned at the factory and should require very<br />
little, if any adjustment. However, you might want to adjust and<br />
further fine-tune. Battens may be tensioned before or after you<br />
insert the mast into the luff pocket.<br />
A<br />
C<br />
To open the lever, place the heel of<br />
your hand on the lower leech edge of<br />
the clamp and hook your middle<br />
fingers between the sail and the lever.<br />
Then pull back with your fingers prying<br />
the lever away form the leech, while<br />
pushing down the batten itself with<br />
your other hand (A).<br />
To close the lever, position the<br />
shoulder of the screw in the<br />
socket portion of the lever and<br />
align the tube with the clip at the<br />
front of the lever (C).<br />
B<br />
3<br />
D<br />
1<br />
5<br />
<strong>Diablo</strong><br />
2<br />
4<br />
To tension the batten, turn the<br />
screw anti-clockwise. To detension<br />
the batten turn the<br />
screw clockwise (B).<br />
Apply pressure and<br />
snap the lever<br />
shut (D).<br />
Warning: Do not over tension the battens. The screw should be extended only as much as necessary to remove wrinkles<br />
across the batten pockets. Over tensioning of the battens can damage the sail.
2<br />
3<br />
4<br />
C<br />
A<br />
D<br />
B<br />
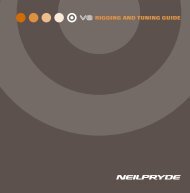
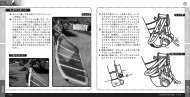
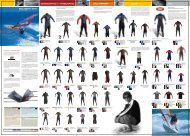
RIGGING<br />
THE SHEAR TIP FITTING<br />
A. Set your boom and mast base to the dimension printed near the tack. The sail<br />
is designed to be perfectly trimmed on the correct mast at the recommended<br />
base settings.<br />
B. Check that all the battens are fully inserted into their pockets. The battens are<br />
pre-tensioned at the factory ans should require very little, if any adjustment.<br />
C. Insert the mast into the luff pocket working the sail down the mast a bit at a<br />
time. When you have the mast almost all the way in, use the tack handle to help<br />
pull the reaining distance to the mast base.<br />
D. Thread the downhaul line according to the instructions and partially tension the<br />
luff using the low friction tack fitting.<br />
E. Attach the booms to the mast, allowing space above it in the cut-out so that the<br />
sail can be fully downhauled later.<br />
F. Downhaul the sail to approximately 1 cm above the cleat<br />
base as shown in the diagram. Fine tune around this<br />
position. A small sticker has been provided with your<br />
sail which you can wrap around your mast base and<br />
use as a reference when you find your best tuning. When<br />
in the correct tuning range the tack pulley will be as<br />
shown.<br />
DIABLO/SUPERSONIC USER MANUAL - ENGLISH<br />
After inserting the mast into the sail, take care that the fitting is seated correctly in<br />
the socket. Once the rig is tensioned, you may adjust the tension on the Shear Tip<br />
sleeve using the Tip adjuster screw, but only until smooth. Do not over tension.<br />
Note : The Shear Tip Fitting has been designed in such way that it is possible to<br />
push down the tip of the arm (see diagram), e.g. when the tip catches a rock or the<br />
ground. When pushed down, the tip will automatically spring back to it’s initial<br />
position.<br />
TWO AND THREE POSITION CLEW<br />
Select the clew ring that’s best suited to your requirements. Use the highest hole in light winds and/or very<br />
smooth water conditions to develop the best power. In this position, you may use less outhaul for a fuller setting<br />
without easing the mid-leech. Use the middle hole for medium conditions. Use the lower hole when overpowered<br />
or in rough water when you want to tune the sail flatter without closing off the twist.<br />
LOW FRICTION TACK RING<br />
The Low Friction Tack Fitting must be rigged properly to ensure maximum downhauling efficiency.<br />
Always rig the tack fitting according to the diagram.<br />
G. If necessary re-tension the batten until wrinkles at the batten pockets<br />
disappear. Be sure not to over-tension the battens.<br />
H. Adjust the outhaul to the recommended dimensions and make the boom<br />
length so the clew is within two centimeters of the boom end. Use a tape<br />
measure to ensure accuracy and repeatability of the settings.<br />
I. To ensure correct tuning for your specific sail, please consult the trim<br />
instructions that follow.<br />
RIGGING TIPS<br />
Pure RAF sails have no cams, so putting the mast into the luff pocket is easy.<br />
Grab the sail by using the handle located inside the fairing.<br />
DE-RIGGING<br />
A. Be sure that the tack fairing is clear of the mast base rings and other rig<br />
components.<br />
B. Carefully ease the outhaul until it is completely loose.<br />
C. Remove the boom.<br />
D. Carefully release the downhaul a little at a time.<br />
E. Remove the mast.<br />
3
4<br />
DIABLO/SUPERSONIC USER MANUAL - ENGLISH<br />
SAIL MAINTENANCE<br />
Always store your sail rolled and dry in its sailbag. Try to prevent the sail from<br />
being crushed or badly creased. Wash the sail in fresh water after use if<br />
possible, but do not store wet. The battens may be left in their pockets.<br />
Do not leave the sail exposed to strong or direct sunlight.<br />
Do not use any solvents or chemicals to clean it. If the sail becomes dirty, use<br />
fresh water and mild soap.<br />
Make sure that you always keep the Shear Tip Rotating Head Fitting as free of<br />
sand as possible and flush the head area and fitting with fresh water regularly.<br />
SAIL SAFE, HAVE FUN<br />
Sail carefully and thoughtfully around other sailors and beach users.<br />
Before leaving the beach check all your equipment thoroughly for<br />
signs of wear or breakage. Always check the weather forecasts and<br />
take note of local conditions and potential hazards before sailing.<br />
Check for dangerous currents, and consider carefully where you<br />
might land in the event of an emergency.<br />
For further information on this or other NEILPRYDE windsurfing<br />
equipment contact your AUTHORISED NEILPRYDE DEALER or our<br />
distributor in your country.<br />
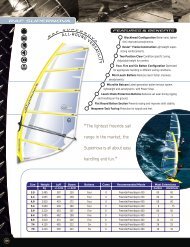
TUNING DIABLO AND THE RAF SUPERSONIC<br />
First set the sails to base recommendations printed at the sail tack. Then, if necessary, tune the downhaul so that the leech appears just<br />
loose at the first and second batten. There may be some small wrinkles in the edge of the leech down to the first batten but these should<br />
not look pronounced or extreme. There will be looseness of the sail material inboard from the batten ends down to batten #2 or #<br />
3 but this will not be wrinkled looking nor will the edge of the sail be heavily wrinkled in this area. Once the upper leech<br />
looks correct (see drawings), then add outhaul until the leech makes a straight line from the first batten<br />
above the boom right up to the head. This should normally require between 2 - 4 cm of<br />
“positive” outhaul (beyond the point where you start to feel resistance). If in doubt<br />
add an additional 5 - 10 mm to be sure the sail is sufficiently outhauled.<br />
A NOTE ON RIG DIMENSIONS<br />
The rig dimensions printed on the tack of all <strong>Neil</strong> <strong>Pryde</strong> collection sails<br />
show the following information:<br />
• Base setting: this is the number which you should set your <strong>Neil</strong><br />
<strong>Pryde</strong> aluminum or carbon mast base ring. Rigged on the correct<br />
mast you will be able to downhaul perfectly with the carbon base.<br />
You will have to interpolate the setting for using the aluminum base<br />
since the dimensioning is different.<br />
• Boom dimension is stated as the best average tuned dimension plus<br />
or minus 1 cm. This is measured from the forward edge of the mast (at<br />
the center of the boom cutout) to the sail clew at the center eyelet.<br />
These figures are intended as a GUIDE to proper sail trim and depending<br />
on the rig components you choose may not always correspond perfectly to<br />
the settings which are best for you.<br />
CHOOSING THE RIGHT MAST<br />
Ideal downhaul –<br />
Moderate wind<br />
Every <strong>Neil</strong> <strong>Pryde</strong> sail is designed around a specific recommended mast.<br />
To get the optimum performance from your <strong>Neil</strong> <strong>Pryde</strong> racing sails, use the<br />
recommended mast. In many cases an alternative mast is specified and<br />
this will also provide good performance.