782RA Maintenance Guide - Nordson EFD
782RA Maintenance Guide - Nordson EFD
782RA Maintenance Guide - Nordson EFD

Create successful ePaper yourself
Turn your PDF publications into a flip-book with our unique Google optimized e-Paper software.
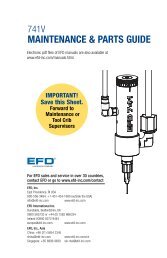
<strong>782RA</strong> Spray Valve<br />
MAINTENANCE & PARTS GUIDE<br />
Electronic pdf files of <strong>EFD</strong> ® manuals are also available at<br />
www.efd-inc.com/manuals.html.<br />
A NORDSON COMPANY<br />
IMPORTANT!<br />
Save this Sheet.<br />
Forward to<br />
<strong>Maintenance</strong> or<br />
Tool Crib<br />
Supervisors<br />
®<br />
For <strong>EFD</strong> sales and service in over 30 countries,<br />
contact <strong>EFD</strong> or go to www.efd-inc.com/contact<br />
<strong>EFD</strong>, Inc.<br />
East Providence, RI USA<br />
800-556-3484; +1-401-434-1680 (outside the USA)<br />
info@efd-inc.com www.efd-inc.com<br />
<strong>EFD</strong> International Inc.<br />
Dunstable, Bedfordshire, UK<br />
0800 585733 or +44 (0) 1582 666334<br />
Ireland 00800 8272 9444<br />
europe@efd-inc.com www.efd-inc.com<br />
<strong>EFD</strong>, Inc., Asia<br />
China: +86 (21) 5854 2345<br />
china@efd-inc.com www.efd-inc.com/cn<br />
Singapore: +65 6896 9630 sin-mal@efd-inc.com
Valve Disassembly<br />
and Reassembly Procedures<br />
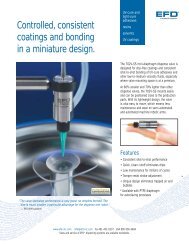
Valve maintenance<br />
To thoroughly clean the fluid body and<br />
replace needle packings:<br />
1. Remove needle stroke control knob<br />
and spring.<br />
2. Remove the gear cover.<br />
3. Remove the rotor retainer nut, then<br />
the rotor, nozzle, fittings and motor<br />
from the fluid body.<br />
4. Remove the motor mount and<br />
motor assembly.<br />
5. Remove the fluid body from the air<br />
cylinder body. Remove the O-ring<br />
from the fluid body.<br />
6. Clean the fluid body, rotor and nozzle<br />
in appropriate solvent.<br />
Screw #H2-56X1/4PH<br />
Nut #7842A<br />
2<br />
Gear cover<br />
#7864<br />
3<br />
Rotor<br />
bearing,<br />
small<br />
#7844A<br />
Rotor<br />
#7842-3<br />
Rotor<br />
bearing,<br />
large<br />
#7844B<br />
Note: Rotor bearings can be soaked in<br />
light oil for one hour to penetrate past<br />
the seals. Replace bearings if rotor does<br />
not rotate smoothly.<br />
7. Use tool #7803 to remove needle<br />
packings from fluid body.<br />
8. Remove any remaining packings<br />
and the spring from the needle.<br />
Note: The lower cylinder needle O-ring<br />
is held in place by a flat retaining washer<br />
that also serves as the packing-spring<br />
seat. The washer may come out with<br />
the spring. Ensure that it is back in place<br />
before reinstalling the packing spring.<br />
9. Clean the needle with a cloth<br />
dampened in solvent.<br />
Bearing seal #7852<br />
Spur gear #7845<br />
Spur gear<br />
retainer<br />
#7847<br />
Nozzle<br />
extension<br />
#7841-3<br />
Nozzle #7841<br />
Pinion gear<br />
#7862<br />
Screw<br />
#H2-56X1/4FH<br />
Motor mount / gear shroud<br />
#7863<br />
www.efd-inc.com info@efd-inc.com USA 800-556-3484 Europe +44 (0) 1582 666334 Asia +86 (21) 5854 2345<br />
Sales and service of <strong>EFD</strong> dispensing systems are available worldwide.<br />
4
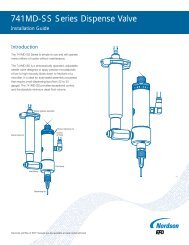
10. Lubricate the needle with Nye<br />
Lubricant #865. Reinstall the<br />
needle packing spring and a new<br />
packing kit.<br />
11. Install a new O-ring (#7517) on the<br />
fluid body.<br />
12. Reassemble valve in reverse order.<br />
Replacing piston and needle<br />
assembly or piston O-ring:<br />
13. Remove needle stroke-control<br />
knob.<br />
14. Remove piston return spring and<br />
thrust washers.<br />
15. Remove the snap ring.<br />
16. With small pliers on the spring<br />
pilot, pull the piston and needle<br />
assembly out of air cylinder. The<br />
piston and needle assembly is one<br />
unit and cannot be disassembled.<br />
5<br />
Fluid body #7875<br />
Fluid inlet fitting #7543BP<br />
Needle packing assembly #7810<br />
Packing spring #7808<br />
Retaining washer #7807<br />
7<br />
Air cylinder body #7811<br />
11<br />
O-ring<br />
#7806<br />
Air motor<br />
assembly<br />
#7860<br />
Air inlet fitting #78518M<br />
O-ring<br />
#7517<br />
17<br />
17. Clean air cylinder body wall and<br />
lubricate with Nye Lubricant #865.<br />
18. Reassemble the valve in reverse<br />
order.<br />
Piston and needle<br />
assembly #7805-SS-3<br />
General <strong>Maintenance</strong> Kit<br />
#780S-RK<br />
Includes O-rings, needle-packing<br />
assembly and lubricant.<br />
<strong>Maintenance</strong> Tools:<br />
6” adjustable wrench<br />
5/16” open-end wrench<br />
snap-ring pliers<br />
packing extraction tool #7803<br />
Snap ring<br />
#7526<br />
10<br />
15<br />
O-ring #7519<br />
Air inlet fitting #78518M<br />
16<br />
Piston<br />
return<br />
spring<br />
#7802<br />
14<br />
Thrust<br />
washer<br />
#7809<br />
1<br />
Needle<br />
stroke<br />
control<br />
#780SR-KIT<br />
Thrust<br />
washer<br />
#7809<br />
www.efd-inc.com info@efd-inc.com USA 800-556-3484 Europe +44 (0) 1582 666334 Asia +86 (21) 5854 2345<br />
Sales and service of <strong>EFD</strong> dispensing systems are available worldwide.<br />
13
Troubleshooting <strong>Guide</strong><br />
No fluid flow<br />
• If valve operating air pressure is too low,<br />
the valve will not open. Increase air<br />
pressure to 70 psi (4.8 bar) minimum.<br />
• The reservoir air pressure may not be<br />
high enough. Increase pressure.<br />
• The nozzle may be clogged. Clean<br />
the nozzle.<br />
• The stroke adjustment control may<br />
be closed. If it is closed, open counterclockwise<br />
one turn.<br />
• The control and the atomizing air<br />
lines may be reversed. Check for<br />
proper connection.<br />
Valve does not provide clean shut-off,<br />
leaving a build-up on the nozzle<br />
• Atomizing air pressure may be too<br />
low. Increase the air pressure.<br />
• Atomizing air delay setting may be too<br />
low. Increase air delay setting.<br />
Fluid continuously drips from the<br />
nozzle after the valve shuts off<br />
• A continuous drip can be caused by<br />
improper seating of the needle in the<br />
nozzle seat. Remove the nozzle,<br />
clean the needle and nozzle, and<br />
replace worn or damaged parts.<br />
• If the fluid body has not been fully<br />
turned onto the air cylinder body<br />
during reassembly, the needle will not<br />
seat in the nozzle. Check fluid body<br />
installation.<br />
• Needle packings may be binding due<br />
to leakage, preventing the needle<br />
from fully closing. Disassemble the<br />
valve and replace the packings if<br />
there is evidence of leakage.<br />
Fluid flows from the nozzle but will not<br />
spray<br />
• Atomizing air pressure may be too<br />
low. Increase air pressure.<br />
• If the fluid viscosity is too high, it will<br />
not atomize. Reduce viscosity.<br />
• Check atomizing hose connection<br />
“B” at the controller.<br />
A NORDSON COMPANY<br />
USA: 800-556-3484 or +1-401-434-1680<br />
Europe: 0800 585733 or +44 (0) 1582 666334<br />
Asia: +86 (21) 5854 2345<br />
technical@efd-inc.com www.efd-inc.com<br />
©2006 <strong>Nordson</strong> Corporation 782-MAINT-01 v062606