2001 – 2003 QX4; DRIVER'S SEAT (WITH ADP ONLY ... - JustAnswer
2001 – 2003 QX4; DRIVER'S SEAT (WITH ADP ONLY ... - JustAnswer
2001 – 2003 QX4; DRIVER'S SEAT (WITH ADP ONLY ... - JustAnswer

You also want an ePaper? Increase the reach of your titles
YUMPU automatically turns print PDFs into web optimized ePapers that Google loves.
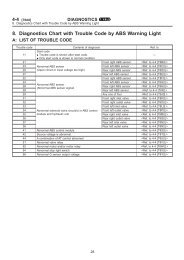
Classification: Reference: Date<br />
BT00-030a ITB00-065a December 21, 2004<br />
<strong>2001</strong> <strong>–</strong> <strong>2003</strong> <strong>QX4</strong>; <strong>DRIVER'S</strong> <strong>SEAT</strong> (<strong>WITH</strong> <strong>ADP</strong> <strong>ONLY</strong>)<br />
WON'T MOVE FORWARD OR BACKWARD<br />
This bulletin amends ITB00-065. This version amends the Applied Vehicles.<br />
Please discard all paper copies of the earlier version.<br />
APPLIED VEHICLES: <strong>2001</strong> - <strong>2003</strong> <strong>QX4</strong> (JR50) equipped with <strong>ADP</strong> only<br />
IF YOU CONFIRM:<br />
The driver's seat will not move in the forward or backward direction,<br />
ACTIONS:<br />
1. Confirm this bulletin applies (see steps 1 and 2 of the Service Procedure).<br />
2. If needed, install the Seat Slide Motor Kit (see Parts Information).<br />
IMPORTANT: DO NOT replace the entire seat adjuster assembly for this incident, if it should occur.<br />
This is the <strong>ONLY</strong> approved repair procedure for this incident. A claim to Infiniti division for the repair<br />
of this incident may be denied if the repair is not performed exactly as outlined in this bulletin.<br />
Figure 1<br />
IMPORTANT: The purpose of "ACTIONS" (above) is to give you a quick idea of the work you will be<br />
performing. You MUST closely follow the entire Service Procedure (starting on page 2) as it contains<br />
information that is essential to successfully completing this repair.<br />
Infiniti Bulletins are intended for use by qualified technicians, not 'do-it-yourselfers'. Qualified technicians are properly trained<br />
individuals who have the equipment, tools, safety instruction, and know-how to do a job properly and safely. NOTE: If you believe<br />
that a described condition may apply to a particular vehicle, DO NOT assume that it does. See your Infiniti dealer to determine if this<br />
applies to your vehicle.<br />
1/8
PARTS INFORMATION<br />
DESCRIPTION PART # QUANTITY<br />
Seat Slide Motor Kit 87562-C9925 1<br />
CLAIMS INFORMATION<br />
NOTE: This is the <strong>ONLY</strong> approved repair procedure for this incident. A claim to Infiniti division for the<br />
repair of this incident may be denied if the repair is not performed exactly as outlined in this bulletin.<br />
Submit a Primary Failed Part (PP) line claim using the following claims coding:<br />
DESCRIPTION PFP OP CODE SYM DIA FRT<br />
RPL Slide motor & gear assy 87562-C9925 VH80AA ZE 32 1.1 hrs<br />
SERVICE PROCEDURE<br />
1. Using the power seat switch, tilt the front edge of the seat bottom all the way up.<br />
2. Check voltage to the seat slide motor as follow:<br />
• Measure voltage between terminal 1 ("BR" wire) and terminal 2 ("W/B" wire) in the seat slide motor<br />
connector (B518).<br />
• See Figure 2. For more detailed information, refer to "Automatic Drive Positioner" in the EL section of<br />
the appropriate Service Manual (ESM).<br />
WARNING: When checking the power seat slide motor circuit, do not confuse its black connector<br />
(B518) with the side air bag module yellow connector.<br />
Side air bag connector.<br />
Do Not probe this connector.<br />
Seat slide motor<br />
Figure 2<br />
• This voltage check can be done with the seat slide motor connected.<br />
B518 connector.<br />
Back-probe here (harness side)<br />
• If the voltage is about 12V when the seat slide switch is pressed to the “forward” and “backward”<br />
positions this bulletin applies, proceed to step 3.<br />
• If voltage is 0V when the seat slide switch is pressed to either the “forward” or “backward” positions,<br />
this bulletin does not apply. Use the EL section of the appropriate Service Manual (ESM) to further<br />
diagnosis and repair the incident.<br />
2/8
3. Record the radio station pre-sets for later reprogramming after the procedure.<br />
Pre-sets 1 2 3 4 5 6<br />
FM 1<br />
FM 2<br />
AM<br />
4. Lightly tap the seat slide motor (see Figure 2 on page 2). Sometimes this will get the motor working again<br />
temporarily so the seat can be moved to access the seat mounting bolts.<br />
5. Move the seat bottom all the way forward and remove the two rear seat mounting bolts (M10, 14mm head).<br />
6. Move the seat all the way to the back position and remove the two front seat mounting bolts (M10, 14mm<br />
head.<br />
7. Turn the ignition key "OFF".<br />
8. Disconnect both battery cables, negative cable first, and wait three (3) minutes. This will allow the<br />
Supplemental Restraint System (SRS), which includes the front seat side air bags, to deactivate.<br />
9. Tilt the entire seat assembly back so you can reach all the vehicle harness-to-seat connectors. Then,<br />
disconnect them from the seat.<br />
10. Remove the seat assembly from vehicle and place it on a clean dry surface (use a fender cover or large<br />
floor-mat). Place it with the seat back lying flat so you can reach the underside of the seat.<br />
11. Unhook the carpet flap from the underside of the seat bottom (see Figure 3).<br />
Figure 3<br />
3/8
12. Remove the four seat bottom cushion bolts (M8, 12mm head). These will release it from the seat frame<br />
(see Figure 4).<br />
• Then, remove the two seat track mounting tab bolts (M6, 10mm head), one on each side<br />
(see Figure 4).<br />
• Removing these bolts will release the seat slide rails from the “worm gears”.<br />
Figure 4<br />
13. Remove both screws and finisher from the front edge of the seat (see Figure 5).<br />
Figure 5<br />
14. Remove the top screw only from the RH & LH side finishers (see Figure 5).<br />
4/8
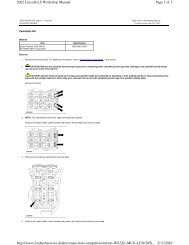
15. Disconnect the seat sub-harness connector to slide motor (see Figure 6).<br />
• Remove the bolts shown below, one from each side of the seat frame (M8, 12mm head). They’re<br />
located at the sides of the front edge of the seat (see “Remove this bolt first” in Figure 6).<br />
• Then, remove six nuts (3 on each side) and two base plates, located at the top of the frame, to release<br />
the gear boxes (see Figure 6).<br />
Figure 6<br />
16. Slide both sides of the seat rail back to the rear position (towards the seat back) and remove the worm<br />
gears, drive cable, motor, and gear boxes, all as one unit, from the seat adjuster assembly. (see Figure 7).<br />
CAUTION: Avoid bending the drive cable. Bending the cable will result in noise during seat operation.<br />
Lift out motor, drive cable, worn gears<br />
and gear boxes as an assembly<br />
Slide both seat<br />
rails downward<br />
Figure 7<br />
5/8<br />
Gear box<br />
Connector<br />
Drive cable<br />
Motor & gear box<br />
Seat track mounting tabs<br />
Worm gears<br />
TP030668
17. Remove the drive cable from the gear boxes. To release the drive cable from the motor end, pull up on the<br />
tab using a small flat blade screwdriver or equivalent (see Figure 8).<br />
Release tab<br />
Figure 8<br />
Motor<br />
Drive cable<br />
connector<br />
TP030669<br />
18. Make sure the new seat track mounting tab is touching the rear stopper, with the threaded shaft facing up<br />
(see Figure 9).<br />
• Measure the distance between the gear box and the mounting tab (see Figure 9).<br />
• Measure and adjust the other seat track mounting tab to the same distance (see Figure 9).<br />
Figure 9<br />
6/8
19. Replace all six rubber grommets (3 to each side) from the kit (see Figure 10).<br />
Figure 10<br />
NOTE: For steps 20 through 23 (below), refer to Figures 6 and 7 on page 5, if needed.<br />
20. Put the worm gears, gear boxes, and drive cable assembly (all as one unit) back into the seat frame.<br />
CAUTION: Avoid bending the drive cable. Bending the drive cable will create a noise when the seat is<br />
operated.<br />
21. Move both seat tracks back into position on top of the seat track mounting tabs. Install and hand tighten<br />
the bolts into both seat track mounting tabs (M6, 10mm head).<br />
22. Tighten the six nuts (three on each side) with the base plates, located at the top of the frame, to secure the<br />
gear boxes (refer to Figure 6 if needed). Nut torque: 64-85 in-lb (7.17-9.69 Nm).<br />
23. Re-install and tighten two bolts (M8, 12mm head) located to the sides of the front edge of the seat frame<br />
(see “Remove this bolt first” in Figure 6). Bolt torque: 13-17 ft-lb (17.5-23.7 Nm).<br />
24. Check the gear box to mounting tab distance again. Make sure the distance has not changed<br />
(see Figure 11).<br />
• If N/G, adjust.<br />
Figure 11<br />
7/8
25. Tighten bolts (M6, 10mm head) into both seat track mounting tabs (see Figure 4). Bolt torque: 65-84 in-lb<br />
(7.3-9.4 Nm).<br />
26. Re-install screws to attach the side finishers and the front finisher (refer to Figure 5 if needed).<br />
27. Re-install four bolts (M8, 12mm head) to tighten the seat bottom cushion to the seat frame (refer to Figure 4<br />
if needed). Bolt torque: 13-17 ft-lb (17.5-23.7 Nm).<br />
28. Re-connect the slide motor electrical connector (B518), making sure it snaps in place.<br />
29. Re-hook the strap to attach the carpet flap onto the bottom of the seat (refer to Figure 3 if needed).<br />
30. Place the seat assembly back into the vehicle and re-connect all electrical connectors. Make sure they all<br />
snap together securely.<br />
31. Re-connect the battery cables, positive cable first.<br />
32. Re-install four seat mounting bolts. Bolt torque: 27-36 ft-lb (37-49 Nm).<br />
33. Operate all seat switches to make sure everything works as it should.<br />
34. For the <strong>ADP</strong> entry/exit feature to return to normal operation, procedure A or B must be performed.<br />
Procedure A:<br />
1. Insert key into the ignition key cylinder. (Ignition switch is “OFF”.)<br />
2. Open <strong>–</strong> close - open the driver side door (dome lamp; “ON” <strong>–</strong> “OFF” <strong>–</strong> “ON”).<br />
3. End<br />
Procedure B:<br />
1. Drive the vehicle at more than 25 km/h (16 MPH).<br />
2. End<br />
35. Re-program the radio presets.<br />
36. Re-set the clock.<br />
8/8