You also want an ePaper? Increase the reach of your titles
YUMPU automatically turns print PDFs into web optimized ePapers that Google loves.
14<br />
SURGICAL TECHNIQUE<br />
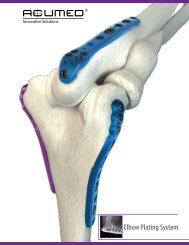
Olecranon Plate by Shawn O’Driscoll, Ph.D., M.D.<br />
This section offers <strong>Acumed</strong>’s suggested method for implanting the Locking Olecranon Plate from the Mayo Clinic Congruent<br />
Elbow Plate System. For specific questions not addressed here, please contact your local <strong>Acumed</strong> representative or <strong>Acumed</strong> by<br />
phone at (888) 627-9957 or on the web at www.acumed.net.<br />
1: Flex the elbow 90°, reduce the fracture and apply the<br />
plate. The prongs in the proximal end of the plate should<br />
penetrate the triceps tendon and provide provisional fixation.<br />
These prongs do not compress the tendon, and a gap<br />
between the plate and the bone should be visible on X-ray.<br />
3: With provisional reduction confirmed, drill (MS-DC28)<br />
and insert a 3.5mm non-locking screw (CO-3xx0) through<br />
the slotted hole distal to the fracture site and into the ulnar<br />
shaft. Connect the 2.5mm hex driver tip (HPC-0025) to the<br />
driver handle (MS-3200 or MS-1210) and tighten the screw<br />
partially to allow for later compression.<br />
Bone taps (MS-LTT27/35) are recommended for patients<br />
with dense bone.<br />
2: A 2.0mm wire (WS-2009ST) is drilled through the proximal<br />
hole of the plate and across the fracture site, penetrating<br />
the anterior metaphyseal cortex. If a locking screw is to be<br />
utilized, thread the 2.7mm locking drill guide (MS-LDG27)<br />
into the plate hole and then insert the wire. Do not remove<br />
this wire until Step 6.<br />
Alternatively, two .062" wires can be placed across the<br />
fracture, one on each side of the plate.<br />
4: Insert a 3.5mm non-locking screw (CO-3xx0) in dynamic<br />
compression mode into a distal slot along the ulnar shaft<br />
using the offset drill guide (PL-2095). The proximal shaft<br />
screw may be loosened to allow for compression. If a longer<br />
plate is used and further compression is required, insert<br />
another non-locking screw into a distal slot in dynamic compression<br />
mode, loosening the first two screws to allow for<br />
plate movement.