VoiceTone Correct - TC-Helicon
VoiceTone Correct - TC-Helicon VoiceTone Correct - TC-Helicon
ENGLISH VERSION
- Page 3 and 4: Introduction ......................
- Page 5 and 6: About TC-Helicon At TC-Helicon we t
- Page 7 and 8: Step 3: Connect a mic cable to the
- Page 9 and 10: Step 7: Connect Correct’s power a
- Page 11 and 12: Step 11: Here are some quick tips o
- Page 13 and 14: 1. Guide Output Alternate output wi
- Page 15 and 16: 6. Pitch Knob Controls the amount o
- Page 17 and 18: Standard Setup The standard setup f
- Page 19 and 20: Sound Engineer Setup If you are in
- Page 21 and 22: Advanced Settings: Manual Shape The
- Page 23 and 24: Adaptive Shape EQ Set up the produc
- Page 25 and 26: De-ess Set up the product as follow
- Page 27 and 28: What's the problem? 1. Dynamics Voc
- Page 29 and 30: Current ways of solving the problem
- Page 31 and 32: Getting comfortable with correction
- Page 33 and 34: FAQ & Troubleshooting: 1. I'm not g
- Page 35: Analog Inputs Connectors Balanced
ENGLISH VERSION
Introduction .................................................... page 4<br />
Quick Start .......................................................page 6<br />
Using Two <strong>VoiceTone</strong> Pedals ....................... page 12<br />
Front & Back Panel Descriptions ............... page 13<br />
Setup Configurations ....................................page 16<br />
Phantom Power ..............................................................page 16<br />
Standard Setup ................................................................page 17<br />
Main/Monitor ...................................................................page 18<br />
Sound Engineer Setup .................................................page 19<br />
Advanced Setup .............................................................page 2<br />
<strong>TC</strong> <strong>Helicon</strong> Vocal Technologies Ltd.<br />
info@tc-helicon.com<br />
Table of Contents<br />
Using & Understanding the Effect ..............page 22<br />
Using the Effects ............................................page 23<br />
Adaptive Shape EQ ......................................................page 23<br />
Adaptive Compression ...............................................page 24<br />
De-ess ..................................................................................page 25<br />
Pitch <strong>Correct</strong>ion .............................................................page 26<br />
Understanding Live Engineer Effects .........page 27<br />
Understanding Pitch <strong>Correct</strong>ion ................page 31<br />
FAQ & Troubleshooting ...............................page 33<br />
Specifications ..................................................page 35<br />
Manual revision 1.0 – SW – V 1.0<br />
English Version<br />
| Prod. No: E60507211<br />
3
Introduction<br />
Welcome to <strong>VoiceTone</strong> <strong>Correct</strong><br />
We at <strong>TC</strong>-<strong>Helicon</strong> believe that <strong>VoiceTone</strong> <strong>Correct</strong> will<br />
finally make you truly satisfied with your live vocal sound.<br />
More than any other musicians, vocalists are<br />
understandably not happy with their live sound. The<br />
reason is typically obvious - the singer has no control of<br />
the sound system and most often there is no sound<br />
engineer to help. <strong>Correct</strong> to the rescue! <strong>Correct</strong> listens<br />
to your voice and adjusts your tone and dynamics<br />
automatically to produce studio quality vocal tone that<br />
you and your audience will appreciate. In addition, the<br />
pitch correction effect is like a metronome for pitch. It<br />
lets you know when you're out of tune and you naturally<br />
decide to correct yourself, or not.<br />
An incredible amount of live sound research was<br />
undertaken for <strong>VoiceTone</strong> <strong>Correct</strong> and that means you<br />
can trust it as a capable and reliable sound engineer. In<br />
terms of audio quality (noise floor, harmonic distortion,<br />
and frequency response), <strong>Correct</strong> surpasses anything<br />
that has come before it, and unarguably exceeds even<br />
4<br />
the most stringent "audiophile" requirements.<br />
Many audience members, band members and sound<br />
engineers may be surprised to see a singer taking<br />
control over their sound. We think it's about time!<br />
Features:<br />
Pitch <strong>Correct</strong>ion:<br />
o Auto-chromatic pitch correction acts as a guide for<br />
you to improve your pitch<br />
o Accurate input pitch and correction display<br />
o <strong>Correct</strong>ion can go to monitors, mains or both<br />
Live Engineer effects (LE effects)<br />
o Adjustable Adaptive Compression<br />
o Multiband Adaptive Shape EQ dynamically sweetens<br />
raw mic sound<br />
o Sibilance-smoothing de-ess algorithm<br />
o Add rich lows on deep voices with the Warmth<br />
button<br />
o XLR mic level I/O<br />
o Clean, studio quality mic preamp with phantom power
About <strong>TC</strong>-<strong>Helicon</strong><br />
At <strong>TC</strong>-<strong>Helicon</strong> we truly believe that the voice is the<br />
world's most beautiful instrument. We don't mean to<br />
degrade other beautiful instruments, but the singing<br />
voice is the anthropological source for all things melodic.<br />
In the words of the founders of <strong>TC</strong>-<strong>Helicon</strong>,<br />
"Everything we do is dedicated to this instrument (the<br />
singing voice). We envision a world where those who<br />
work with the voice in live and recording situations can<br />
bring out the very best from any performance, and<br />
where the possibilities of vocal craft are endless."<br />
Our mission was galvanized by a simple question:<br />
"Isn't it time that someone finally provided dedicated<br />
tools and solutions for voice?"<br />
So what does this all mean to singers? It means that you<br />
should know there is a dedicated group of engineers,<br />
researchers and product specialist based in Victoria, BC,<br />
Canada that spend every waking moment of their<br />
working lives listening, talking, singing, and interacting<br />
with singers and those who have passion for the singing<br />
voice. All this knowledge and experience is used to<br />
design products respecting and empowering the<br />
modern vocalist. Our products focus on removing<br />
barriers and inspiring creativity in performance. That's<br />
why our products range from near-field personal vocal<br />
monitors to floor-based vocal multi-effects pedals.<br />
Enjoy.<br />
The <strong>TC</strong>-<strong>Helicon</strong> Team<br />
a <strong>TC</strong> Group company<br />
Introduction<br />
5
Quick Start<br />
Step 1:<br />
Connect your microphone to a mic cable<br />
NOTE:<br />
Make sure <strong>Correct</strong> is not powered.<br />
6<br />
Step 2:<br />
Connect the mic cable to the Mic Input on <strong>Correct</strong>.
Step 3:<br />
Connect a mic cable to the Main Output of <strong>Correct</strong>.<br />
Quick Start<br />
Step 4:<br />
Connect the mic cable from <strong>Correct</strong> to a mic input on<br />
your sound system.<br />
NOTE:<br />
At this point it would be best to turn the gain and/or<br />
volume on your sound system's mic input to off.<br />
7
Quick Start<br />
Step 5:<br />
Set all EQ and/or compression on your sound system<br />
mic channel to off, or unity (middle position - no boost<br />
or cut).<br />
NOTE:<br />
<strong>Correct</strong> is going to supply the EQ and compression<br />
for your voice automatically. After it has been turned<br />
on for your voice, a live sound engineer can decide if<br />
they want to do any further processing. But know<br />
that for the vast majority of the time, there is no<br />
need for extra EQ or compression.<br />
8<br />
Step 6:<br />
Turn the Input Knob fully left and set the last four knobs<br />
on <strong>Correct</strong> to their default position as indicated.
Step 7:<br />
Connect <strong>Correct</strong>’s power adapter to main power and<br />
to the Power Input on <strong>Correct</strong>.<br />
Quick Start<br />
Step 8:<br />
While singing through your microphone, turn the Input<br />
Knob to the right until the Input Light turns green,<br />
sometimes orange on louder parts, but never red.<br />
9
Quick Start<br />
Step 9:<br />
Raise the gain and/or volume on your sound system mic<br />
input channel and master volume until you hear a good<br />
level from your vocals.<br />
10<br />
Step 10:<br />
You're ready to hear <strong>Correct</strong> on your voice.<br />
a. Turn the Live Engineer effects on or off with the<br />
Right Footswitch<br />
b. Turn the pitch correction effect on or off with the<br />
Left Footswitch
Step 11:<br />
Here are some quick tips on understanding what<br />
<strong>Correct</strong> will do for your live vocal sound.<br />
Live Engineer (LE effects): On<br />
Regardless of your microphone, mic technique or<br />
whether you are a Bass or Soprano, the LE effects will<br />
optimize the balance of low and high frequencies and<br />
smooth the loud and soft parts of your singing to make<br />
you sound your best. Your sound will be clear and<br />
defined and will fit well into your mix.<br />
Pitch <strong>Correct</strong>ion effect: On<br />
Singing with the pitch correction effect can ensure that<br />
your vocal is on pitch. You'll hear the pitch corrected<br />
version of your voice that will act as a reference so you<br />
can self adjust your pitch to be right on key.<br />
Quick Start<br />
11
Using Two <strong>VoiceTone</strong> Pedals<br />
You can use two <strong>VoiceTone</strong> pedals in series. For<br />
example, a great combination is to have <strong>VoiceTone</strong><br />
<strong>Correct</strong> feeding a <strong>VoiceTone</strong> Create pedal. Generally,<br />
<strong>Correct</strong> should be the first device in the chain.<br />
Step 1:<br />
Follow the Quick Start guide for both <strong>VoiceTone</strong> Pedals.<br />
Step 2:<br />
Instead of connecting your first <strong>VoiceTone</strong> pedal to the<br />
PA, connect its mono output to the mic input on Create.<br />
12<br />
Step 3:<br />
Connect the second <strong>VoiceTone</strong> pedal, in this case Create<br />
to the PA.<br />
Step 4:<br />
Set <strong>VoiceTone</strong> Create’s Input Knob fully left.<br />
Step 5:<br />
Use the first pedal’s Input Knob to set the microphone<br />
gain.
1. Guide Output<br />
Alternate output with full time pitch correction when it’s<br />
only desired in stage monitors. Diagram below shows<br />
possible routings<br />
2. Main Output<br />
Typical output for use with sound system. Diagram<br />
below shows possible routings.<br />
POWER<br />
3. Mic Input<br />
Microphone connection<br />
PI<strong>TC</strong>H ENABLED LE EFFECTS<br />
ENABLED<br />
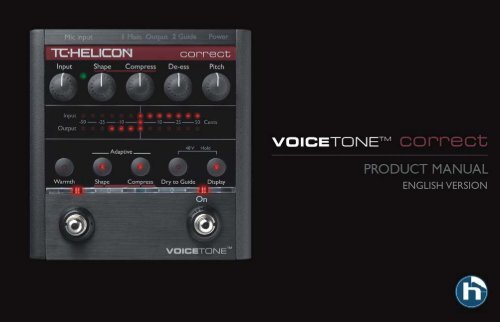
Front & Back Panel Descriptions<br />
1<br />
2<br />
MAIN OUTPUT GUIDE OUTPUT<br />
No No Dry Pitch<br />
Yes No Dry Pitch<br />
Yes Yes LE Effects + Pitch LE Effects + Pitch<br />
No Yes LE Effects LE Effects + Pitch<br />
3<br />
13
7<br />
8<br />
Front & Back Panel Descriptions<br />
14<br />
1 2 3 4 5 6<br />
13 14<br />
9<br />
10<br />
11<br />
12<br />
1. Input Knob<br />
Controls the microphone pre-amplifier gain. <strong>Correct</strong> can<br />
accept dynamic or condenser microphones.<br />
2. Input Light<br />
Indicates the input level of the microphone. Flashing<br />
green, sometimes orange is good. Flashing red is clipping,<br />
which is not good.<br />
3. Shape Knob<br />
Controls the amount of Shape EQ on the voice. 12<br />
o’clock is the default position, full left is off.<br />
4. Compress Knob<br />
Controls the amount of compression on the voice. 12<br />
o’clock is the default position, full left is off.<br />
5. De-ess Knob<br />
Controls the amount of de-essing on the voice. 12<br />
o’clock is the default position, full left is off.
6. Pitch Knob<br />
Controls the amount of pitch correction effect on the<br />
voice. 12 o’clock is default position, full left is off.<br />
7.Warmth Button<br />
Enables the Warmth EQ.<br />
8.Adaptive Shape & Compress Buttons<br />
Switch the Shape and Compress effects between<br />
adaptive and manual.<br />
9. Pitch Display<br />
Displays your relative intonation.The top bar shows your<br />
input pitch, the bottom bar shows your corrected pitch.<br />
10. Phantom Power Light<br />
Indicates status of +48V phantom power.<br />
Front & Back Panel Descriptions<br />
11. Dry to Guide Button<br />
When enabled, the Guide Output will feature your pitch<br />
corrected voice in parallel with your natural voice. This<br />
can make it easier to hear the pitch correction effect in<br />
high level situations.<br />
12. Display Button<br />
Turns the Pitch Display on/off<br />
13. Left Footswitch<br />
Turns the pitch correction effect on/off.<br />
14. Right Footswitch<br />
Turns all effects off in the Main Output of <strong>Correct</strong> (LE<br />
Effects and pitch correction).<br />
15
Setup Configurations<br />
Phantom Power<br />
Before using any setup configuration, determine the type<br />
of microphone you are using:<br />
16<br />
Dynamic microphone: phantom power off.<br />
Condenser microphone: phantom power on.<br />
Enabling Phantom Power:<br />
1. Confirm that your sound system master level is off.<br />
2. Connect <strong>Correct</strong>'s power adapter to main power<br />
and to the Power Input on <strong>Correct</strong>.<br />
3. Press and hold Dry to Guide Button and Display<br />
Button simultaneously until the Phantom Power Light<br />
comes on.To turn phantom power off, repeat this step.<br />
NOTE:<br />
Set your sound system level to off when you are<br />
turning phantom power on/off as it can create a<br />
“pop” sound in your speakers.
Standard Setup<br />
The standard setup for <strong>VoiceTone</strong> <strong>Correct</strong> couldn't be<br />
easier - put <strong>Correct</strong> between your microphone and<br />
your mic input on your sound system. In this<br />
configuration only Main Output is used.<br />
Connecting and Enabling for Standard Setup:<br />
1. Connect your microphone to <strong>Correct</strong>’s Mic Input.<br />
2. Connect to your sound system as in diagram on this<br />
page. Main Output to mic input channel on your sound<br />
system.<br />
3. Connect <strong>Correct</strong>'s power adapter to main power<br />
and to the Power Input on <strong>Correct</strong>.<br />
Setup Configurations<br />
17
Setup Configurations<br />
Main / Monitor Setup<br />
While <strong>Correct</strong>’s pitch correction is so transparent that<br />
your audience may never know you're using it, we<br />
suspect there'll always be purists who'd rather the<br />
audience hear only their raw and naked voice. Using the<br />
Guide Output, you can route your pitch corrected voice<br />
to your monitor mix, while your audience hears no<br />
correction effect from the Main Output.<br />
Connecting and Enabling for Main/Monitor<br />
Setup:<br />
1. Connect your microphone to <strong>Correct</strong>'s Mic Input.<br />
2. Connect to your sound system as in diagram: Main<br />
Output to your front-of-house sound system’s mic input,<br />
and the Guide Output to your personal voice monitor,<br />
or monitor mix channel.<br />
3. Connect <strong>Correct</strong>'s power adapter to main power<br />
and to the Power Input on <strong>Correct</strong>.<br />
18
Sound Engineer Setup<br />
If you are in a situation where a live sound engineer<br />
mixes your vocal sound, there are some details you<br />
should provide to them when working with <strong>VoiceTone</strong><br />
<strong>Correct</strong>:<br />
1. <strong>Correct</strong> can supply phantom power if needed.<br />
2. Sending external phantom power to <strong>Correct</strong> will<br />
not harm the pedal, but will produce a pop sound when<br />
power is turned on/off.<br />
3. The Main Output is for front-of-house, the Guide<br />
Output is for monitors only if the singer wants to hear<br />
the pitch correction effect separately in the monitors.<br />
4. Set your sound console’s EQ, and any outboard<br />
dynamic processing gear to unity or bypass. <strong>Correct</strong>’s<br />
Adaptive Shape EQ and compress features adapt to<br />
vocals over a short time. <strong>Correct</strong> is designed with the<br />
Setup Configurations<br />
assumption that the overall sound system has a flat<br />
response with no dynamics processing.<br />
In the vast majority of cases, it won’t be necessary to<br />
add any more EQ or compression. If extra processing is<br />
desired, only add addtional EQ or compression after<br />
<strong>Correct</strong> has been running for thirty seconds, giving it<br />
enough time to dynamically adjust to the singer's voice.<br />
19
Setup Configurations<br />
Advanced Settings: Tuning Reference<br />
If you know that the instruments you are singing with are<br />
not tuned to A440, or you hear that your corrected<br />
voice doesn’t sound in tune, then you need to change<br />
<strong>Correct</strong>’s tuning reference.<br />
1. Press and hold the Warmth, Shape, and Compress<br />
Buttons simultaneoulsy as you plug the power adapter<br />
into <strong>Correct</strong>.The Pitch On Light flashes to indicate you<br />
are ready to change the tuning reference.<br />
2. Plug your mic into the Mic Input and set the level as<br />
in Step 8 of the Quick Start section.<br />
3. Place the microphone near an instrument you know<br />
to be in tune (piano, guitar, bass, etc.), and play any<br />
monophonic pitch.<br />
4. On the pitch display you’ll see how far the instrument<br />
is out of tune from A440 on the top bar. As the note is<br />
held, the bottom bar will show the tuning reference<br />
20<br />
change to correct it. When the two bars match, press<br />
the Left Footswitch. <strong>Correct</strong> will enter regular mode<br />
with the new tuning reference.<br />
NOTE:<br />
The tuning reference is reset to A440 the next time<br />
power is removed from <strong>Correct</strong>.
Advanced Settings: Manual Shape<br />
The Shape EQ can either run in adaptive or manual<br />
mode. Adaptive mode will function the vast majority of<br />
the time to provide just the right amount of EQ for your<br />
voice. Manual mode can be useful for applying<br />
specialized EQ curves.<br />
When the Shape Knob is turned fully left, there will be<br />
no boost or cut. When it's turned fully right, there will<br />
be a fixed amount of High Boost and Low Cut. The<br />
maximum amount of High Boost and Low Cut can be<br />
changed by following the steps below.<br />
1. Press the Adaptive Shape Button to exit adaptive<br />
mode (the Shape Button's light should be off).<br />
2. Set the Shape Knob to 12 o'clock.<br />
3. Press and Hold the Warmth and Adaptive Shape<br />
buttons simultaneously for 2 seconds.<br />
Setup Configurations<br />
For the next 10 seconds, the pitch display meter will<br />
change to indicate manual EQ settings. Only the leftmost<br />
four dots of the input and output display lines are<br />
used. The Input line indicates High Boost while the<br />
Output line indicates Low Cut.<br />
High 0dB +4dB +8dB +12dB<br />
Low<br />
0dB -4dB -8dB -12dB<br />
4.To change the High Boost or Low Cut, first make sure<br />
you are viewing the manual settings using step 3. Press<br />
the Warmth Button to cycle through High Boost settings<br />
and the Shape Button to cycle through Low Cut settings.<br />
You'll see the High Boost dot or Low Cut dot moving<br />
from left to right as you press the respective button.<br />
5. You can return to pitch view immediately by pressing<br />
and holding the Warmth and Adapative Shape Buttons<br />
for 2 seconds. Alternatively, if you make no changes for<br />
10 seconds, <strong>Correct</strong> will return to manual shape mode.<br />
21
Using & Understanding the Effects<br />
With all knobs set to 12 o'clock, <strong>Correct</strong> sounds great<br />
in almost every situation. We've gone through a lot of<br />
effort to see that it does.<br />
The following sections in the manual will allow you to<br />
get the best from <strong>Correct</strong>, as well as learn more about<br />
what it takes to get a good vocal sound.<br />
Using the Effects:<br />
Use these sections to try out each effect in <strong>Correct</strong> to<br />
hear the different qualities they give to your live vocal<br />
performance. Connect <strong>Correct</strong> to your mic and the<br />
mixer and set the input level as described in the Quick<br />
Start section of the manual.<br />
Understanding the Effects:<br />
These sections discuss the major issues that can<br />
compromise live vocal sound, what traditional steps are<br />
taken to try to resolve the issues, and how <strong>Correct</strong><br />
solves the issues with its researched algorithms.<br />
22
Adaptive Shape EQ<br />
Set up the product as follows:<br />
Shape Control: 12 o’clock<br />
Compress Control: off<br />
De-Ess: off<br />
Pitch: off<br />
Warmth Button: off<br />
Adaptive Shape Button: on<br />
Adaptive Compress Button: on<br />
Now try singing a song into <strong>Correct</strong>. The Adaptive<br />
Shape EQ takes approximately 30 seconds to<br />
completely adapt to your voice. While you’re singing<br />
press the Right Footswitch to turn the LE effects on and<br />
off.<br />
What you’ll hear<br />
In most cases, depending on the microphone used and<br />
the timbre of your voice, the effect will make your voice<br />
slightly brighter and less boomy. If you are using a good<br />
Using the Effects: Adaptive EQ<br />
mic, have really good mic technique, and have an<br />
extremely well balanced timbre in your voice, you'll<br />
barely perceive any change to the sound at all. For the<br />
rest of us, you should hear a significant improvement in<br />
both intelligibility and quality.<br />
In Adaptive mode, turning the control down from center<br />
will reduce the amount of Adaptive Shape EQ applied.<br />
Turning past centre will intelligently add high frequencies<br />
to make your voice sizzle with added presence, without<br />
making it sound tinny.<br />
Warmth Button<br />
While you’re singing into <strong>Correct</strong>, try pressing the<br />
Warmth Button. Since PA systems can vary in the<br />
amount of low end they produce, this control adds<br />
some additional low end when you need it.<br />
Manual Shape<br />
Press the Adaptive Shape Button to disable the adaptive<br />
nature of the EQ. See Advance Settings: Manual Shape<br />
section for using this mode.<br />
23
Using the Effects: Adaptive Compression<br />
Adaptive Compression<br />
Set up the product as follows:<br />
Shape Control: 12 o’clock<br />
Compress Control: 12 o’clock<br />
De-Ess: off<br />
Pitch: off<br />
Warmth Button: off<br />
Adaptive Shape Button: on<br />
Adaptive Compress Button: on<br />
Sing while turning the LE effects on and off.<br />
What you’ll hear<br />
Adaptive Compression is a tricky effect to perceive, but<br />
will significantly help your voice stay balanced in a mix. It<br />
smoothes your dynamics by increasing low levels and<br />
decreasing the high levels of your voice. The more<br />
compression you apply by turning the knob right of<br />
centre, the smoother your voice will become. Without<br />
compression it’s like singing directly into someone’s ear.<br />
24<br />
If you're having trouble hearing the effect, try singing<br />
with an extreme dynamic range (very loud than<br />
suddenly very soft) with the compress knob set at full.<br />
Try toggling between LE effects on and off with the Right<br />
Footswitch.<br />
You should be able to hear what it’s doing now. Leaving<br />
the Compress control at 12 o’clock should give optimal<br />
results in most applications.Turning the Compress Knob<br />
down from center will reduce the effect.<br />
Manual Compress<br />
Press the Adaptive Compress Button to turn the<br />
adaptive nature of the compressor off. While set to<br />
manual, the compressor works like a soft knee<br />
compressor. To get the right sound you may need to<br />
adjust your input level and the Compress Knob.
De-ess<br />
Set up the product as follows:<br />
Shape Control: 12 o’clock<br />
Compress Control: 12 o’clock<br />
De-Ess: 12 o’clock<br />
Pitch: off<br />
Warmth Button: off<br />
Adaptive Shape Button: on<br />
Adaptive Compress Button: on<br />
Sing or say words with lots of S's like "necessary" or<br />
"sustenance" while turning the LE effects on and off.<br />
What you’ll hear<br />
At the center position you may or may not notice the<br />
esses being reduced in level. With the LE effects on, sing<br />
an ESSSSSS sound and try turning the De-ess control to<br />
maximum. Now you'll hear the effect. The center<br />
position results in a good balance of sibilance. With the<br />
control at the center position you can turn up the Shape<br />
Using the Effects: De-ess<br />
Knob to add more sizzle to your voice with out making<br />
the ess sounds excessively loud.<br />
25
Using the Effects: Pitch <strong>Correct</strong>ion<br />
Pitch <strong>Correct</strong>ion<br />
Set up the product as follows:<br />
Pitch: 12 o’clock<br />
Display Button: on<br />
LE effect: on<br />
Sing and toggle the Right Footswitch to turn pitch<br />
correction on and off.<br />
What you’ll hear<br />
At this setting, <strong>Correct</strong> is optimized to produce<br />
transparent sounding pitch correction as well as create<br />
a comfortable pitch guide for you to sing with.The top<br />
bar of the Pitch Display shows how far your input pitch<br />
strays from its closest chromatic reference, while the<br />
lower bar shows how much <strong>Correct</strong> is pulling your pitch<br />
back in-tune. Try exaggerating the effect by turning the<br />
Pitch Knob fully right. This position is only useful as a<br />
special effect and to demonstrate what pitch correction<br />
can do. For natural pitch correction that's comfortable<br />
26<br />
to sing with, keep the control between 10 and 2 o'clock.<br />
When singing along with your corrected pitch, try to<br />
sing the pitch that you hear. This will result in you selfcorrecting<br />
your pitch.<br />
Dry to Guide<br />
Press the Dry to Guide Button to hear your<br />
uncorrected voice mixed with your pitch corrected<br />
voice in the Guide Output. This can make it easier to<br />
hear the pitch correction effect, especially in louder<br />
situations.<br />
Display<br />
Press the Display Button to enable and disable the Pitch<br />
Display. In rehearsal, coaching, or teaching, watching the<br />
Pitch Display can provide valuable feedback.The top bar<br />
shows your intonation. If the centre bar is lit, you are<br />
singing exactly in tune. If the meter goes right or left of<br />
centre, you are singing up to 50 cents sharp or flat of the<br />
the closest chromatic pitch.The bottom bar shows how<br />
much your voice is being corrected. If the display is<br />
distracting in live performance you can disable it.
What's the problem?<br />
1. Dynamics<br />
Vocals in music define the melody and the message in a<br />
song. In professional studio recordings, vocals are always<br />
clearly heard in the mix. In live situations, especially with<br />
full bands, the vocals often get lost.<br />
The human voice is very dynamic, meaning there can be<br />
a very significant difference in volume between the<br />
loudest and softest a person can sing. It's typical for a<br />
singer's volume to vary by about 10dB. In terms of<br />
sound energy, this means a person's loud singing can be<br />
ten times louder than their soft signing. To get a good<br />
mix where the vocal never gets lost during low levels, it<br />
would be necessary to mix it such that the quietest<br />
parts of the vocal are heard. If this was done, the loud<br />
parts of the vocals would be excessively loud. As a<br />
result, without dynamics processing, vocals in live sound<br />
often "bounce" in and out of the mix.<br />
Understanding Live Engineer Effects<br />
2. EQ<br />
If not treated properly, live vocals often sound:<br />
- Muddy or woofy<br />
- Tinny<br />
- Lacking sizzle, presence or air.<br />
These conditions have many contributing factors,<br />
including the singer's voice. Some singers have lots of<br />
bass in their voices (adds to muddiness) and some have<br />
lots of energy in the upper-mids (adds to tinniness).<br />
Muddiness also occurs as a result of the proximity effect<br />
of cardioid pattern microphones. This occurs when the<br />
microphone is positioned close to the sound source.<br />
The proximity effect can add as much as 12dB to the<br />
low end of a vocal sound.Another reason for muddiness<br />
is the fact that frequencies are less directional as they get<br />
lower. Low frequencies go everywhere while high<br />
frequencies just go where the speakers are pointed. This<br />
leads to far too much bass bouncing around the room.<br />
27
Understanding Live Engineer Effects<br />
The best we can do to optimize clarity and intelligibility<br />
while reducing muddiness is to intelligently limit low<br />
frequencies without making them sound thin.<br />
A vocal running into a PA without EQ usually sounds<br />
quite dull. A sound engineer will often add high end to<br />
give sizzle to the vocal using a two or three band EQ.<br />
When you add a bit of high end with this type of EQ,<br />
instead of adding sizzle it actually adds “tin”. With these<br />
types of EQs you need to really crank the high end<br />
before sizzle boost kicks in. Unfortunately this makes<br />
the overall vocal sound much too bright.<br />
To get more sizzle on a voice, people often turn the high<br />
EQ past 3 o'clock, and then to compensate for the<br />
excessive brightness, they then turn up the bass. This will<br />
make the vocal sound somewhat spectrally balanced, but<br />
unnatural and lacking detail. As well, turning up the bass<br />
like this increases the low frequency energy of the vocals<br />
and makes them sound extremely muddy everywhere<br />
except directly in line with the PA speakers.<br />
28<br />
3. Excessive Sibilance<br />
This is only a problem with some singers. It is when<br />
"ess", "ch", "sh" and "t" sounds are too loud compared<br />
with the overall vocal sound. With some singers this<br />
sibilance can seem to almost rip your head off. This<br />
natural sound of the singer coupled with the super<br />
bright breathy EQ of a lot of today's pop music makes<br />
the problem even more pronounced.
Current ways of solving the problems<br />
1. Dynamics<br />
Fixing the problem of a vocal bouncing in and out of a<br />
mix is usually done with something called compression.<br />
Compression reduces the dynamic range of the audio<br />
being processed. To make a compressor work optimally,<br />
you need to match its operating range to the dynamic<br />
range of the signal it's processing. In a musical<br />
performance you usually have varying dynamics. You'll<br />
have loud parts and quiet parts in the performance. If<br />
the compressor is set up to work with the loud part of<br />
a vocal performance, it won't do anything to the quiet<br />
parts. If it’s set to work on the quiet parts, it will do way<br />
too much on the loud parts, usually making the vocals<br />
too quiet. For this reason, the only way to make<br />
compression work well is if you have an experienced live<br />
sound engineer monitoring the vocals at all times and<br />
constantly adjusting the settings.<br />
Understanding Live Engineer Effects<br />
2. EQ<br />
Previously, the only real way to fix EQ problems on<br />
vocals is to have either out-board graphic or parametric<br />
EQs, or a high end mixing console with multi-band<br />
parametric EQ, and a good engineer who really knows<br />
how to use it. It's simply not possible to do an optimal<br />
job of EQ with just a standard mixing console, regardless<br />
of how good the sound engineer is.<br />
3. Sibilance<br />
The best way to reduce unwanted sibilance is to buy an<br />
adaptive de-esser. If you just get a regular De-esser, you'll<br />
need a sound engineer to go along with it to make sure<br />
it doesn't make you sound unnatural on loud passages.<br />
29
Understanding Live Engineer Effects<br />
30<br />
How <strong>Correct</strong> Solves the problems<br />
1. Dynamics<br />
<strong>Correct</strong> features a new kind of compression; Adaptive<br />
Compression (Dynamic Smoothing). This processing<br />
does exactly what the name implies. It has been<br />
designed to work optimally with a single voice input.<br />
Over the course of a phrase, Adaptive Compression<br />
will reduce your voice’s variance in levels. Whether your<br />
performance is loud or soft, <strong>Correct</strong> will work to make<br />
your vocals sit well in the mix and not bounce in and<br />
out. On <strong>Correct</strong> all you need to do is set the Compress<br />
Knob at its center position and make sure the Adaptive<br />
Compress light is lit.<br />
2. EQ<br />
To solve this problem, <strong>Correct</strong> employs an Adaptive<br />
Shape EQ that analyzes the input vocal and applies an<br />
optimal digital EQ. To develop this technology, countless<br />
pristine studio vocal recordings were analyzed. From<br />
these analyses an algorithm was developed to<br />
characterize the input vocal and apply the appropriate<br />
EQ to approximately match the studio recordings. With<br />
<strong>Correct</strong>, a male vocalist with a deep voice and a very<br />
close mic technique will get the EQ needed, while a<br />
female vocalist with a high voice, and farther mic<br />
technique would get very different EQ, but again, exactly<br />
as needed. The beauty of this is that you can plug in your<br />
mic, tell the sound engineer to set your EQ to flat, and<br />
just perform. The resulting EQ will probably be better<br />
than anything you've ever had. Simply set the Shape<br />
Knob to 12 o'clock, and make sure the Adaptive Shape<br />
light is lit.<br />
3. Sibilance<br />
We've put an adaptive De-sser in <strong>Correct</strong> that<br />
separately looks at the level of the overall voice and<br />
makes sure the level of sibilance isn't too high. If it is, our<br />
adaptive de-esser will reduce the sibilance level. Setting<br />
the De-ess Knob to 12 o’clock will ensure that your<br />
sibilance is in check.
Getting comfortable with correction<br />
No one likes the idea of needing pitch correction.<br />
Everyone would much rather just sing in-tune. <strong>Correct</strong><br />
helps you do this. The reality is that no one ever sings<br />
perfectly on pitch. This is not really a problem since it<br />
isn't necessary to be perfectly in pitch to have a good<br />
sounding vocal. In fact, natural pitch variances help make<br />
singers who they are. Sounding like a robot is not the<br />
goal.The goal is to sing in-tune at the end of a long set,<br />
when you're tired, or just having a bad day. The goal is<br />
to constantly improve your singing.<br />
<strong>VoiceTone</strong> <strong>Correct</strong> can help.<br />
The reasons for singing out of pitch are both a function<br />
of physiology and psychology. A person's ability to hit a<br />
desired pitch is affected by the way they hear the music<br />
around them, coupled with their physical ability to<br />
reproduce the pitch they want to sing. Pitch correction<br />
most often occurs in the recording studio where the<br />
pitch is corrected after a vocal is recorded.<br />
Understanding Pitch <strong>Correct</strong>ion<br />
When pitch correction is used live, the sound engineer<br />
usually applies the correction to the mains and not the<br />
monitors. In both cases, the artist doesn't hear the<br />
corrected signal while they are singing. We've designed<br />
<strong>Correct</strong> to be used differently. With <strong>Correct</strong> the singer<br />
hears the corrected signal while they are singing. It<br />
becomes a guide track. It's like being in a vocal duo and<br />
singing unison with someone who sings in perfect pitch.<br />
What happens is that the singer automatically selfcorrects<br />
their own voice to match <strong>Correct</strong>'s pitch<br />
corrected output. Sometimes, when pitch correction is<br />
only applied at the mains, and a singer is singing flat, he<br />
or she will keep singing flat. When using the Guide<br />
Output on <strong>Correct</strong>, the singer immediately hears as they<br />
stray out of tune, and can immediately compensate.<br />
Even great singers, if they are not feeling well, or have<br />
over-worked their voices, sometimes sing out of pitch. A<br />
common tendency when this happens is for the singer<br />
to tense up, which creates even more vocal strain. Using<br />
<strong>Correct</strong> tends to relax people in these situations. Good<br />
31
Understand Pitch <strong>Correct</strong>ion<br />
singers will often use <strong>Correct</strong> when they are having<br />
trouble.<br />
When pitch correction is only applied in the mains, what<br />
often happens is that if the singer goes really off pitch,<br />
the pitch corrector corrects to the wrong pitch. This<br />
means that the pitch is actually more out than if it hadn't<br />
been corrected in the first place.This is what has given<br />
pitch correction a deservedly bad name for use in live<br />
performance. By monitoring the Guide Output with<br />
<strong>Correct</strong>, these problems completely disappear.<br />
After using our pitch correction live for a while, some<br />
users who admittedly had pitch problems reported that<br />
their pitch had improved, even without using pitch<br />
correction.<br />
32
FAQ & Troubleshooting:<br />
1. I'm not getting any sound out of <strong>Correct</strong><br />
a. Confirm the power adapter is properly connected<br />
by pressing the Right Footswitch on/off, and confirming<br />
the <strong>Correct</strong> On Light goes on/off.<br />
b. Confirm your microphone is connected properly by<br />
talking through the microphone and looking for the<br />
Input Light to light green or orange. If the Input Light is<br />
going on, check your connections and settings on your<br />
sound system. If you have a condenser microphone,<br />
ensure phantom power is enabled.<br />
2. I'm not hearing any effect from <strong>Correct</strong>, just<br />
my dry voice<br />
a. If you’re using the Main Output, press the Right<br />
Footswitch until the On Light activates. If there is still no<br />
effect, ensure the Shape, Compress, and De-ess knobs<br />
are at 12 o’clock. If you still hear no effect, try applying<br />
FAQ & Troubleshooting<br />
more of each effect by turning the Shape, Compress<br />
and De-ess Knobs further to the right.<br />
b. If you’re using the the Guide Output check to make<br />
sure the Pitch Knob is at 12 o’clock. If you still hear no<br />
effect, your voice may be close enough in-tune that pitch<br />
correction at the 12 o'clock setting has little effect. Try<br />
turning the Pitch Knob further to the right to hear more<br />
aggressive pitch correction.<br />
3. I can’t turn pitch correction off.<br />
a. Check if you are using the Guide Output. If so, the<br />
only way to turn the pitch correction off is by turning<br />
the Pitch Knob fully left.<br />
b. If you are using the Main Output turn pitch<br />
correction off by toggling the Left Footswitch.<br />
Alternatively, you can also turn the Pitch Knob fully left.<br />
However, this will also turn the pitch correction off in<br />
the Guide Output.<br />
33
FAQ & Troubleshooting<br />
4. My corrected voice sounds out of tune<br />
a. It’s possible that the tuning reference of the<br />
instruments you are singing with are not tuned to the<br />
default setting of A440. Please see the Setup<br />
Configuration, Advance Settings: Tuning Reference<br />
section to change the tuning reference.<br />
34
Analog Inputs<br />
Connectors Balanced XLR, Input Impedance 1kOhm<br />
Mic Input Sensitivity @ 0dBFS -44dBu to +2dBu<br />
Mic Input Sensitivity @ 12dB headroom -56dBu to -10dBu<br />
EIN -128dBu @ max. mic amp gain, Rg = 150 Ohm<br />
Analog Outputs<br />
Connectors Balanced XLR<br />
Output Impedance 40 Ohm<br />
Output Level @ 0dBFS +2dBu<br />
Input to Output Analog Audio Performance<br />
Dynamic Range, Mic. @ Min gain >108dB, 20 Hz - 20kHz *A-weighted<br />
Dynamic Range, Mic. @ -18dBu sensitivity > 104dB, 20hz - 20kHz*<br />
THD+ Noise, Mic. @ Min gain


