AT+i Programmer's Manual - SE Spezial-Electronic AG
AT+i Programmer's Manual - SE Spezial-Electronic AG
AT+i Programmer's Manual - SE Spezial-Electronic AG
You also want an ePaper? Increase the reach of your titles
YUMPU automatically turns print PDFs into web optimized ePapers that Google loves.
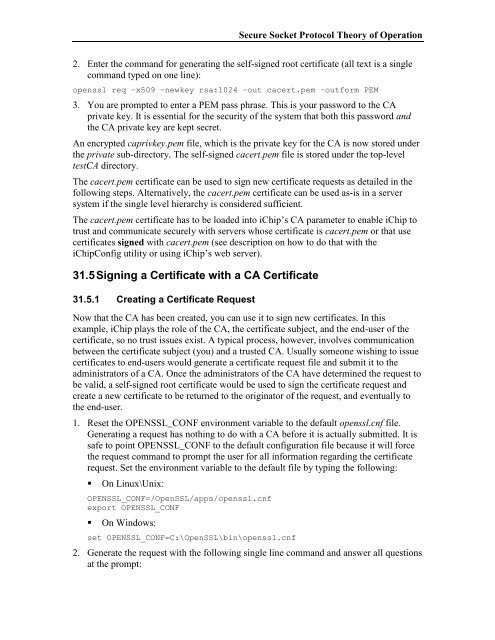
Secure Socket Protocol Theory of Operation<br />
2. Enter the command for generating the self-signed root certificate (all text is a single<br />
command typed on one line):<br />
openssl req –x509 –newkey rsa:1024 –out cacert.pem –outform PEM<br />
3. You are prompted to enter a PEM pass phrase. This is your password to the CA<br />
private key. It is essential for the security of the system that both this password and<br />
the CA private key are kept secret.<br />
An encrypted caprivkey.pem file, which is the private key for the CA is now stored under<br />
the private sub-directory. The self-signed cacert.pem file is stored under the top-level<br />
testCA directory.<br />
The cacert.pem certificate can be used to sign new certificate requests as detailed in the<br />
following steps. Alternatively, the cacert.pem certificate can be used as-is in a server<br />
system if the single level hierarchy is considered sufficient.<br />
The cacert.pem certificate has to be loaded into iChip‘s CA parameter to enable iChip to<br />
trust and communicate securely with servers whose certificate is cacert.pem or that use<br />
certificates signed with cacert.pem (see description on how to do that with the<br />
iChipConfig utility or using iChip‘s web server).<br />
31.5 Signing a Certificate with a CA Certificate<br />
31.5.1 Creating a Certificate Request<br />
Now that the CA has been created, you can use it to sign new certificates. In this<br />
example, iChip plays the role of the CA, the certificate subject, and the end-user of the<br />
certificate, so no trust issues exist. A typical process, however, involves communication<br />
between the certificate subject (you) and a trusted CA. Usually someone wishing to issue<br />
certificates to end-users would generate a certificate request file and submit it to the<br />
administrators of a CA. Once the administrators of the CA have determined the request to<br />
be valid, a self-signed root certificate would be used to sign the certificate request and<br />
create a new certificate to be returned to the originator of the request, and eventually to<br />
the end-user.<br />
1. Reset the OPENSSL_CONF environment variable to the default openssl.cnf file.<br />
Generating a request has nothing to do with a CA before it is actually submitted. It is<br />
safe to point OPENSSL_CONF to the default configuration file because it will force<br />
the request command to prompt the user for all information regarding the certificate<br />
request. Set the environment variable to the default file by typing the following:<br />
On Linux\Unix:<br />
OPENSSL_CONF=/OpenSSL/apps/openssl.cnf<br />
export OPENSSL_CONF<br />
On Windows:<br />
set OPENSSL_CONF=C:\OpenSSL\bin\openssl.cnf<br />
2. Generate the request with the following single line command and answer all questions<br />
at the prompt:


