Universal Reduction Screw. Top loading polyaxial screw ... - Synthes
Universal Reduction Screw. Top loading polyaxial screw ... - Synthes
Universal Reduction Screw. Top loading polyaxial screw ... - Synthes

Create successful ePaper yourself
Turn your PDF publications into a flip-book with our unique Google optimized e-Paper software.
Technique Guide<br />
<strong>Universal</strong> <strong>Reduction</strong> <strong>Screw</strong>. <strong>Top</strong> <strong>loading</strong><br />
<strong>polyaxial</strong> <strong>screw</strong> with extended tabs.
Table of Contents<br />
Introduction<br />
Surgical Technique<br />
Product Information<br />
<strong>Synthes</strong> Spine Biomaterials Overview 34<br />
Warning<br />
This description alone does not provide sufficient background for direct use of<br />
the instrument set. Instruction by a surgeon experienced in handling these<br />
instruments is highly recommended.<br />
Reprocessing, Care and Maintenance of<br />
<strong>Synthes</strong> Instruments<br />
For general guidelines, function control and dismantling of multi-part instruments,<br />
please refer to: www.synthes.com/reprocessing<br />
<strong>Universal</strong> <strong>Reduction</strong> <strong>Screw</strong> 2<br />
AO Principles 4<br />
Indications and Contraindications 5<br />
Surgical Technique 6<br />
Optional Techniques 18<br />
Implants 23<br />
Instruments 25<br />
Sets and Vario Cases 29<br />
<strong>Universal</strong> <strong>Reduction</strong> <strong>Screw</strong> Technique Guide <strong>Synthes</strong> 1
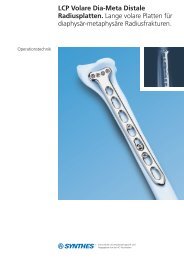
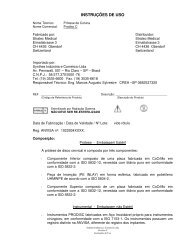
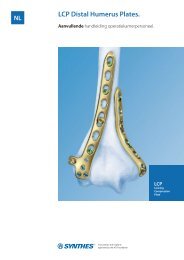
<strong>Universal</strong> <strong>Reduction</strong> <strong>Screw</strong>. <strong>Top</strong> <strong>loading</strong><br />
<strong>polyaxial</strong> <strong>screw</strong> with extended tabs.<br />
Implant for rod reduction<br />
– Rod reduction with extended tabs on<br />
<strong>screw</strong>s eliminates the need for reduction<br />
instruments<br />
– Two-step locking cap allows for<br />
vertebral body derotation and for<br />
lordotic as well as parallel compression/distraction<br />
– Extended tabs break off after completed<br />
rod reduction<br />
– Can be used as a stand-alone system<br />
or combined with other 6.0 mm<br />
rod and pedicle <strong>screw</strong> systems<br />
2 <strong>Synthes</strong> <strong>Universal</strong> <strong>Reduction</strong> <strong>Screw</strong> Technique Guide<br />
Two-step locking cap<br />
Extended tabs for rod<br />
reduction<br />
Dual-core and double-lead<br />
thread design<br />
Extended angle of 45°
<strong>Universal</strong> <strong>Reduction</strong> <strong>Screw</strong> Technique Guide <strong>Synthes</strong> 3
AO Principles<br />
In 1958, the AO formulated four basic principles 1 , which<br />
have become the guidelines for internal fixation. They are:<br />
– Anatomical reduction<br />
– Stable internal fixation<br />
– Preservation of blood supply<br />
– Early, active pain-free mobilization<br />
The fundamental aims of fracture treatment in the limbs<br />
and fusion of the spine are the same. A specific goal in the<br />
spine is returning as much function as possible to the<br />
injured neural elements. 2<br />
AO Principles as Applied to the Spine 2<br />
Anatomical reduction<br />
Restoration of normal spinal alignment to improve the<br />
biomechanics of the spine.<br />
Stable internal fixation<br />
Stabilization of the spinal segment to promote bony fusion.<br />
Preservation of blood supply<br />
Creation of an optimal environment for fusion.<br />
Early, active pain-free mobilization<br />
Minimization of damage to the spinal vasculature, dura, and<br />
neural elements, which may contribute to pain reduction and<br />
improved function for the patient.<br />
1Müller ME, Allgöwer M, Schneider R, Willenegger H (1995) Manual of<br />
Internal Fixation. 3rd, expanded and completely revised ed. 1991. Berlin,<br />
Heidelberg, New York: Springer<br />
2Aebi M, Arlet V, Webb JK (2007). AOSpine Manual (2 vols), Stuttgart,<br />
New York:Thieme<br />
4 <strong>Synthes</strong> <strong>Universal</strong> <strong>Reduction</strong> <strong>Screw</strong> Technique Guide
Indications and Contraindications<br />
The <strong>Universal</strong> <strong>Reduction</strong> <strong>Screw</strong> System is a posterior pedicle<br />
<strong>screw</strong> fixation system (T1-S2) intended for use in skeletally<br />
mature patients.<br />
Indications<br />
– Deformities (i.e. scoliosis, kyphosis and/or lordosis,<br />
Scheuermann’s disease)<br />
– Degenerative disc disease<br />
– Spondylolisthesis<br />
– Trauma (i.e. fracture or dislocation)<br />
– Tumor<br />
– Stenosis<br />
– Pseudarthrosis<br />
– Failed previous fusion<br />
Contraindications<br />
– In fractures and tumors with severe anterior vertebral body<br />
disruption, an additional anterior support or column reconstruction<br />
is required.<br />
– Osteoporosis<br />
<strong>Universal</strong> <strong>Reduction</strong> <strong>Screw</strong> Technique Guide <strong>Synthes</strong> 5
Surgical Technique<br />
1<br />
Prepare pedicle<br />
Instruments<br />
187.200 USS General Instruments in Vario Case<br />
Optional instruments<br />
01.622.014 Pangea Basic Instruments in Vario Case<br />
01.622.021 Pangea Basic Instruments (part 1)<br />
in Vario Case<br />
Prepare pedicles as described in the AOSpine manual.<br />
2<br />
Assemble <strong>screw</strong>driver<br />
Instruments<br />
03.636.001 <strong>Screw</strong>driver Shaft Stardrive, T25<br />
03.636.002 Holding Sleeve for <strong>Screw</strong>driver Shaft<br />
03.620.061 T-Handle with Ratchet Wrench and with<br />
Torque Limiter, 10 Nm<br />
Optional instruments<br />
03.620.005 Ratchet T-Handle with Low Toggle with<br />
Hexagonal Coupling 6.0 mm<br />
03.620.100 Handle with Ratchet, straight,<br />
with Quick Coupling, for Pangea<br />
03.636.008 T-Handle with Hexagonal Coupling 6.0 mm<br />
Assemble holding sleeve on to the <strong>screw</strong>driver shaft and<br />
attach the ratchet handle.<br />
6 <strong>Synthes</strong> <strong>Universal</strong> <strong>Reduction</strong> <strong>Screw</strong> Technique Guide
3<br />
Pick up <strong>screw</strong><br />
Instruments<br />
03.636.001 <strong>Screw</strong>driver Shaft Stardrive, T25<br />
03.636.002 Holding Sleeve for <strong>Screw</strong>driver Shaft<br />
03.620.061 T-Handle with Ratchet Wrench and<br />
with Torque Limiter, 10 Nm<br />
Optional instruments<br />
03.620.005 Ratchet T-Handle with Low Toggle<br />
with Hexagonal Coupling 6.0 mm<br />
03.620.100 Handle with Ratchet, straight,<br />
with Quick Coupling, for Pangea<br />
03.636.008 T-Handle with Hexagonal Coupling 6.0 mm<br />
Choose the appropriate <strong>screw</strong> diameter and length based on<br />
pedicle probe feedback.<br />
Insert the tip of the <strong>screw</strong>driver shaft into the <strong>screw</strong> head (1).<br />
Make sure that the tip of the <strong>screw</strong>driver is fully seated in the<br />
recess of the <strong>screw</strong> head.<br />
Hold the ratchet handle with one hand and turn the knurled<br />
upper part of the sleeve clockwise with the other hand until<br />
the tip of the sleeve is firmly attached to the <strong>screw</strong> head (2).<br />
Verify the <strong>screw</strong> length with the template in the <strong>screw</strong><br />
module. (3)<br />
1<br />
2 3<br />
<strong>Universal</strong> <strong>Reduction</strong> <strong>Screw</strong> Technique Guide <strong>Synthes</strong> 7
Surgical Technique<br />
4<br />
Insert <strong>screw</strong><br />
Instruments<br />
03.636.001 <strong>Screw</strong>driver Shaft Stardrive, T25<br />
03.636.002 Holding Sleeve for <strong>Screw</strong>driver Shaft<br />
03.620.061 T-Handle with Ratchet Wrench and<br />
with Torque Limiter, 10 Nm<br />
Optional instruments<br />
03.620.005 Ratchet T-Handle with Low Toggle<br />
with Hexagonal Coupling 6.0 mm<br />
03.620.100 Handle with Ratchet, straight,<br />
with Quick Coupling, for Pangea<br />
03.636.008 T-Handle with Hexagonal Coupling 6.0 mm<br />
03.636.005 Tab Remover / Alignment Tool<br />
03.620.001 <strong>Screw</strong>driver Stardrive, T25, with T-Handle,<br />
for Pangea<br />
Insert the <strong>screw</strong>. Hold the golden part of the holding sleeve<br />
during <strong>screw</strong> insertion (1).<br />
Remove the <strong>screw</strong>driver by turning the knurled upper part of<br />
the sleeve counterclockwise until the thread of the sleeve disengages<br />
from the <strong>screw</strong> head (2).<br />
8 <strong>Synthes</strong> <strong>Universal</strong> <strong>Reduction</strong> <strong>Screw</strong> Technique Guide<br />
1<br />
2
Note: If the sleeve cannot be loosened by hand, use the<br />
<strong>screw</strong>driver Stardrive T25 to loosen it. Insert the tip of the<br />
<strong>screw</strong>driver into the lateral hole on the upper knurled part.<br />
Turn counterclockwise and hold the <strong>screw</strong>driver shaft in<br />
place (3).<br />
Optional<br />
The extended tab remover/alignment tool can be used to adjust<br />
the position of the <strong>screw</strong> head and to check <strong>polyaxial</strong>ity<br />
of the <strong>screw</strong> head (4).<br />
3<br />
4<br />
<strong>Universal</strong> <strong>Reduction</strong> <strong>Screw</strong> Technique Guide <strong>Synthes</strong> 9
Surgical Technique<br />
5<br />
Determine rod contour and length<br />
Instrument<br />
388.880* Trial Rod 6.0 mm, length 400 mm<br />
Use the trial rod to determine contour and length of the rod.<br />
Cut the rod to length as needed with a 6.0 mm rod cutter.<br />
6<br />
Contour rod<br />
Instrument<br />
388.960* Bending pliers with rolls for USS rods<br />
6.0 mm<br />
Optional instruments<br />
388.910* USS Bending Iron, left<br />
388.920* USS Bending Iron, right<br />
Contour the rod to match the trial rod using the bending<br />
pliers.<br />
Bending irons can be used for further contouring after rod<br />
insertion.<br />
* Instruments from general or basic instrument set<br />
10 <strong>Synthes</strong> <strong>Universal</strong> <strong>Reduction</strong> <strong>Screw</strong> Technique Guide
7<br />
Insert rod<br />
Instrument<br />
388.440* Holding Forceps with broader tip,<br />
length 290 mm, for rods 6.0 mm<br />
Insert the rod using the rod holding forceps.<br />
* Instrument from general or basic instrument set<br />
<strong>Universal</strong> <strong>Reduction</strong> <strong>Screw</strong> Technique Guide <strong>Synthes</strong> 11
Surgical Technique<br />
8<br />
Insert locking cap<br />
Instruments<br />
03.636.003 <strong>Screw</strong>driver Shaft for Locking Cap<br />
for <strong>Universal</strong> <strong>Reduction</strong> <strong>Screw</strong><br />
03.620.061 T-Handle with Ratchet Wrench and<br />
with Torque Limiter, 10 Nm<br />
03.636.006 Derotation Instrument for<br />
<strong>Universal</strong> <strong>Reduction</strong> <strong>Screw</strong><br />
Optional instruments<br />
03.620.005 Ratchet T-Handle with Low Toggle<br />
with Hexagonal Coupling 6.0 mm<br />
03.620.100 Handle with Ratchet, straight,<br />
with Quick Coupling, for Pangea<br />
03.636.008 T-Handle with Hexagonal Coupling 6.0 mm<br />
03.636.007 Rod Pusher/Counter Torque<br />
for <strong>Universal</strong> <strong>Reduction</strong> <strong>Screw</strong><br />
03.636.010 <strong>Screw</strong>driver, small, for Locking Cap for<br />
<strong>Universal</strong> <strong>Reduction</strong> <strong>Screw</strong><br />
Attach the <strong>screw</strong>driver shaft to a handle for insertion.<br />
Pick up a locking cap from the <strong>screw</strong> module with the <strong>screw</strong>driver<br />
shaft for locking caps (1). The <strong>screw</strong>driver shaft is selfretaining.<br />
Place the derotation instrument over the <strong>screw</strong> head. Insert<br />
the locking cap through the derotation instrument.<br />
Turning the locking cap will reduce the rod into the <strong>screw</strong><br />
head (2).<br />
12 <strong>Synthes</strong> <strong>Universal</strong> <strong>Reduction</strong> <strong>Screw</strong> Technique Guide<br />
1<br />
2
Optional technique<br />
The rod pusher/counter torque can be used instead of the<br />
derotation instrument to provide guidance for the locking<br />
cap insertion.<br />
Note: For locking cap insertion and rod reduction always<br />
use the derotation instrument or rod pusher/counter torque<br />
for better guidance. If the locking cap is cross-threaded, a<br />
turn back will re-align the locking cap for proper insertion.<br />
3<br />
<strong>Universal</strong> <strong>Reduction</strong> <strong>Screw</strong> Technique Guide <strong>Synthes</strong> 13
Surgical Technique<br />
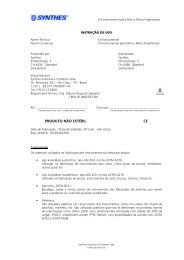
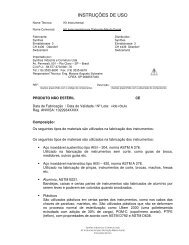
9<br />
Final tightening of outer part of locking cap<br />
Instruments<br />
03.636.003 <strong>Screw</strong>driver Shaft for Locking Cap<br />
for <strong>Universal</strong> <strong>Reduction</strong> <strong>Screw</strong><br />
03.620.061 T-Handle with Ratchet Wrench and<br />
with Torque Limiter, 10 Nm<br />
03.636.007 Rod Pusher/Counter Torque for<br />
<strong>Universal</strong> <strong>Reduction</strong> <strong>Screw</strong><br />
Optional instrument<br />
03.620.019 Torque-limiting T-Handle, 10 Nm<br />
Attach the <strong>screw</strong>driver shaft to a torque limiting handle.<br />
Place the rod pusher/counter torque over the <strong>screw</strong> head. Insert<br />
the <strong>screw</strong>driver shaft through the rod pusher/counter<br />
torque and turn until the torque limiting handle clicks.<br />
The click indicates that the outer part of the locking cap is<br />
tightened with 10 Nm.<br />
Note: Always fully seat the rod pusher/counter torque on the<br />
rod. The instrument must be perpendicular to the rod during<br />
final thightening.<br />
The <strong>screw</strong> head is now locked and <strong>polyaxial</strong> movement no<br />
longer possible.<br />
Important: The outer part of the locking cap must always<br />
be tightened before the inner part, otherwise the <strong>screw</strong> head<br />
might not lock properly.<br />
14 <strong>Synthes</strong> <strong>Universal</strong> <strong>Reduction</strong> <strong>Screw</strong> Technique Guide<br />
Correct Incorrect
10<br />
Deformity correction<br />
A Rod rotation<br />
Instrument<br />
388.440* Holding Forceps with broader tip,<br />
length 290 mm, for rods 6.0 mm<br />
Rotate the rod with the holding forceps until the desired<br />
correction is achieved.<br />
Note: Rod rotation can be done before the outer part of the<br />
locking cap is fully reduced in the <strong>screw</strong> head or before final<br />
tightening is applied.<br />
B Vertebral body derotation<br />
Instrument<br />
03.636.006 Derotation Instrument for <strong>Universal</strong><br />
<strong>Reduction</strong> <strong>Screw</strong><br />
Derotate the vertebral bodies with the derotation instruments<br />
until the desired correction is achieved.<br />
* Instrument from general or basic instrument set<br />
<strong>Universal</strong> <strong>Reduction</strong> <strong>Screw</strong> Technique Guide <strong>Synthes</strong> 15
Surgical Technique<br />
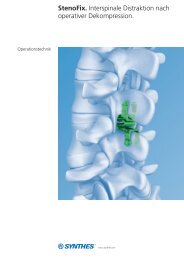
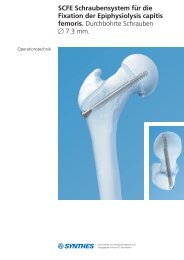
11<br />
Final tightening of inner part of locking cap<br />
Instruments<br />
03.636.001 <strong>Screw</strong>driver Shaft Stardrive,T25,<br />
for <strong>Universal</strong> <strong>Reduction</strong> <strong>Screw</strong><br />
03.636.002 Holding Sleeve for <strong>Screw</strong>driver Shaft<br />
03.620.061 T-Handle with Ratchet Wrench and<br />
with Torque Limiter, 10 Nm<br />
03.636.007 Rod Pusher/Counter Torque<br />
for <strong>Universal</strong> <strong>Reduction</strong> <strong>Screw</strong><br />
Optional instrument<br />
03.620.019 Torque-limiting T-Handle, 10 Nm<br />
Assemble the holding sleeve onto the <strong>screw</strong>driver shaft and<br />
attach the <strong>screw</strong>driver shaft to the torque limiting handle.<br />
Place the rod pusher/counter torque over the <strong>screw</strong> head.<br />
Insert the <strong>screw</strong>driver assembly through the rod<br />
pusher/counter torque and turn until the torque limiting<br />
handle clicks. The click indicates that the inner part of the<br />
locking cap is tightened with 10 Nm. The rod is now locked<br />
to the <strong>screw</strong>.<br />
Note: Always fully seat the rod pusher/counter torque on the<br />
rod. The instrument must be perpendicular to the rod during<br />
final thightening.<br />
12<br />
Insert second rod<br />
Repeat steps 5 through 11 for contralateral rod.<br />
16 <strong>Synthes</strong> <strong>Universal</strong> <strong>Reduction</strong> <strong>Screw</strong> Technique Guide<br />
Correct Incorrect
13<br />
Remove extended tabs<br />
Instrument<br />
03.636.005 Tab Remover/Alignment Tool<br />
Slide the tab remover over the first extended tab and break it<br />
off by tilting the instrument towards the outside or inside of<br />
the <strong>screw</strong>.<br />
The broken off extended tab remains in the tab remover and<br />
must be removed from the instrument.<br />
Slide the tab remover over the remaining extended tab and<br />
break it off by tilting towards the outside or inside of the<br />
<strong>screw</strong>.<br />
Repeat for all remaining <strong>screw</strong>s. All extended tabs must be<br />
removed before closing the incision.<br />
Note: Only break off the extended tabs if all reduction and<br />
correction maneuvers have been accomplished.<br />
<strong>Universal</strong> <strong>Reduction</strong> <strong>Screw</strong> Technique Guide <strong>Synthes</strong> 17
Optional Techniques<br />
Remobilization of <strong>screw</strong> head<br />
Instruments<br />
03.620.001 <strong>Screw</strong>driver Stardrive, T25,<br />
with T-Handle, for Pangea<br />
03.636.004 <strong>Screw</strong>driver, cannulated, for Locking Cap<br />
for <strong>Universal</strong> <strong>Reduction</strong> <strong>Screw</strong><br />
Optional instruments<br />
03.636.006 Derotation Instrument for <strong>Universal</strong><br />
<strong>Reduction</strong> <strong>Screw</strong><br />
03.636.007 Rod Pusher/Counter Torque for<br />
<strong>Universal</strong> <strong>Reduction</strong> <strong>Screw</strong><br />
Remobilize the <strong>screw</strong> head by using the cannulated<br />
<strong>screw</strong>driver as a counter torque instrument and use the<br />
<strong>screw</strong>driver T25 to loosen the inner part of the locking<br />
cap.<br />
Loosen the outer part of the locking cap with the cannulated<br />
<strong>screw</strong>driver.<br />
The <strong>screw</strong> head is now unlocked.<br />
If the <strong>screw</strong> head is stuck in its position, use the rod<br />
pusher/counter torque or the derotation instrument to<br />
remobilize the <strong>screw</strong> head.<br />
18 <strong>Synthes</strong> <strong>Universal</strong> <strong>Reduction</strong> <strong>Screw</strong> Technique Guide
Removal of locking cap<br />
Instruments<br />
03.620.001 <strong>Screw</strong>driver Stardrive, T25,<br />
with T-Handle, for Pangea<br />
03.636.004 <strong>Screw</strong>driver, cannulated,<br />
for Locking Cap for <strong>Universal</strong> <strong>Reduction</strong><br />
<strong>Screw</strong><br />
Remove the locking cap by using the cannulated <strong>screw</strong>driver<br />
as a counter torque instrument and use the <strong>screw</strong>driver T25<br />
to loosen the inner part of the locking cap.<br />
Loosen and remove the outer part of the locking cap with<br />
the cannulated <strong>screw</strong>driver. The <strong>screw</strong>driver is self-retaining<br />
so that the locking cap can easily be removed.<br />
<strong>Universal</strong> <strong>Reduction</strong> <strong>Screw</strong> Technique Guide <strong>Synthes</strong> 19
Optional Techniques<br />
Rod reduction after tabs are broken off<br />
Instruments<br />
03.620.091 Socket, hexagonal 6.0 mm<br />
03.636.014 <strong>Reduction</strong> Instrument<br />
for <strong>Universal</strong> <strong>Reduction</strong> <strong>Screw</strong><br />
388.654 Ratchet with Handle,<br />
with Hexagonal Quick Coupling 6.0 mm<br />
To assemble the instrument, slide the inner tube through the<br />
outer tube. Insert the black nut. Push the inner tube up<br />
towards the black nut and turn the black nut clockwise until<br />
the red line is visible at the 45 line.<br />
Place the reduction instrument over the <strong>screw</strong> head. Press<br />
down firmly until the tips engage under the <strong>screw</strong> head.<br />
Push the outer tube downward until it sits on the rod. Load<br />
the hexagonal socket into the ratchet handle and insert it<br />
into the top of the reduction instrument.<br />
Rotate the ratchet handle clockwise to reduce the rod into<br />
the <strong>screw</strong> head. Full reduction is achieved when the red line<br />
on the side of the instrument is visible at the 0 line. Remove<br />
the hexagonal socket to insert a locking cap through the instrument.<br />
To remove the instrument from the <strong>screw</strong> head, turn the<br />
palm handle counter-clockwise until the line on the side of<br />
the instrument is visible at the 45 line.<br />
Note: The reduction instrument for universal reduction <strong>screw</strong><br />
can be used as counter torque for final tightening of the<br />
locking cap.<br />
Note: Ensure there is enough space underneath the <strong>screw</strong><br />
head to attach the reduction instrument.<br />
20 <strong>Synthes</strong> <strong>Universal</strong> <strong>Reduction</strong> <strong>Screw</strong> Technique Guide
Remobilization of <strong>screw</strong> head<br />
Instruments<br />
03.636.006 Derotation Instrument<br />
for <strong>Universal</strong> <strong>Reduction</strong> <strong>Screw</strong><br />
03.636.013 Remobilization Tool<br />
for <strong>Universal</strong> <strong>Reduction</strong> <strong>Screw</strong><br />
The <strong>Universal</strong> <strong>Reduction</strong> <strong>Screw</strong>s are designed to lock the construct<br />
safely and minimize the chance of <strong>screw</strong> head tilting<br />
during derotation maneuvers. Therefore, in certain cases, a<br />
high force may be required to remobilize previously locked<br />
<strong>screw</strong> heads. In such cases, use the following techniques.<br />
Place the derotation tube over the <strong>screw</strong> head. Let the derotation<br />
instrument fall down through the tube onto the <strong>screw</strong><br />
head. Repeat if necessary.<br />
Warning: Too much force may advance the <strong>screw</strong>.<br />
Warning: the remobilization tool should only be used under<br />
image intensifier control.<br />
<strong>Universal</strong> <strong>Reduction</strong> <strong>Screw</strong> Technique Guide <strong>Synthes</strong> 21
Optional Techniques<br />
If after multiple attempts the <strong>screw</strong> head is still immobile, the<br />
following technique should be used:<br />
Instruments<br />
03.636.007 Rod Pusher/Counter Torque<br />
for <strong>Universal</strong> <strong>Reduction</strong> <strong>Screw</strong><br />
03.636.015 Sleeve Remover<br />
for <strong>Universal</strong> <strong>Reduction</strong> <strong>Screw</strong><br />
Place the counter torque onto the <strong>screw</strong> head. Slide the<br />
sleeve removal instrument through the counter torque and<br />
press down firmly until tactile feedback is experienced.<br />
Squeeze the handles together to rotate the sleeve inside the<br />
<strong>screw</strong> head. Use a forceps to remove the sleeve from the<br />
<strong>screw</strong> head. Repeat the steps on page 21 to remobilize the<br />
<strong>screw</strong> head.<br />
Warning: This <strong>screw</strong> is now destroyed and needs to be removed<br />
and replaced by a new <strong>screw</strong>. The removed <strong>screw</strong><br />
may not be reused.<br />
22 <strong>Synthes</strong> <strong>Universal</strong> <strong>Reduction</strong> <strong>Screw</strong> Technique Guide
Implants<br />
Locking cap<br />
– Two-step locking<br />
– Outer part locks angulation of head<br />
– Inner part locks rod to <strong>screw</strong><br />
– Material: TAN<br />
Art. No. 04.636.001<br />
<strong>Universal</strong> reduction <strong>screw</strong>s<br />
– Dual core and double lead thread design<br />
– Color coded by diameter<br />
– Extreme angle of +/- 45° around 360°<br />
– Material: TAN<br />
Art. Nos. Outer (mm) Lengths (mm)<br />
04.636.420–445 4.0 20– 45<br />
04.636.525–555 5.0 25– 55<br />
04.636.625–665 6.0 25– 65<br />
04.636.725–799 7.0 25–100<br />
04.636.825–899 8.0 25–100<br />
04.636.930–999 9.0 30–100<br />
Rods<br />
6.0 mm, curved, soft, TiCP<br />
Art. No. Length (mm)<br />
04.620.140 40<br />
498.139 45<br />
04.620.150 50<br />
498.140 55<br />
04.620.160 60<br />
498.141 65<br />
04.620.170 70<br />
498.142 75<br />
04.620.180 80<br />
498.143 85<br />
<strong>Universal</strong> <strong>Reduction</strong> <strong>Screw</strong> Technique Guide <strong>Synthes</strong> 23
Implants<br />
6.0 mm, straight, soft, TiCP<br />
Art. No. Length (mm)<br />
498.150 50<br />
498.151 75<br />
498.152 100<br />
498.153 125<br />
498.154 150<br />
6.0 mm, straight, hard, TiCP<br />
Art. No. Length (mm)<br />
498.102 50<br />
498.103 75<br />
498.104 100<br />
498.105 125<br />
498.106 150<br />
498.108 200<br />
498.112 300<br />
498.116 400<br />
498.119 500<br />
6.0 mm, straight, extra-hard, TAN<br />
Art. No. Length (mm)<br />
498.290 200<br />
498.291 250<br />
498.292 300<br />
498.293 350<br />
498.294 400<br />
498.295 450<br />
498.296 500<br />
24 <strong>Synthes</strong> <strong>Universal</strong> <strong>Reduction</strong> <strong>Screw</strong> Technique Guide
Instruments<br />
03.636.001 <strong>Screw</strong>driver Shaft Stardrive, T25,<br />
for <strong>Universal</strong> <strong>Reduction</strong> <strong>Screw</strong><br />
03.636.002 Holding Sleeve for <strong>Screw</strong>driver Shaft for<br />
No. 03.636.001<br />
03.636.003 <strong>Screw</strong>driver Shaft for Locking Cap for<br />
<strong>Universal</strong> <strong>Reduction</strong> <strong>Screw</strong><br />
03.636.004 <strong>Screw</strong>driver, cannulated, for Locking Cap<br />
for <strong>Universal</strong> <strong>Reduction</strong> <strong>Screw</strong><br />
03.636.010 <strong>Screw</strong>driver, small, for Locking Cap for<br />
<strong>Universal</strong> <strong>Reduction</strong> <strong>Screw</strong><br />
03.636.005 Tab Remover/Alignment Tool<br />
03.636.006 Derotation Instrument for <strong>Universal</strong><br />
<strong>Reduction</strong> <strong>Screw</strong><br />
03.636.007 Rod Pusher/Counter Torque for <strong>Universal</strong><br />
<strong>Reduction</strong> <strong>Screw</strong><br />
03.636.013 Remobilization Tool<br />
for <strong>Universal</strong> <strong>Reduction</strong> <strong>Screw</strong><br />
<strong>Universal</strong> <strong>Reduction</strong> <strong>Screw</strong> Technique Guide <strong>Synthes</strong> 25
03.636.014 <strong>Reduction</strong> Instrument<br />
for <strong>Universal</strong> <strong>Reduction</strong> <strong>Screw</strong><br />
03.636.015 Sleeve Remover<br />
for <strong>Universal</strong> <strong>Reduction</strong> <strong>Screw</strong><br />
03.620.005 Ratchet T-Handle with Low Toggle with<br />
Hexagonal Coupling 6.0 mm<br />
03.620.100 Handle with Ratchet, straight,<br />
with Quick Coupling, for Pangea<br />
03.620.061 T-Handle with Ratchet Wrench and<br />
with Torque Limiter, 10 Nm<br />
03.636.008 T-Handle with Hexagonal coupling 6.0 mm<br />
26 <strong>Synthes</strong> <strong>Universal</strong> <strong>Reduction</strong> <strong>Screw</strong> Technique Guide
03.620.019 Torque-limiting T-Handle, 10 Nm,<br />
for Pangea<br />
03.620.001 <strong>Screw</strong>driver Stardrive, T25, with T-Handle,<br />
for Pangea<br />
388.532 Reamer for preassembled Pedicle <strong>Screw</strong>s<br />
388.395 <strong>Screw</strong>driver, hexagonal, long, 2.5 mm,<br />
length 293 mm<br />
388.363 Holding Sleeve with Catches,<br />
for No. 314.070<br />
388.880* Trial rod 6.0 mm, length 400 mm<br />
<strong>Universal</strong> <strong>Reduction</strong> <strong>Screw</strong> Technique Guide <strong>Synthes</strong> 27
Instruments<br />
388.960* Bending pliers with rolls for USS rods<br />
6.0 mm<br />
388.440* Holding Forceps with broader tip, length<br />
290 mm, for rods 6.0 mm<br />
388.910* USS Bending Iron, left<br />
388.920* USS Bending Iron, right<br />
* Instruments from USS General Instrument Set<br />
28 <strong>Synthes</strong> <strong>Universal</strong> <strong>Reduction</strong> <strong>Screw</strong> Technique Guide
Sets and Vario Cases<br />
Sets and Vario Cases for Implants<br />
01.636.001 <strong>Universal</strong> <strong>Reduction</strong> <strong>Screw</strong>s in Vario Case,<br />
size 1/1<br />
68.636.001 Vario Case for <strong>Universal</strong> <strong>Reduction</strong> <strong>Screw</strong>s,<br />
size 1/1, with Lid, without Contents<br />
Note: The Vario Case includes two <strong>screw</strong> frames.<br />
<strong>Screw</strong> modules have to be ordered separately, see page 30.<br />
01.636.002 <strong>Universal</strong> <strong>Reduction</strong> <strong>Screw</strong>s in Vario Case,<br />
size 1/2<br />
68.636.002 Vario Case for <strong>Universal</strong> <strong>Reduction</strong> <strong>Screw</strong>s,<br />
size 1/2, with Lid, without Contents<br />
Note: The Vario Case includes one <strong>screw</strong> frame. <strong>Screw</strong><br />
module has to be ordered separately, see page 30.<br />
<strong>Universal</strong> <strong>Reduction</strong> <strong>Screw</strong> Technique Guide <strong>Synthes</strong> 29
Sets and Vario Cases<br />
<strong>Screw</strong> modules (to be ordered separately)<br />
68.636.005 Module for <strong>Universal</strong> <strong>Reduction</strong> <strong>Screw</strong><br />
4.0 mm<br />
68.636.006 Module for <strong>Universal</strong> <strong>Reduction</strong> <strong>Screw</strong><br />
5.0 mm<br />
68.636.007 Module for <strong>Universal</strong> <strong>Reduction</strong> <strong>Screw</strong><br />
6.0 mm<br />
68.636.008 Module for <strong>Universal</strong> <strong>Reduction</strong> <strong>Screw</strong><br />
7.0 mm<br />
68.636.009 Module for <strong>Universal</strong> <strong>Reduction</strong> <strong>Screw</strong><br />
8.0 mm<br />
68.636.010 Module for <strong>Universal</strong> <strong>Reduction</strong> <strong>Screw</strong><br />
9.0 mm<br />
<strong>Screw</strong> frame with drawer<br />
Two <strong>screw</strong> modules fit in one <strong>screw</strong> frame. The frame can<br />
accommodate <strong>screw</strong>s up to 60 mm. Different <strong>screw</strong> modules<br />
can be attached to the frame according to the customer’s<br />
needs. A small drawer in the bottom of the frame can accommodate<br />
<strong>screw</strong>s longer than 60 mm.<br />
30 <strong>Synthes</strong> <strong>Universal</strong> <strong>Reduction</strong> <strong>Screw</strong> Technique Guide
Assembly and disassembly instructions for modules<br />
1. Module attachment<br />
Insert the mounting clips through the holes in the module<br />
and attach to the frame.<br />
Clips indicating <strong>screw</strong> lengths can be snapped into place.<br />
2. Module removal<br />
The modules can be removed from the frame with removal<br />
tools. Two removal tools are included in the order of Vario<br />
Cases 68.636.001 and 68.636.002. (1)<br />
Clips indicating <strong>screw</strong> lengths can be removed as shown by<br />
pushing the tip of a ball-point pen on the back of the<br />
module. (2)<br />
1<br />
2<br />
<strong>Universal</strong> <strong>Reduction</strong> <strong>Screw</strong> Technique Guide <strong>Synthes</strong> 31
Sets and Vario Cases<br />
01.636.011 Implants for <strong>Universal</strong> <strong>Reduction</strong> <strong>Screw</strong><br />
in Vario Case<br />
68.636.011 Vario Case for Implants for <strong>Universal</strong><br />
<strong>Reduction</strong> <strong>Screw</strong>, with Lid,<br />
without Contents<br />
Optional<br />
68.622.012 Module for Transverse Connectors<br />
low profile<br />
68.622.011 Module for Cross-Link Clamps with Rods<br />
32 <strong>Synthes</strong> <strong>Universal</strong> <strong>Reduction</strong> <strong>Screw</strong> Technique Guide
Set and Vario Case for Instruments<br />
01.636.012 Instruments for <strong>Universal</strong> <strong>Reduction</strong> <strong>Screw</strong><br />
in Vario Case<br />
68.636.012 Vario Case for Instruments for<br />
<strong>Universal</strong> <strong>Reduction</strong> <strong>Screw</strong>, with Lid,<br />
without Contents<br />
187.200 USS General Instruments in Vario Case<br />
68.636.013 Vario Case for Instruments for <strong>Universal</strong><br />
<strong>Reduction</strong> <strong>Screw</strong>, for degenerative Surgery,<br />
with Lid, without Contents<br />
<strong>Universal</strong> <strong>Reduction</strong> <strong>Screw</strong> Technique Guide <strong>Synthes</strong> 33
<strong>Synthes</strong> Spine Biomaterials Overview<br />
Biomaterials may be the product of<br />
choice to enhance the fusion of spinal<br />
segments.<br />
<strong>Synthes</strong> offers a wide range of synthetic<br />
biomaterial products in different<br />
application forms and with distinct biological<br />
properties:<br />
chronOS chronOS Strip<br />
DBX*<br />
Osteoinductive power<br />
A comprehensive portfolio of allograft<br />
products is available in certain countries<br />
depending on regional regulations.<br />
Synthetic and allogenic bone replacement<br />
materials have the advantage of<br />
uniform quality, unlimited availability<br />
and absence of potential complications<br />
at a donor site.<br />
Osteoconductive, resorbable, synthetic Osteoconductive, resorbable, synthetic<br />
34 <strong>Synthes</strong> <strong>Universal</strong> <strong>Reduction</strong> <strong>Screw</strong> Technique Guide<br />
For more detailed information about a<br />
specific product or availability of allografts<br />
please contact your local <strong>Synthes</strong><br />
representative.<br />
Additionally, the application of synthetic<br />
and allogenic bone graft substitutes<br />
reduces the duration of the surgery.<br />
*Facilitated through <strong>Synthes</strong>
<strong>Universal</strong> <strong>Reduction</strong> <strong>Screw</strong> Technique Guide <strong>Synthes</strong> 35
36 <strong>Synthes</strong> <strong>Universal</strong> <strong>Reduction</strong> <strong>Screw</strong> Technique Guide
<strong>Synthes</strong> GmbH<br />
Eimattstrasse 3<br />
CH-4436 Oberdorf<br />
www.synthes.com<br />
All technique guides are available as PDF files at<br />
www.synthes.com/lit<br />
Ö036.000.228öADXä<br />
0123<br />
036.000.228 version AD 06/2011 50147476 © <strong>Synthes</strong>, Inc. or its affiliates Subject to modification <strong>Synthes</strong>, Stardrive and Vario Case are trademarks of <strong>Synthes</strong>, Inc. or its affiliates