Quick Square Instruction Manual - Stanley
Quick Square Instruction Manual - Stanley
Quick Square Instruction Manual - Stanley

Create successful ePaper yourself
Turn your PDF publications into a flip-book with our unique Google optimized e-Paper software.
<strong>Quick</strong><strong>Square</strong> ®<br />
<strong>Instruction</strong> <strong>Manual</strong><br />
30˚<br />
0˚ 10˚<br />
20˚<br />
30˚ 20˚ 10˚ 0˚
INTRODUCTION<br />
This booklet has been prepared for both the professional<br />
carpenter and the do-it-yourselfer! The information pertains to<br />
general roof construction and specifically to the <strong>Stanley</strong> <strong>Quick</strong><br />
<strong>Square</strong> ® & Pocket <strong>Square</strong> ® tools.<br />
The illustrations and instructions contained within this<br />
booklet are presented as recommended practice, but by no<br />
means do they imply that other techniques are not valid or<br />
acceptable.<br />
Why not get yourself a cup of coffee, sit down, relax and<br />
read through this material to familiarize yourself with the<br />
features of the <strong>Stanley</strong> <strong>Square</strong>s, and refresh your memory of<br />
the various terms and definitions used in roof construction.<br />
We start by illustrating the most common shapes of roofs,<br />
roof terminology, definitions, and types of rafters. Following is<br />
a description of the <strong>Quick</strong> <strong>Square</strong> ® and Pocket <strong>Square</strong> ®, and<br />
how they are used for rafter layout with illustrations and<br />
illustrated examples.<br />
Then we describe and illustrate the additional features<br />
and uses designed into the <strong>Stanley</strong> <strong>Square</strong>s, such as the<br />
pro-tractor scale, the inch scale, and how to use the square as<br />
a saw guide.<br />
At the rear of the booklet are tables of actual rafter lengths<br />
of common, hip and valley rafters for various building widths<br />
and roof rises, as well as a table for determining the<br />
differences in length of jack rafters for various on-center<br />
spacing.<br />
So sit back, relax, and let us show you how<br />
"<strong>Stanley</strong> helps you do things right" ®
TYPE OF ROOFS<br />
There are numerous types and shapes of roofs. The most common in<br />
use are the following:<br />
Shed or Lean-To-Roof<br />
This is the simplest type of roof and<br />
has only a single slope<br />
Gable or Pitch Roof<br />
This is also a simple roof and the<br />
one most commonly used. It has two<br />
slopes meeting at the center or ridge<br />
and forming a gable.<br />
Hip Hoof<br />
This roof consists of four sides, all<br />
sloping toward the center of the<br />
building. The corner rafters run up<br />
diagonally to meet the ridge.<br />
Gable and Valley or Hip and Valley<br />
This is a combination of two gable<br />
or two hip roofs intersecting each other<br />
The valley is the intersection of the two<br />
slopes al the roofs, which run in different<br />
directions There are numerous<br />
modifications of this type of roof, and<br />
the most common is where the<br />
intersecting roofs are at right angles to<br />
each other.<br />
Deck Roof<br />
This type of roof occurs when the<br />
rafters rise to meet a flat surface or<br />
"deck" instead of corning together at<br />
the ridge.<br />
DECK ROOF<br />
3<br />
SHED OF<br />
LEAN-TO ROOF<br />
GABLE ROOF<br />
HIP ROOF<br />
GABLE & VALLEY ROOF<br />
HIP & VALLEY ROOF
Definitions:<br />
There are many numbers of publications available concerning<br />
framing, roof construction and so on. For the most part these publications<br />
are fairly consistent in the terminology used in describing various<br />
structural members, etc. Unfortunately, when it comes to using certain<br />
terms relating to such things as rafter cuts, different words are used to<br />
mean the same thing-even within the same publication (i.e. bottom cut,<br />
seat cut, heel cut, fascia cut, etc.). Therefore, in the interest of<br />
consistency and clarity, we shall use one term in these instances.<br />
The following definitions relating to the various roof members and<br />
terms used in roof construction-and throughout this booklet-should be<br />
carefully noted and committed to memory.<br />
Rafter<br />
The sloping structural members which support the roof .There are<br />
four distinct types of rafters, Common, Hip, Valley and Jack.<br />
(Ref. Booklet Cover).<br />
Common Rafter<br />
A rafter extending from the plate to the ridge or ridge board and<br />
perpendicular to the plate and ridge in a plan view.<br />
Hip Rafter<br />
A rafter extending diagonally from the outside corner of intersecting<br />
plates to the ridge board, usually at an angle of 45° to the plate in<br />
a plan view,<br />
Valley Rafter<br />
A rafter extending diagonally from the inside corner of intersecting<br />
plates to the ridge of one of the intersecting roots. In most cases at an<br />
angle of 45° to the plate(s) in plan view.<br />
Jack Rafter<br />
A rafter that does not extend from plate to ridge. They lie in the<br />
same plane as common rafters and either abuts plate and hip, ridge<br />
and valley or hip and valley rafters, and is classified as follows:<br />
Hip Jack<br />
A rafter extending from plate to hip rafter at right angles to the<br />
plate in plan view.<br />
Valley Jack<br />
A rafter extending from ridge to valley rafter at right angles to the<br />
ridge in plan view.<br />
Cripple Jack<br />
A rafter extending between a hip rafter and a valley rafter at right<br />
angles to the ridge and plate in plan view. A cripple jack abuts neither<br />
a ridge or plate.<br />
4
Definitions: (Continued)<br />
Cuts<br />
Naturally all rafters must be cut to specific dimensions in order to<br />
properly fit in the space they are to occupy. The mating surfaces of the<br />
rafter and abutted roof members must fit flush, and as witnessed by<br />
the variety of roof styles and different kinds of rafters. A variety of cuts<br />
will be required to insure a proper rafter fit. There are basically four<br />
cuts made on rafters – plumb, seat, heel and side cut.<br />
Plumb Cut<br />
The cut at the top or bottom of any<br />
rafter, which is perpendicular to the<br />
span (width) of the building when the<br />
rafter is in position. (Also called the top<br />
plumb or bottom plumb cut.)<br />
Seat or Level Cut<br />
The cut made at the bottom of any<br />
rafter resting on the horizontal surface<br />
of the plate.<br />
Heel Cut<br />
The cut made at the bottom end of<br />
any rafter, which bears against the<br />
vertical surface of the plate. Note that<br />
this is parallel to the plumb cut.<br />
Side Cut<br />
The cut made at the end of a rafter<br />
that abuts the ridge or other rafter at<br />
other than 90º in plan view. This cut is<br />
required at the top end of all hip, valley,<br />
and hip jack and cripple jack rafters and<br />
at the bottom end of valley jack and<br />
cripple jack rafters. (Also called cheek or<br />
bevel cut.)<br />
5<br />
PLUMB CUT<br />
SEAT CUT<br />
PLATE<br />
HEEL CUT PLUMB CUT<br />
PLATE<br />
SIDE CUT<br />
RIDGE BOARD<br />
PLUMB CUT
Definitions: (Continued)<br />
Cuts (Continued)<br />
Birds Mouth<br />
The notch formed, at the bottom<br />
end of rafters, as a result of a seal cut<br />
and heel cut is called a birds mouth. The<br />
depth of birds mouth is made to the<br />
location of measuring line. (Refer to<br />
definition of “measuring hoe")<br />
Ridge Board<br />
The ridge board is the horizontal<br />
member at the peak of the roof to which<br />
the upper ends of the rafters on both<br />
sides of the roof are fastened.<br />
In less expensive construction,<br />
sometimes the ridge boards are omitted<br />
and opposite rafters are fastened to each<br />
other forming the ridge.<br />
Plate<br />
The plate is the roof member to<br />
which the lower ends of the rafters are<br />
fastened. The plates are located on the<br />
tops of the outside walls.<br />
Span<br />
The span of a roof is the distance<br />
from outside of the building wall to the<br />
outside of the opposite wall, or basically<br />
the outside width of the building.<br />
Run<br />
The run of a roof is the horizontal<br />
distance from the center of the ridge to<br />
the outside of the wall (or plate). In<br />
equally pitched roofs and where the<br />
plates are on the same plane, the run is<br />
equal to half the span, therefore, half the<br />
building width. In shed or lean-to type<br />
roofs, the run is equal to the span, less<br />
the thickness of the wall.<br />
6<br />
MEASURING<br />
LINE<br />
RIDGE<br />
BOARD<br />
PLATE<br />
RAFTERS<br />
RUN<br />
RUN<br />
SEAT CUT<br />
BIRDSMOUTH<br />
HEEL CUT<br />
SPAN<br />
=<br />
SPAN<br />
2
Definitions: (Continued)<br />
Rise<br />
The rise of a roof is the<br />
vertical distance Rom the top of<br />
the plate to the intersection of the<br />
measuring tines of opposing<br />
common rafters. (See "Measuring<br />
Line" for the location of this line<br />
on common rafters.)<br />
Unit Rise<br />
The unit rise of a roof is the<br />
vertical distance a roof raises for<br />
each 1 foot of roof run<br />
(unit run).<br />
Pitch<br />
The pitch of a tool is the ratio<br />
of rise in feet to span in feet Or<br />
unit rise to unit span. To find the<br />
pitch, divide the rise by the span<br />
Slope<br />
The slant of a roof is more<br />
commonly being expressed in<br />
terms of "slope" as opposed to<br />
"pitch." Building plans usually<br />
include the roof slope defined by a<br />
small triangle, called the slope<br />
Triangle. The slope of a roof is the<br />
ratio of the rise in inches to a run<br />
of 12 inches.<br />
7<br />
RISE<br />
SLOPE<br />
TRIANGLE<br />
1 FOOT<br />
(UNIT RUN)<br />
RUN<br />
UNIT RISE<br />
RISE<br />
RISE<br />
PITCH<br />
SPAN<br />
SPAN<br />
RUN<br />
RISE<br />
RISE<br />
SLOPE <br />
RUN<br />
RISE<br />
RISE
Definitions: (Continued)<br />
Eave<br />
Most buildings are constructed with<br />
an overhang, that is, the roof ends beyond<br />
the outside wall of the building. The<br />
extension at the rafter necessary to<br />
provide this overhang is called an eave<br />
(sometimes referred to as tail). The length<br />
of an eave is calculated independently of<br />
the rafter length, but the two are added<br />
together to obtain the total rafter length.<br />
Plan View<br />
The plan view is a view<br />
looking straight down on the roof<br />
Measuring Line<br />
The length of a rafter is<br />
measured and laid out on a<br />
measuring line on the rafter. The<br />
measuring line on a common<br />
rafter with an eave, is located<br />
along the side of rafter parallel to<br />
the top edge. Rafters made by 2<br />
x 4's, lay a carpenter square<br />
body flush with top edge of the<br />
rafter and marking the bottom<br />
edge of the square body. For<br />
rafters made in 2 x 6's or larger,<br />
lay the square body flush with<br />
the bottom edge of the rafter and<br />
mark along top edge of the<br />
square body.<br />
On rafters without an eave,<br />
the measuring line is along the<br />
top edge of the rafter.<br />
The measuring line on hip,<br />
valley, and jack rafters is located<br />
along the centerline on top of the<br />
rafter.<br />
8<br />
EAVE<br />
2 X 4 RAFTER<br />
EAVE<br />
MEASURING<br />
LINE<br />
MARK MEASURING<br />
LINE ALONG THIS EDGE<br />
MEASURING LINE<br />
HIP RAFTER<br />
OVE RMANG<br />
2 X 6 OR LARGER<br />
RAFTER<br />
COMMON RAFTER<br />
WITH EAVE<br />
MARK<br />
MEASURING<br />
LINE ALONG<br />
THIS EDGE<br />
MEASURING RIDGE BOARD<br />
LINE<br />
HIP JACK RAFTER
THE STANLEY QUICK SQUARE ® TOOL<br />
The <strong>Stanley</strong> <strong>Quick</strong> <strong>Square</strong>® is designed to provide a quick, accurate,<br />
and repeatable means for laying out and cutting the various cuts on<br />
common, hip, valley and jack rafters used in roof construction.<br />
Description<br />
The <strong>Stanley</strong> <strong>Quick</strong> <strong>Square</strong>® Is constructed basically of three (3)<br />
parts, namely Refer to Figure 1):<br />
1) The Body<br />
2) The Adjustable Arm<br />
3) The Locking Screw<br />
COM/JAK SCALE<br />
HIP/VAL SCALE<br />
2 - ADJUSTABLE ARM<br />
PLUMB CUT<br />
FIGURE 1<br />
1) The Body<br />
The body is manufactured from a non-corrosive aluminum die<br />
casting. Scales graduated in terms of inch rise per foot of run or the<br />
various rafters are cast into both sides of the body to extremely<br />
accurate tolerances. For additional convenience, protractor scales<br />
graduated in degrees, as well as an inch scale graduated every<br />
1/8-inch are also cast into the body.<br />
2) The Adjustable Arm<br />
The adjustable arm is also manufactured from a non-corrosive<br />
aluminum die casting. The arm is positioned with its top edge aligned<br />
with the desired inch rise per foot run marking on the body to obtain the<br />
correct angle for marking and cutting the rafter.<br />
3) The Locking Screw<br />
The locking screw, also of aluminum, is used to lock the<br />
adjustable arm at the desired rise marking on the body.<br />
9<br />
1- BODY<br />
3- LOCKING SCREW<br />
SEAT CUT<br />
PROTRACTOR SCALE
THE STANLEY QUICK SQUARE ® TOOL<br />
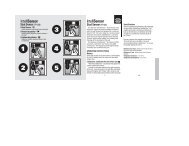
Plumb Cuts<br />
Loosen the locking screw and set the adjustable arm so that its<br />
top edge coincides with the desired inch rise per foot of run (slope) for<br />
the desired type of rafter. Tighten the locking screw to lock the arms in<br />
position (Refer to Figure 2A)<br />
At one end at the rafter lay the <strong>Quick</strong> <strong>Square</strong>® on the side of the<br />
rafter with the top at the adjustable arm placed against the bottom<br />
edge at the rafter. (Refer to Figure 2B)<br />
Along the edge marked for plumb cuts, mark the rafter as shown<br />
in figure 2C.<br />
PLUMB<br />
Rafter Length<br />
To find the length of a rafter (common, hip, or valley) for a specific<br />
roof pitch and building width. First look up the required building width<br />
in Table 1. Next, find the desired rise in inches per foot of run (slope) in<br />
the left hand column, and read the exact rafter length required to the<br />
right of the rise under the column for the type of rafter desired.<br />
Along the measuring line, lay out and mark the length of the rafter.<br />
The lengths of rafters obtained from the tables are to the center at<br />
the ridge. Therefore, half of the thickness at the ridge board should<br />
always be deducted from the listed rafter length before the top plumb<br />
cut is made. (See Figure 3)<br />
10<br />
MARK<br />
A<br />
SET ARM<br />
B<br />
RAFTER<br />
C<br />
SEAT SEAT<br />
SEAT<br />
FIGURE 2<br />
MEASURING LINE<br />
LENGTH OF RAF TER FROM TABLE<br />
DEDUCTION FOR RIDGE<br />
TOP PLUMB<br />
CUT MARK
Using the <strong>Stanley</strong> <strong>Quick</strong> <strong>Square</strong> ® Tool<br />
The deduction of half the thickness of the ridge board is measured<br />
at right angles to the top plumb cut line and is marked parallel to the<br />
top plumb cut line.<br />
A right angle line to the top plumb cut line is easily made with the<br />
<strong>Stanley</strong> <strong>Quick</strong> <strong>Square</strong>®.<br />
Without changing the position of the adjustable arm originally set,<br />
rotate the <strong>Quick</strong> <strong>Square</strong>® so that the bottom of the adjustable arm<br />
now rests against the bottom edge of the rafter. Slide the square so that<br />
right edge marked for seat cuts overlaps the top plumb cut mark, and<br />
mark the rafter along that edge. (See Figure 4)<br />
SEAT<br />
ROTATE<br />
MARK<br />
FIGURE 4<br />
SEAT<br />
Now along this line, measure and mark half the thickness of the<br />
ridge board from the top plumb cut line. Next, rotate the square to its<br />
original position and place the square so that the edge marked for<br />
plumb cuts is set on the mark just made Be sure the top of the<br />
adjustable arm is snug against the bottom edge at the rafter. Now mark<br />
the rafter along the edge of the square marked for plumb cuts. (See<br />
Figure 5)<br />
(Note: For jack rafter lengths, refer to pages 21 through 25).<br />
Seat Cuts<br />
The seat cut is made perpendicular to the bottom plumb heel cut<br />
where it intersects the measuring line at a distance from the original<br />
top plumb cut line, equal to the rafter length.<br />
To obtain the seat cut, again rotate the square so that the bottom<br />
edge of the adjustable arm is against the bottom edge of the rafter. Now<br />
position the square so that the edge marked for seat cuts coincides<br />
with the bottom plumb cut line (heel cut) at the measuring line. Mark<br />
the seat cut from the bottom plumb cut line to the bottom edge of the<br />
rafter. (See Figure 6A & 6B)<br />
EAVE<br />
LENGTH OF RAFTER FROM TABLEI<br />
MEASURING LINE<br />
11<br />
MEASURE<br />
HEEL CUT SEAT CUT DEDUCTION FOR RIDGE<br />
BOTTOM (BOTTOM PLUMB CUT)<br />
PLUMB CUT<br />
COMMON RAFTER LAYOUT WITH EAVE - FIGURE 6A<br />
MARK<br />
1/2 RIDGE THICKNESS<br />
FIGURE 5 SEAT<br />
TOP<br />
PLUMB<br />
LINE
Using the <strong>Stanley</strong> <strong>Quick</strong> <strong>Square</strong> ® Tool<br />
LENGTH OF RAFTER FROM TABLEI<br />
SEAT CUT DEDUCTION FOR RIDGE<br />
(NOTE MEASURIM+NG LINE IS ALONG TOP OF RAFTER)<br />
COMMON RAFTER LAYOUT WITH EAVE - FIGURE 6B<br />
The preceding paragraphs in this section described how to use<br />
the <strong>Quick</strong> <strong>Square</strong>® for making plumb, seat, and heel cuts, determining<br />
the length of a rafter, and were general in nature.<br />
Let’s now take a look at an example for laying out and cutting<br />
common, hip, valley and jack rafters for a specific building width and<br />
roof rise. The roof is also to have an overhang.<br />
Building Specification<br />
Widthe ............... 20 feet<br />
Rise ................... 9 inches per foot run<br />
Ridge ................. 2x8 (11/2 in. actual ridge thickness)<br />
Eave Length ....... 2 feet<br />
Rafter Spacing ....16 inch centers<br />
Rafter Stock ....... 2 x 6<br />
Plate Stock ......... 2 x 6<br />
Common Rafter<br />
1) Set the top edge of the arm of the <strong>Quick</strong> <strong>Square</strong>® at the ‘9’<br />
graduation (between the 8 and 10) on the scale for com/jack.<br />
SEAT<br />
2) Mark the top plumb cut line at one end of the rafter<br />
TOP PLUMB<br />
CUT LINE<br />
3) Find the rafter length from Table 1 (as 12 feet, 6 inches),<br />
and lay out and mark this Iength on the measuring line.<br />
12 FT 6 IN<br />
PLUMB<br />
4) Subtract 1/2 of the thickness of the ridge board (in this case<br />
3/4 inch) from the top plumb cut line.<br />
12
Using the <strong>Stanley</strong> <strong>Quick</strong> <strong>Square</strong> ® Tool<br />
5) Mark the heel cut (a bootom plumb cut line) and the seat cut<br />
lines.<br />
SEAT<br />
6) Add 2 feet. For the length of the eave, from the heel cut line<br />
along the measuring line and mark a bottom plumb cut line.<br />
7) Once the rafter has been cut, it may now be used as template<br />
for laying out the rest of the common rafters.<br />
Hip and Valley Rafter<br />
1) Set the top edge of the arm of the <strong>Quick</strong> <strong>Square</strong> ® at the ‘9’<br />
graduation (between the 8 and 10) on the scale for hip/val.<br />
SEAT<br />
SEAT<br />
2) Mark the top plumb cut at one end of the rafter.<br />
13<br />
SEAT
Using the <strong>Stanley</strong> <strong>Quick</strong> <strong>Square</strong> ® Tool<br />
3) Rotate the <strong>Quick</strong> <strong>Square</strong>® and mark a line perpendicular to<br />
the plumb cut line. Along this line, measure and mark the thickness of<br />
to rafter.<br />
4) Make a second plumb cut mark at this point.<br />
T<br />
SEAT<br />
5) Set the arm on the <strong>Quick</strong> <strong>Square</strong> at 0 degrees and extend bath<br />
plumb cut marks square across the top of the rafter.<br />
14<br />
SEAT<br />
SEAT<br />
T
Using the <strong>Stanley</strong> <strong>Quick</strong> <strong>Square</strong> ® Tool<br />
6) Connect opposite ends of the square fines, which will give the<br />
correct side cut angle. Note that rafters with opposite side cut angles<br />
will be required for opposing hip rafters and valley rafters.<br />
7) From the center of the side cut angle, lay out and mark the<br />
rafter length on the measuring line, as obtained form Table 1. (You will<br />
remember that we defined the measuring line on hip, valley and jack<br />
rafters as along the center line on top of the rafter.)<br />
8) <strong>Square</strong> the length of the rafter across the top of the rafter, arm<br />
mark a bottom plumb cut line on the side of the rafter.<br />
If you are laying out a valley rafter, add a second plumb line 1/2,<br />
the thickness of the rafter from the plumb line just made! This is the<br />
line along which the heel cut will be made on the valley rafter to fit the<br />
intersecting plates.<br />
SEAT<br />
SET AT 9 ON<br />
HIP/VAL SCALE<br />
CENTER OF THE<br />
SIDE CUT ANGLE<br />
SIDE CUT ANGLE<br />
15<br />
TOP PLUMB CUT LINE<br />
16 FT 1/8 INCH(FROM TABLEI)<br />
T<br />
2<br />
T<br />
SEAT
Using the <strong>Stanley</strong> <strong>Quick</strong> <strong>Square</strong> ® Tool<br />
9) Measure the depth of the heel cut from a common rafter, and<br />
mark the seat cut line (using the '9' setting on the hip/val scale).<br />
COMMON RAFTER VALLEY OR HIP RAFTER<br />
D<br />
10 Now the deduction for the ridge board thickness must be<br />
subtracted from the rafter length obtained from Table 1. Since the hip<br />
and valley rafters sit at an angle of 45 degrees to the ridge in the plan<br />
view, the thickness of the ridge board must be measured on a 45<br />
degree diagonal line.<br />
Set and lock the arm on the square at 45 degrees. Draw a 45<br />
degree fine across the top at the ridge board. Measure the length of the<br />
line and divide by 2. (In this case, the line should be 2 1 /8 inches long<br />
divided by 2 = 1 1 /16 inch)<br />
11 Along the perpendicular line laid out in Step 3), and trim the<br />
original top plumb cut line, measure and mark 1 1 /16 inch, and at this<br />
mark make another top plumb cut line.<br />
12 From the top of this top plumb cut line, draw another side<br />
cut tine parallel to the side cut line made in Step 6). These last top<br />
plumb and side cut lines define the angle at which the end of the rafter<br />
is to be cut to fit flush against the ridge board.<br />
Note that a portable electric circular saw is used to cut this end of<br />
the rafter, that by tilting the blade at an angle of 45 degrees to the sole<br />
plate of the now, and cutting along the top plumb cut line. The result<br />
will be the correct side cut angle! It is best to lay out the side cut angle<br />
on top at the rafter in any case, in order to be sure the tilt of the blade<br />
angle is in the right direction to result in the desired side cut!<br />
16<br />
D<br />
1 1/16 INCH
Using the <strong>Stanley</strong> <strong>Quick</strong> <strong>Square</strong> ® Tool<br />
13) We must now consider the additional length that must be<br />
added to the length of the rafter to accommodate the eave. We<br />
calculate this by ratios. First, determine the length of common and<br />
hip/valley rafters for this pitch roof. In our example, the rafter length is<br />
12’6”. The length of the hip rafter is 161 /8. The ratio of hip rafter length<br />
to common rafter length is:<br />
161 /8 (16x12)+.125 192,125<br />
= = =1.28<br />
12’ 6” (12x12)+6 150<br />
This ratio holds or the eave length at the tip or valley rafter divided by<br />
the eave length at the common rafter.<br />
D<br />
=1.28 where D is the length of<br />
C<br />
the hip or valley eave, and C is the length of the common rafter eave,<br />
as shown in the diagram below in our example:<br />
D<br />
=1.28, then D = 24”x l.28 = 30.72”<br />
24”<br />
COMMON RAFTER<br />
HIP RAFTER<br />
OVERHANG<br />
C : EAVE LENGTH<br />
D : HIP EAVE LENGTH<br />
17<br />
A<br />
C<br />
B<br />
D
Using the <strong>Stanley</strong> <strong>Quick</strong> <strong>Square</strong> ® Tool<br />
14) From the squared line across the top of the rafter at the<br />
bottom plumb cut line, measure and mark 303/4 inches (eave length).<br />
<strong>Square</strong> this line across the top of the rafter, and mark another bottom<br />
plumb cut line on the side of the rafter from this squared line.<br />
SEAT<br />
303/4 IN<br />
15) Since the length of the hip rafter and valley rafter are<br />
measured along the center line on top of the rafter, you can see that the<br />
corners at the bottom end of the eave are not in the same plane as the<br />
ends of the common rafters.<br />
The cut-off length or the allowance for the mitre is half the<br />
thickness of the hip rafter as illustrated below in plan view.<br />
T<br />
OVERHANG<br />
T<br />
2<br />
PLATE<br />
HIP RAFTER<br />
T<br />
2<br />
AS NMARKED CUT OFF<br />
18<br />
T<br />
2<br />
MITRE<br />
T<br />
2
Using the <strong>Stanley</strong> <strong>Quick</strong> <strong>Square</strong> ® Tool<br />
Some carpenters and roof framers prefer to mark and cut the eave<br />
after the hip rafter is in place by snapping a chalk line from the ends of<br />
the common rafters.<br />
The cut-off is made along a plumb line laid out from the chalk<br />
mark, or as laid out to the calculated length above, with the blade of a<br />
orable electric saw set at an angle of 90 degrees to the soleplate.<br />
The mitre cut is made along a plumb line with the blade of a<br />
porable electric saw set at an angle of 45 degrees to the soleplate.<br />
16) In the case of the valley rafter, it is not necessary to<br />
foreshorten or mitre the end of the rafter since the measured length of<br />
the eave (measured along the top of the rafter) lies in the same plane<br />
as the ends of the common rafters, as show in plan view below!<br />
PLATE<br />
VALLEY RAFTER<br />
For those who want to make the effort, a 90 degree notch can be<br />
made a the bottom of the rafter to provide a better surface for fastening<br />
the fascia board. In this case, half the thickness of the valley rafter must<br />
be added to the length of the rafter, as illustrated below. A plumb line<br />
would again be drawn on the side of the rafter at this point, and with<br />
the blade set at 45 degress on a porable electric saw, and at the proper<br />
depth, a cut is made along the plumb line on both sides of the rafter.<br />
19<br />
COMMON RAFTER<br />
OVERHANG
Using the <strong>Stanley</strong> <strong>Quick</strong> <strong>Square</strong> ® Tool<br />
PLATE<br />
17) When budding a hip roof the ridge board should be left about<br />
a foot longer than necessary at the ends. Then a common rafter, which<br />
has been cut to size, is placed on the center of the end plate, and the<br />
upper end positioned alongside the ridge board, aligning the top end at<br />
the common rafter with the top of the ridge board.<br />
The ridge board is then marked at the end at the common rafter.<br />
RIDGE BOARD<br />
VALLEY RAFTER<br />
T<br />
2<br />
C OF BUIL DING<br />
If a center common ridge rafter is used, the ridge board is cut to<br />
length at this mark, and the hip rafters are fastened at the top end of<br />
the common ridge ratter<br />
If no center common ridge rafter is used, add 2 inches to the<br />
length of the ridge board from the mark just made, to provide a surface<br />
to fasten the upper end of the hip rafter, and cut off the ridge board at<br />
this point.<br />
20<br />
T<br />
PLATE<br />
COMMON RAFTER<br />
OVERHANG<br />
COMMON RAFTER
Using the <strong>Stanley</strong> <strong>Quick</strong> <strong>Square</strong> ® Tool<br />
Jack Rafter<br />
Jack rafters lie in the same plane as common rafters, and<br />
therefore have the same inch rise per foot run as common rafters.<br />
1) Set the adjustable arm to the required graduation on the 'Com/<br />
Jack' scale-in this case, '9', as was done for the common rafter layout.<br />
2) At one end of the rafter, mark a plumb cut line.<br />
3) Rotate the square and mark a line perpendicular to the plumb<br />
cut line. Along this line measure and mark the thickness of the rafter.<br />
T<br />
SEAT<br />
SEAT<br />
4) Mark a second plumb cut line at this point.<br />
21<br />
SEAT<br />
T<br />
SEAT<br />
TOP PLUMB CUT LINE<br />
RAFTER THICKNESS
Using the <strong>Stanley</strong> <strong>Quick</strong> <strong>Square</strong> ® Tool<br />
5) <strong>Square</strong> the top at the plumb lines across the top of the rafter.<br />
Note that in the case of a valley-jack rafter, the top of the rafter is on<br />
the 'short' side at the plumb line-that is, just the apposite side of a<br />
hip-jack!<br />
HIP JACK RAFTER VALLEY JACK RAFTER<br />
6) Depending on which way the side cut is to be made, connect<br />
opposite ends of the square fines.<br />
HIP JACK RAFTER<br />
SEAT<br />
7) From Table 2, "Difference in Length at Jack Rafters for Various<br />
Spacing," the length given for 9 inch rise per foot run on 16 inch<br />
centers is 1 foot, 8 inches. This is also the length of the first, or shortest<br />
hip-jack or valley-jack rafter. Each succeeding jack rafter will be 1 foot,<br />
8 inches longer than the preceding one!<br />
8) Along the measuring line (the center line on top of the rafter),<br />
and from the side cut line marked in Step 6), measure and mark the<br />
length of the rafter. The first rafter will be 1 foot, 8 inches long, the<br />
second rafter 3 feet, 4 inches long (2 times 1 foot, 8 inches), the third<br />
rafter 5 feet, 0 inches (3 times 1 foot, 8 inches), and so on!<br />
JACK LENGTH<br />
22<br />
VALLEY JACK RAFTER<br />
SEAT<br />
JACK LENGTH<br />
HIP JACK RAF TER VALLEY JACK RAF TER
Using the <strong>Stanley</strong> <strong>Quick</strong> <strong>Square</strong> ® Tool<br />
9) From the length marked, mark a plumb cut line on the side of<br />
the rafter.<br />
10) For a valley-jack, the rafter will be cut parallel to this line to fit<br />
against the ridge board. Be sure this plumb line on the valley-jack is in<br />
the same direction as the plumb fine at the opposite end of the rafter,<br />
that is, parallel to it!<br />
11) For a hip-jack, use a common rafter as template, and mark the<br />
heel and seat cuts (birdsmouth), on the side of the rafter at the bottom<br />
plumb cut line. In case there isn’t a common rafter available, lay out the<br />
heel and seat cut lines as described on page 11 under Seat Cuts.<br />
12) Again on a hip-jack, the additional length for the eave is laid<br />
out the same as it was for the common rafter. A common rafter may be<br />
used as template, if one is available!<br />
SEAT<br />
VALLEY-JACK RAFTER<br />
SEAT<br />
2 FEET<br />
(SAME AS COMMON<br />
RAFTER)<br />
23
Using the <strong>Stanley</strong> <strong>Quick</strong> <strong>Square</strong> ® Tool<br />
13) Compensation must now be made for the thickness of the hip<br />
or valley rafter in the length of the jack rafter, as was done for the hip<br />
and valley rafter to compensate for the thickness of the ridge board.<br />
With the <strong>Quick</strong> <strong>Square</strong>® set on the ‘9’ of the ‘Com/Jack’ scale, mark<br />
another plumb cut line on the side of the rafter 1 1/16 inch form the<br />
original plumb cut mark made in Step 2 above. (The 11/16inch<br />
dimension being half the diagonal thickness of the hip or valley rafter).<br />
VALLEY JACK RAFTER<br />
14) From the top of this plumb line, mark a line across the top of<br />
the rafter parallel to the side cut mark made in Step No. 6). These last<br />
side and plumb cut marks are the marks on which the rafter will be cut.<br />
Cutting along this plumb cut line with a portable electric circular saw<br />
set a 45 degrees, will result in the correct side cut angle!<br />
24<br />
1 1/16”<br />
1 3/4”<br />
1 1/16 IN
Using the <strong>Stanley</strong> <strong>Quick</strong> <strong>Square</strong> ® Tool<br />
15) A valley-jack rafter must be further reduced in length to<br />
compensate for the thickness of the ridge board which it abuts. This is<br />
accomplished in the same manner in which the common rafter was<br />
shortened, and for the same reason. (Refer to Page 10-Rafter Length)<br />
25<br />
3/4 IN<br />
VALLEY JACK RAFTER<br />
HIP JACK RAFTER
ADDITONAL FEATURES AND USES<br />
Protractor Scale<br />
The <strong>Quick</strong> <strong>Square</strong>® is embossed with a scale, graduated in<br />
degrees which makes it very handy for use as an adjustable protractor!<br />
The scale is embossed on both sides of the square body so that either<br />
side may be used. The illustration below shows the angles which may<br />
be obtained with the adjustable arm set at the 30 degree graduation.<br />
SEAT<br />
120˚<br />
30˚<br />
15˚<br />
105˚<br />
30˚<br />
Used in conjunction with a level, the <strong>Quick</strong> <strong>Square</strong>® may be used<br />
to determine angles of construction members, the rise of existing roofs<br />
and rafters, or to adjust a member to any desired angle, as illustrated<br />
below.<br />
SEAT<br />
READ<br />
ANGLE<br />
OR RISE<br />
26<br />
75˚<br />
SEAT<br />
60˚<br />
SEAT<br />
READ ANGLE<br />
OR RISE
THE INCH SCALE<br />
On one side of the <strong>Quick</strong> <strong>Square</strong>® tool is an embossed scale,<br />
graduated every 1/8 of an inch.<br />
By setting the adjustable arm to zero (0) degrees the <strong>Quick</strong><br />
<strong>Square</strong>® may be used as an ordinary square for measuring, and /or<br />
marking a dimension square to the edge of a board. The scale may only<br />
be used in conjunction with the adjustable arm when the arm is set to<br />
(0). Any other arm setting will not align the arm with the zero on the<br />
scale. However, since the scale is an accurate one, it may be used as a<br />
conventional scale for measuring and marking by aligning the zero (0)<br />
with the edge of the work piece by eye.<br />
The <strong>Stanley</strong> Pocket <strong>Square</strong>® is embossed with a scale, 63/4<br />
inches long, and graduated every 1/8 of an inch on both sides. It may<br />
be used as a conventional scale for measuring and marking by aligning<br />
the pivot point up with the edge of the work by eye.<br />
AS A SAW GUIDE<br />
The <strong>Stanley</strong> <strong>Square</strong>, aside from being a tool for quickly and<br />
accurately laying out rafters, may be used as a saw guide for a portable<br />
electric circular saw or an electric saber saw.<br />
Once set at the desired angle, the square may be used on either<br />
edge of a rafter, not only for marking the rafter, but also as a guide for<br />
cuffing the rafter at the correct angle. Make sure the square is clamped<br />
tightly against the work piece, and that the saw is guided along the<br />
edge of the square.<br />
27
THE STANLEY POCKET SQUARE<br />
The <strong>Stanley</strong> Pocket <strong>Square</strong>® is designed to provide a quick, accurate,<br />
and repeatable means for laying out and cutting the various cuts on<br />
common, hip, valley and jack rafters used in root construction.<br />
Description<br />
Features<br />
PIVOT POINT<br />
INCH SCALE<br />
FIXED BASE<br />
1) Common/Jack and Hip/Valley rafter scales-Defined by inch rise<br />
per foot of run.<br />
2) Protractor Scale-Graduated in degrees.<br />
3) Inch Scale-63/4" long graduated every 1/8 inch.<br />
4) Fixed base.<br />
5) For use as a saw guide.<br />
28<br />
HIP-VAL<br />
COMMON/JACK<br />
PROTRACTORSGALE
Using the <strong>Stanley</strong> Pocket <strong>Square</strong><br />
Place the square on the face of the rafter, near the top end of the<br />
rafter. Pivot the square so that the number 6 (6” rise) on the common<br />
scale lines up with the rafter. While holding the pivot firmly against the<br />
rafter and keeping the number 6 lined up properly, mark your line,<br />
starting at the pivot point along the top edge of the square. This will be<br />
the top plumb cut line. (See Figure 2)<br />
Illustration shows the square in position for marking the top plumb<br />
cut of a common rafter having a 6” rise, also showing a 261/2 degree<br />
angle.<br />
Rafter Length<br />
To find the length of a rafter (common, hip or valley) for a specific<br />
roof pitch and building width. First look up the required building width<br />
in Table 1. Next, find the desired rise in inches per foot of run (slope), in<br />
the left hand column, and read the exact rafter length length required<br />
to the right of the rise, under the column for the type of rafter desired.<br />
Along the measuring line (refer to page 8), lay out and mark the<br />
length on the rafter.<br />
Note: The length of rafters obtained from tables are to the center of the<br />
ridge. Therefore, half of the thickness of the ridge board should always<br />
be deducted from the listed rafter length before the top plumb cut is<br />
made. (See Figure 3)<br />
MEASURING LINE<br />
LENGTH OF RAFTER FROM TABLE 1<br />
29<br />
DEDUCTION FOR RIDGE<br />
FIGURE 2<br />
FIGURE 3 TOP PLUMB CUT MARK
Using the <strong>Stanley</strong> Pocket <strong>Square</strong> (continued)<br />
The deduction of half the thickness of the ridge board is measured<br />
at right angles to the top plumb cut line and is marked parallel to the<br />
top plumb cut line.<br />
A right angle line to the top plumb cut line is easily made with the<br />
<strong>Stanley</strong> Pocket <strong>Square</strong>®.<br />
TOP END OF RAFTER<br />
90˚<br />
LINE A<br />
TOP PLUMB CUT LINETOP PLUMB CUT LINE<br />
FICURE 4 FICURE 5<br />
Simply line up A on the square so that it is coincides with the top<br />
plumb cut line you just made. Your protractor scale edge will now be 90<br />
degrees to your plumb cut line. Mark a line, along your protractor scale<br />
edge, on which you will measure and mark 1/2 your ridge thickness.<br />
(See Figure 4)<br />
Alter marking 1/2 the ridge thickness, mark another line, through<br />
this mark, parallel to the original top plumb cut line. (See Figure 5)<br />
NOTE: For jack rafter lengths, refer to pages 40 thru 44.<br />
Seat Cuts<br />
The seat cut is made perpendicular to the bottom plumb cut (heel<br />
cut) where it intersects the measuring line at a distance from the<br />
original top plumb cut line, equal to the rafter length.<br />
To obtain the seat cut, construct another plumb cut line so that it<br />
crosses the measure line at the point that defines the rafter length. Line<br />
up line A on the square with the bottom plumb cut line made and move<br />
the square along this line until the edge of the square reaches the rafter<br />
length point on the measure line. Now mark a line from this point to the<br />
bottom of the square. This is your seat cut line. (See Figure 6A & 6B)<br />
EAVE<br />
30<br />
1/2 RIDGE THICKNESS<br />
LENGTH OF RAFTER FROM TABLEI<br />
MEASURING LINE<br />
HEEL CUT SEAT CUT DEDUCTION FOR RIDGE<br />
BOTTOM (BOTTOM PLUMB CUT)<br />
PLUMB CUT<br />
COMMON RAFTER LAYOUT WITH EAVE - FIGURE 6A<br />
TOP<br />
PLUMB<br />
LINE
Using the <strong>Stanley</strong> Pocket <strong>Square</strong> (continued)<br />
LENGTH OF RAFTER FROM TABLEI<br />
SEAT CUT DEDUCTION FOR RIDGE<br />
(NOTE MEASURIM+NG LINE IS ALONG TOP OF RAFTER)<br />
COMMON RAFTER LAYOUT WITH EAVE - FIGURE 6B<br />
The preceding paragraphs in this section describe how to use the<br />
Pocket <strong>Square</strong>® for making plumb, seat and heel cuts, determining<br />
the length of a rafter, and were general in nature.<br />
Let's now take a look at an example for laying out and cutting<br />
common hip, valley and jack rafters for a specific building width and<br />
roof rise, the roof is also to have an overhang.<br />
Building Specification<br />
Width............................ 20 feet<br />
Rise.............................. 9 inches per foot run<br />
Ridge............................ 2 x 8 (11 /2 in. actual ridge thickness)<br />
Eave Length.................. 2 feet<br />
Rafter Spacing.............. 16 inch centers<br />
Rafter Stock.................. 2 x 6<br />
Plate Stock.................... 2 x 6<br />
Common Rafter<br />
1) Set the pivot of the <strong>Stanley</strong> Pocket <strong>Square</strong>® on the rafter edge.<br />
Rotate the square about the pivot point until the edge of the rafter lines<br />
up at '9' (between 8 and 10) on the scale for COM/JACK.<br />
2) Mark the top plumb cut line at one end of the rafter.<br />
3) Find the rafter length from Table 1 (as 12 feet, 6 inches),<br />
and lay out and mark this length on the measuring line.<br />
12 FT 6 IN<br />
4) Subtract 1/2 of the thickness of the ridge board (in this case 3/4<br />
inch) from the top plumb cut line.<br />
31<br />
TOP PLUMB<br />
CUT LINE<br />
TOP PLUMB<br />
CUT LINE<br />
3/4”
Using the <strong>Stanley</strong> Pocket <strong>Square</strong> (continued)<br />
5) Mark a heel cut (bottom plumb cut line) and the seat cut lines.<br />
MARKING HEEL CUT<br />
(BOTTOM PLUMB CUT LINE)<br />
6) Add 2 feet, for the length of the eave, from the heel cut line<br />
along the measuring line and mark a bottom plumb cut line.<br />
2FT.<br />
7) Once the rafter has been cut, it may now be used as a template<br />
for laying out the rest of the common rafters.<br />
Hip and Valley Rafter<br />
HEEL CUT LINE<br />
(BOTTOM PLUMB CUT LINE)<br />
LINE<br />
1) Set the pivot at the <strong>Stanley</strong> Pocket <strong>Square</strong>® on the rafter edge.<br />
Rotate the square about the pivot point until the edge of the rafter lines<br />
up at '9' (between 8 and 10) on the scale for HIP/VAL.<br />
2) Mark the top plumb cut line at one end at the rafter.<br />
32<br />
MARKING SEAT CUT LINE<br />
TOP PLUMB<br />
CUT LINE
Using the <strong>Stanley</strong> Pocket <strong>Square</strong> (continued)<br />
3) Rotate the Pocket <strong>Square</strong>® and mark a line perpendicular to the<br />
top plumb cut line. Along this line measure and mark the thickness of<br />
the rafter.<br />
T<br />
RAFTER<br />
THICKNESS<br />
4) Make a second plumb cut mark at this point.<br />
5) Set the <strong>Stanley</strong> Pocket <strong>Square</strong>® on the top edge of the<br />
rafter. Extend both plumb cut marks square across the top of the rafter.<br />
33<br />
T<br />
TOP PLUMB CUT LINE<br />
RAFTER THICKNESS
Using the <strong>Stanley</strong> Pocket <strong>Square</strong> (continued)<br />
6) Connect opposite ends of the square lines, which will give the<br />
correct side cut angle. Note that rafters with opposite side cut angles<br />
will be required for opposing hip rafters and valley rafters.<br />
7) From the center of the side cut angle, lay out and mark the<br />
rafter length on the measuring line, as obtained from Table 1, (You will<br />
remember that we defined the measuring line on hip, valley and jack<br />
rafters as along the center line on lop al the rafter.)<br />
8) Alter marking the rafter length, mark a square line as shown<br />
above, Now mark a bottom plumb cut line on the side of the rafter as<br />
shown below left.<br />
NOTE: If you are laying out a valley rafter, add a second plumb line 1/2<br />
the thickness of the rafter from the plumb line just made, as shown<br />
below right. This is the line along which the heel cut will be made on<br />
the valley rafter to fit the intersecting plates.<br />
SET AT 9 ON<br />
HIP/VAL SCALE<br />
CENTER OF THE SIDE CUT ANGLE<br />
SIDE CUT ANGLE<br />
TOP PLUMB CUT LINE<br />
RAFTER LENGTH<br />
34<br />
T<br />
2<br />
T
Using the <strong>Stanley</strong> Pocket <strong>Square</strong> (continued)<br />
9) Measure the depth (D) at the heel cut from a common rafter,<br />
and mark the seat cut Iine by setting the pivot at the square on the edge<br />
of the rafter. Rotate the square about the pivot until the edge of the<br />
rafter lines up at the '9' on the HIP/VAL scale.<br />
COMMON RAFTER VALLEY OR HIP RAFTER<br />
D<br />
10) Now we move back to the top plumb cut line. The deduction<br />
for the ridge board thickness must be subtracted from the rafter length<br />
previously obtained from Table 1. Since the hip and valley rafters sit at<br />
an angle at 45 degrees to the ridge in the plan view, the thickness of<br />
the ridge board must be measured on a 45 degree diagonal line.<br />
Draw a 45 degree line across the top of the ridge board. Measure the<br />
length of the line and divide by 2. (In this case, the line should be 21 /8<br />
inches long-divided by 2 = 11 /16 inch.)<br />
11) Along the perpendicular line laid out in Step 3, page 33, and<br />
from the original top plumb cut line, measure and mark 11 /16 inch. and<br />
at this mark make another top plumb cut line.<br />
12) From the top at this top plumb cut line, draw another side cut<br />
line parallel to the side cut line made in Step 6). These last top plumb<br />
and side cut lines define the angle at which the end of the rafter is to<br />
be cut to fit flush against the ridge board.<br />
Note that if a portable electric circular saw is used to cut this end of the<br />
rafter, that by tilting the blade at an angle of 45 degrees to the sole<br />
plate of the saw, and cutting along the top plumb cut line, the result will<br />
be the correct side cut angle. It is best to lay out the side cut angle on<br />
top of the rafter in any case, in order to be sure the tilt at the blade<br />
angle is In the right direction to result in the desired side cut.<br />
35<br />
1 1/16”<br />
1 3/4”<br />
D
Using the <strong>Stanley</strong> Pocket <strong>Square</strong> (continued)<br />
13) We must now consider the additional length that must be<br />
added to the length of the rafter to accomodate the eave. We calculate<br />
this by ratios. First, determine the length of common and hip/valley<br />
rafters for this pitch roof. In our example, the rafter length is 12' 6". The<br />
length of the hip rafter is 16'1/8". The ratio of hip rafter length to<br />
common rafter length is:<br />
16 1 /8 (16x12)+.125 192,125<br />
= = =1.28<br />
12’ 6” (12x12)+6 150<br />
This ratio or the eave length at the hip or valley rafter divided by<br />
the eave length at the common rafter.<br />
D<br />
=1.28 where D is the length of<br />
C<br />
the hip or valley eave, and C is the length of the common rafter eave,<br />
as shown in the diagram below in our example:<br />
D<br />
=1.28, then D = 24”x l.28 = 30.72”<br />
24”<br />
COMMON RAFTER<br />
HIP RAFTER<br />
OVERHANG<br />
C : EAVE LENGTH<br />
D : HIP EAVE LENGTH<br />
36<br />
A<br />
C<br />
B<br />
D
Using the <strong>Stanley</strong> Pocket <strong>Square</strong> (continued)<br />
14) From the squared line across the top at the rafter at the bottom<br />
plumb cut line, measure and mark 30 3 /4 inches (eave length). <strong>Square</strong><br />
this line across the top of the rafter, and mark another bottom plumb<br />
cut line on the side of the rafter from this squared line.<br />
SEAT<br />
303/4 IN<br />
15) Since the length at the hip rafter and valley rafter are<br />
measured along the center line on top of the rafter, you can see that the<br />
corners at the bottom end of the eave are not in the same plane as the<br />
ends of the common rafters.<br />
The cut-off length or the allowance for the mitre is half the<br />
thickness of the hip rafter as illustrated below in plan view.<br />
T<br />
OVERHANG<br />
T<br />
2<br />
PLATE<br />
HIP RAFTER<br />
T<br />
2<br />
AS NMARKED CUT OFF<br />
37<br />
T<br />
2<br />
MITRE<br />
T<br />
2
Using the <strong>Stanley</strong> Pocket <strong>Square</strong> (continued)<br />
Some carpenters and roof framers prefer to mark and cut the eave<br />
after the hip rafter is in place by snapping a chalk line from the ends of<br />
the common rafters.<br />
The cut-off is made along a plumb line laid out from the chalk<br />
mark, or as laid out to the calculated length above, with the blade of a<br />
portable electric saw set at an angle of 90 degrees to the soleplate.<br />
The mitre cut is made along a plumb line with the blade of a<br />
portable electric saw set at an angle of 45 degrees to the soleplate.<br />
16) In the case of the valley rafter, it is not necessary to<br />
foreshorten or mitre the end of the rafter since the measured length of<br />
the eave (measured along the top of the rafter) lies in the same plane<br />
as the ends of the common rafters, as shown in plan view below!<br />
PLATE<br />
VALLEY RAFTER<br />
For those who want to make the effort, a 90 degree notch can be<br />
made at the bottom at the rafter to provide a better surface far<br />
fastening the fascia board. In this case, half the thickness of the valley<br />
rafter must be added to the length of the rafter, as illustrated below. A<br />
plumb line would again be drawn on the side of the rafter at this point,<br />
and with the blade set at 45 degrees on a portable electric saw, and at<br />
the proper depth, a cut is made along the plumb line on both sides of<br />
the rafter.<br />
38<br />
COMMON RAFTER<br />
OVERHANG
Using the <strong>Stanley</strong> Pocket <strong>Square</strong> (continued)<br />
PLATE<br />
VALLEY RAFTER<br />
17) When building a hip roof the ridge board should be left about<br />
a foot longer than necessary at the ends. Then a common rafter, which<br />
has been cut to size, is placed an the center of the end plate, and the<br />
upper end positioned alongside the ridge board, aligning the top end of<br />
the common rafter with the top of the ridge board.<br />
The ridge board is then marked at the end of the common rafter.<br />
RIDGE BOARD<br />
T<br />
2<br />
C OF BUIL DING<br />
COMMON RAFTER<br />
OVERHANG<br />
If a center common ridge rafter is used, the ridge board is cut to<br />
length at this mark, and the hip rafters are fastened at the tap end of<br />
the common ridge rafter.<br />
If no center common ridge rafter is used, add 2 inches to the<br />
length al the ridge board from the mark just made, to provide a surface<br />
to fasten the upper end of the hip rafter, and cut off the ridge board at<br />
this point.<br />
39<br />
T<br />
PLATE<br />
COMMON<br />
RAFTER
Using the <strong>Stanley</strong> Pocket <strong>Square</strong> (continued)<br />
Jack rafters<br />
Jack rafters tie in the same plane as common rafters, and<br />
therefore have the same inch rise per foot run as common rafters.<br />
1) At one end at the rafter, mark the top plumb cut line by setting<br />
the pivot of the <strong>Stanley</strong> Pocket <strong>Square</strong>® on the rafter edge and rotating<br />
the square about the pivot point until the edge of the rafter lines up at<br />
the ‘9’ on the scale for COM/JACK.<br />
2) Mark a line perpendicular to the top plumb cut line, as shown in<br />
figure 4 page 30. Along this line measure and mark the thickness of the<br />
rafter.<br />
T<br />
RAFTER THICKNESS<br />
3) Mark a second plumb cut line at this point.<br />
40<br />
T<br />
TOP PLUMB<br />
CUT LINE<br />
TOP PLUMB CUT LINE<br />
RAFTER THICKNESS
Using the <strong>Stanley</strong> Pocket <strong>Square</strong> (continued)<br />
4) <strong>Square</strong> the top of the plumb lines across the top of the rafter.<br />
Note that in the case of a valley-jack rafter, the top of the rafter is on the<br />
'short' side of the plumb line-that is, just the opposite side of a hipjack!<br />
HIP JACK RAFTER VALLEY JACK RAFTER<br />
5) Depending on which way the side cut is to be made, connect<br />
opposite ends of the square lines.<br />
HIP JACK RAFTER<br />
6) From Table 2, "Difference in Length of Jack Rafters for Various<br />
Spacing." the length given for 9 inch rise per foot run on 16 inch<br />
centers is 1 foot, 8 inches. This is also the length of the first, or shortest,<br />
hip-jack or valley-jack rafter. Each succeeding jack rafter will be 1 foot,<br />
8 inches longer than the preceding one!<br />
7) Along the measuring line (the center line on top of the rafter),<br />
and from the side cut line marked in Step 5), measure and mark the<br />
length of the rafter. The first rafter will be 1 foot, 8 inches long, the<br />
second rafter 3 feet, 4 inches long (2 times 1 fool, 8 inches), the third<br />
rafter 5 feet, 0 inches (3 times 1 foot, 8 inches), and so on!<br />
JACK LENGTH<br />
41<br />
VALLEY JACK RAFTER<br />
JACK LENGTH<br />
HIP JACK RAF TER VALLEY JACK RAF TER
Using the <strong>Stanley</strong> Pocket <strong>Square</strong> (continued)<br />
8) From the length marked, make a plumb cut line on the side of<br />
the rafter.<br />
9) For a valley-jack, the raster will be cut parallel to this line to fit<br />
against the ridge board. Be sure this plumb line on the valley-jack is in<br />
the same direction as the plumb line at the opposite end of the rafter,<br />
that is, parallel to it!<br />
10) For a hip-jack, use a common rafter as a template, and mark<br />
the heel and seat cuts (birdsmouth), on the side of the rafter at the<br />
bottom plumb cut line. In case there isn't a common rafter available,<br />
lay out the heel and seat cut lines as described on page 30 under Seat<br />
Cuts.<br />
11) Again on a hip-jack, the additional length for the eave is laid<br />
out the same as it was for the common rafter. A common rafter may be<br />
used as a template. if one is available!<br />
2 FEET<br />
(SAME AS COMMON<br />
RAFTER)<br />
42<br />
VALLEY JACK RAFTER
Using the <strong>Stanley</strong> Pocket <strong>Square</strong> (continued)<br />
12) Compensation must now be made for the thickness of the hip<br />
or valley rafter in the length of the jack rafter, just as was done for the<br />
hip and valley rafter to compensate for the thickness of the ridge board.<br />
Mark another plumb cut line 1 1 /16 inch from and parallel to the original<br />
plumb cut mark made in Step 1) above. (The 1 1 /16 inch dimension being<br />
half the diagonal thickness of the hip or valley rafter).s<br />
VALLEY JACK RAFTER<br />
13) From the top of this plumb line, mark a line across the top of<br />
the rafter parallel to the side cut mark made in Step No. 6). These last<br />
side and plumb cut marks are the marks on which the rafter will be cut.<br />
Cutting along this plumb cut line with a portable electric circular saw<br />
set at 45 degrees, will result in the correct side cut angle.<br />
43<br />
1 1/16”<br />
1 3/4”<br />
1 1/16 IN
Using the <strong>Stanley</strong> Pocket <strong>Square</strong> (continued)<br />
14) A valley-jack rafter must be further reduced in length to<br />
compensate for the thickness of the ridge board which it abuts. This is<br />
accomplished in the same manner in which the common rafter was<br />
shortened, and for the same reason. (Refer to Page 24-Palter Length).<br />
44<br />
3/4 IN<br />
VALLEY JACK RAFTER<br />
HIP JACK RAFTER
Protractor Scale<br />
ADDITIONAL FEATURES AND USES<br />
The <strong>Stanley</strong> Pocket <strong>Square</strong>® is embossed with a scale,<br />
graduated in degrees which makes it very handy for use as protractor.<br />
The scale is embossed on both sides of the square body so that either<br />
side may be used. The illustration below shows the angles which may<br />
be obtained by aligning the pivot and the 30 and 60 degree graduation<br />
with the edge.<br />
120º<br />
30º<br />
15º<br />
Used in conjunction with a level, the Pocket <strong>Square</strong>® may be<br />
used to determine angles of construction members, the rise of existing<br />
roofs and rafters, or to adjust a member to any desired angle, as<br />
illustrated below.<br />
Read Angle or Rise<br />
105º<br />
30º<br />
Read Angle or Rise<br />
45<br />
75º<br />
60º
RISE IN<br />
TABLE 1<br />
TABLES OF RAFTER LENGTHS<br />
INCHES<br />
PER FOOT<br />
OF RUN<br />
3 FEET 4 FEET<br />
COMMON<br />
FEET-INCHES<br />
5 FEET 6 FEET<br />
HIP-VAL<br />
FEET-INCHES COMMON<br />
FEET-INCHES HIP-VAL<br />
FEET-INCHES<br />
1 1-6<br />
2<br />
3<br />
4<br />
5<br />
6<br />
7<br />
8<br />
9<br />
10<br />
11<br />
12<br />
1/16<br />
1-61/4 1-69/16 1-7<br />
1-71/2 1-81/8 1-813/16 1-95/8 1-101/2 1-117/16 2-07/16 2-17/16 2-11/2 2-15/8 2-17/8 2-21/8 2-29/16 2-3<br />
2-39/16 2-41/8 2-413/16 2-59/16 2-65/16 2-73/16 2-01/16 2-05/16 2-03/4 2-15/16 2-2<br />
2-213/16 2-313/16 2-47/8 2-6<br />
2-71/4 2-89/16 2-915/16 2-10<br />
2-103/16 2-107/16 2-107/8 3-113/8 3-0<br />
3-011/16 3-11/2 3-27/16 3-33/8 3-47/16 3-59/16 1 2-6<br />
2<br />
3<br />
4<br />
5<br />
6<br />
7<br />
8<br />
9<br />
10<br />
11<br />
12<br />
1/8<br />
2-67/16 2-615/16 2-75/8 2-81/2 2-99/16 2-103/4 3-01/16 3-11/2 3-31/16 3-411/16 3-67/16 3-61/2 3-63/4 3-71/16 3-79/16 3-81/4 3-9<br />
3-97/8 3-107/8 4-0<br />
4-11/4 4-29/16 4-315/16 3-01/8 3-01/2 3-11/8 3-115/16 3-3<br />
3-41/4 3-511/16 3-71/4 3-9<br />
3-107/8 4-013/16 4-215/16 4-3<br />
4-31/4 4-311/16 4-45/16 4-51/16 4-6<br />
4-71/16 4-85/16 4-95/8 4-111/16 5-011/16 5-25/16 BUILDING WIDTH<br />
46
RISE IN<br />
INCHES<br />
PER FOOT<br />
OF RUN<br />
7 FEET 8 FEET<br />
COMMON<br />
FEET-INCHES<br />
9 FEET 10 FEET<br />
HIP-VAL<br />
FEET-INCHES COMMON<br />
FEET-INCHES HIP-VAL<br />
FEET-INCHES<br />
1 3-6<br />
2<br />
3<br />
4<br />
5<br />
6<br />
7<br />
8<br />
9<br />
10<br />
11<br />
12<br />
1/8<br />
3-69/16 3-75/16 3-81/4 3-91/2 3-1015/16 4-05/8 4-21/2 4-41/2 4-611/16 4-9<br />
4-113/8 4-111/2 4-1113/16 5-05/16 5-11/16 5-115/16 5-3<br />
5-41/4 5-511/16 5-71/4 5-815/16 5-103/4 6-03/4 4-03/16 4-011/16 4-11/2 4-25/8 4-4<br />
4-511/16 4-79/16 4-911/16 5-0<br />
5-21/2 5-51/8 5-77/8 5-8<br />
5-83/8 5-815/16 5-93/4 5-103/4 6-0<br />
6-17/16 6-31/16 6-413/16 6-613/16 6-87/8 6-111/8 1 4-6<br />
2<br />
3<br />
4<br />
5<br />
6<br />
7<br />
8<br />
9<br />
10<br />
11<br />
12<br />
3/16<br />
4-63/4 4-711/16 4-811/16 4-101/2 5-03/8 5-21/2 5-47/8 5-71/2 5-105/16 6-11/4 6-43/8 6-41/2 6-47/8 6-59/16 6-61/2 6-75/8 6-9<br />
6-105/8 7-07/16 7-27/16 7-45/8 7-7<br />
7-91/2 5-03/16 5-013/16 5-17/8 5-31/4 5-5<br />
5-71/16 5-97/16 6-01/8 6-3<br />
6-61/8 6-93/8 7-07/8 7-1<br />
7-17/16 7-21/8 7-33/16 7-47/16 7-6<br />
7-713/16 7-913/16 8-01/16 8-21/2 8-51/8 8-715/16 TABLE 1<br />
TABLES OF RAFTER LENGTHS<br />
BUILDING WIDTH<br />
47
RISE IN<br />
INCHES<br />
PER FOOT<br />
OF RUN<br />
11 FEET 12 FEET<br />
COMMON<br />
FEET-INCHES<br />
13 FEET 14 FEET<br />
HIP-VAL<br />
FEET-INCHES COMMON<br />
FEET-INCHES HIP-VAL<br />
TABLE 1<br />
TABLES OF RAFTER LENGTHS<br />
BUILDING WIDTH<br />
FEET-INCHES<br />
1 5-6 1/4 7-9 1/2 6-0 1/4 8-6<br />
2 5-6 15/16 7-10 6-1 8-6 1/2<br />
3 5-8 7-10 13/16 6-2 3/16 8-7 3/8<br />
4 5-9 9/16 7-11 7/8 6-3 7/8 8-8 5/8<br />
5 5-11 1/2 8-1 5/16 6-6 8-10 1/8<br />
6 4-1 13/16 8-3 6-8 1/2 9-0<br />
7 6-4 7/16 8-4 15/16 6-11 3/8 9-2 1/8<br />
8 6-7 5/16 8-7 3/16 7-2 9/16 9-4 9/16<br />
9 6-10 1/2 8-9 5/8 7-6 9-7 1/4<br />
10 7-1 15/16 9-0 5/16 7-9 3/4 9-10 3/16<br />
11 7-5 9/16 9-3 1/4 8-1 11/16 10-1 5/16<br />
12 7-9 5/16 9-6 5/16 8-5 13/16 10-4 11/16<br />
1 6-6 1/4 9-2 1/2 7-0 5/16 9-11<br />
2 6-7 1/16 9-3 1/16 7-1 3/16 9-11 5/8<br />
3 6-8 3/8 9-4 7-2 9/16 10-0 5/8<br />
4 6-10 1/4 9-5 5/16 7-4 9/16 10-2 1/16<br />
5 7-0 1/2 9-7 7-7 10-3 13/16<br />
6 7-3 3/16 9-9 7-9 15/16 10-6<br />
7 7-6 5/16 9-11 5/16 8-1 1/4 10-8 1/2<br />
8 7-9 3/4 10-1 15/16 8-4 15/16 10-11 5/16<br />
9 8-1 1/2 10-4 7/8 8-9 11-2 7/16<br />
10 8-5 9/16 10-8 1/16 9-1 5/16 11-5 7/8<br />
11 8-9 13/16 10-11 7/16 9-5 15/16 11-9 9/16<br />
12 9-2 1/16 11-3 1/8 9-10 13/16 12-1 1/2<br />
48
TABLE 1<br />
TABLES OF RAFTER LENGTHS<br />
RISE IN<br />
INCHES<br />
PER FOOT<br />
OF RUN<br />
15 FEET 16 FEET<br />
COMMON<br />
FEET-INCHES HIP-VAL<br />
FEET-INCHES COMMON<br />
FEET-INCHES HIP-VAL<br />
BUILDING WIDTH<br />
FEET-INCHES<br />
1<br />
2<br />
3<br />
4<br />
5<br />
6<br />
7<br />
8<br />
9<br />
10<br />
11<br />
12<br />
1<br />
2<br />
3<br />
4<br />
5<br />
6<br />
7<br />
8<br />
9<br />
10<br />
11<br />
12<br />
7-6 5/16<br />
7-7 1/4<br />
7-8 3/4<br />
7-10 7/8<br />
8-1 1/2<br />
8-4 5/8<br />
8-8 3/16<br />
9-0 3/16<br />
9-4 1/2<br />
9-9 1/8<br />
10-2 1/16<br />
10-7 1/4<br />
8-6 3/8<br />
8-7 7/16<br />
8-9 1/8<br />
8-11 1/2<br />
9-2 1/2<br />
9-6 1/16<br />
9-10 1/16<br />
10-2 9/16<br />
10-7 1/2<br />
11-0 3/4<br />
11-6 3/8<br />
12-0 1/4<br />
10-7 1/2<br />
10-8 3/16<br />
10-9 1/4<br />
10-10 3/4<br />
11-0 11/16<br />
11-3<br />
11-5 11/16<br />
11-8 11/16<br />
12-0 1/16<br />
12-3 3/4<br />
12-7 11/16<br />
12-11 7/8<br />
8-0 5/16<br />
8-1 5/16<br />
8-2 15/16<br />
8-5 3/16<br />
8-8<br />
8-11 5/16<br />
9-3 1/8<br />
9-7 3/8<br />
10-0<br />
10-4 15/16<br />
10-10 1/4<br />
11-3 3/4<br />
17 FEET 18 FEET<br />
12-0 1/2<br />
12-1 1/4<br />
12-2 1/2<br />
12-4 3/16<br />
12-6 3/8<br />
12-9<br />
13-0 1/16<br />
13-3 1/2<br />
13-7 1/4<br />
13-1 7/16<br />
14-3 7/8<br />
14-8 11/16<br />
49<br />
9-0 3/8<br />
9-1 1/2<br />
9-3 5/16<br />
9-5 13/16<br />
9-9<br />
10-0 3/4<br />
10-5 1/16<br />
10-9 13/16<br />
11-3<br />
11-8 9/16<br />
12-2 1/2<br />
12-8 3/4<br />
11-4<br />
11-4 11/16<br />
11-5 7/8<br />
11-7 1/2<br />
11-9 9/16<br />
12-0<br />
12-2 7/8<br />
12-6 1/16<br />
12-9 11/16<br />
13-1 9/16<br />
13-5 13/16<br />
13-10 1/4<br />
12-9<br />
12-9 13/16<br />
12-11 1/8<br />
13-0 15/16<br />
13-3 1/4<br />
13-6<br />
13-9 3/16<br />
14-0 7/8<br />
14-4 7/8<br />
14-9 1/4<br />
15-2<br />
15-7 1/16
RISE IN<br />
INCHES<br />
PER FOOT<br />
OF RUN<br />
19 FEET 20 FEET<br />
COMMON<br />
FEET-INCHES HIP-VAL<br />
FEET-INCHES COMMON<br />
FEET-INCHES HIP-VAL<br />
BUILDING WIDTH<br />
FEET-INCHES<br />
1<br />
2<br />
3<br />
4<br />
5<br />
6<br />
7<br />
8<br />
9<br />
10<br />
11<br />
12<br />
1<br />
2<br />
3<br />
4<br />
5<br />
6<br />
7<br />
8<br />
9<br />
10<br />
11<br />
12<br />
TABLE 1<br />
TABLES OF RAFTER LENGTHS<br />
9-6 3/8<br />
9-7 9/16<br />
9-9 1/2<br />
10-0 3/16<br />
10-3 1/2<br />
10-7 7/16<br />
11-0<br />
11-5<br />
11-10 1/2<br />
12-4 3/8<br />
12-10 5/8<br />
13-5 1/4<br />
10-6 7/16<br />
10-7 3/4<br />
10-9 7/8<br />
11-0 13/16<br />
11-4 1/2<br />
11-8 7/8<br />
12-1 7/8<br />
12-7 7/16<br />
13-1 1/2<br />
13-8<br />
14-2 15/16<br />
14-10 3/16<br />
13-5 1/2<br />
13-6 5/16<br />
13-7 3/4<br />
13-9 5/8<br />
14-0 1/16<br />
14-3<br />
14-6 3/8<br />
14-10 1/4<br />
15-2 1/2<br />
15-7 1/16<br />
16-0 1/16<br />
16-5 7/16<br />
21 FEET 22 FEET<br />
14-10 1/2<br />
14-11 7/16<br />
15-0 15/16<br />
15-3 1/16<br />
15-5 3/4<br />
15-9<br />
16-0 3/4<br />
16-5<br />
16-9 11/16<br />
17-2 13/16<br />
17-8 3/8<br />
18-2 1/4<br />
50<br />
10-0 7/16<br />
10-1 5/8<br />
10-3 11/16<br />
10-6 1/2<br />
10-10<br />
11-2 3/16<br />
11-6 15/16<br />
12-0 1/4<br />
12-6<br />
13-0 3/16<br />
13-6 13/16<br />
14-1 11/16<br />
11-0 7/16<br />
11-1 13/16<br />
11-4 1/16<br />
11-7 1/8<br />
11-11<br />
12-3 9/16<br />
12-8 13/16<br />
13-2 5/8<br />
13-9<br />
14-3 13/16<br />
14-11 1/16<br />
15-6 11/16<br />
14-2<br />
14-2 7/8<br />
14-4 5/16<br />
14-6 3/8<br />
14-8 15/16<br />
15-0<br />
15-3 9/16<br />
15-7 5/8<br />
16-0 1/8<br />
16-5<br />
16-10 1/4<br />
17-3 7/8<br />
15-7<br />
15-7 15/16<br />
15-9 9/16<br />
15-11 13/16<br />
16-2 5/8<br />
16-6<br />
16-9 15/16<br />
17-2 3/8<br />
17-7 5/16<br />
18-0 11/16<br />
18-6 7/16<br />
19-0 5/8
TABLE 1<br />
TABLES OF RAFTER LENGTHS<br />
RISE IN<br />
INCHES<br />
PER FOOT<br />
OF RUN<br />
23 FEET 24 FEET<br />
COMMON<br />
FEET-INCHES HIP-VAL<br />
FEET-INCHES COMMON<br />
FEET-INCHES HIP-VAL<br />
BUILDING WIDTH<br />
FEET-INCHES<br />
1<br />
2<br />
3<br />
4<br />
5<br />
6<br />
7<br />
8<br />
9<br />
10<br />
11<br />
12<br />
1<br />
2<br />
3<br />
4<br />
5<br />
6<br />
7<br />
8<br />
9<br />
10<br />
11<br />
12<br />
11-6 1/2<br />
11-7 7/8<br />
11-10 1/4<br />
12-1 7/16<br />
12-5 1/2<br />
12-10 5/16<br />
13-3 3/4<br />
13-9 7/8<br />
14-4 1/2<br />
14-1 5/8<br />
15-7 3/16<br />
16-3 3/16<br />
12-6 1/2<br />
12-8 1/16<br />
12-10 5/8<br />
13-2 1/8<br />
13-6 1/2<br />
13-11 11/16<br />
14-5 5/8<br />
15-0 1/4<br />
15-7 1/2<br />
16-3 1/4<br />
16-11 1/2<br />
17-8 1/8<br />
16-3 1/2<br />
16-4 1/2<br />
16-6 3/16<br />
16-8 1/2<br />
16-11 7/16<br />
17-3<br />
17-7 1/8<br />
17-11 3/4<br />
18-4 15/16<br />
18-10 1/2<br />
19-4 9/16<br />
19-11<br />
25 FEET 26 FEET<br />
17-8 1/2<br />
17-9 5/8<br />
17-11 7/16<br />
18-1 15/16<br />
18-5 1/8<br />
18-9<br />
19-1 1/2<br />
19-6 1/2<br />
20-0 1/8<br />
20-6 1/4<br />
21-0 13/16<br />
21-7 13/16<br />
51<br />
12-0 1/2<br />
12-2<br />
12-4 7/16<br />
12-7 13/16<br />
13-0<br />
13-5<br />
13-10 11/16<br />
14-5 1/16<br />
15-0<br />
15-7 7/16<br />
16-3 3/8<br />
16-11 5/8<br />
13-0 9/16<br />
13-2 1/8<br />
13-4 13/16<br />
13-8 7/16<br />
14-1<br />
14-6 7/16<br />
15-0 5/8<br />
15-7 1/2<br />
16-3<br />
16-11 1/16<br />
17-7 5/8<br />
18-4 5/8<br />
17-0<br />
17-1 1/16<br />
17-2 13/16<br />
17-5 1/4<br />
17-8 5/16<br />
18-0<br />
18-4 5/16<br />
18-9 1/8<br />
19-2 1/2<br />
19-8 3/8<br />
20-2 11/16<br />
20-9 7/16<br />
18-5<br />
18-6 1/8<br />
18-8 1/16<br />
18-10 11/16<br />
19-2<br />
19-6<br />
19-10 5/8<br />
20-3 7/8<br />
20-9 3/4<br />
21-4 1/16<br />
21-10 15/16<br />
22-6 3/16
RISE IN<br />
TABLE 1<br />
TABLES OF RAFTER LENGTHS<br />
INCHES<br />
PER FOOT<br />
OF RUN<br />
27 FEET 28 FEET<br />
COMMON<br />
FEET-INCHES<br />
29 FEET 30 FEET<br />
HIP-VAL<br />
FEET-INCHES COMMON<br />
FEET-INCHES HIP-VAL<br />
BUILDING WIDTH<br />
FEET-INCHES<br />
1 13-6 9/16 19-1 1/2 14-0 9/16 19-10<br />
2 13-8 1/4 19-2 11/16 14-2 5/16 19-11 1/4<br />
3 13-11 19-4 5/8 14-5 3/16 20-1 1/4<br />
4 14-2 3/4 19-7 3/8 14-9 1/16 20-4 1/8<br />
5 14-7 1/2 19-10 13/16 15-2 20-7 11/16<br />
6 15-1 1/8 20-3 15-7 13/16 21-0<br />
7 15-7 9/16 20-7 13/16 16-2 1/2 21-5<br />
8 16-2 11/16 21-1 5/16 16-9 15/16 21-10 11/16<br />
9 16-10 1/2 21-7 5/16 17-6 22-4 15/16<br />
10 17-6 7/8 22-1 15/16 18-2 11/16 22-11 3/4<br />
11 18-3 3/4 22-9 18-11 7/8 23-7 1/8<br />
12 19-1 1/8 23-4 9/16 19-9 9/16 24-3<br />
1 14-6 5/8 20-6 1/2 15-0 5/8 21-3<br />
2 14-8 3/8 20-7 3/4 15-2 1/2 21-4 5/16<br />
3 14-11 3/8 20-9 7/8 15-5 9/16 21-6 1/2<br />
4 15-3 7/16 21-0 13/16 15-9 3/4 21-9 9/16<br />
5 15-8 1/2 21-4 9/16 16-3 22-1 3/8<br />
6 16-2 9/16 21-9 16-9 1/4 22-6<br />
7 16-9 7/16 22-2 3/16 17-4 3/8 22-11 3/8<br />
8 17-5 1/8 22-8 1/16 18-0 5/16 23-5 7/16<br />
9 18-1 1/2 23-2 9/16 18-9 24-0 1/8<br />
10 18-10 1/2 23-9 5/8 19-6 5/16 24-7 7/16<br />
11 19-8 1/16 24-5 1/4 20-4 3/16 25-3 3/8<br />
12 20-6 1/16 25-1 3/8 21-2 9/16 25-11 3/4<br />
52
TABLE 1<br />
TABLES OF RAFTER LENGTHS<br />
RISE IN<br />
INCHES<br />
PER FOOT<br />
OF RUN<br />
31 FEET 32 FEET<br />
COMMON<br />
FEET-INCHES HIP-VAL<br />
FEET-INCHES COMMON<br />
FEET-INCHES HIP-VAL<br />
BUILDING WIDTH<br />
FEET-INCHES<br />
1<br />
2<br />
3<br />
4<br />
5<br />
6<br />
7<br />
8<br />
9<br />
10<br />
11<br />
12<br />
1<br />
2<br />
3<br />
4<br />
5<br />
6<br />
7<br />
8<br />
9<br />
10<br />
11<br />
12<br />
15-6 5/8<br />
15-8 9/16<br />
15-1 3/4<br />
16-4 1/16<br />
16-9 1/2<br />
17-3 15/16<br />
17-11 5/16<br />
18-7 9/16<br />
19-4 1/2<br />
20-2 1/8<br />
21-0 5/16<br />
21-1 1/16<br />
16-6 11/16<br />
16-8 3/4<br />
17-0 1/16<br />
17-4 11/16<br />
17-10 1/2<br />
18-5 3/8<br />
19-1 1/4<br />
19-9 15/16<br />
20-7 1/2<br />
21-5 3/4<br />
22-4 5/8<br />
23-4<br />
21-11 1/2<br />
22-0 7/8<br />
22-3 1/8<br />
22-6 1/4<br />
22-10 1/4<br />
23-3<br />
23-8 9/16<br />
24-2 13/16<br />
24-9 3/4<br />
25-5 7/16<br />
26-1 1/16<br />
26-10 3/16<br />
33 FEET 34 FEET<br />
23-4 1/2<br />
23-5 15/16<br />
23-8 3/8<br />
23-11 11/16<br />
24-3 15/16<br />
24-9<br />
25-2 7/8<br />
25-9 9/16<br />
26-4 15/16<br />
27-1<br />
27-4 11/16<br />
28-6 15/16<br />
53<br />
16-0 11/16<br />
16-2 5/8<br />
16-5 15/16<br />
16-10 3/8<br />
17-4<br />
17-10 11/16<br />
18-6 1/4<br />
19-2 3/4<br />
20-0<br />
20-9 15/16<br />
21-8 7/16<br />
22-7 1/2<br />
17-0 11/16<br />
17-2 13/16<br />
17-6 1/4<br />
17-11 1/16<br />
18-5<br />
19-0 1/16<br />
19-8 3/16<br />
20-5 3/16<br />
21-3<br />
22-1 9/16<br />
23-0 3/4<br />
24-0 1/2<br />
22-8<br />
22-9 7/16<br />
22-11 3/4<br />
23-3<br />
23-7 1/16<br />
24-0<br />
24-5 3/4<br />
25-0 3/16<br />
25-7 3/8<br />
26-3 3/16<br />
26-11 9/16<br />
27-8 9/16<br />
24-1<br />
24-2 1/2<br />
24-5<br />
24-8 3/8<br />
25-0 3/4<br />
25-6<br />
26-0 1/16<br />
26-6 15/16<br />
27-2 9/16<br />
27-10 7/8<br />
28-7 13/16<br />
29-5 5/16
TABLE 1<br />
TABLES OF RAFTER LENGTHS<br />
RISE IN<br />
INCHES<br />
PER FOOT<br />
OF RUN<br />
35 FEET 36 FEET<br />
COMMON<br />
FEET-INCHES HIP-VAL<br />
FEET-INCHES COMMON<br />
FEET-INCHES HIP-VAL<br />
BUILDING WIDTH<br />
FEET-INCHES<br />
1<br />
2<br />
3<br />
4<br />
5<br />
6<br />
7<br />
8<br />
9<br />
10<br />
11<br />
12<br />
1<br />
2<br />
3<br />
4<br />
5<br />
6<br />
7<br />
8<br />
9<br />
10<br />
11<br />
12<br />
17-6 3/4<br />
17-8 7/8<br />
18-0 7/16<br />
18-5 3/8<br />
18-11 1/2<br />
19-6 13/16<br />
20-3 1/8<br />
21-0 3/8<br />
21-10 1/2<br />
22-9 3/8<br />
23-8 7/8<br />
24-9<br />
18-6 3/4<br />
18-9 1/16<br />
19-0 13/16<br />
19-6<br />
20-0 1/2<br />
20-8 3/16<br />
21-5<br />
22-2 13/16<br />
23-1 1/2<br />
24-1<br />
25-1 3/16<br />
26-1 15/16<br />
24-9 1/2<br />
24-11 1/16<br />
25-1 9/16<br />
25-5 1/8<br />
25-9 5/8<br />
26-3<br />
26-9 1/4<br />
27-4 5/16<br />
28-0 3/16<br />
28-8 11/16<br />
29-5 15/16<br />
30-3 3/4<br />
37 FEET 38 FEET<br />
26-2 1/2<br />
26-4 1/8<br />
26-6 13/16<br />
26-10 9/16<br />
27-3 5/16<br />
27-9<br />
28-3 5/8<br />
28-11 1/16<br />
29-7 3/8<br />
30-4 7/16<br />
31-2 1/8<br />
32-0 1/2<br />
54<br />
18-0 3/4<br />
18-3<br />
18-6 5/8<br />
18-11 11/16<br />
19-6<br />
20-1 1/2<br />
20-10 1/6<br />
21-7 5/8<br />
22-6<br />
23-5 3/16<br />
24-5<br />
25-5 1/2<br />
19-0 13/16<br />
19-3 1/8<br />
19-7<br />
20-0 5/16<br />
20-7<br />
21-2 15/16<br />
21-11 15/16<br />
22-10<br />
23-9<br />
24-8 13/16<br />
25-9 5/16<br />
26-10 7/16<br />
25-6<br />
25-7 9/16<br />
25-10 3/16<br />
26-1 13/16<br />
26-6 7/16<br />
27-0<br />
27-6 7/16<br />
28-1 11/16<br />
28-9 3/4<br />
29-6 9/16<br />
30-4<br />
31-2 1/8<br />
26-11<br />
27-0 11/16<br />
27-3 7/16<br />
27-7 1/4<br />
28-0 1/8<br />
28-6<br />
29-0 13/16<br />
29-8 1/2<br />
30-5<br />
31-2 1/4<br />
32-0 1/4<br />
32-10 15/16
RISE IN<br />
TABLE 1<br />
TABLES OF RAFTER LENGTHS<br />
INCHES<br />
PER FOOT<br />
OF RUN<br />
39 FEET 40 FEET<br />
COMMON<br />
FEET-INCHES<br />
41 FEET 42 FEET<br />
HIP-VAL<br />
FEET-INCHES COMMON<br />
FEET-INCHES HIP-VAL<br />
FEET-INCHES<br />
1 19-6 13/16 27-7 1/2 20-0 13/16<br />
2 19-9 1/4 27-9 3/16 20-3 5/16<br />
3 20-1 3/16 28-0 1/16 20-7 3/8<br />
4 20-6 11/16 28-4 21-1<br />
5 21-1 1/2 28-9 21-8<br />
6 21-9 5/8 29-3 22-4 5/16<br />
7 22-6 7/8 29-10 23-1 7/8<br />
8 23-5 1/4 30-5 7/8 24-0 7/16<br />
9 24-4 1/2 31-2 9/16 25-0<br />
10 25-4 5/8 32-0 1/8 26-0 7/16<br />
11 26-5 7/16 32-10 3/8 27-1 9/16<br />
12 27-6 15/16 33-9 5/16 28-37/16 28-4<br />
28-5 3/4<br />
28-8 11/16<br />
29-0 11/16<br />
29-5 13/16<br />
30-0<br />
30-7 1/8<br />
31-31/4 BUILDING WIDTH<br />
32-0 3/16<br />
32-9 15/16<br />
33-8 1/2<br />
34-7 11/16<br />
1 20-6 7/8 29-0 1/2 21-0 7/8 29-9<br />
2 20-9 3/8 29-2 5/16 21-3 1/2 29-10 7/8<br />
3 21-1 9/16 29-5 5/16 21-7 3/4 30-1 15/16<br />
4 21-7 5/16 29-9 7/16 22-1 5/8 30-6 1/8<br />
5 22-2 1/2 30-2 11/16 22-9 30-11 1/2<br />
6 22-11 11/16 30-9 23-5 3/4 31-6<br />
7 23-8 13/16 31-4 5/16 24-3 3/4 32-1 1/2<br />
8 24-7 5/8 32-0 5/8 25-2 7/8 32-10<br />
9 25-7 1/2 32-9 13/16 26-3 33-7 3/8<br />
10 26-8 1/4 33-7 13/16 27-4 34-5 5/8<br />
11 27-9 11/16 34-6 9/16 28-5 7/8 35-4 11/16<br />
12 28-11 7/8 35-6 1/16 29-8 3/8 36-4 1/2<br />
55
TABLE 1<br />
TABLES OF RAFTER LENGTHS<br />
RISE IN<br />
INCHES<br />
PER FOOT<br />
OF RUN<br />
43 FEET 44 FEET<br />
COMMON<br />
FEET-INCHES HIP-VAL<br />
FEET-INCHES COMMON<br />
FEET-INCHES HIP-VAL<br />
BUILDING WIDTH<br />
FEET-INCHES<br />
1<br />
2<br />
3<br />
4<br />
5<br />
6<br />
7<br />
8<br />
9<br />
10<br />
11<br />
12<br />
1<br />
2<br />
3<br />
4<br />
5<br />
6<br />
7<br />
8<br />
9<br />
10<br />
11<br />
12<br />
21-6 7/8<br />
21-9 9/16<br />
22-1 15/16<br />
22-7 15/16<br />
23-3 1/2<br />
24-0 7/16<br />
24-10 11/16<br />
25-10 1/16<br />
26-10 1/2<br />
27-11 13/16<br />
29-2<br />
30-4 7/8<br />
22-6 15/16<br />
22-9 3/4<br />
23-2 5/16<br />
23-8 5/8<br />
24-4 1/2<br />
25-1 7/8<br />
26-0 9/16<br />
27-0 1/2<br />
28-1 1/2<br />
29-3 7/16<br />
30-6 1/4<br />
31-9 13/16<br />
30-5 1/2<br />
30-7 3/8<br />
30-10 1/2<br />
31-2 7/8<br />
31-8 3/8<br />
32-3<br />
32-10 11/16<br />
33-7 3/8<br />
34-5<br />
35-3 1/2<br />
36-2 13/16<br />
37-2 7/8<br />
45 FEET 46 FEET<br />
31-10 1/2<br />
32-0 1/2<br />
32-3 3/4<br />
32-8 5/16<br />
33-2 1/16<br />
33-9<br />
34-5 1/16<br />
35-2 1/8<br />
36-0 3/16<br />
36-11 3/16<br />
37-11 1/16<br />
38-11 5/8<br />
56<br />
22-0 15/16<br />
22-3 5/8<br />
22-8 1/8<br />
23-2 1/4<br />
23-10<br />
24-7 3/16<br />
25-5 5/8<br />
26-5 5/16<br />
27-6<br />
28-7 5/8<br />
29-10 1/8<br />
31-1 3/8<br />
23-0 15/16<br />
23-3 13/16<br />
23-8 1/2<br />
24-2 15/16<br />
24-11<br />
25-8 9/16<br />
26-7 1/2<br />
27-7 11/16<br />
28-9<br />
29-11 1/4<br />
31-2 7/16<br />
32-6 5/16<br />
31-2<br />
31-3 15/16<br />
31-7 1/8<br />
31-11 9/16<br />
32-5 1/4<br />
33-0<br />
33-7 7/8<br />
34-4 3/4<br />
35-2 5/8<br />
36-1 3/8<br />
37-0 15/16<br />
38-1 1/4<br />
32-7<br />
32-9<br />
33-0 3/8<br />
33-5<br />
33-10 15/16<br />
34-6<br />
35-2 1/4<br />
35-11 1/2<br />
36-9 13/16<br />
37-9 1/16<br />
38-9 1/8<br />
39-10 1/16
RISE IN<br />
TABLE 1<br />
TABLES OF RAFTER LENGTHS<br />
INCHES<br />
PER FOOT<br />
OF RUN<br />
47 FEET 48 FEET<br />
COMMON<br />
FEET-INCHES<br />
49 FEET 50 FEET<br />
HIP-VAL<br />
FEET-INCHES COMMON<br />
FEET-INCHES HIP-VAL<br />
BUILDING WIDTH<br />
FEET-INCHES<br />
1 23-7 33-3 1/2 24-1 34-0<br />
2 23-9 7/8 33-5 9/16 24-4 34-2 1/8<br />
3 24-2 11/16 33-9 24-8 7/8 34-5 5/8<br />
4 24-9 1/4 34-1 3/4 25-3 9/16 34-10 7/16<br />
5 25-5 1/2 34-7 3/4 26-0 35-4 5/8<br />
6 26-3 5/16 35-3 26-10 36-0<br />
7 27-2 1/2 35-11 3/8 27-9 7/16 36-8 9/16<br />
8 28-2 15/16 36-8 7/8 28-10 1/8 37-6 1/4<br />
9 29-4 1/2 37-7 7/16 30-0 38-5<br />
10 30-7 1/16 38-6 7/8 31-2 7/8 39-4 3/4<br />
11 31-10 9/16 39-7 1/4 32-6 11/16 40-5 3/8<br />
12 33-2 13/16 40-8 7/16 33-11 5/16 41-6 13/16<br />
1 24-7 34-8 1/2 25-1 1/16 35-5<br />
2 24-10 1/16 34-10 11/16 25-4 1/8 35-7 3/16<br />
3 25-3 1/16 35-2 1/4 25-9 1/4 35-10 13/16<br />
4 25-9 7/8 35-7 3/16 26-4 1/4 36-3 7/8<br />
5 26-6 1/2 36-1 7/16 27-1 36-10 5/16<br />
6 27-4 11/16 36-9 27-11 7/16 37-6<br />
7 28-4 3/8 37-5 3/4 28-11 5/16 38-2 15/16<br />
8 29-5 3/8 38-3 11/16 30-0 9/16 39-1 1/16<br />
9 30-7 1/2 39-2 5/8 31-3 40-0 1/4<br />
10 31-10 11/16 41-2 5/8 32-6 1/2 41-0 7/16<br />
11 33-2 13/16 41-3 1/2 33-11 42-1 5/8<br />
12 34-7 3/4 42-5 1/4 35-4 1/4 43-3 5/8<br />
57
TABLE 2<br />
Difference in Length of Jack Rafters<br />
FOR VARIOUS SPACING<br />
Rise<br />
1<br />
2<br />
3<br />
4<br />
5<br />
6<br />
7<br />
8<br />
9<br />
10<br />
11<br />
12<br />
13<br />
14<br />
15<br />
16<br />
17<br />
18<br />
19<br />
20<br />
21<br />
22<br />
23<br />
24<br />
(FEET-INCHES)<br />
16” 18” 20” 24”<br />
1-41/16 1-41/4 1-41/2 1-47/8 1-55/16 1-57/8 1-61/2 1-71/4 1-8<br />
1-813/16 1-911/16 1-105/8 1-119/16 2-09/16 2-15/8 2-211/16 2-33/4 2-4 7/8<br />
2-515/16 2-71/8 2-81/4 2-9 7/16<br />
2-109/16 2-113/4 1-61/16 1-61/4 1-69/16 1-7<br />
1-71/2 1-81/8 1-813/16 1-95/8 1-101/2 1-117/16 2-07/16 2-17/16 2-29/16 2-311/16 2-413/16 2-6<br />
2-73/16 2-8 7/16<br />
2-911/16 2-11<br />
3-01/4 3-19/16 3-215/16 3-41/4 58<br />
1-81/16 1-81/4 1-85/8 1-91/16 1-911/16 1-103/8 1-111/8 2-01/16 2-1<br />
2-21/16 2-31/8 2-45/16 2-51/2 2-63/4 2-8<br />
2-95/16 2-1011/16 3-01/16 3-17/16 3-27/8 3-45/16 3-53/4 3-71/4 4-83/4 2-01/16 2-05/16 2-03/4 2-15/16 2-2<br />
2-213/16 2-313/16 2-47/8 2-6<br />
2-71/4 2-89/16 2-915/16 2-113/8 3-07/8 3-27/16 3-4<br />
3-55/8 3-71/4 3-815/16 3-105/8 4-03/8 4-21/8 4-37/8 4-511/16
Rafter Lengths- For building widths in feet and inches:<br />
The following tables are used to determine rafter lengths<br />
(common, hip and valley) for building widths which are in feet and<br />
fractions of a foot.<br />
For example, to find the length of a common rafter for a 34 foot, 7<br />
inch wide building with a roof rise of 8 inches per foot of run, find the<br />
length of a common rafter for a 34 foot wide building as 20 feet, 5 3 /16<br />
inches from the previous tables. From the following table 3, find the<br />
additional length to add for 7 inch width and 8 inch rise as 4 3 /16 inches.<br />
Add this to the 20 feet, 5 3 /16 inches and obtain 20 feet, 9 3 /8 inches as<br />
the correct common rafter length.<br />
To determine the lengths of hip and valley rafters, proceed as<br />
above using the appropriate preceding tables and table 4.<br />
59
TABLE 3<br />
ADDITIONAL LENGTH IN INCHES TO<br />
ADD TO COMMON RAFTERS<br />
Rise<br />
1<br />
For Inches Additional Building Width<br />
2 3 4 5 6<br />
1 1/2 1 11/2 2 2 9/16 31/16<br />
2 1/2 1 11/2 2 2 9/16 31/16<br />
3 1/2 1 19/16 21/16 2 9/16 31/16<br />
4 1/2 11/16 19/16 21/8 25/8 33/16<br />
5 9/16 11/16 15/8 23/16 211/15 31/4<br />
6 9/16 11/8 11/16 21/4 213/16 33/8<br />
7 9/16 13/16 13/4 25/16 27/8 31/2<br />
8 5/8 13/16 113/16 23/8 3 35/8<br />
9 5/8 11/4 17/8 21/2 31/8 33/4<br />
10 5/8 15/16 115/16 25/8 31/4 37/8<br />
11 11/16 13/8 21/16 211/16 33/8 41/16<br />
12 11/16 17/16 21/8 213/16 39/16 41/4<br />
13 3/4 11/2 23/16 215/16 311/16 47/16<br />
14 3/4 19/16 21/4 31/16 313/16 45/8<br />
15 13/16 15/8 23/8 33/16 4 413/16<br />
16 13/16 111/16 21/2 35/16 43/16 5<br />
17 7/8 13/4 25/8 37/16 45/16 53/16<br />
18 7/8 113/16 211/16 35/8 41/2 57/16<br />
19 15/16 17/8 213/16 33/4 411/16 55/8<br />
20 1 115/16 215/16 37/8 47/8 513/16<br />
21 1 2 3 41/16 51/16 61/16<br />
22 11/16 21/16 31/8 43/16 51/4 61/4<br />
23 11/16 23/16 31/4 45/16 53/8 57/16<br />
24 11/8 21/4 33/8 41/2 59/16 611/16<br />
60
Rise<br />
1<br />
2<br />
3<br />
4<br />
5<br />
6<br />
7<br />
8<br />
9<br />
10<br />
11<br />
12<br />
13<br />
14<br />
15<br />
16<br />
17<br />
18<br />
19<br />
20<br />
21<br />
22<br />
23<br />
24<br />
39/16<br />
39/16<br />
35/8<br />
311/16<br />
313/16<br />
315/16<br />
41/16<br />
43/16<br />
43/8<br />
49/16<br />
43/4<br />
415/16<br />
53/16<br />
53/8<br />
55/8<br />
ADDITIONAL LENGTH IN INCHES TO<br />
ADD TO COMMON RAFTERS<br />
For Inches Additional Building Width<br />
7 8 9 10 11<br />
513/16<br />
61/16<br />
65/16<br />
69/16<br />
613/16<br />
71/16<br />
75/16<br />
79/16<br />
713/16<br />
41/16<br />
41/16<br />
41/8<br />
43/16<br />
45/16<br />
41/2<br />
45/8<br />
413/16<br />
5<br />
53/16<br />
57/16<br />
511/16<br />
57/8<br />
61/8<br />
63/8<br />
611/16<br />
715/16<br />
73/16<br />
71/2<br />
73/4<br />
81/16<br />
83/8<br />
85/8<br />
815/16<br />
TABLE 3<br />
49/16<br />
49/16<br />
45/8<br />
43/4<br />
47/8<br />
51/16<br />
53/16<br />
57/16<br />
55/8<br />
57/8<br />
61/8<br />
63/8<br />
65/8<br />
615/16<br />
73/16<br />
71/2<br />
713/16<br />
81/8<br />
87/16<br />
83/4<br />
91/16<br />
93/8<br />
93/4<br />
101/16<br />
61<br />
51/16<br />
51/16<br />
51/8<br />
51/4<br />
57/16<br />
59/16<br />
513/16<br />
6<br />
61/4<br />
61/2<br />
613/16<br />
71/16<br />
73/8<br />
711/16<br />
8<br />
85/16<br />
811/16<br />
9<br />
93/8<br />
911/16<br />
101/16<br />
107/16<br />
1013/16<br />
113/16<br />
59/16<br />
59/16<br />
511/16<br />
513/16<br />
515/16<br />
61/8<br />
63/8<br />
65/8<br />
67/8<br />
73/16<br />
77/16<br />
73/4<br />
81/8<br />
87/16<br />
813/16<br />
93/16<br />
99/16<br />
915/16<br />
105/16<br />
1011/16<br />
111/16<br />
111/2<br />
117/8<br />
125/16
TABLE 4<br />
ADDITIONAL LENGTH IN INCHES TO<br />
ADD TO HIP & VALLEY RAFTER<br />
Rise<br />
1<br />
For Inches Additional Building Width<br />
2 3 4 5 6<br />
1 11/16 17/16 21/8 213/16 39/16 41/4<br />
2 11/16 17/16 21/8 27/8 39/16 41/4<br />
3 11/16 17/16 21/8 27/8 39/16 45/16<br />
4 3/4 17/16 23/16 215/16 35/8 43/8<br />
5 3/4 11/2 23/16 215/16 311/16 47/16<br />
6 3/4 11/2 21/4 3 33/4 41/2<br />
7 3/4 11/2 2 9/16 31/16 313/16 49/16<br />
8 13/16 19/16 23/8 31/8 315/16 411/16<br />
9 13/16 15/8 23/8 33/16 4 413/16<br />
10 13/16 15/8 2 7/16 35/16 41/8 415/16<br />
11 13/16 111/16 21/2 33/8 43/16 51/16<br />
12 7/8 13/4 25/8 37/16 45/16 53/16<br />
13 7/8 113/16 211/16 39/16 47/16 53/8<br />
14 15/16 113/16 23/4 311/16 49/16 51/2<br />
15 15/16 17/8 213/16 33/4 43/4 511/16<br />
16 15/16 115/16 27/8 37/8 413/16 513/16<br />
17 1 2 3 4 5 6<br />
18 1 21/16 31/16 41/8 51/8 63/16<br />
19 11/16 21/8 33/16 41/4 55/16 63/8<br />
20 11/16 23/16 31/4 43/8 57/16 39/16<br />
21 11/8 21/4 33/8 41/2 55/8 63/4<br />
22 13/16 25/16 31/2 45/8 513/16 615/16<br />
23 13/16 23/8 39/16 43/4 6 71/8<br />
24 11/4 21/2 311/16 47/8 61/8 73/8<br />
62
Rise<br />
1<br />
2<br />
3<br />
4<br />
5<br />
6<br />
7<br />
8<br />
9<br />
10<br />
11<br />
12<br />
13<br />
14<br />
15<br />
16<br />
17<br />
18<br />
19<br />
20<br />
21<br />
22<br />
23<br />
24<br />
TABLE 4<br />
ADDITIONAL LENGTH IN INCHES TO<br />
ADD TO HIP & VALLEY RAFTER<br />
For Inches Additional Building Width<br />
7 8 9 10 11<br />
415/16<br />
5<br />
5<br />
51/16<br />
53/16<br />
51/4<br />
53/8<br />
51/2<br />
55/8<br />
53/4<br />
57/8<br />
61/16<br />
61/4<br />
67/16<br />
65/8<br />
63/4<br />
7<br />
73/16<br />
77/16<br />
75/8<br />
77/8<br />
81/8<br />
85/16<br />
89/16<br />
511/16<br />
511/16<br />
53/4<br />
513/16<br />
57/8<br />
6<br />
61/8<br />
61/4<br />
63/8<br />
69/16<br />
63/4<br />
615/16<br />
71/8<br />
75/16<br />
79/16<br />
73/4<br />
8<br />
81/4<br />
81/2<br />
83/4<br />
9<br />
91/4<br />
91/2<br />
913/16<br />
63/8<br />
67/16<br />
67/16<br />
69/16<br />
65/8<br />
63/4<br />
67/8<br />
71/16<br />
73/16<br />
73/8<br />
79/16<br />
713/16<br />
8<br />
81/4<br />
81/2<br />
811/16<br />
9<br />
91/4<br />
99/16<br />
913/16<br />
101/8<br />
107/16<br />
1011/16<br />
11<br />
63<br />
71/16<br />
71/8<br />
73/16<br />
71/4<br />
73/8<br />
71/2<br />
75/8<br />
713/16<br />
8<br />
83/16<br />
87/16<br />
811/16<br />
815/16<br />
93/16<br />
97/16<br />
911/16<br />
10<br />
105/16<br />
105/8<br />
1015/16<br />
111/4<br />
119/16<br />
1111/16<br />
121/4<br />
713/16<br />
713/16<br />
77/8<br />
8<br />
81/8<br />
81/4<br />
87/16<br />
85/8<br />
813/16<br />
9<br />
91/4<br />
91/2<br />
913/16<br />
101/16<br />
103/8<br />
105/8<br />
11<br />
115/16<br />
1111/16<br />
12<br />
123/8<br />
123/4<br />
131/8<br />
131/2
©2010 <strong>Stanley</strong> Black & Decker<br />
New Britain, CT 06053 U.S.A.<br />
http://www.stanleyworks.com 79001152