External Dental Implant Catalog - BioHorizons
External Dental Implant Catalog - BioHorizons
External Dental Implant Catalog - BioHorizons

You also want an ePaper? Increase the reach of your titles
YUMPU automatically turns print PDFs into web optimized ePapers that Google loves.
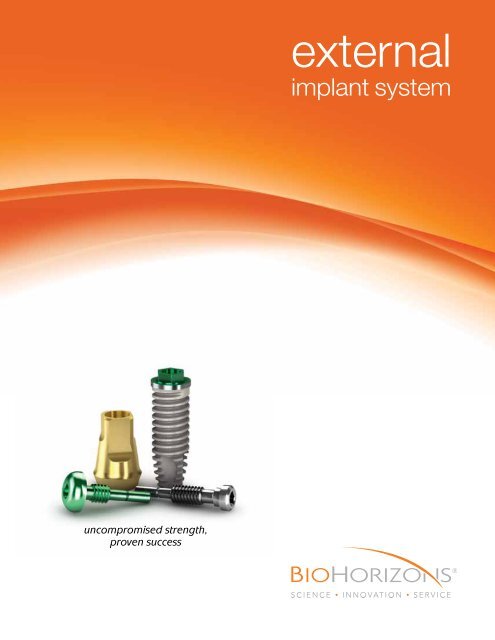
uncompromised strength,<br />
proven success<br />
external<br />
implant system
products<br />
sold<br />
in 85<br />
markets<br />
99.2%<br />
average<br />
implant<br />
success<br />
rate 1<br />
<strong>BioHorizons</strong> is dedicated to developing evidence-based and scientifically proven products. From the launch of the<br />
<strong>External</strong> implant system (Maestro) in 1997, to the Laser-Lok 3.0 implant in 2010, dental professionals as well as<br />
patients have confidence in our comprehensive portfolio of dental implants and biologics products.<br />
Our commitment to science, innovation and service has aided us in becoming one of the fastest growing companies<br />
in the dental industry. <strong>BioHorizons</strong> has helped restore smiles in 85 markets throughout Asia, North America, South<br />
America, Africa, Australia and Europe.<br />
global<br />
leader for<br />
biologic<br />
based<br />
solutions<br />
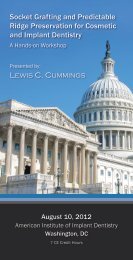
SCIENCE<br />
<strong>BioHorizons</strong> uses science and<br />
innovation to create unique products<br />
with proven surgical and esthetic results.<br />
INNOVATION<br />
Our advanced implant technologies,<br />
biologic products and computer guided<br />
surgery software have made <strong>BioHorizons</strong><br />
a leading dental implant company.<br />
SERVICE<br />
<strong>BioHorizons</strong> understands the<br />
importance of providing excellent<br />
service. Our global network of<br />
professional representatives and our<br />
highly trained customer care support<br />
team are well-equipped to meet the<br />
needs of patients and clinicians.
Table of Contents<br />
Product <strong>Catalog</strong><br />
Surgical Manual<br />
<strong>External</strong> System Overview<br />
<strong>Implant</strong>s, Healing Abutments & Cover Screws<br />
Instruments<br />
Literature & Support Material<br />
W&H Surgical Motors & Accessories<br />
Individual Abutments<br />
Impression Components<br />
Locator Abutment Components<br />
Ball Abutment Components<br />
Abutment for Screw Components<br />
Prosthetic Instrumentation<br />
Introduction & Surgical Protocols<br />
<strong>Implant</strong> Spacing<br />
Surgical Kit Layout<br />
Osteotomy Preparation<br />
<strong>Implant</strong> Packaging<br />
<strong>Implant</strong> Pick-up<br />
Abutment Removal<br />
Cover Screws & Healing Abutments<br />
Ancillary Instruments<br />
Appendix<br />
Icon Legend & References<br />
Ordering & Warranty Information<br />
2-3<br />
4-5<br />
6-9<br />
10<br />
11<br />
12-15<br />
16-17<br />
18-19<br />
20-21<br />
22-23<br />
24-25<br />
26-27<br />
28<br />
29<br />
30-33<br />
34<br />
35<br />
36<br />
37<br />
38<br />
39<br />
40<br />
41
external<br />
Originally known as the Maestro, the <strong>External</strong> implant has performed masterfully in every published study since its launch in<br />
1997. With success rates from 98.5% to 100% in studies of up to 1,400 implants in a wide variety of placement and loading<br />
conditions, 1 clinicians can confidently rely on the <strong>External</strong> to achieve consistent, reproducible results necessary to build a<br />
successful implantology practice.<br />
• Transmits 10 times less destructive shear than conventional v-threads 2<br />
• Shown to achieve bone-to-implant contact levels of 80.6% 3<br />
• Higher reverse torque values than conventional v-thread implants 4<br />
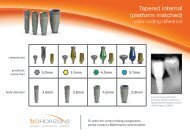
• 4 platform/body diameters: 3.5mm, 4.0mm, 5.0mm, 6.0mm<br />
• 5 lengths: 7mm, 9mm, 10.5mm, 12mm, 15mm<br />
Spiralock ®<br />
technology<br />
virtually<br />
eliminates<br />
screw<br />
loosening<br />
Low-profile Abutment<br />
Screw uses industry<br />
standard .050”<br />
(1.25mm) hex<br />
Patented Guide Pin saves<br />
time and eliminates cross<br />
threading<br />
2<br />
Gold-hued TiN<br />
coating for soft<br />
tissue esthetics<br />
0.5mm<br />
machined<br />
collar<br />
Prosthetic platform 0.2mm<br />
wider than implant body<br />
<strong>Implant</strong> body<br />
diameter<br />
Stable 1mm high<br />
external hex<br />
Stated<br />
implant<br />
length
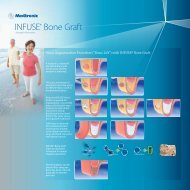
Crestal bone maintenance leads to success<br />
Biomechanical thread form | Backed by science<br />
<strong>External</strong> implants feature the time-proven, biomechanical square thread which has been demonstrated to provide<br />
increased bone-to-implant contact and yield higher reverse-torque values.<br />
Reverse Torque Value (Ncm)<br />
% Bone-to-<strong>Implant</strong> Contact<br />
Steigenga J, Al-Shammari K, Misch C, Nociti F and Wang H-L. Effects of <strong>Implant</strong> Thread Geometry on Percentage of Osseointegration and Resistance to Reverse<br />
Torque in the Tibia of Rabbits. J Periodontology 2004;75:1233-1241<br />
<strong>BioHorizons</strong> <strong>Implant</strong>s<br />
A prospective, multicenter trial showed a 5-year cumulative success rate of 99.5% for 495 <strong>External</strong><br />
implants in 151 patients. There were no significant differences in the results by center, implant type, bone<br />
density, area of the mouth or prosthesis type. Crestal bone loss from prosthesis delivery to one-year<br />
follow-up was extremely low (0.06mm), and actually turned into bone gain at later follow-up intervals. 5<br />
Radiographs of <strong>External</strong> implants in function for more than<br />
6 years. Note that the crestal bone levels are maintained<br />
above the level of the first thread. Courtesy of Dr. Carl E. Misch.<br />
Increased surface area for immediate loading success<br />
Bone is strongest in compressive loading; weakest in shear. <strong>External</strong>’s square-thread design imparts 10 times less destructive stresses<br />
at the implant / bone interface than conventional v-thread designs, while maximizing compressive load transfer and providing<br />
excellent primary stability. These attributes have become increasingly important with the emergence of early and immediate load<br />
protocols. 6,7,8<br />
The square-thread design provides up to 154% greater surface area than conventional v-thread designs. A comparative study of<br />
thread designs (square-thread, v-thread and buttress thread) concluded that the square-thread design exhibited significantly higher<br />
reverse torque values and bone-to-implant contact than the other thread designs. 3<br />
<strong>BioHorizons</strong><br />
square-thread<br />
V-thread Modified-square<br />
15.58 ± 6.07<br />
65.46 ± 9.64<br />
N <strong>Implant</strong>s N Failures % <strong>Implant</strong> Survival % Prostheses Survival<br />
Immediate Functional Loading<br />
126 0 100% 100%<br />
Immediate Non-Functional Loading 116 0 100% 100%<br />
Degidi and Piattelli. Immediate Functional and Non-Functional Loading of <strong>Dental</strong> <strong>Implant</strong>s: A 2- to 60-Month Follow-Up Study of 646 Titanium <strong>Implant</strong>s.<br />
J Periodontology 2003;74:225-241.<br />
3<br />
Conventional<br />
v-thread<br />
23.17 ± 9.68<br />
74.37 ± 8.63<br />
Multiple studies have demonstrated the <strong>BioHorizons</strong> square thread to be extremely reliable in immediate loading protocols.<br />
One study, summarized below, followed 242 <strong>BioHorizons</strong> implants through immediate functional and non-functional loading.
Resorbable Blast<br />
Texturing (RBT)<br />
Roughened<br />
TiO 2 surface<br />
3.5mm<br />
<strong>Implant</strong>s<br />
4.0mm<br />
<strong>Implant</strong>s<br />
5.0mm<br />
<strong>Implant</strong>s<br />
6.0mm<br />
<strong>Implant</strong>s<br />
Body<br />
Diameter<br />
3.5mm<br />
4.0mm<br />
5.0mm<br />
6.0mm<br />
3507D3*<br />
3509D3<br />
35105D3<br />
3512D3<br />
3515D3<br />
4007D3*<br />
4009D3<br />
40105D3<br />
4012D3<br />
4015D3<br />
5007D3*<br />
5009D3<br />
50105D3<br />
5012D3<br />
5015D3<br />
6007D3*<br />
6009D3<br />
60105D3<br />
6012D3<br />
6015D3<br />
Platform<br />
Diameter<br />
3.7mm<br />
4.2mm<br />
5.2mm<br />
6.2mm<br />
Apical<br />
Diameter<br />
2.0mm<br />
2.1mm<br />
2.5mm<br />
3.5mm<br />
Diameter x Length<br />
3.5mm x 7mm<br />
3.5mm x 9mm<br />
3.5mm x 10.5mm<br />
3.5mm x 12mm<br />
3.5mm x 15mm<br />
4.0mm x 7mm<br />
4.0mm x 9mm<br />
4.0mm x 10.5mm<br />
4.0mm x 12mm<br />
4.0mm x 15mm<br />
5.0mm x 7mm<br />
5.0mm x 9mm<br />
5.0mm x 10.5mm<br />
5.0mm x 12mm<br />
5.0mm x 15mm<br />
6.0mm x 7mm<br />
6.0mm x 9mm<br />
6.0mm x 10.5mm<br />
6.0mm x 12mm<br />
6.0mm x 15mm<br />
Hex flat-toflat<br />
measure<br />
2.4mm<br />
2.7mm<br />
3.0mm<br />
3.0mm<br />
4<br />
NA<br />
NA<br />
NA<br />
NA<br />
NA<br />
4007D4*<br />
4009D4<br />
40105D4<br />
4012D4<br />
4015D4<br />
5007D4*<br />
5009D4<br />
50105D4<br />
5012D4<br />
5015D4<br />
6007D4*<br />
6009D4<br />
60105D4<br />
6012D4<br />
6015D4<br />
Machined<br />
Collar Height<br />
0.5mm<br />
0.5mm<br />
0.5mm<br />
0.5mm<br />
EXTERNAL IMPLANTS<br />
Hydroxylapatite<br />
Coating (HA)<br />
High-density<br />
crystalline coating<br />
Minimum<br />
Ridge Width<br />
5.5mm<br />
6.0mm<br />
7.0mm<br />
8.0mm<br />
Please refer to the <strong>External</strong> -7mm Length <strong>Implant</strong>s manual (ref. L0151) for detailed instructions for use of the prosthetic<br />
components for 7mm implants.<br />
*Each 7mm implant comes packaged with the 3inOne Abutment, a short cover screw and a short Abutment Screw.<br />
Minimum Mesial/<br />
Distal Space<br />
6.5mm<br />
7.0mm<br />
8.0mm<br />
9.0mm
HEALING ABUTMENTS & COVER SCREWS<br />
Use for tissue healing at second-stage uncovery or as a transmucosal element for single-stage procedures.<br />
Color-coded by implant diameter. Hand-tighten with the .050” (1.25mm) Hex Driver. Titanium Alloy.<br />
Flared Emergence <strong>Implant</strong> Diameter x Height<br />
212-303<br />
212-304<br />
212-306<br />
212-403<br />
212-404<br />
212-406<br />
212-503<br />
212-504<br />
212-506<br />
212-603<br />
212-604<br />
212-606<br />
3.5mm x 3mm<br />
3.5mm x 4.5mm<br />
3.5mm x 6mm<br />
4.0mm x 3mm<br />
4.0mm x 4.5mm<br />
4.0mm x 6mm<br />
5.0mm x 3mm<br />
5.0mm x 4.5mm<br />
5.0mm x 6mm<br />
6.0mm x 3mm<br />
6.0mm x 4.5mm<br />
6.0mm x 6mm<br />
5<br />
204-503<br />
204-504<br />
204-506<br />
204-603<br />
204-604<br />
204-606<br />
Packaged with each implant. Protects the implant’s prosthetic platform during submerged surgical healing. Colorcoded<br />
by implant diameter. Hand-tighten with the .050” (1.25mm) Hex Driver. Titanium Alloy.<br />
103-900<br />
104-900<br />
105-900<br />
106-900<br />
103-700<br />
104-700<br />
105-700<br />
106-700<br />
204-303<br />
204-304<br />
204-306<br />
204-403<br />
204-404<br />
204-406<br />
3.5mm Cover Screw<br />
4.0mm Cover Screw<br />
5.0mm Cover Screw<br />
6.0mm Cover Screw<br />
Healing Abutments<br />
Straight Emergence<br />
Cover Screws<br />
3.5mm Short Cover Screw (for 7mm length implants)<br />
4.0mm Short Cover Screw (for 7mm length implants)<br />
5.0mm Short Cover Screw (for 7mm length implants)<br />
6.0mm Short Cover Screw (for 7mm length implants)<br />
products shown not to scale
<strong>External</strong> Surgical Kit<br />
Individual Surgical Kit Components<br />
122-103<br />
2.0mm Starter Drill<br />
products shown not to scale<br />
122-100<br />
Drill Extender<br />
122-12507<br />
122-12509<br />
122-125105<br />
122-12512<br />
122-12515<br />
122-225<br />
122-230<br />
122-232<br />
122-237<br />
122-242<br />
122-247<br />
122-252<br />
6<br />
SURGICAL KIT AND COMPONENTS<br />
144-100<br />
144-200<br />
160-500<br />
<strong>External</strong> Surgical Kit<br />
Includes all instruments (except 122-12507)<br />
shown on pages 6-7.<br />
160-200<br />
Straight Parallel Pins (4 per kit)<br />
20° Angled Parallel Pins (2 per kit)<br />
2.5 x 7mm Depth Drill (sold separately)<br />
2.5 x 9mm Depth Drill<br />
2.5 x 10.5mm Depth Drill<br />
2.5 x 12mm Depth Drill<br />
2.5 x 15mm Depth Drill<br />
Surgical Tray & Lid (without instruments)<br />
2.5mm Depth Drill (without Depth Stop)<br />
3.0mm Width Increasing Drill<br />
3.4mm Width Increasing Drill<br />
3.9mm Width Increasing Drill<br />
4.4mm Width Increasing Drill<br />
4.9mm Width Increasing Drill<br />
5.4mm Width Increasing Drill
SURGICAL KIT COMPONENTS<br />
133-100<br />
145-100<br />
135-351<br />
123-000<br />
124-000<br />
125-000<br />
126-000<br />
3.5mm Crestal Bone Drill<br />
4.0mm Crestal Bone Drill<br />
5.0mm Crestal Bone Drill<br />
6.0mm Crestal Bone Drill<br />
3.5mm Handpiece Adapter<br />
4.0/5.0/6.0mm Handpiece Adapter<br />
.050” (1.25mm) Hex Driver<br />
300-400<br />
Hand Wrench<br />
300-206<br />
4mm Square Drive Extender*<br />
Replaced 300-205 starting in June 2010.<br />
Includes PEEK C-ring for durable retention in<br />
Ratchet. Cannot be used with bone taps.<br />
153-000<br />
154-000<br />
155-000<br />
*instrument o-rings & c-rings wear out over time. If an instrument is no longer held securely by its associated driver, order a replacement ring through Customer Care.<br />
products shown not to scale<br />
7<br />
Individual Surgical Kit Components<br />
303-200<br />
345-200<br />
123-300<br />
124-300<br />
125-300<br />
126-300<br />
3.5mm <strong>Implant</strong>-level Insertion Tool*<br />
4.0mm <strong>Implant</strong>-level Insertion Tool*<br />
5.0/6.0mm <strong>Implant</strong>-level Insertion Tool*<br />
130-000<br />
Ratchet<br />
144-300<br />
3.5mm Bone Tap<br />
4.0mm Bone Tap<br />
5.0mm Bone Tap<br />
6.0mm Bone Tap<br />
3.5mm Ratchet Adapter*<br />
4.0/5.0/6.0mm Ratchet Adapter*<br />
<strong>Implant</strong> Spacer / Depth Probe
Extended Shank Drills (not included in Surgical Kit)<br />
Extended Shank Drills are 8mm longer than our standard drills. They provide an<br />
intermediary increase in length between the standard drills used alone, or with the Drill<br />
Extender (ref. 122-100), which adds 16mm of length. The depth marks and cutting<br />
geometry are identical to our standard drills.<br />
Ratchet & Hand Wrench Extender<br />
Surgical Driver<br />
products shown not to scale<br />
ANCILLARY SURGICAL INSTRUMENTS<br />
122-403<br />
122-42507<br />
122-42509<br />
122-425105<br />
122-42512<br />
122-42515<br />
122-425<br />
122-430<br />
122-432<br />
122-437<br />
122-442<br />
122-447<br />
122-452<br />
300-205<br />
150-000 Surgical Driver<br />
8<br />
2.0mm Starter Drill, Extended Shank<br />
2.5 x 7mm Depth Drill, Extended Shank<br />
2.5 x 9mm Depth Drill, Extended Shank<br />
2.5 x 10.5mm Depth Drill, Extended Shank<br />
2.5 x 12mm Depth Drill, Extended Shank<br />
2.5 x 15mm Depth Drill, Extended Shank<br />
2.5mm Depth Drill, Extended Shank<br />
3.0mm Width Increasing Drill, Extended Shank<br />
3.4mm Width Increasing Drill, Extended Shank<br />
3.9mm Width Increasing Drill, Extended Shank<br />
4.4mm Width Increasing Drill, Extended Shank<br />
4.9mm Width Increasing Drill, Extended Shank<br />
5.4mm Width Increasing Drill, Extended Shank<br />
Ratchet & Hand Wrench Extender<br />
Can be used with Bone Taps (page 7).<br />
Use to drive implants into the osteotomy, particularly in the anterior region.<br />
The driver holds the Abutment-level Driver, Ratchet which interfaces with the<br />
3inOne Abutment. Also interfaces with the .050” (1.25mm) Hex Drivers as<br />
well as Bone Taps and the <strong>Implant</strong>-level Drivers, Ratchet.
ANCILLARY SURGICAL INSTRUMENTS<br />
122-110<br />
Ancillary Instruments (not included in Surgical Kit)<br />
2.0mm Lindemann Bone Cutter<br />
Side-cutting drill used to correct eccentric osteotomy preparations.<br />
PYTP<br />
122-201<br />
122-202<br />
122-203<br />
122-113<br />
122-114<br />
122-115<br />
122-116<br />
134-350<br />
134-450<br />
3.5mm Tissue Punch<br />
4.0mm Tissue Punch<br />
5.0mm Tissue Punch<br />
6.0mm Tissue Punch<br />
<strong>BioHorizons</strong> Tissue Punches are used in a latch-type handpiece to remove the soft tissue<br />
from the crest of the ridge prior to osteotomy preparation in a flapless surgical procedure.<br />
<strong>External</strong> Bone Profiler, 3.5mm<br />
<strong>External</strong> Bone Profiler, 4.0mm<br />
<strong>External</strong> Bone Profiler, 5.0mm<br />
<strong>External</strong> Bone Profiler, 6.0mm<br />
Use at implant uncovery to contour crestal bone to accommodate abutments when the<br />
implant is subcrestal. For use in latch-type reduction handpieces. The Profiler’s internal<br />
geometry matches the geometry of the surgical Cover Screw which aligns the Profiler for<br />
precise removal of tissue surrounding the platform.<br />
.050” (1.25mm) Handpiece Hex Driver<br />
.050” (1.25mm) Handpiece Hex Driver, Long<br />
For installation and removal of Cover Screws, Healing Abutments and Abutment Screws. Use<br />
with latch-type contra-angle handpieces: WS-75 E/KM or similar. 134-450 is 5mm longer<br />
than the 134-350.<br />
9<br />
Adjustable Torque Wrenches<br />
ATW ITL Precise Adjustable Torque Wrench<br />
Ratchet design places both implants and abutments with 9 distinct<br />
torque settings (15, 20, 25, 30, 35, 40, 45, 50 and 60 Ncm). A simple<br />
twist of the handle locks in precision-engineered torque values and<br />
guarantees accuracy and repeatability. Use with 4mm square drivers.<br />
EL-C12374 Elos Adjustable Torque Wrench<br />
Lightweight titanium design is easy to use as an adjustable<br />
torque wrench or a ratchet. Quickly disassembles for cleaning.<br />
No calibration required. Use with 4mm square drivers.<br />
products shown not to scale
Marketing Collateral<br />
<strong>BioHorizons</strong> <strong>External</strong> - 7mm Length <strong>Implant</strong>s<br />
<strong>BioHorizons</strong> <strong>External</strong> Impression Technique Guide<br />
products shown not to scale<br />
L0151<br />
ML0129<br />
MLD101<br />
ML0131<br />
10<br />
LITERATURE & SUPPORT MATERIAL<br />
ML0103 Patient Education – Tooth replacement with dental implants<br />
ML0114 Patient Education – Stabilizing dentures using dental implants<br />
MPSA<br />
EP-MSLA<br />
ML0207<br />
<strong>External</strong> - 7mm Length <strong>Implant</strong>s<br />
Guides the clinician and laboratory through the nuances of placing and<br />
restoring <strong>BioHorizons</strong> <strong>External</strong> 7mm length implants. Includes ordering<br />
information for implants, 2.0 x 7mm Depth Drills and Radiographic<br />
Templates with 7mm length implants.<br />
NOTE: 7mm length implants are not available in all countries; please<br />
call for availability in your market.<br />
Patient Education – Rebuilding and maintaining bone<br />
Patient Education – Soft tissue grafting with AlloDerm®<br />
Patient Education – <strong>Dental</strong> <strong>Implant</strong>s - the tooth replacement solution<br />
This high-quality flipbook helps the implant candidate understand the rationale<br />
and the advantages of implant therapy compared to traditional treatment<br />
methods. 9” x 6” (23cm x 16cm).<br />
Five <strong>Implant</strong> Acrylic Model<br />
This life-sized model allows the clinician to illustrate implant placement of<br />
<strong>BioHorizons</strong> implants. Clear acrylic allows the implants to be viewed in relation<br />
to adjacent teeth. Call for availability.<br />
Locator Patient Education Model<br />
This life-sized model allows the clinician to illustrate a denture on an edentulous<br />
mandible supported by 2 implants with Locator abutments. Clear acrylic allows<br />
the implants to be viewed in relation to the denture. Call for availability.<br />
<strong>External</strong> Impression Technique Guide<br />
Guides the clinician and laboratory through impression making techniques<br />
and procedures with <strong>BioHorizons</strong> <strong>External</strong> impression components.
W&H MOTORS AND ACCESSORIES<br />
Motor Kits include: console, handheld motor with cable, foot pedal,<br />
(3) disposable irrigation tubes, handpiece, bur testing gauge, service oil, and oil spray cap.<br />
WH-310L<br />
WH-310<br />
WH-915L<br />
WH-915<br />
WH-00001100<br />
WH-00001101<br />
WH-00001120<br />
WH-00001130<br />
WH-10100900<br />
WH-10101000<br />
WH-10101200<br />
WH-10205601<br />
WH-10207510<br />
WH-10207530<br />
WH-10207550<br />
WH-10207560<br />
WH-10209201<br />
WH-12227901<br />
WH-16934000<br />
WH-04363600<br />
WH-06338400<br />
WH-04757100<br />
WH-10940011<br />
WH-04013900<br />
WH-06338500<br />
WH-00929300<br />
WH-04019000<br />
WH-02139800<br />
Elcomed SA-310 Professional Kit with LED<br />
Includes LED handpiece (WH-10207530).<br />
Elcomed SA-310 Professional Kit<br />
Includes handpiece (WH-10207510).<br />
<strong>Implant</strong>med SI-915 Starter Kit with LED<br />
Includes mono block LED handpiece (WH-10207560).<br />
<strong>Implant</strong>med SI-915 Starter Kit<br />
Includes mono block handpiece (WH-10207550).<br />
11<br />
W&H Motor Kits<br />
Surgical Handpieces & Prosthodontic Screwdriver<br />
S-11 Surgical Handpiece 1:1 Straight<br />
SL-11 Surgical Handpiece 1:1 Straight, Long<br />
SI-11 LED G Surgical Handpiece 1:1 Straight, Mono Block<br />
S-11 LED G Surgical Handpiece 1:1 Straight<br />
S-9 Surgical Handpiece 1:1 Angled<br />
S-10 Surgical Handpiece 1:1 Angled, Slim<br />
S-12 Surgical Handpiece 1:2 Angled, Slim<br />
WS-56 E Surgical Handpiece 1:1 Contra-Angle<br />
WS-75 E/KM Surgical Handpiece 20:1 Contra-Angle<br />
WS-75 E/KM LED G Surgical Handpiece 20:1 Contra-Angle<br />
WI-75 E/KM Surgical Handpiece 20:1 Contra-Angle, Mono Block<br />
WI-75 E/KM LED G Surgical Handpiece 20:1 Contra-Angle, Mono Block<br />
WS-92 E/3 Surgical Handpiece 1:2.7 Contra-Angle<br />
EB-79 ENDO NiTi Handpiece 2:1 Contra-Angle<br />
IA-400 Prosthodontic Screwdriver<br />
W&H Elcomed and <strong>Implant</strong>med Re-Order Items<br />
Disposable Irrigation Tubing, 2.2m (<strong>Implant</strong>med and Elcomed SA-310) (box of 6)<br />
Irrigation Spike w/ Roller Clamp<br />
Irrigation Spray Clip for <strong>External</strong> and Internal Irrigation (set of 3)<br />
MD-400 Service-Oil F1<br />
Pump Tube Complete (<strong>Implant</strong>med and Elcomed SA-310)<br />
Spare Irrigation Tube for Spike<br />
Spray Tubes (box of 10)<br />
Tube Clamps (<strong>Implant</strong>med) (set of 5)<br />
Bur Testing Gauge<br />
products shown not to scale
1mm<br />
Ceramic Abutments for Esthetic Zone Restorations<br />
7mm<br />
If a 6.0mm abutment is not available, the 5.0mm abutment may be used.<br />
products shown not to scale<br />
223-315<br />
224-315<br />
225-315<br />
226-315<br />
203-311<br />
204-411<br />
205-511<br />
206-611<br />
3.5mm Ceramic Abutment<br />
4.0mm Ceramic Abutment<br />
5.0mm Ceramic Abutment<br />
6.0mm Ceramic Abutment<br />
3inOne Abutments for Cement-retained Restorations<br />
8mm<br />
17-20°<br />
2.0mm<br />
1.5mm<br />
223-313<br />
224-313<br />
225-313<br />
3.5mm 3inOne Abutment<br />
4.0mm 3inOne Abutment<br />
5.0mm 3inOne Abutment<br />
6.0mm 3inOne Abutment<br />
Angled Abutments for Cement-retained Restorations<br />
11mm<br />
Angled Esthetic Abutments for Cement-retained Restorations<br />
9mm<br />
1mm<br />
15°<br />
3mm<br />
213-400<br />
214-400<br />
215-400<br />
3.5mm Angled Abutment (17°)<br />
4.0mm Angled Abutment (20°)<br />
5.0mm Angled Abutment (20°)<br />
3.5mm Angled Esthetic Abutment<br />
4.0mm Angled Esthetic Abutment<br />
5.0mm Angled Esthetic Abutment<br />
12<br />
INDIVIDUAL ABUTMENTS<br />
Use to fabricate cement-retained, single- or multiple-unit prostheses. Packaged<br />
with an abutment screw (130-400 or 140-400 used only with <strong>External</strong> Ceramic<br />
Abutments). Yttria-stabilized Zirconia. Final torque: 30Ncm.<br />
Use to fabricate cement-retained, single- or multiple-unit prostheses. Also use with a Ball-top<br />
Screw as a closed-tray, hexed-timed impression coping. Packaged with an abutment screw<br />
(130-300 or 140-300). Titanium Alloy. TiN coated. Final torque: 30Ncm.<br />
Use to fabricate cement-retained, single- or multiple-unit prostheses. Packaged with an<br />
abutment screw (130-300 or 140-300). Titanium Alloy. Final torque: 30Ncm.<br />
Use to fabricate cement-retained, single- or multiple-unit prostheses. Packaged with an<br />
abutment screw (130-300 or 140-300). Titanium Alloy. TiN coated. Final torque: 30Ncm.
INDIVIDUAL ABUTMENTS<br />
233-410<br />
234-410<br />
235-410<br />
223-314<br />
224-314<br />
225-314<br />
3.5mm Straight Abutment<br />
4.0mm Straight Abutment<br />
5.0mm Straight Abutment<br />
Use to fabricate cement-retained, single- or multiple-unit prostheses. Packaged with an<br />
abutment screw (130-300 or 140-300). Titanium Alloy. Final torque: 30Ncm.<br />
Straight Esthetic Abutments for Cement-retained Restorations<br />
3.5mm Straight Esthetic Abutment<br />
4.0mm Straight Esthetic Abutment<br />
5.0mm Straight Esthetic Abutment<br />
Use to fabricate cement-retained, single- or multiple-unit prostheses. Packaged with an<br />
abutment screw (130-300 or 140-300). Titanium Alloy. TiN coated. Final torque: 30Ncm.<br />
223-312<br />
224-312<br />
225-312<br />
3.5mm Profile Abutment<br />
4.0mm Profile Abutment<br />
5.0mm Profile Abutment<br />
Use to fabricate cement-retained, single- or multiple-unit prostheses. Packaged with an<br />
abutment screw (130-300 or 140-300). Titanium Alloy. Final torque: 30Ncm.<br />
223-208<br />
224-208<br />
225-208<br />
3.5mm Abutment for Cement, Non-hexed<br />
4.0mm Abutment for Cement, Non-hexed<br />
5.0mm Abutment for Cement, Non-hexed<br />
Straight Abutments for Cement-retained Restorations<br />
13<br />
9mm<br />
12mm<br />
10mm<br />
1mm<br />
8mm<br />
3mm<br />
Profile Abutments for Cement-retained Restorations<br />
3mm<br />
4.0mm<br />
4mm<br />
Abutments for Cement-retained Restorations - Non-hexed<br />
Use to fabricate cement-retained, multiple-unit prostheses. One-piece,<br />
non-hex engaging abutment. Titanium Alloy. Final torque: 30Ncm.<br />
Note: Must be prepped chairside followed by a conventional crown and bridge impression.<br />
If a 6.0mm abutment is not available, the 5.0mm abutment may be used.<br />
products shown not to scale
12mm<br />
12mm<br />
Custom Castable (UCLA) Abutments - Hexed<br />
1mm<br />
12mm<br />
1mm<br />
products shown not to scale<br />
0.5mm<br />
0.5mm<br />
233-227<br />
234-227<br />
235-227<br />
236-227<br />
233-217<br />
234-217<br />
235-217<br />
236-217<br />
Custom Castable (UCLA) Abutments - Non-hexed<br />
12mm<br />
5mm<br />
to top of screw<br />
5mm<br />
to top of screw<br />
233-228<br />
234-228<br />
235-228<br />
236-228<br />
233-210<br />
234-210<br />
235-210<br />
236-210<br />
3.5mm Gold/Plastic Custom Castable Abutment, Hexed<br />
4.0mm Gold/Plastic Custom Castable Abutment, Hexed<br />
5.0mm Gold/Plastic Custom Castable Abutment, Hexed<br />
6.0mm Gold/Plastic Custom Castable Abutment, Hexed<br />
3.5mm Plastic Custom Castable Abutment, Hexed<br />
4.0mm Plastic Custom Castable Abutment, Hexed<br />
5.0mm Plastic Custom Castable Abutment, Hexed<br />
6.0mm Plastic Custom Castable Abutment, Hexed<br />
3.5mm Gold/Plastic Custom Castable Abutment, Non-hexed<br />
4.0mm Gold/Plastic Custom Castable Abutment, Non-hexed<br />
5.0mm Gold/Plastic Custom Castable Abutment, Non-hexed<br />
6.0mm Gold/Plastic Custom Castable Abutment, Non-hexed<br />
3.5mm Plastic Custom Castable Abutment, Non-hexed<br />
4.0mm Plastic Custom Castable Abutment, Non-hexed<br />
5.0mm Plastic Custom Castable Abutment, Non-hexed<br />
6.0mm Plastic Custom Castable Abutment, Non-hexed<br />
14<br />
INDIVIDUAL ABUTMENTS<br />
Use for single-unit screw-retained or custom abutment cement-retained restorations.<br />
Packaged with an abutment screw (130-300 or 140-300). Gold Alloy base with natural<br />
acetyl (Delrin® or Pomalux®) sleeve. Final torque: 30Ncm.<br />
Use for multiple-unit, screw-retained restorations.Packaged with an abutment screw<br />
(130-300 or 140-300). Natural acetyl (Delrin® or Pomalux®) sleeve. Final torque: 30Ncm.<br />
Use for single-unit screw-retained or custom abutment cement-retained restorations.<br />
Packaged with an abutment screw (130-300 or 140-300). Gold Alloy base with natural<br />
acetyl (Delrin® or Pomalux®) sleeve. Final torque: 30Ncm.<br />
Use for multiple-unit, screw-retained restorations. Packaged with an abutment screw<br />
(130-300 or 140-300). Natural acetyl (Delrin® or Pomalux®) sleeve. Final torque: 30Ncm.
INDIVIDUAL ABUTMENTS<br />
273-000<br />
274-000<br />
275-000<br />
276-000<br />
233-215<br />
234-215<br />
235-215<br />
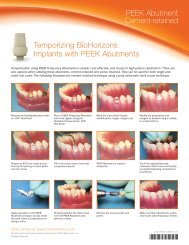
3.5mm PEEK Temporary Abutment<br />
4.0mm PEEK Temporary Abutment<br />
5.0mm PEEK Temporary Abutment<br />
6.0mm PEEK Temporary Abutment<br />
Use for fabrication of cement- or screw-retained provisional restorations (up to 30 days). A<br />
direct coping screw (243-320 or 244-320, purchased separately) may be used to maintain<br />
screw access hole during fabrication of screw-retained provisional prostheses. Packaged<br />
with an abutment screw (130-300 or 140-300). PEEK (PolyEtherEtherKetone) material.<br />
Final torque: 30Ncm.<br />
233-214<br />
234-214<br />
235-214<br />
3.5mm Titanium Temporary Abutment, Hexed<br />
4.0mm Titanium Temporary Abutment, Hexed<br />
5.0mm Titanium Temporary Abutment, Hexed<br />
Use for single-unit screw-retained, long term temporary restorations (>30 days). Packaged with<br />
an abutment screw (130-300 or 140-300).Titanium Alloy. Final torque: 30Ncm.<br />
3.5mm Titanium Temporary Abutment, Non-hexed<br />
4.0mm Titanium Temporary Abutment, Non-hexed<br />
5.0mm Titanium Temporary Abutment, Non-hexed<br />
Use for multiple-unit, screw-retained, long term temporary restorations (>30 days). Packaged with<br />
an abutment screw (130-300 or 140-300).Titanium Alloy. Final torque: 30Ncm.<br />
213-235<br />
214-235<br />
3.5mm Ball-top Screw<br />
4.0/5.0/6.0mm Ball-top Screw<br />
Use with the 3inOne Abutment to form an impression coping for closed-tray,<br />
hexed-timed transfers. Hand-tighten. Titanium Alloy.<br />
15<br />
PEEK Temporary Abutments<br />
8mm<br />
5mm<br />
1.5mm<br />
Titanium Temporary Abutments - Hexed<br />
9mm<br />
Titanium Temporary Abutments - Non-hexed<br />
9mm<br />
2.5mm<br />
to top of screw<br />
2.5mm<br />
to top of screw<br />
Ball-top Screw for Indirect Transfer<br />
If a 6.0mm abutment is not available, the 5.0mm abutment may be used.<br />
products shown not to scale
Direct Pick-up Copings (Open Tray) - Hexed<br />
5mm<br />
products shown not to scale<br />
6mm<br />
11mm<br />
<strong>Implant</strong> Analogs<br />
17mm<br />
243-331<br />
244-331<br />
245-331<br />
246-331<br />
Use to make an open-tray, implant-level, hexed-timed impression. Packaged<br />
with an extended direct coping screw (243-320 or 244-320). Titanium Alloy.<br />
Hand-tighten.<br />
243-321<br />
244-321<br />
245-321<br />
246-321<br />
3.5mm Direct Pick-up Coping, Hexed<br />
4.0mm Direct Pick-up Coping, Hexed<br />
5.0mm Direct Pick-up Coping, Hexed<br />
6.0mm Direct Pick-up Coping, Hexed<br />
Direct Pick-up Copings (Open Tray) - Non-hexed<br />
3.5mm Direct Pick-up Coping, Non-hexed<br />
4.0mm Direct Pick-up Coping, Non-hexed<br />
5.0mm Direct Pick-up Coping, Non-hexed<br />
6.0mm Direct Pick-up Coping, Non-hexed<br />
Use to make an open-tray, implant-level, non-hexed impression. Packaged with<br />
an extended direct coping screw (243-320 or 244-320). Titanium Alloy. Handtighten.<br />
293-000<br />
294-000<br />
295-000<br />
296-000<br />
3.5mm <strong>Implant</strong> Analog<br />
4.0mm <strong>Implant</strong> Analog<br />
5.0mm <strong>Implant</strong> Analog<br />
6.0mm <strong>Implant</strong> Analog<br />
16<br />
IMPRESSION COMPONENTS<br />
Use in lab to represent the implant in the working cast. Color-coded by implant<br />
body diameter. Titanium Alloy.
IMPRESSION COMPONENTS<br />
243-320<br />
244-320<br />
130-300<br />
140-300<br />
3.5mm Direct Pick-up Screw<br />
4.0/5.0/6.0mm Direct Pick-up Screw<br />
3.5mm Abutment Screw<br />
4.0/5.0/6.0mm Abutment Screw<br />
17<br />
Direct Coping Screws<br />
Packaged with all direct pick-up copings. May also be used in place of an abutment screw<br />
when extra length is needed, or to maintain the screw access hole during fabrication of screwretained<br />
provisional prostheses. Up to 7mm can be removed from the screw without losing<br />
the hex engagement. Utilizes the .050” (1.25mm) Hex Driver. Hand-tighten or torque to 30 Ncm<br />
depending on application. Titanium Alloy.<br />
Abutment Screws<br />
Low profile screw head. Packaged with all two-piece abutments. Utilizes the .050” (1.25mm)<br />
Hex Driver. Final torque: 30 Ncm. Titanium Alloy.<br />
130-050<br />
140-050<br />
Abutment Screws for 7mm length implants<br />
3.5mm Short Abutment Screw, for 7mm<br />
4/5/6mm Short Abutment Screw, for 7mm<br />
Specifically designed for and packaged with each 7mm length <strong>External</strong> implant.<br />
May be used with all restorative components in lieu of the regular abutment<br />
screw. Utilizes .050” (1.25mm) Hex Driver. Titanium Alloy.<br />
products shown not to scale
Locator ® Abutments<br />
1 to 5mm<br />
Cuff Height<br />
1.0mm<br />
1.5mm<br />
Locator Components<br />
products shown not to scale<br />
3.5mm<br />
5.5mm<br />
LA-8531<br />
LA-8532<br />
LA-8533<br />
LA-8534<br />
LA-8535<br />
LA-8541<br />
LA-8542<br />
LA-8543<br />
LA-8544<br />
LA-8545<br />
LA-8551<br />
LA-8552<br />
LA-8553<br />
LA-8554<br />
LA-8555<br />
LOCATOR ABUTMENT COMPONENTS<br />
3.5mm Locator Abutment, 1.25mm Cuff Height<br />
3.5mm Locator Abutment, 2.0mm Cuff Height<br />
3.5mm Locator Abutment, 3.0mm Cuff Height<br />
3.5mm Locator Abutment, 4.0mm Cuff Height<br />
3.5mm Locator Abutment, 5.0mm Cuff Height<br />
4.0mm Locator Abutment, 1.0mm Cuff Height<br />
4.0mm Locator Abutment, 2.0mm Cuff Height<br />
4.0mm Locator Abutment, 3.0mm Cuff Height<br />
4.0mm Locator Abutment, 4.0mm Cuff Height<br />
4.0mm Locator Abutment, 5.0mm Cuff Height<br />
5.0mm Locator Abutment, 1.5mm Cuff Height<br />
5.0mm Locator Abutment, 2.5mm Cuff Height<br />
5.0mm Locator Abutment, 3.5mm Cuff Height<br />
5.0mm Locator Abutment, 4.5mm Cuff Height<br />
5.0mm Locator Abutment, 5.5mm Cuff Height<br />
The Locator <strong>Implant</strong> Attachments are designed for use with overdentures or partial dentures retained in whole or in part by dental implants in<br />
the mandible or maxilla. Order by Cuff Height to match the height of the gingival tissue. The abutment will extend above the tissue by 1.5mm<br />
to allow the Locator Male to seat completely. Order one Locator Male Processing Set for each Locator Abutment (sold in packs of 2 or 10).<br />
Titanium Alloy.<br />
The Male Processing Package provides 3 choices of retention. The Replacement Males (clear, pink and blue) are used to restore implants with<br />
up to 10° of divergence (20° between implants). The Extended Range Replacement Males (green and red) accommodate divergences from<br />
10° and 20° (40° between implants), and may be purchased separately.<br />
LCT Core Tool<br />
Multi-purpose tool serves as hand driver for seating Locator Abutments onto<br />
the implants, seating tool for nylon male inserts and insert removal tool.<br />
LMPP-2<br />
LMPP-10<br />
Locator Male Processing Package (2 pack)<br />
Includes: (2) Denture Caps with (2) Black Processing Males; (2) White Blockout<br />
Spacers; (2) Clear, (2) Pink and (2) Blue Nylon Males.<br />
Locator Male Processing Package (10 pack)<br />
Includes: (10) Denture Caps with (10) Black Processing Males; (10) White<br />
Block-out Spacers; (10) Clear, (10) Pink and (10) Blue Nylon Males.<br />
18
LOCATOR ABUTMENT COMPONENTS<br />
LIC Locator Impression Coping (4 pack)<br />
LFA-4MM Locator Female Analog 4mm (4 pack)<br />
Use for 3.5/4.0 platform<br />
LFA-5MM Locator Female Analog 5mm (4 pack)<br />
Use for 5.0 and 6.0 platform<br />
LRM-C<br />
LRM-P<br />
LRM-B<br />
LRM-G<br />
LRM-R<br />
LBPRM<br />
LAMG<br />
LSDT-15MM<br />
LSDT-21MM<br />
Locator Replacement Male (clear) (4 pack)<br />
Retention: 5lb / 2268g<br />
Locator Light Retention Replacement Male (pink) (4 pack)<br />
Retention: 3lb / 1361g<br />
Locator Extra Light Retention Replacement Male (blue) (4 pack)<br />
Retention: 1.5lb / 680g<br />
Locator Extended Range Replacement Male (green) (4 pack)<br />
Retention: 3-4lbs / 1361-1814g<br />
Locator Extended Range Extra Light Retention Rep. Male (red) (4 pack)<br />
Retention: 1.5lbs / 680g<br />
Locator Black Processing Replacement Male (4 pack)<br />
LPP Locator Parallel Post (4 pack)<br />
Locator Angle Measurement Guide<br />
Locator Square Drive Tool (15mm)<br />
Use with a torque wrench to seat Locator Abutments. 15mm in length.<br />
Locator Square Drive Tool (21mm)<br />
Use with a torque wrench to seat Locator Abutments. 21mm in length.<br />
19<br />
Locator Impression Coping<br />
Locator Female Analog<br />
Locator Male Replacements<br />
Locator Parallel Post<br />
Locator Measurement Guide<br />
Locator Square Drive Tool<br />
products shown not to scale
Ball Abutments<br />
2.6mm<br />
2, 4 or 6mm<br />
products shown not to scale<br />
Ø5.9mm<br />
260-300<br />
2.5mm<br />
3.2mm<br />
3.5mm<br />
O-ring Attachment Set<br />
Ø5.5mm<br />
Sizing comparison of<br />
O-ring Attachment and<br />
Ball Attachment<br />
5mm<br />
O-ring Individual Components<br />
260-100<br />
O-ring Encapsulator<br />
Female receptacle processed into<br />
denture. Titanium. 2 per package.<br />
BALL ABUTMENTS AND COMPONENTS<br />
263-002<br />
263-004<br />
263-006<br />
264-002<br />
264-004<br />
264-006<br />
265-002<br />
265-004<br />
265-006<br />
O-ring Attachment Set<br />
20<br />
3.5mm Ball Abutment, 2mm Collar<br />
3.5mm Ball Abutment, 4mm Collar<br />
3.5mm Ball Abutment, 6mm Collar<br />
4.0mm Ball Abutment, 2mm Collar<br />
4.0mm Ball Abutment, 4mm Collar<br />
4.0mm Ball Abutment, 6mm Collar<br />
5.0mm Ball Abutment, 2mm Collar<br />
5.0mm Ball Abutment, 4mm Collar<br />
5.0mm Ball Abutment, 6mm Collar<br />
Use for retention of tissue-supported overdentures. Ball Abutments<br />
may be used for indirect transfer impressions. Ball Abutment Analogs<br />
on facing page are used for producing a working cast. Titanium Alloy.<br />
Standard O-ring attachment for processing into denture. Includes: (1) O-ring encapsulator,<br />
(2) Processing O-rings and (2) Clinical O-rings. Recommended for relatively parallel<br />
implants (5° of divergence or 10° between implants).<br />
260-220<br />
260-210<br />
Processing O-ring<br />
Use for lab processing applications.<br />
Buna. 12 per package.<br />
Clinical O-ring<br />
Use for clinical applications.<br />
Silicone. 12 per package.
BALL ABUTMENT COMPONENTS<br />
BCAS Ball Attachment Set<br />
Includes: (1) Titanium Housing, (3) Female Nylon Inserts - white (more retention), pink (less<br />
retention), black (lab processing) and (1) Protective Disk (ref. BCPD, protects tissue during<br />
impression making or denture pick-up)<br />
The Ball Attachment system offers several advantages over traditional O-ring attachments:<br />
• Greater abutment angulation (14° of divergence or 28° between implants)<br />
• 0.4mm of less mesial/distal/buccal/lingual space<br />
• Four different levels of retention instead of one<br />
BCAHT<br />
BCIB<br />
BCIG<br />
BCIST<br />
Attachment Housings - Titanium<br />
For Resin pickup or Soldering.<br />
2 per package.<br />
Black Nylon Insert<br />
Lab Processing and Chair-side<br />
Denture Pick-up. 2 per package.<br />
Green Nylon Insert<br />
Clinical use. 2 per package.<br />
Elastic Retention.<br />
Insert Seating Tool<br />
Use to seat nylon inserts in attachment housings.<br />
260-400<br />
260-500<br />
3.5/4.0mm Ball Abutment Analog (2 pack)<br />
5.0mm Ball Abutment Analog (2 pack)<br />
Use to represent the Ball Abutment/<strong>Implant</strong> assembly in the working cast. Only use in conjunction<br />
with Ball Abutments. Titanium Alloy.<br />
21<br />
BCIY<br />
BCIP<br />
BCIW<br />
BCDR<br />
BCR<br />
Ball Attachment Set<br />
Ball Abutment Components<br />
Yellow Nylon Insert<br />
Clinical use. 2 per package.<br />
Extra Soft Retention: 500-550g<br />
Pink Nylon Insert<br />
Clinical use. 2 per package.<br />
Soft Retention: 800-950g<br />
White Nylon Insert<br />
Clinical use. 2 per package.<br />
Standard Retention: 1200-1300g<br />
Directional Rings<br />
Use for obtaining parallelism.<br />
0°, 7° and 14° rings. Set of 3.<br />
Reamer<br />
Use to adjust retention of nylon inserts.<br />
Ball Abutment Analogs<br />
products shown not to scale
4mm<br />
to top of<br />
screw<br />
Abutment for Screw - Non-hexed<br />
3.5 or 4.5mm<br />
products shown not to scale<br />
AFS353<br />
AFS354<br />
AFS403<br />
AFS404<br />
AFS503<br />
AFS504<br />
Angled Abutment , Abutment for Screw - Hexed<br />
5mm<br />
15, 17 or 25°<br />
1mm<br />
ABUTMENT FOR SCREW COMPONENTS<br />
3.5mm Abutment for Screw, 3.5mm collar<br />
3.5mm Abutment for Screw, 4.5mm collar<br />
4.0mm Abutment for Screw, 3.5mm collar<br />
4.0mm Abutment for Screw, 4.5mm collar<br />
5.0mm Abutment for Screw, 3.5mm collar<br />
5.0mm Abutment for Screw, 4.5mm collar<br />
Gold & Plastic Copings, Abutment for Screw - Non-hexed<br />
12mm<br />
Instant Fixed Overdenture Abutment - Non-hexed<br />
Cover Cap, Abutment for Screw<br />
Use for multiple-unit restorations including: screw-retained restorations at the abutment level,<br />
cast alloy bars for overdentures and fixed/detachable (hybrid) restorations. Comes packaged<br />
with the Cover Cap (PXABCC). Titanium Alloy.<br />
AFS355-17<br />
AFS405-15<br />
AFS405-25<br />
AFS505-15<br />
3.5mm Angled Abutment for Screw, 17 Degree<br />
4.0mm Angled Abutment for Screw, 15 Degree<br />
4.0mm Angled Abutment for Screw, 25 Degree<br />
5.0mm Angled Abutment for Screw, 15 Degree<br />
Comes packaged with the Cover Cap (PXABCC) and Abutment Screw (130-<br />
300 or 140-300). Final torque: 30Ncm. Titanium Alloy.<br />
PXABGC PXABPC<br />
Gold Coping, Abutment for Screw<br />
May be trimmed for height. Packaged with<br />
12mm<br />
Plastic Coping, Abutment for Screw<br />
May be trimmed for height. Packaged with<br />
one Screw (regular), Abutment for Screw (see<br />
PXABS). Gold Alloy base with natural acetyl<br />
4mm<br />
to top of<br />
one Screw (regular), Abutment for Screw (see<br />
PXABS). Natural acetyl (Delrin® or Pomalux®).<br />
(Delrin® or Pomalux®).<br />
screw<br />
PXIFO<br />
Instant Fixed Overdenture Abutment<br />
Use with Abutments for Screw for fabrication of immediate provisional overdentures. See Fixed<br />
Provisional Overdenture Technique (L0155) for more details. Packaged with one Screw (regular),<br />
Abutment for Screw (see PXABS). Abutment height is 9mm. Final torque: 30Ncm. Titanium Alloy.<br />
PXABCC<br />
Cover Cap, Abutment for Screw<br />
Packaged with all Abutments for Screw. Hand-tighten with .050” (1.25mm) Hex Driver.<br />
Titanium Alloy.<br />
*Abutment for Screw components are now universal for Internal, Tapered Internal, <strong>External</strong> and Single-stage provided the new Abutments for Screw are used.<br />
For legacy <strong>External</strong> Abutment for Screw component availability, contact Customer Care.<br />
22
ABUTMENT FOR SCREW COMPONENTS<br />
PXHA<br />
Hex Adapter, Abutment for Screw*<br />
Use to place Abutment for Screw. May be driven by either Hand Wrench, Torque Wrench or<br />
AS123 Hand Unit.<br />
PXABDC<br />
Direct Pick-up Coping, Abutment for Screw<br />
Use to make a direct pick-up impression (open-tray) at the abutment level. Packaged with the Screw<br />
(long), Abutment for Screw (PXABSL). Use only with Abutment for Screw. Titanium Alloy.<br />
PXABIC<br />
Indirect Transfer Coping, Abutment for Screw<br />
Use to make an indirect transfer (closed-tray) impression at the abutment level.<br />
Use only with Abutment for Screw. Titanium Alloy.<br />
PXABA<br />
Analog, Abutment for Screw<br />
Use at lab to represent the Abutment for Screw/<strong>Implant</strong> assembly in the working cast.<br />
Not for use with implant-level impressions.<br />
PXABS<br />
Screw (regular), Abutment for Screw (5 pack)<br />
Use to retain bars or prostheses fabricated with the Abutment for Screw Copings.<br />
Utilizes the .050” (1.25mm) Hex Driver. Final torque: 30 Ncm. Titanium Alloy.<br />
PXABSL<br />
Screw (long), Abutment for Screw (5 pack)<br />
Direct Pick-up Coping, Abutment for Screw<br />
Use in the lab when a longer screw is desired. Use only with the Abutment for Screw. Up to 7mm can<br />
be removed from the screw without losing the hex engagement. Hand-tighten or torque to 30Ncm<br />
depending on application. Titanium Alloy.<br />
23<br />
Hex Adapter, Abutment for Screw<br />
Indirect Transfer Coping, Abutment for Screw<br />
Analog, Abutment for Screw<br />
Screw (regular or long), Abutment for Screw<br />
*instrument o-rings & c-rings wear out over time. If an instrument is no longer held securely by its associated driver, order a replacement ring through Customer Care.<br />
5.6mm<br />
11mm<br />
10mm<br />
7mm<br />
products shown not to scale
Prosthetic Instrumentation System<br />
320-000<br />
*instrument o-rings & c-rings wear out over time. If an instrument is no longer held securely by its associated driver, order a replacement ring through Customer Care.<br />
products shown not to scale<br />
24<br />
PROSTHETIC INSTRUMENTATION<br />
Complete Prosthetic Instrumentation System (shown)<br />
Includes:<br />
• AS123 Hand Unit<br />
• Hand Wrench<br />
• 30 Ncm Torque Wrench<br />
• Sterilization Tray<br />
•.050” (1.25mm) Hex Driver, Regular<br />
•.050” (1.25mm) Hex Driver, Long<br />
• Hex Adapter for Abutment for Screw<br />
• 4mm Square Drive Extender<br />
320-101 Basic Prosthetic Instrumentation Kit (not shown) 300-070 Prosthetic Sterilization Tray (not shown)<br />
Identical to the Complete Prosthetic Instrumentation System,<br />
Autoclavable tray for prosthetic instrumentation (included with<br />
but excludes the AS123 Hand Unit and Hex Adapter for<br />
Abutment for Screw.<br />
the 320-000 and 320-101).<br />
6.25mm<br />
300-400<br />
Use on drive end of AS123 Hand Unit. Also fits<br />
individual Hex Drivers/Adapters and Bone Taps.<br />
12.5mm<br />
Hand Wrench*<br />
PXHA<br />
300-350 (regular)<br />
300-351 (long)<br />
300-100<br />
Provides improved vision and easy access to prosthetic<br />
components in posterior regions of the mouth. Hand Wrench<br />
and Drivers are sold separately.<br />
300-430<br />
300-206<br />
Replaced 300-205 starting in June 2010.<br />
Includes PEEK C-ring for durable retention in<br />
Ratchet. Cannot be used with bone taps.<br />
AS123 Hand Unit*<br />
30 Ncm Torque Wrench<br />
Use break-style design to deliver 30 Ncm of torque to<br />
prosthetic components.<br />
Hex Adapter, Abutment for Screw*<br />
4mm Square Drive Extender*<br />
Use to place Abutment for Screw. May be driven by either<br />
Hand Wrench, Torque Wrench or AS123 Hand Unit.<br />
.050” (1.25mm) Hex Driver Regular or Long*<br />
Use to tighten all hex-driven prosthetic screws.<br />
In early 2011, a running change was made to<br />
improve abutment screw retention and handling.
ANCILLARY PROSTHETIC INSTRUMENTATION<br />
IMPAH Abutment Clamp<br />
Use to hold two-piece abutments during delivery and<br />
tightening of the Abutment Screw.<br />
ATW<br />
293-100<br />
294-100<br />
295-100<br />
123-001<br />
124-001<br />
122-170<br />
ITL Precise Adjustable Torque Wrench<br />
Designed to place both implants and abutments with 9 distinct torque<br />
settings (15, 20, 25, 30, 35, 40, 45, 50 and 60 Ncm). A simple twist of<br />
the handle locks in precision-engineered torque values and guarantees<br />
accuracy and repeatability.<br />
EL-C12374 Elos Adjustable Torque Wrench<br />
Lightweight titanium design is easy to use as an adjustable torque<br />
wrench or a ratchet. Quickly disassembles for cleaning. No calibration<br />
required.<br />
3.5mm <strong>Implant</strong> Analog Handle<br />
4.0mm <strong>Implant</strong> Analog Handle<br />
5.0/6.0mm <strong>Implant</strong> Analog Handle<br />
Use to comfortably hold <strong>External</strong> abutments for chairside or laboratory preparation.<br />
Abutments are secured to the handle with a standard abutment screw. Comes in<br />
three platform sizes: 3.5, 4.0mm and 5.0/6.0mm.<br />
135-351<br />
135-451<br />
134-350<br />
134-450<br />
.050” (1.25mm) One-piece Hex Driver*<br />
.050” (1.25mm) One-piece Hex Driver, Long*<br />
.050” (1.25mm) Handpiece Hex Driver<br />
.050” (1.25mm) Handpiece Hex Driver, Long<br />
For installation and removal of Cover Screws, Healing Abutments and abutment screws.<br />
The Hex Drivers, Long (134-450 and 135-451) are 5mm longer than the standard versions<br />
(134-350 and 135-351).<br />
In early 2011, a running change was made to improve abutment screw retention and handling.<br />
3.5mm <strong>Implant</strong> Clean-out Tap Tool<br />
4.0/5.0/6.0mm <strong>Implant</strong> Clean-out Tap Tool<br />
Abutment for Screw Clean-out Tap Tool<br />
Use to re-thread <strong>External</strong> implants or Abutments for Screw where the<br />
internal threads have become damaged. Requires a standard surgical<br />
Ratchet (130-000) or Hand Wrench (300-400) as a drive mechanism.<br />
*instrument o-rings & c-rings wear out over time. If an instrument is no longer held securely by its associated driver, order a replacement ring through Customer Care.<br />
products shown not to scale<br />
25<br />
Abutment Clamp<br />
Adjustable Torque Wrenches<br />
Abutment Prepping Handles<br />
8.5mm<br />
Hex Drivers<br />
13.5mm<br />
6.5mm<br />
Clean-out Tap Tools<br />
11.5mm
products shown not to scale<br />
EXTERNAL SURGICAL MANUAL - INTRODUCTION<br />
This Surgical Manual serves as a reference for using the <strong>External</strong> implants and surgical instruments. It is intended solely<br />
to provide instructions on the use of <strong>BioHorizons</strong> products. It is not intended to describe the methods or procedures<br />
for diagnosis, treatment planning, or placement of implants, nor does it replace clinical training or a clinician’s best<br />
judgment regarding the needs of each patient. <strong>BioHorizons</strong> strongly recommends appropriate training as a prerequisite<br />
for the placement of implants and associated treatment.<br />
The procedures illustrated and described within this manual reflect idealized patient presentations with adequate<br />
bone and soft tissue to accommodate implant placement. No attempt has been made to cover the wide range of<br />
actual patient conditions that may adversely affect surgical and prosthetic outcomes. Clinician judgment as related<br />
to any specific case must always supersede any recommendations made in this or any <strong>BioHorizons</strong> literature.<br />
Before beginning any implant surgical procedure with <strong>BioHorizons</strong> implants:<br />
• Read and understand the Instructions for Use that accompany the products.<br />
• Clean and sterilize the surgical tray and instruments per Instructions for Use.<br />
• Become thoroughly familiar with all instruments and their uses.<br />
• Study Surgical Kit layout and iconography.<br />
• Design a surgical treatment plan to satisfy the prosthetic requirements of the case.<br />
Indications for Use<br />
<strong>BioHorizons</strong> dental implants may be used in the mandible and maxilla for use as an artificial root structure for single<br />
tooth replacement or as abutments for bridgework and denture retention.<br />
VIP Treatment Planning<br />
Virtual <strong>Implant</strong> Placement (VIP) treatment planning software is a user-friendly solution<br />
that reduces clinical challenges and enhances post-operative outcomes.<br />
• Interactive 2D and 3D treatment planning<br />
• Self processing DICOM converter<br />
• Case viewer available for download from <strong>BioHorizons</strong> website<br />
26
SURGICAL PROTOCOLS<br />
Two-stage Protocol<br />
Two-stage surgery was the original protocol developed for placing<br />
modern dental implants. In this type of surgery, the implant is placed<br />
below the soft tissue and protected from occlusal function and other<br />
forces during osseointegration. A low-profile Cover Screw is placed on<br />
the implant to protect it from the ingress of soft tissue.<br />
Following osseointegration, a second surgery exposes the implant and a<br />
transmucosal Healing Abutment is placed to allow for soft tissue healing<br />
and development of a sulcus. Prosthetic restoration begins after soft<br />
tissue healing.<br />
Single-stage Protocol<br />
Single-stage surgery may be accomplished with the <strong>External</strong> implant<br />
by placing a healing abutment at the time of initial implant surgery.<br />
This eliminates the need for a second surgery to expose the implant.<br />
Although the implant is not in occlusal function, some forces can be<br />
transmitted to it through the exposed transmucosal element.<br />
Prosthetic restoration begins following osseointegration of the implant<br />
and soft tissue healing.<br />
Non-functional Immediate Restoration<br />
Single-stage surgery with non-functional immediate provisionalization<br />
provides the patient a non-functioning provisional prosthesis early<br />
in the treatment plan. An abutment is placed on the implant at or<br />
shortly after surgery, and a provisional restoration is secured to it with<br />
temporary cement. The provisional can help contour the soft tissue<br />
profile during healing.<br />
Immediate Function Restoration<br />
Single-stage surgery with immediate function is possible in good quality<br />
bone where multiple implants exhibiting excellent initial stability can<br />
be splinted together. Splinting implants together can offer a significant<br />
biomechanical advantage over individual, unsplinted prostheses.<br />
27<br />
<strong>External</strong> implant with Cover Screw in a<br />
two-stage protocol.<br />
<strong>External</strong> implant with removable Healing Abutment in<br />
a single-stage protocol.<br />
<strong>External</strong> implant restored with a nonfunctional<br />
provisional prosthesis.<br />
<strong>External</strong> implants with a splinted<br />
prosthesis in immediate function.<br />
products shown not to scale
products products shown shown not to scale scale<br />
During implant placement, clinicians must apply their best judgment as to the appropriate spacing<br />
for individual patient conditions.<br />
1.5mm<br />
3.5mm<br />
Osteotomy center 3.5mm<br />
from adjacent tooth<br />
(4.0mm implant pictured)<br />
28<br />
3.0mm<br />
7.5mm<br />
Measurement is dependent on<br />
the two implant body diameters.<br />
(4.0 & 5.0mm implants pictured)<br />
6.5mm<br />
6.8mm<br />
7.3mm<br />
IMPLANT SPACING<br />
Spacing considerations for <strong>BioHorizons</strong> <strong>External</strong> implants (measurements are taken at the osseous crest):<br />
The osteotomy centerpoint required<br />
to maintain a 1.5mm implant-to-tooth<br />
spacing (generally accepted) is<br />
½ [implant body diameter] + 1.5mm.<br />
3.5mm 3.3mm<br />
3.5mm<br />
4.0mm 3.5mm<br />
4.0mm<br />
5.0mm 4.0mm<br />
5.0mm<br />
5.0mm 4.5mm<br />
5.0mm<br />
The osteotomy center-to-center measurement required<br />
to maintain a 3.0mm edge-to-edge spacing (generally<br />
accepted) between <strong>External</strong> implants is<br />
½ [sum of 2 implant body diameters] + 3.0mm.<br />
body osteotomy center<br />
body<br />
diameter from adjacent tooth<br />
diameter 3.5mm 4.0mm 5.0mm 6.0mm<br />
<strong>Implant</strong> Spacer / Depth Probe<br />
Purpose: Multi-function instrument for intraoral measurements.<br />
The rectangular end of<br />
the tool provides intraoral<br />
measurements.<br />
• Five centimeter graduated ruler on shaft<br />
Useful for marking center-<br />
to-center implant spacing<br />
on the ridge.<br />
The rectangular end against an<br />
existing crown places the osteotomy<br />
~4.25mm from the contact.<br />
7.0mm<br />
7.5mm<br />
8.0mm<br />
7.8mm 8.0mm 8.5mm 9.0mm<br />
~4.25mm<br />
16mm<br />
14mm<br />
12mm<br />
10mm<br />
15mm<br />
13mm<br />
11mm<br />
9mm<br />
7mm<br />
Probe tip measures osteotomy depth.<br />
Note: these markings are different than the<br />
tapered drill markings
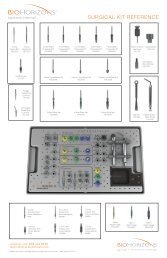
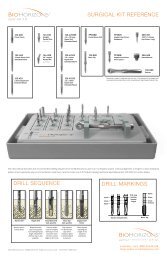
SURGICAL KIT LAYOUT<br />
The <strong>External</strong> Surgical Kit uses an intuitive layout to guide the surgeon through the instrument sequence. The sequence begins in<br />
the upper left hand corner and works left-to-right and then down. Color-coded lines, instruments and grommets are matched<br />
with each implant and further aid in instrument selection and identification.<br />
Prior to use, clean and sterilize the surgical tray and instruments per appropriate Instructions for Use and study the Surgical Kit<br />
layout, color-coding and iconography. Surgical assistants should also be thoroughly familiar with all instruments and their uses.<br />
Depth Drill<br />
Sequence<br />
Width Increasing<br />
Drill Sequence<br />
29<br />
Crestal<br />
Bone<br />
Drills<br />
Bone<br />
Taps<br />
Abutment-level<br />
and/or <strong>Implant</strong>level<br />
Drivers<br />
products shown not to scale
The Surgical Drills included in the <strong>External</strong> Surgical Kit are externally irrigated and designed to be used at speeds of 850-2,500<br />
rpm 9 with steady sterile irrigation. Reduced drill speed may be desired in softer bone or as drill diameter increases.<br />
The depth marks are consistent throughout the Starter Drill, Depth Drills and Width Increasing Drills. The thick bands are<br />
each one millimeter wide. Thin lines are used to mark 7mm and 11mm.<br />
Peri-operative oral rinses with a 0.12% Chlorhexidine Digluconate solution have been shown to significantly lower the<br />
incidence of post-implantation infectious complications. 10 A preoperative 30-second rinse is recommended, followed by<br />
twice daily rinses for two weeks following surgery.<br />
Drilling must be done under a constant stream of sterile irrigation. A pumping motion should be employed to prevent overheating<br />
the bone. Surgical drills and taps should be replaced when they are worn, dull, corroded or in any way compromised.<br />
<strong>BioHorizons</strong> recommends the replacement of drills after 12 to 20 osteotomies. 11 A Drill-usage Tracking Chart is available from<br />
<strong>BioHorizons</strong> to aid offices in archiving this important information.<br />
There is a risk of injury to the mandibular nerve associated with surgical drilling in lower posterior regions. To minimize the<br />
risk of nerve injury, it is imperative the clinician understand the drill depth markings in order to correlate implant length with<br />
the actual drilling depth to produce the desired vertical placement of the implant.<br />
products products shown shown not to scale scale<br />
14mm<br />
12mm<br />
10mm<br />
Drilling Considerations<br />
30<br />
SURGICAL DRILLS<br />
15mm<br />
13mm<br />
11mm<br />
9mm<br />
7mm
OSTEOTOMY INITIALIZATION<br />
2.0mm Starter Drill<br />
Purpose: Initiates osteotomy.<br />
• Chisel-tip design eliminates “skating” on osseous crest<br />
• Initiates osteotomy to desired depth<br />
• Prepares site for Paralleling Pins<br />
Purpose: Sets osteotomy depth following use of the 2.0mm Starter Drill.<br />
• Fixed circular ring acts as a definitive drill stop<br />
• One drill length for each implant length<br />
• 1mm laser-etched line guides supracrestal implant placement<br />
• <strong>BioHorizons</strong> Surgical Kit includes spare slots for Depth Drills with Stops<br />
• Please call for availability<br />
2.5 x 12mm Depth<br />
Stop Drill<br />
12mm long<br />
<strong>External</strong><br />
<strong>Implant</strong><br />
31<br />
2.5mm Depth Drill<br />
Purpose: Sets osteotomy depth following use<br />
of the 2.0mm Starter Drill.<br />
• Efficient cutting drill design collects bone for<br />
autografting<br />
2.5mm Depth Drill with Stop<br />
2.5mm Depth Drill<br />
without Stop<br />
products shown not to scale
Parallel Pins<br />
products products shown shown not to scale scale<br />
Purpose: Evaluation of osteotomy position and angle.<br />
PARALLEL PINS & WIDTH INCREASING DRILLS<br />
• Provided straight and with a 20° angle<br />
• Use after 2.0mm Starter Drill and 2.5mm Depth Drills<br />
• 9mm shank for radiographic evaluation of proximity to adjacent anatomy<br />
• Hub diameter is 4.0mm<br />
Width Increasing Drills<br />
Purpose: Incrementally widens the osteotomy without creating excessive heat.<br />
• Depth-marked for reference. Non-end cutting geometry for added safety<br />
• Efficient cutting geometry collects bone for autografting<br />
• Color-coded by the smallest diameter implant body with which it is used<br />
Width Increasing<br />
Sequence for 3.5mm<br />
<strong>Implant</strong> Body<br />
Width Increasing<br />
Sequence for 4.0mm<br />
<strong>Implant</strong> Body<br />
Width Increasing<br />
Sequence for 5.0mm<br />
<strong>Implant</strong> Body<br />
Width Increasing<br />
Sequence for 6.0mm<br />
<strong>Implant</strong> Body<br />
3.0mm 3.4mm 3.9mm 4.4mm<br />
4.9mm 5.4mm<br />
Variations in bone density or possible voids require surgeons to observe the drill’s depth markings as the primary<br />
determinant of drilling depth, rather than relying exclusively on the non-end cutting geometry to stop the drill.<br />
If a Width Increasing Drill fails to reach the planned depth as shown by the depth marks, use the 2.5mm Depth Drill<br />
to re-establish the depth and recommence the Width Increasing Sequence with the 3.0mm Width Increasing Drill.<br />
32
CRESTAL BONE DRILLS & BONE TAPS<br />
Purpose: Removes cortical bone at ridge crest to facilitate pressure-free seating of the implant collar.<br />
• Site Specific. Indicated when dense cortical bone is present at crest<br />
• Rounded non-end cutting hub centers drill in osteotomy<br />
• Used following the final Width Increasing Drill for each implant<br />
• 850-2,500 rpm with steady irrigation11 Do not fully seat the drill if all or a portion of the collar is to be left supracrestal. Fully seating the<br />
drill allows the implant to be placed with the prosthetic platform level with the crestal ridge.<br />
Partially seat drill.<br />
(Supracrestal)<br />
1mm left above osseous crest.<br />
• Preparing to Level 1 allows placement of the prosthetic platform level with the crest.<br />
• Preparing to Level 2 allows placement of the Cover Screw level with the crest, provided the osteotomy<br />
has been prepared to accommodate the additional depth.<br />
Purpose: Prepares dense cortical bone for implant threads.<br />
• Site specific<br />
• 30 rpm or less12 • Final instrument prior to implant placement<br />
• Square drive shaft interfaces with Ratchet and Hand Wrench<br />
Place the tip of the Bone Tap into the osteotomy, apply firm apical pressure<br />
and begin rotating slowly in a clockwise direction (30 rpm or less is<br />
recommended) 12 . When the threads engage, allow the tap to feed without<br />
excessive pressure. To remove, rotate the Bone Tap in a counter-clockwise<br />
direction, allowing it to back out of the osteotomy.<br />
Do not pull on the Bone Tap to remove it from the site.<br />
33<br />
Fully seat drill.<br />
(Crestal)<br />
Crestal Bone Drills<br />
<strong>Implant</strong> level with<br />
osseous crest.<br />
Bone Taps<br />
products shown not to scale
<strong>Implant</strong> Packaging<br />
products products shown shown not to scale scale<br />
34<br />
IMPLANT PACKAGING<br />
<strong>External</strong> implants are provided in a blister pack with multiple peel-and-stick labels for affixing to the patient’s chart. When the lid of<br />
the blister tray is removed, the sterile implant vial is exposed and may then be placed in the sterile field. While holding the vial<br />
in an upright fashion, remove the cap by rotating it in a counter-clockwise direction. The implant can then be removed from the<br />
vial by engaging the premounted 3inOne Abutment with the appropriate Adapter.
IMPLANT PICK-UP<br />
• Premounted 3inOne Abutment serves as the surgical drive mount<br />
• O-ring secures implant while it is carried to osteotomy<br />
• Electric handpiece or manual insertion options<br />
• 30 rpm or less12 The dimple on the<br />
Adapters align with any<br />
of the four external flats<br />
on the abutment.<br />
Handpiece and Ratchet Adapters (Abutment-level)<br />
Purpose: Engages the 3inOne Abutment allowing the implant to be driven into the osteotomy.<br />
Handpiece and Ratchet Adapters engage <strong>External</strong> implants via the square on the coronal aspect of the 3inOne abutment. Remove<br />
the cap from the inner vial and seat the chosen Adapter. Remove the implant from the vial and carry it to the osteotomy on the<br />
Adapter, taking precautions not to touch the implant surface during the transfer.<br />
Place the apex of the implant into the osteotomy, apply firm apical pressure and begin rotating in a clockwise direction (30 rpm<br />
or less). Once the apical threads engage the bone, allow the implant to feed without excessive pressure.<br />
Overtightening the implant in the osteotomy may cause osseous microfracture or pressure-induced necrosis of the adjacent<br />
bone. Manual seating via the Adapter for Ratchet may be desired to gain a tactile sense of final implant placement. If too much<br />
resistance is felt during insertion, remove the implant and revise the osteotomy with the appropriate Crestal Bone Drill or Bone Tap<br />
as deemed necessary to reduce insertion torque.<br />
35<br />
Abutment-level<br />
Adapters engage the<br />
3inOne Abutment’s<br />
external square.<br />
products shown not to scale
3inOne Abutment Removal<br />
To remove the 3inOne Abutment, engage the Abutment Screw with the .050” (1.25mm)<br />
Hex Driver. Apply firm apical pressure to the Hex Driver and rotate counter-clockwise until<br />
the screw is completely disengaged from the implant body.<br />
In soft bone, or when the implant lacks initial stability, an Abutment Clamp (ref. IMPAH, sold<br />
separately) should be used to grasp the outside of the abutment to provide counter-torque<br />
during the loosening of the Abutment Screw.<br />
The 3inOne Abutment and the Abutment Screw should be retained with the patient’s chart.<br />
They can later be used in the impression making procedure and as a temporary or final<br />
abutment for cement retention.<br />
Hex Orientation<br />
The longest flat surface on the external aspect of the 3inOne Abutment is indexed to one<br />
of the six flats of the implant’s external hexagon. In most cases one of the hex flats should<br />
be oriented to the facial aspect, as it allows for angulation correction with stock angled<br />
abutments. Placing the long flat of the 3inOne Abutment to the facial also leaves more<br />
room for porcelain in that area on the final prosthesis.<br />
products products shown shown not to scale scale<br />
The implant’s rotational position can be adjusted following<br />
removal of the 3inOne Abutment using the <strong>Implant</strong>-level<br />
Insertion Tools.<br />
Insertion Tools (<strong>Implant</strong>-level)<br />
Purpose: Engages external hex allowing implant’s position to be adjusted in the osteotomy.<br />
• May be used following removal of the 3inOne Abutment<br />
• Offers a narrower path of insertion and better clearance than the<br />
3inOne Abutment / Abutment-level Adapter option<br />
• Square drive shaft interfaces with the Ratchet and Hand Wrench<br />
Mate the appropriate Insertion Tool with the external hex of the implant and<br />
lightly screw into place. Engage the Insertion Tool with either the Ratchet or<br />
Hand Wrench and rotate the implant to the required position.<br />
36<br />
ABUTMENT REMOVAL
COVER SCREWS & HEALING ABUTMENTS<br />
Purpose: Protects prosthetic platform in two-stage (submerged) surgical protocols.<br />
• Packaged with each implant in the sterile inner vial<br />
• Hand-tighten (10-15 Ncm) 13 utilizing .050” (1.25mm) Hex Driver<br />
• Color-coded by implant body diameter<br />
Purpose: Transmucosal element for single-stage surgical protocol or for soft tissue healing<br />
period following second-stage uncovery.<br />
• Select by height and emergence profile<br />
• Hand-tighten (10-15 Ncm) 13 utilizing .050” (1.25mm) Hex Driver<br />
• Color-coded by implant body diameter<br />
• Encoded for easy intraoral identification, for example:<br />
4 x 4.5 indicates 4.0mm implant diameter x 4.5mm high<br />
37<br />
Cover Screws<br />
Remove the 3inOne Abutment and thoroughly irrigate the inside of the implant to remove blood and other debris. Unscrew the<br />
Cover Screw (included in each implant vial) from its holder and screw it into the implant using the .050” (1.25mm) Hex Driver.<br />
Following placement of the Cover Screw, the surgical site should be irrigated and the soft tissue adapted in a normal surgical<br />
fashion. Take precautions to prevent the Cover Screw from being aspirated by the patient.<br />
Healing Abutments<br />
Healing Abutments are placed after uncovery in a two-stage surgical protocol, or in lieu of a Cover Screw in a single-stage<br />
(non-submerged) protocol. Prior to seating the Healing Abutment, thoroughly irrigate the inside of the implant to remove blood<br />
and other debris. An antibacterial paste may be placed on the screw portion to decrease the risk of bacterial growth within the<br />
implant body during the healing phase. Following seating, irrigate the surgical site and adapt the soft tissue in normal surgical<br />
fashion. A gingivectomy or apically positioned flap technique may be used to reduce the soft tissue thickness and to decrease<br />
sulcular depth around the implant. The suture groove on the Healing Abutment may be used to apically position the soft tissue<br />
flap. Take precautions to prevent the Healing Abutment from being aspirated by the patient.<br />
All 7mm implants come packaged with a special Cover Screw and Abutment Screw that have shorter<br />
guide pins for complete seating into the 7mm implant. Standard length Abutment Screws and<br />
Healing Abutments can be used provided the guide pin is carefully removed at the notch using a<br />
high-speed carbide disk. Please refer to the <strong>External</strong> -7mm Length <strong>Implant</strong>s manual (ref. L0151) for<br />
detailed information.<br />
products shown not to scale
Bone Profiler<br />
products products shown shown not to scale scale<br />
38<br />
ANCILLARY INSTRUMENTS<br />
Purpose: Remove and contour excess bone and soft tissue from the area of the prosthetic platform.<br />
• Compatible with latch-type, speed-reducing handpieces<br />
• 850-2,500 rpm drill speed with steady sterile irrigation9 • Cover Screw protects implant platform<br />
• Bone Profiler cuts away excess bone and soft tissue<br />
• Color-coded by specific prosthetic platform<br />
Bur Testing Gauge<br />
Surgical Kit Cleaning<br />
Do not use the Profiler without the Cover Screw in place.<br />
The Cover Screw aligns the Bone Profiler and protects the implant from damage. The Profiler is used in a latch-type, reduction<br />
handpiece under copious amounts of sterile irrigation. Following removal of the excess bone and soft tissue, unscrew the<br />
Cover Screw from the implant and seat the desired prosthetic element.<br />
Also called a “Go / No-Go Gauge,” the Bur Testing Gauge is used to verify the<br />
dimensional accuracy of drill shanks of latch-type burs. Burs in proper condition WILL<br />
fit into the larger diameter hole, but WILL NOT fit into the smaller hole (marked red).<br />
Burs that fail either of these criteria are unfit for use and may become stuck in the<br />
handpiece if used. The gauge is included with all W&H starter packages, and may also<br />
be ordered separately.<br />
All <strong>BioHorizons</strong> Surgical Kits are provided non-sterile and must be cleaned and sterilized prior to use following the associated<br />
Instructions for Use. Always remove instruments from packaging prior to sterilization, and remove and discard packaging<br />
materials used to stabilize and secure kits during shipment. Double-check all surgical instruments to ensure their functionality<br />
prior to surgery. Backup sterile drills are also recommended.<br />
Caution: The use of hydrogen peroxide or other oxidizing agents will cause damage to the surface of<br />
the instruments. Towel- or air-dry all instrumentation before sterilizing. Drills should be replaced after<br />
approximately 12 to 20 osteotomy cycles, depending on the bone density. 11<br />
Proper testing, cleaning and calibration of sterilization equipment should occur frequently to assure that the units are in proper<br />
working order. Equipment operating conditions vary and it is the responsibility of each dental office to ensure that the proper<br />
sterilization technique for instrumentation is followed.
APPENDIX<br />
39<br />
Post-operative Considerations<br />
A period of unloaded healing is often recommended, depending on individual patient healing rates and initial implant stability.<br />
Each case must be independently evaluated. This unloaded healing period allows for integration between the bone and implant<br />
surface.<br />
The patient must be instructed to follow a post-surgical regimen including cold packs for 24 hours post-implantation. The patient’s<br />
diet should consist of soft foods and possibly liquid dietary supplements. Pharmacological therapy should be considered as the<br />
patient’s condition dictates.<br />
If a removable prosthesis is used during the initial healing phase, it is recommended that a soft liner material be used to prevent<br />
pressure on the surgical site. This soft liner should be relieved over the implant site. The patient should be checked periodically to<br />
monitor healing of the soft tissues and bone using clinical and radiographic evaluations.<br />
Ongoing hygiene for the implant patient is vital. Hygiene recall appointments at three month intervals are suggested. Instruments<br />
designed for implant scaling, such as Implacare® instruments from Hu-Friedy® should be utilized. The stainless steel handles may<br />
be fitted with assorted tip designs used for hygiene on natural teeth. The Implacare® scalers will not damage implant abutments<br />
and contain no glass or graphite fillers that can scratch titanium implant abutments.<br />
products shown not to scale
Symbol Descriptions for Product Labeling<br />
STERILE R<br />
Sterile by<br />
gamma irradiation<br />
Non-sterile<br />
Non-sterile<br />
0473<br />
References<br />
Use before expiration<br />
date (YYYY-MM)<br />
See<br />
Instructions for Use<br />
<strong>BioHorizons</strong> products carry the CE mark<br />
and fulfill the requirements of the<br />
Medical Devices Directive<br />
EU Authorised Representative<br />
QUALITY FIRST INTERNATIONAL<br />
Suites 317/318 Burford Business Centre<br />
11 Burford Road, Stratford<br />
London E15 2ST United Kingdom<br />
Telephone +44-208-221-2361<br />
Telefax +44-208-221-1912<br />
1. Please see <strong>BioHorizons</strong> document #ML0130.<br />
Single use only<br />
Manufacture date<br />
(YYYY-MM)<br />
40<br />
ICON LEGEND & REFERENCES<br />
Rx Only<br />
Caution: Federal (USA) law<br />
restricts these devices to the sale,<br />
distribution and use by, or on the<br />
order of, a dentist or physician.<br />
Lot/batch<br />
number<br />
Prosthetic platform<br />
3.5mm Prosthetic Platform<br />
4.0mm Prosthetic Platform<br />
5.0mm Prosthetic Platform<br />
6.0mm Prosthetic Platform<br />
2. Functional Surface Area: Thread-Form Parameter Optimization for <strong>Implant</strong> Body Design. J. Todd Strong, Carl E. Misch, DDS, MDS, Martha W. Bidez, PhD, Prasad Nalluri.<br />
Compendium / Special Issue. Vol 19, No. 3, 1998.<br />
3. Histologic and Histomorphometric Findings from Retrieved, Immediately Occlusally Loaded <strong>Implant</strong>s in Humans. Romanos GE, Testori T, Degidi M, Piattelli A.<br />
J Periodontol. 2005 Nov;76(11):1823-1832.<br />
4. Effects of <strong>Implant</strong> Thread Geometry on Percentage of Osseointegration and Resistance to Reverse Torque in the Tibia of Rabbits. Steigenga J, Al-Shammari K, Misch C,<br />
Nociti Jr. FH, Wang H-L. J Periodontol. 2004;75(9):1233-1241.<br />
5. A Prospective Multicenter Clinical Investigation of a Bone-Quality Based <strong>Implant</strong> System. Kline R, Hoar J, Beck G, Hazen R, Resnik R and Crawford E.<br />
<strong>Implant</strong> Dentistry, 224-234, Vol. 11 No. 3, 2002.<br />
6. Five-Year Prospective Study of Immediate / Early Loading of Fixed Prostheses in Completely Edentulous Jaws with a Bone Quality-Based <strong>Implant</strong> System. Misch CE<br />
and Degidi M. Clinical <strong>Implant</strong> Dentistry and Related Research, 17-27, Vol. 5 No. 1, 2003<br />
7. Immediate Functional and Non-Functional Loading of <strong>Dental</strong> <strong>Implant</strong>s: a 2- to 60-Month Follow-Up Study of 646 Titanium <strong>Implant</strong>s. Degidi M and Piattelli A.<br />
J Periodontology 2003;74:225-241.<br />
8. Non-Functional Immediate Teeth in Partially Edentulous Patients: A Pilot Study of 10 Consecutive Cases Using the Maestro <strong>Dental</strong> <strong>Implant</strong> System. Misch CE.<br />
Compendium Special Issue, 25-36, 1998.<br />
9. Density of Bone: Effect on Surgical Approach and Healing. CE Misch. Contemporary <strong>Implant</strong> Dentistry. Second Edition. Mosby: St. Louis, 1999. 371-384.<br />
10. The Influence of 0.12% Chlorhexidine Digluconate Rinses on the Incidence of Infectious Complications and <strong>Implant</strong> Success. Lambert P, Morris H and Shigeru O.<br />
J Oral Maxillofac Surg, 1997, 55:25-30 Suppl 5.<br />
11. Heat production by 3 implant drill systems after repeated drilling and sterilization. Chacon GE, Bower DL, Larsen PE, McGlumphy EA, Beck FM.<br />
J Oral Maxillofac Surg. 2006 Feb;64(2):265-9.<br />
12. Root Form Surgery in the Edentulous Mandible: Stage I <strong>Implant</strong> Insertion. CE Misch. Contemporary <strong>Implant</strong> Dentistry. Second Edition. Mosby: St. Louis, 1999. 347-369.<br />
13. <strong>Implant</strong> abutment screw torque generated by general dentists using a hand driver in a limited access space simulating the mouth. E. Hill, S. Phillips and L. Breeding.<br />
J. of Oral <strong>Implant</strong>ology. 2007 Vol. 33(5):277-279.<br />
LOT<br />
REF<br />
Reference/<br />
article number
ORDERING & WARRANTY INFORMATION<br />
Product Support Specialist:<br />
Cell phone:<br />
Fax:<br />
<strong>BioHorizons</strong> Lifetime Warranty on <strong>Implant</strong>s and Prosthetics: All <strong>BioHorizons</strong> implants and prosthetic components include a Lifetime<br />
Warranty. <strong>BioHorizons</strong> implant or prosthetic components will be replaced if removal of that product is due to failure (excluding normal wear to<br />
overdenture attachments).<br />
Additional Warranties: <strong>BioHorizons</strong> warranties instruments, surgical drills, taps, torque wrenches and Virtual <strong>Implant</strong> Placement (VIP) treatment<br />
planning software.<br />
(1) Surgical Drills and Taps: Surgical drills and taps include a warranty period of ninety (90) days from the date of initial invoice. Surgical<br />
instruments should be replaced when they become worn, dull, corroded or in any way compromised. Surgical drills should be replaced after<br />
12 to 20 osteotomies. 4<br />
(2) Instruments: The <strong>BioHorizons</strong> manufactured instrument warranty extends for a period of one (1) year from the date of initial invoice.<br />
Instruments include drivers, sinus lift components, implant site dilators and <strong>BioHorizons</strong> tools used in the placement or restoration of<br />
<strong>BioHorizons</strong> implants.<br />
(3) VIP treatment planning software: VIP treatment planning software warranty extends for a period of ninety (90) days from the date of<br />
initial invoice. The warranty requires that VIP be used according to the minimum system requirements.<br />
(4) Compu-Guide surgical templates: Compu-Guide surgical templates are distributed without making any modifications to the submitted<br />
Compu-Guide Prescription Form and VIP treatment plan (“as is”). <strong>BioHorizons</strong> does not make any warranties expressed or implied as it relates<br />
to surgical templates.<br />
Return Policy: Product returns require a Return Authorization Form, which can be acquired by contacting Customer Care. The completed<br />
Return Authorization Form should be included with the returned product. For more information, please see the reverse side of the invoice that<br />
was shipped with the product.<br />
Disclaimer of Liability: <strong>BioHorizons</strong> products may only be used in conjunction with the associated original components and instruments<br />
according to the Instructions for Use (IFU). Use of any non-<strong>BioHorizons</strong> products in conjunction with <strong>BioHorizons</strong> products will void<br />
any warranty or any other obligation, expressed or implied. Treatment planning and clinical application of <strong>BioHorizons</strong> products are the<br />
responsibility of each individual clinician. <strong>BioHorizons</strong> strongly recommends completion of postgraduate dental implant education and<br />
adherence to the IFU that accompany each product. <strong>BioHorizons</strong> is not responsible for incidental or consequential damages or liability relating<br />
to use of our products alone or in combination with other products other than replacement or repair under our warranties. Compu-Guide<br />
surgical templates are ordered under the control of a Clinician. The Clinician recognizes responsibility for use. Therefore, regardless of the real<br />
or proven damages, the liability to <strong>BioHorizons</strong> is limited to the price of the product directly related to the reason for the claim.<br />
Distributed Products: For information on the manufacturer’s warranty of distributed products, please refer to their product packaging.<br />
Distributed products are subject to price change without notice.<br />
Validity: Upon its release, this literature supersedes all previously published versions.<br />
Availability: Not all products shown or described in this literature are available in all countries. <strong>BioHorizons</strong> continually strives to improve its<br />
products and therefore reserves the right to improve, modify, change specifications or discontinue products at any time.<br />
Any images depicted in this literature are not to scale, nor are all products depicted. Product descriptions have been modified for presentation<br />
purposes. For complete product descriptions and additional information, visit shop.biohorizons.com.<br />
41
<strong>BioHorizons</strong> Canada<br />
866-468-8338<br />
<strong>BioHorizons</strong> Germany<br />
+49 761-556328-0<br />
Direct Offices<br />
<strong>BioHorizons</strong> USA<br />
888-246-8338 or<br />
205-967-7880<br />
<strong>BioHorizons</strong> Spain<br />
+34 91 713 10 84<br />
<strong>BioHorizons</strong> Australia<br />
+61 2 8399 1520<br />
Distributors<br />
Not all products shown or described in this literature are available in all countries. As applicable, <strong>BioHorizons</strong> products are cleared for sale in the European Union under<br />
the EU Medical Device Directive 93/42/EEC and the tissues and cells Directive 2004/23/EC. We are proud to be registered to ISO 13485:2003, the international quality<br />
management system standard for medical devices, which supports and maintains our product licences with Health Canada and in other markets around the globe.<br />
Original language is English. © 2012 <strong>BioHorizons</strong> IPH, Inc. All Rights Reserved.<br />
shop online at<br />
www.biohorizons.com<br />
*L0129*<br />
L0129<br />
REV E FEB 2012<br />
<strong>BioHorizons</strong> UK<br />
+44 (0)1344 752560<br />
<strong>BioHorizons</strong> Chile<br />
+56 2 361 9519<br />
For contact information in our 85 markets, visit www.biohorizons.com<br />
<strong>BioHorizons</strong>®, Laser-Lok®, MinerOss®, Autotac® and Mem-Lok® are registered trademarks of <strong>BioHorizons</strong> IPH, Inc. Zimmer® and Screw-Vent® are registered trademarks of<br />
Zimmer, Inc. Grafton® DBM and LADDEC® are registered trademarks of Osteotech, Inc. AlloDerm® and AlloDerm GBR® are registered trademarks of LifeCell Corporation.<br />
Spiralock® is a registered trademark of Spiralock Corporation. Locator is a registered trademark of Zest Anchors, Inc.<br />
Delrin® is a registered trademark of E.I. du Pont de Nemours and Company. Pomalux® is a registered trademark of Westlake Plastics Co.<br />
Mem-Lok® is manufactured by Collagen Matrix, Inc.