String Book - Logan Oil Tools
String Book - Logan Oil Tools
String Book - Logan Oil Tools

Create successful ePaper yourself
Turn your PDF publications into a flip-book with our unique Google optimized e-Paper software.
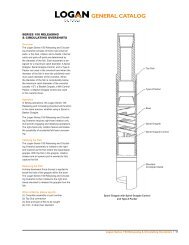
eLevator anD tooL joint inSpection gaUge<br />
Determining if an elevator is safe or unsafe, satisfactory for use or ready for repair, should not be entrusted to the eye!<br />
Such determinations require accurate measurements of the critical elevator parts.<br />
Link Arm<br />
Dimension<br />
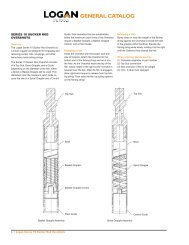
to MEASuRE AngLE oF 8° tApER ELEVAtoRS: Place body of gauge<br />
on top of elevator bore, and drop sliding arm into the bore. Bring tapered<br />
edge of slide (marked “Elevator Taper”) against tapered surface of the bore.<br />
Read true taper angle of elevator bore at “H.” Percentage of remaining rated<br />
capacity is given opposite the reading. Tapers of 13° and less require factory<br />
reconditioning, or retirement from service. NOTE: Bores do not wear evenly.<br />
Use the smallest angle found.<br />
to MEASuRE AngLE oF 8° tApER tooL JoIntS: Place body of gauge<br />
on top shoulder of tool joint “box.” Sliding arm is adjusted so that the tapered<br />
edge (marked “Tool Joint Taper”) is in contact with the tapered surface of the<br />
tool joint. The true angle is read at “H.” Percentage of remaining rated capacity<br />
of the elevator is given opposite the reading. Again, use the smallest angle<br />
found. Tool joints of less than 13° should be repaired or replaced.<br />
WARNING: Even though the elevator may be in perfect condition,<br />
a worn tool joint taper reduces its rated capacity!<br />
While inspecting the tool joint, lay any straight edge of the gauge along the 18°<br />
taper to check that the angle of taper has not been violated by hardbanding.<br />
Should hardbanding extend onto the taper, such banding should be removed;<br />
and the elevator that was used with such a tool joint should be inspected for<br />
damaging wear.<br />
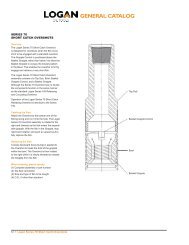
to MEASuRE WoRn CoLLAR SuRFACES oF SQuARE ShouLDER<br />
ELEVAtoRS: Place body of gauge on top surface of elevator. Using nontapered<br />
end of sliding arm, drop arm end into the worn area. Depth of wear is<br />
read on the “1/4-inch” scale where body and sliding arm cross. Shoulders worn<br />
more than 1/16 inch should be re-faced by machining. Any rolling of the edge<br />
into the bore should be removed so that it will not interfere with the closing of<br />
the elevator.<br />
to ChECk SQuARE ShouLDER tooL JoIntS: Use end of gauge body<br />
marked “90°.” Corner has been removed to permit this measurement. Joints<br />
out-of-square by more than 1/16 inch should be re-machined to 90°.<br />
LInk ARM WEAR ChARt FoR ChAMpIon ELEVAtoRS<br />
Collar type 8° taper type<br />
Elevator Link Arm Link Arm Elevator Link Arm Link Arm<br />
Size Cap. (ton) Dim. (in) Size Cap. (ton) Dim. (in)<br />
100 3 100 4<br />
C-100<br />
90<br />
79<br />
2-3/4<br />
2-1/2<br />
T-100<br />
91<br />
82<br />
3-3/4<br />
3-1/2<br />
69 2-1/4 72 3-1/4<br />
150 4 150 4-3/4<br />
C-150<br />
136<br />
122<br />
3-3/4<br />
3-1/2<br />
T-150<br />
138<br />
126<br />
4-1/2<br />
4-1/4<br />
108 3-1/4 114 4<br />
250 4-3/4 250 5<br />
C-250<br />
230<br />
210<br />
4-1/2<br />
4-1/4<br />
T-250<br />
232<br />
214<br />
4-3/4<br />
4-1/2<br />
190 4 198 4-1/4<br />
350 5 400 5-1/4<br />
322 4-3/4 368 5<br />
C-350 300 4-1/2 T-400 338 4-3/4<br />
276 4-1/4 311 4-1/2<br />
250 4 286 4-1/4<br />
7